|
Fairey
Firefly AS.6
by
Mark Beckwith
|

|
|
Fairey
Firefly AS.6
|

HyperScale is proudly sponsored by
Squadron
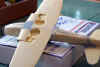
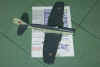
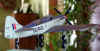
I was asked to build this kit for a gentleman who was involved in
the restoration of the Fairey Firefly AS6 currently housed at the
Canadian Warplane Heritage Museum in Hamilton, Ontario. The kit is
resin, photo etch, white metal and a vac formed canopy. At first
glance it appears to be very detailed, an impression later borne out
in construction. The instructions mention that this kit is heavily
based on the PP Aerokits vacform kit of the same aircraft, but using
injected resin for the airframe parts.
My research, which was considerably aided by the wealth of
information supplied by my "customer", indicated that the
AS6 differed from a MK5 only in the addition of the radome on the
starboard wing and the removal of the wing cannons and gun site. The
only other deviation from the kit instructions was to be the decals
for the specific aircraft I was building.
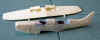
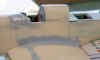
Construction began with the cockpits for the pilot and observer.
These are entirely photo-etch. I had photographs of the real aircraft
and for the most part they matched the kit instructions. Whenever
there was a difference, I went with the photos. This work required
much patience with very small parts! The radios in the observer's
office were metal castings requiring a little clean up, but apart from
that, this phase went quite well.
Once I was happy with the cockpits, they were installed in the
fuselage half ready for closing. The location is a little vague,
however with care no problems should be encountered. Upon offering the
two halves together, I found some gaps, but nothing too bad. Once the
fuselage was joined I tried a test fit of the one-piece wing. I had
previously removed the cannon bulges on the upper surfaces of the
wing, filled the spent shell ejection shoots underneath and filled the
location holes on the leading edges. The wing initially wanted to sit
about 10 degrees out of square with the fuselage and not nearly
horizontally. I had to remove (and add where appropriate) lots of
material to get the wing to sit properly. Unfortunately, during this
phase some detail was lost on the under side. Conversely, the
horizontal stabilisers required minimal clean up and located very
nicely in the fuselage with very little filler required to fair the
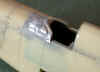
join in. I attached the port auxiliary fuel tank and the starboard
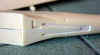
radome next, both fitting quite well. The last piece of the basic
airframe is a small metal piece just forward of the windshield on the
port side. I'm not sure why this wasn't part of the fuselage moulding;
it did require a fair bit of work to blend in. Finally, before
painting I carefully cut out the canopies, masked them and fitted them
to the fuselage.
With the basic construction complete, I finished up the seams. I
used a combination of Squadron white putty, Testors white putty, CA
glue and Mr.Surfacer 1000 to complete the seam clean up. All were
sanded with 600 wet n' dry then finished with 1000 grit.
Click Thumbnails below
to view images full-sized

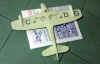
I began by spraying with Mr.Surfacer 1000 thinned with lacquer
thinner. This showed a couple of areas that needed a little more work.
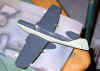
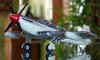
Once that was taken care of, I began on the colours. The aircraft I
was building served in the RCN with a basic scheme of Extra Dark Sea
Grey over Sky. The Sky was put on first (all paints used were Gunze).
I've found that best results with Gunze happen if I leave it for at
least a couple of days to cure before handling, so when the sky was
completed I waited three days before continuing. I masked with a
combination of Tamiya tape and blue tack and painted the grey. I
wasn't happy with the tail area and eventually removed the horizontal
stabilisers to ease the masking, re-sprayed, and then reattached them.
After letting the grey cure, I applied the Future in preparation for
the decals. In addition, while I sprayed each of the two main colours
I painted much of the rest of the components such as the
under-carriage and doors, antennas, etc.
Click Thumbnails below
to view images full-sized

I used the kit decals for all stencilling. There are very many, and
as there is no separate carrier film for each one, I was very careful
cutting them out to minimise the clear film. The kit decals went down
very well, I found I didn't need setting solution. The only problem I
encountered was that they seemed to have a higher than normal tendency
to curl over into themselves, though that might have just been me.
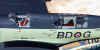
I made the squadron codes, serial number, and a tiny "Canadian
Warplane Heritage" decal myself. This was fairly straightforward,
I printed the fuselage and underwing codes I made on my PC onto clear
decal paper that I then protected with microsol clear decal film.
The roundels were a bit of a problem at first. There is a dearth of
Canadian decal sheets for the early 1950's with the required
specification of roundel, with the yellow outline. It was around this
time I wandered into the hobby shop and found a new (to me) release of
the HobbyCraft Sea Fury with box artwork showing a Canadian Sea Fury
with the correct roundel style (unlike the original release which only
had the other, incorrect for the Firefly, style). I asked Trevor if
he'd open the box so I could confirm they were correct by style and
size without being committed to buying the kit and he said
"sure" - I'm a very good customer! Anyway, they were and I
bought the kit and solved the roundel problem. My wife, however,
didn't believe I had to buy the kit just for the decals!
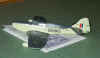
Once decaling was complete, I misted on a couple more light coats
of future to seal them. I applied a light wash of artist oil burnt
umber thinned with turps, and then I used Dullcoat to bring the finish
down to a semi-gloss sheen.
Click Thumbnails below
to view images full-sized
Next I completed the installation of the undercarriage which is all
cast metal and photo-etch. I used aluminium foil for the chrome parts
(I can't remember the proper name for them). I used foil for the
reflector in the landing light too. The landing light cover is clear
scotch tape that I cut very carefully to size (which took about 20
attempts) and "glued" with semi-cured future. I like the
scale thinness of doing it this way, but it can get very frustrating!
I used painted clear decal film for the framing on the observer's
canopy. This was the first time I've tried this technique and found it
to be very effective, right down to the scale thickness of the decal
film for that very slightly raised look.
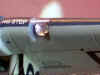
I attached exhausts and the antenna post at the correct angles
next. I have some sprue from a dollar-store kit my son had once that
is black, very soft plastic that stretches thinner than any other I've
tried. I used this for the antenna, attaching it with white glue,
which I also used for the insulators.
My "customer" wanted the plane to be very lightly
weathered so I did very little aside from pastels for exhaust
staining. Suddenly it was finished!
Click Thumbnails below
to view images full-sized
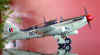
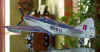
This is a very extensive kit that, with a reasonable amount of care
and diligence, will build up to a very nice looking representation of
a classic aircraft. My rendition is not perfect, in fact I was still
touching up on the day I delivered it to its owner. Given the same
opportunity again I'd do quite a lot differently (which I may get as I
hear the pilot of the museum aircraft may want one made for him too)
but overall I am pleased with the result.
The whole project happened over 4.5 months, with about 130 hours
work plus several more on research.
I have several people to thank, in no particular order, and with
apologies for those whose names I've forgotten:
-
Denis Keegan
-
Hugh Gilliland
-
Brent Hamre
-
Tony Hayes FlightPath for sending
me a replacement canopy within 1 week of asking, free of charge.
-
The HS discussion board regulars
who gave me the tip on using decal film for canopy framing
-
The HS discussion board regular who
sent me some scans from IPMS Canada detailing specifications for
the markings.
-
The HS board regulars who answered
a dozen other sundry questions.
-
Brett Green for providing the forum
that helped me so much.
Model, Text and Images Copyright ©
2001 by Mark Beckwith
Page Created 12 May, 2001
Last Updated 04 June, 2007
Back to HyperScale
Main Page
Back to Features
Index
|
 Home
| What's New |
Features |
Gallery |
Reviews |
Reference |
Forum |
Search
Home
| What's New |
Features |
Gallery |
Reviews |
Reference |
Forum |
Search


