Home
| What's New |
Features |
Gallery |
Reviews |
Reference |
Forum |
Search
Home
| What's New |
Features |
Gallery |
Reviews |
Reference |
Forum |
Search
|
|
|
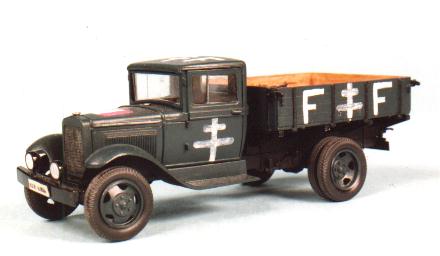
"Free French Ford" By Ian Sadler
The kit used in this simple conversion is the Toko GAS -AA kit number 122 in 1/35 scale. I started by building the chassis and running gear, making sure I got it all level and set solid before the next step. Using original photographs of a French Ford of the period, I measured up the width of the fenders at the front. By eyeballing the photograph I was able to determine the height of the bumper. I noticed that it had a slight curve from the centre to the outside. So by cutting a piece of plastic card in an oblong then using a french curve I traced out the curve I needed. I then cut two identical pieces and fitted a simple brace at the back to hold them in shape ie scrap of plastic card. By curling a piece of plastic card over my finger. I was able to test it against the curve of the front edge of the bumper. After I was satisfied I glued it all together and left to set. The braces I set at the same distance as the chassis bearers just inside to give max strength. The radiator only need the outer edges rounding off to a more gentle curve. The roof of the cab from the kit was reshaped to a more gentle slope from the back to the front and the edges rounded of as per the photograph. The cab was then built per instructions and fitted test fitted to the chassis, I then built up the rear cargo area test fitted this along with the cab making sure they were level and square to the chassis. All held in place with blue tack. The new bumper was then test fitted and eyeballed up along side the photograph. It looks as near as I was going to get it right. So I glued it in position and left it to set. The new positions for the headlights was then eyeballed up and marked on the top edge of the bumper. Two holes were drilled and the headlights glued in position.. The last item was the vehicle registration plate this was a piece of scrap plastic card with letters from Slaters Plastic Card Alphabet set added. This gives the raised pre war type of vehicle number plate. A similar plate was fitted at the rear and a single rear light added from the spares box. All the components were test fitted and a last check before adding glue to plastic.
I have my own tried and tested method of painting my models. In the UK we have a chain of shops called Pound Time, this means every item cost no more than a pound in money. In the Auto section of Pound Time they have 3 Acrylic Car primers in spray cans - White, Light Grey, and Semi Gloss Black. I buy all three and use them regularly on my models. Preparation is the most important step. Firstly I wash the completed model in warm soapy water and dry with a hair dryer on the lowest heat. Then it is placed in a clear plastic bag and sealed till I am ready to spray . Since I spray out doors it may be several days or weeks before I get the right weather conditions. I place the primer spray can in this case the white in a poly bag and stood it upright in hand hot water for about 10 minutes. I sprayed the inside of the cargo body with three light coats of white primer after masking of the outside. I then left it to harden off. I then filled the cargo body with wet tissue and carried out the rest the spraying with black primer.. I ghost the paint on very lightly, in several coats, till it is covered all over. This may take an hour , so I replenish the water every time. I also have a cup of coffee while waiting for the first coat to dry. The model then goes back into the poly bag to harden off till the weather is right again. I filled the cargo section with wet tissue paper. I also masked of the chassis to keep it black as all Ford Chassis were. I then set up my airbrush and in this case I ghosted on 3 light coats of a Humbrol French Dark Blue over the top of the black. I left it to dry and harden off, again in the poly bag. The cargo area was then hand painted in acrylics to stimulate real wood using , the following colours light cream, light brown, tan and a pinky grey colour listed as coffee. and painting each plank in turn separately, In several places I painted thin washes of a lighter colour over the original to tone it down. Once I was satisfied I hand painted the black letters on the number plates against the white background. The Free French Flag on the bonnet and Cross of Lorain on the sides and rear were hand painted with acrylics to represent the original water based paint used at the time. I even added a few drips of paint to simulate it was painted in a hurry.
The Model was completed in about 25 hours work including the painting which was carried out in stages over a month. References photographs used for this model are from the After the Battle series of magazines and the After The Battle Then and Now D Day Special. The model has caused a few comments at model shows in which it has been displayed. The latest one was only this weekend at Huddersfield Model show 11/02/2001. A Frenchman came across to congratulate me on it, and he said he knows the very vehicle as it is preserved in a Museum on the French Coast near Dunkirk. He was very complimentary about the colour and the way I had painted the Free French markings. He said he wanted to take it back to France with him, but I said it was not for sale! Text, Models and Images Copyright © 2000 by Ian
Sadler
|