|
Hawk 127 LIF
by Anthony Papadis
|
|
|
Hawk 127 LIF |

Italeri's 1/72 scale Hawk 127 LIF is available online at Squadron.com
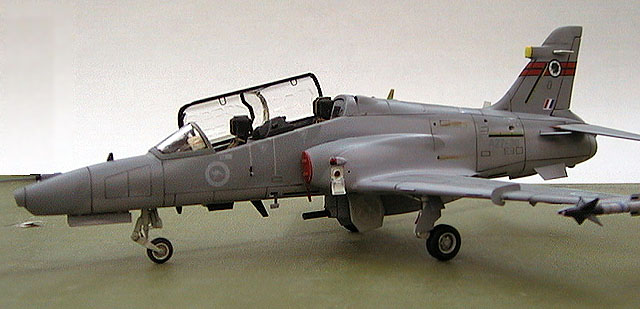
Here is Italeri’s 1/72 scale Hawk 100 (kit no. 1127). I aim to highlight
any pitfalls and offer corrections for the kit’s inaccuracies. The kit
depicts aircraft A27-30 currently on strength with 76 Squadron.
I had been awaiting Italeri’s release of the Hawk 100 kit ever since I
first saw the ‘new kits’ notices last year. I picked up the kit a couple
of months ago (May) and upon opening the box I was left with mixed
feelings. The kit is generally accurate in outline and shape, however
there are a couple of glaring errors with regards to the RAAF variant
(Hawk 127). The decals featured in the kit depict the first test
aircraft (pre-production) in the livery it wore whilst undergoing
testing, and featured a mix of RAF fin flash/RAAF roundels, and civilian
registration! The latest copy of Air Forces Monthly (AFM) has a review
on the RAAF Hawk 127, and includes pictures of this aircraft, however it
should be noted that this aircraft also wore RAF roundels in addition to
the RAAF ‘rats’. If you wish to depict this aircraft then simply
cannibalize the RAF roundels provided for the –100 demo aircraft on the
same sheet.
Construction notes will not necessarily follow the instruction sequence,
but generally the instructions flow in a logical sequence.
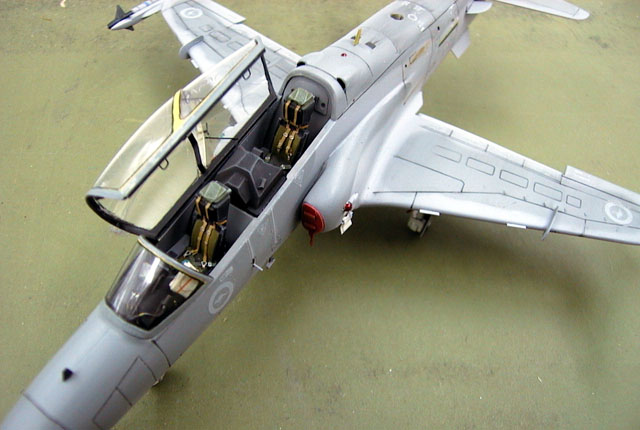
Cockpit
Naturally enough the construction begins with the cockpit. This is the
point at which the first inaccuracy comes to light. The RAAF variant is
unique in terms of cockpit layout. The aim of the Hawk is as a Lead In
Fighter (LIF) trainer, and to this end, much effort was spent to make
the cockpit ergonomics and layout as similar to an F/A-18 as possible.
The cockpits feature several TV screens as per most modern fighters.
Unfortunately, Italeri’s attempt is little more than a random
arrangement of some square and round raised shapes, which bear little
resemblance to the real thing. I decided early on to use the Eduard
brass set for the Hawk Mk.1 (72-337). Although the cockpit on this sheet
is also inaccurate, featuring the analogue (i.e ‘steam driven’) gauges,
the rest of the set is very useful.
I used the side consoles and instrument panels any way as they were
still superior to the kit items. A solution would have been to use
something like an F-18 Hornet sheet for the instrument panels, but then
the cost starts to build, it’s your call, but you have been told. Eduard
may even release a dedicated sheet for the –127, but we will have to
wait.
The brass sheet features a 4 piece seatbelt harness for the kit’s
ejector seats. Once fitted, they really lift the kit seats and in my
opinion look as dazzling as any after market seats, but if you just have
to add some after market items then no doubt some (MB.10L) seats from
Paragon or Pavla would fit after a bit of judicious filing.
The cockpit was painted in overall FS.36231, with matt black
consoles, which was all drybrushed a light grey. I painted the seats
matt black with olive canvas parachute covers. The headrest and shoulder
belts were painted khaki, with the lap belts painted dark green. The
belt buckles and bayonets were picked out in silver with the main
connector painted metallic blue. The seat side handle was painted black
with yellow stripes , and the central ejector handle yellow with black
bands. I also added throttle levers from plastic strip and these were
painted black. The instrument coamings had some wiring added and were
painted matt black and lightly drybrushed.
Fuselage
Prior to gluing the fuselage tub inside the fuselage halves, there is a
glaring major error which must be dealt with. This concerns the tail
area of the fuselage. The fin base features a box like structure (brake
parachute housing?) which must be removed for the RAAF version. This
will return this part of the aircraft to what is normally seen on other
versions of the Hawk. Using my trusty Olfa P-cutter, I made several
light passes before I was able to remove the excess plastic. This leaves
you with a gaping hole which requires filling.
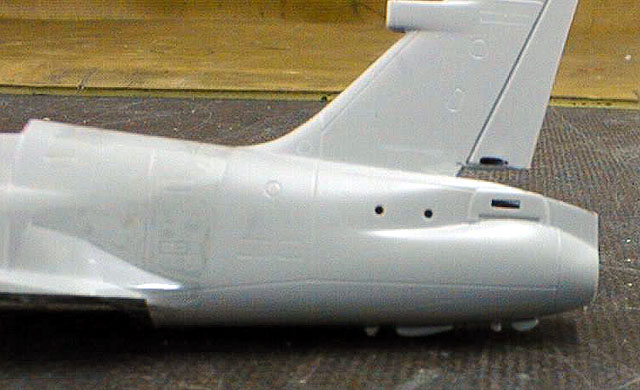
I used plastic sheet cut to suit the shape of the hole, and plastic
strip of suitable width, which I re-profiled to match the rear fuselage
to overcome this. Whilst all this was drying, I took the opportunity to
clean up the sidewinder missiles, tailplanes, undercarriage and to
assemble the 30mm gun pod. Once the tail’s “cut and shut” bits were dry,
filler was applied and wet sanded until all was blended in. I left off
the rear instrument coaming (19A) as well as the canopies and ejector
seats as I wanted to mask over the cockpit before spraying. I also left
out the engine exhaust as this would provide a convenient place to stick
a handle into whilst spraying. The fuselage halves were glued and sanded
as per normal. I also constructed some new strakes for the area just in
front of the tailplanes. I ‘eyeballed’ these, so they are not exactly to
scale but the ones in the kit are overthick and the wrong shape. I also
glued the Eduard ventral strakes instead of the kit parts (32A) for a
better scale appearance. I cut off all the fuselage antennas to ease the
seam filling, and will replace these once painting and decalling is
complete. I also cut out the opening for the extendable boarding ladder
and built the ladder itself, but left it off until later.
Wings
The wings were fairly straightforward, however the kit would have you
fit 4 wing fences per wing (55A, 54A). The RAAF version only features 2
fences, a large fence approx mid span (19mm from the wing root), and a
smaller one at the tip. I elected to use the Eduard wing fences, however
as only 2 are supplied on the fret, and the second wing fences are
really small, I left off the second wing fence on each wing. The kit
items were waaay too thick and I couldn’t scratch build anything that
thin, and after all this is only a model. I also added the brass main
gear bay insert into the lower wing half (11B). All the Hawks that I
have seen are parked with the flaps down and I wanted to replicate this.
I began by cutting away the upper and lower flap sections, then using a
scalpel, I scraped away plastic from the trailing edges of the upper and
lower wing halves. Next, I glued 6 small plastic spacers made from
plastic strip, onto the lower flap half which had its leading edge
re-profiled. The strips were glued chordwise. Onto the strips was glued
a curved piece of plastic sheet to represent the inner flap section. The
rear half of the flap hinges (39B, 40B and 41B), were cut away and kept
for use later. The wingtip missile rails were glued on into place. I
used some graph paper to get everything aligned to the centreline as the
fit of the wingtip rails is not very positive. There are 4 formation
light locations at the wing tips. These are in the form of 2 strips, one
each above and below the wing tip approx mid length of the missile rail.
Italeri only provide 2, but I scratch built 4 from plasticard anyway.
The wing was now offered up to the fuselage for joining and glued in
place.
Intakes
I wanted to have the single point re-fuelling receptacle showing so I
cut open the re-fuelling port on the left (port) intake and scratch
built the interior. I also built up the door from 2 pieces of aluminium
from a soft drink can. As there is no trunking inside the kit’s intakes,
I also made a couple of intake blanks from plastic card, but left these
off until after the paint and decals were applied.
Undercarriage
These were assembled as per the instructions but left off until after
painting and decalling was completed. I painted the wheels, inner doors
and undercarriage legs in gloss light gull grey (FS 16440) and the
interior of the bays themselves in semi-gloss white.
Stores
The 30mm gun pod was assembled, however I replaced the gun barrel with
some aluminium tube, the end of which I had drilled and thinned down.
The sidewinder missile can be carried by the Hawk 127, however as it is
a trainer, I decided to depict the CATM (Captive Air Training Missile)
or ‘dummy’ version. This version doesn’t always have to have the forward
or even any of the fins fitted but the aircraft that I worked on did so
this is what I went with. I left off all the stores until after painting
and decalling. The missiles were painted FS 36375 with 2 light blue
bands to signify that it is an inert round. The drop tanks in the kits
can go straight to the spares box as they are completely the wrong
shape. Instead of being a cylinder with rounded ends, they are rounded
with an increasing diam. i.e cones, then sharply tapered at the end.
Interestingly, the kit’s box art depicts the drop tanks correctly!
The camouflage scheme depicted in the kit is not quite correct,
although the colours listed are. I wanted to depict a 76 Squadron
aircraft.
 Aussie
Decals currently sell a sheet for the current colour scheme, however the
sheet doesn’t feature any tailbands for 76 or 79 Squadrons. This sheet
also has the RAAF roundels (rats) and some stencil data in too dark a
shade. I believe that a correction sheet has been issued I instead
bought the Hawkeye Models sheet, which not only includes correct colour
stencil data and roundels, but also fin flashes. The sheets only cover
one squadron so you will have to decide which one you want to depict in
advance (or build one of each!). Steve Evans of Hawkeye Models is very
approachable and I can vouch for the correctness of the Hawk release
(something I cannot say about some other decal manufacturers). Aussie
Decals currently sell a sheet for the current colour scheme, however the
sheet doesn’t feature any tailbands for 76 or 79 Squadrons. This sheet
also has the RAAF roundels (rats) and some stencil data in too dark a
shade. I believe that a correction sheet has been issued I instead
bought the Hawkeye Models sheet, which not only includes correct colour
stencil data and roundels, but also fin flashes. The sheets only cover
one squadron so you will have to decide which one you want to depict in
advance (or build one of each!). Steve Evans of Hawkeye Models is very
approachable and I can vouch for the correctness of the Hawk release
(something I cannot say about some other decal manufacturers).
The kit was primed in Gunze acrylics. I primed it in FS36375, and
after I was satisfied that there were no flaws to correct, the kit was
given another coat of this colour as it is the lighter colour of the 2
greys used. The upper grey (FS 36237) was then applied and left to dry.
The beauty of Gunze paints is that most dry semi gloss, which means that
decals can go straight on without the need for a gloss coat to be
applied.
I next picked out any details, such as the VOR fins on the tail
(semi-gloss white), the RWR antenna on the fin tip (pale yellow), ADF
aerial under the fuselage (semi-gloss white) and nav lights. Decalling
then commenced, followed by washing the panel lines with some oil paint.
At this point, I replaced all the aerials removed during the sanding
process and glued them on with super glue. The model was then sealed
with a coat of matt varnish in preparation for the final assembly.
After all the paint and decals were dry, final assembly could take
place. I attached all the undercarriage legs, struts, undercarriage
doors and the 30mm gun pod. Next the ‘winders’ were added, as was the
pitot tube (from stretched sprue) and the cockpit internals, i.e seats
and second instrument coaming, HUD glass and the transparent ‘blast
shield’ in the main canopy. I also added the rear view mirrors, and
canopy rails at this point and finally attached the canopies to the
fuselage using PVA glue.
I enjoyed this project. The work required to depict a RAAF Hawk 127,
although reasonable, should be within the scope of most modelers of
average skills. I have also been informed by Steve Evans (Hawkeye
Models) that he is currently selling a conversion kit which includes a
tail correction, weighted wheels, dropped flaps and the correct shaped
drop tanks. Overall, not a bad little kit and reasonably priced at
around $10, however after you add decals ($12) and photo etched brass
($10 if you want it), the price soon doubles or even triples.
I appreciate any constructive criticism, after all, if I got
something wrong I would like to know so I don’t make the same mistake
again, but please be able to back yourself up.
Happy hacking!
Model, Text and Images Copyright © 2001 by
Anthony Papadis
Page Created 16 August, 2001
Last Updated 04 June, 2007
Back to HyperScale
Main Page
Back to Features Index |
 Home
| What's New |
Features |
Gallery |
Reviews |
Reference |
Forum |
Search
Home
| What's New |
Features |
Gallery |
Reviews |
Reference |
Forum |
Search