|
LaGG-3 Type 66
by Caz Dalton
|

|
|
LaGG-3 Type 66 |

available online at Squadron.com
Designed and built by Lavochkin, Gorbunov, and Goudkov, thus the
designation LaGG and despite its ill-fated nickname, transliterated as (Letayushchiy
Absolyutno Garantirovanny Grob) and literally meaning "Flying Absolutely
Guaranteed Coffin", the LaGG-3 series of aircraft, along with the MiG-1,
led Soviet aviation into the modern era.
Hampered by Stalin's purges in the late 1930s, Soviet aviation design
bureaus were stuck utilizing the technology of the 1930s with little
change in the fighters or bombers of 1934 and those of 1939. The LaGG-3
opened up the road to modern fighter airframes. Though metal would have
been preferred, the Soviet Union used the one element it was rich in,
wood. It was skinned using a heavily pressed pine plywood called "Delta
Wood". Legend has it that when Stalin was presented with a sample of the
"Delta Wood", he laid it down and dumped his lit pipe ashes onto the
wood sheet. After letting the ashes lie there a minute, he brushed them
aside and the wood was not charred. He thus gave his directive to use
the wood for sheeting aircraft. Thus, the heavily varnished wood sheet
airframe received its nickname. A better nickname due to its highly
laminated and varnished plywood sheeting was "Рояль", transliterated as
"Royal", which means "Grand Piano".

Although the LaGG-3 was not superior to the Bf-109 and Fw-190, it gave a
good account for itself until superior fighters such as the La-5 and
MiG-3 made their way to the front. It was a tough fighter and easy to
repair in the field, but suffered as much from lack of firepower as any
other thing, having only one 20-mm cannon firing through the propeller
shaft and one 12.7-mm machine gun in the port front fuselage.
When the Germans launched "BARBAROSSA" on June 22, 1941, there were only
322 LaGG-3 Type 1s to have left the four assembly lines. None of them
engaged the Germans, as they were assigned to Fighter Aviation Regiments
in the far Eastern Military Districts. It appeared soon in the summer of
1941 for the first time and baffled the Germans, as its existence had
escaped German intelligence.
Many LaGG-3 pilots lost their lives in the first days of combat, as they
were poorly trained and their leaders unable to lead large units. But,
after the sting of combat, many skilled pilots went on to score
impressive victories against their German foes. Many of the top Soviet
aces in the Great Patriotic War
scored their first victories in LaGG-3s.
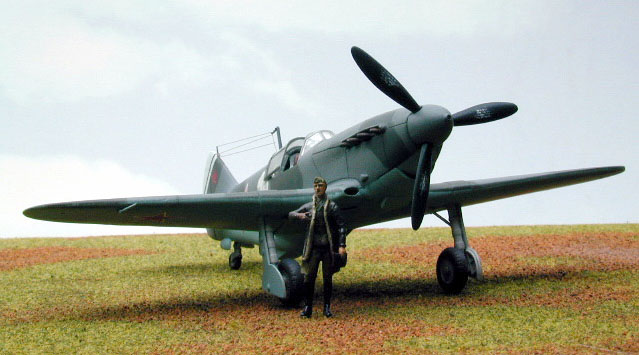
The model represents a LaGG-3 Type 66, the last liquid-cooled in-line
engined fighters to be built by Lavochin. The Type 66 had a considerable
weight reduction along with a number of aerodynamic refinements. The
Type 66 was constructed only at GAZ-31, located in Tbilisi, the capital
of the Georgian Republic. The last LaGG-3 Type 66s were delivered in
September 1943 and when production stopped, 6,528 LaGG-3s of sixty-six
different production batches had left the four State Aircraft Factories.
In the last year 1,294 Type 35s and 66s left the assembly line at
Tbilisi. The markings of the aircraft modeled are those of Yuri Shchipov,
who went on to win the "Hero of the Soviet Union" in January 1944 and
finished the war with 24 victories.
DakoPlast is a Russian modeling company and I have to say, this 1/72
scale kit beats the TOKO offering by a mile. They are hard to come by in
North America, but should you find a DakoPlast kit, I can highly
recommend them. I also have their Il-2M3, which is in my honest opinion
the best 1/72 Il-2 on the market, especially when price is considered.
Cockpit
The cockpit sidewalls were molded in, very clean, and neatly done. The
floor and seatback are two pieces, as is the seat and headrest/plate.
The control stick is separate and has the correct handles, but rudder
controls are merely molded onto the floor. They are still quite nice
after painting and an ink scribing.
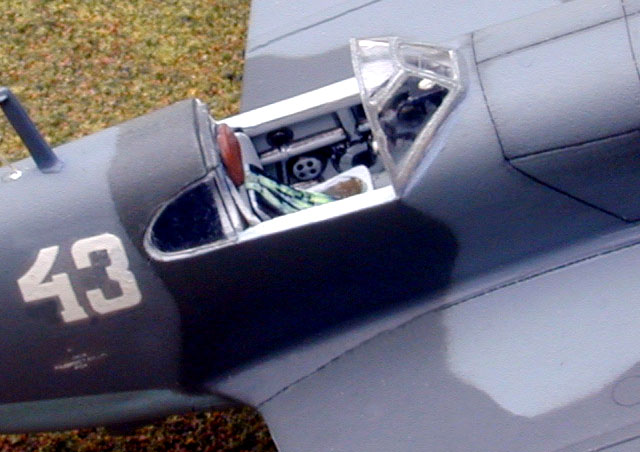
I painted the interior and instrument panel Light Ghost Gray. The panel
was done with punched disks of white decal film followed by some 1/72
Reheat Models Instrument Decals. Radio boxes and such were painted flat
black, glossed, and given some Reheat Models Vintage Control Placard
Decals.
All framework was shadowed using a 0.005-in tip tech pin and India ink.
The seat back was painted black and given a rubbing of skin oil. The
headrest was painted Leather and likewise given a rubbing of skin oil.
The beautifully molded PV-1 gunsight was painted semi-gloss black, but I
replaced the reflector with a piece of clear sheet styrene. It was sat
aside in safe keeping until final assembly. The seat belts and harnesses
are printed on InkJet paper, coated on both sides with Superfilm, and
cut with an X-Acto #11 blade. They are applied with a little Elmer's
glue like a decal, as the Superfilm keeps the ink from running and the
paper from dissolving.
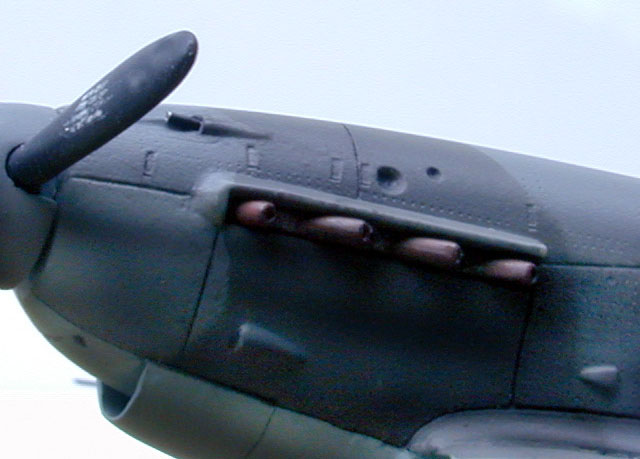
Exhausts and Gun
The exhausts are separate mold pieces and that's always a plus when
masking. I drilled out the openings and painted the exhaust pieces flat
black. I followed this with a hand brushing of Burnt Iron and a light
wash of rust. The kit only has a barrel molded into the machine gun
port. I carefully cut this away with the Dremel Mini-Mite and an
engraving bit, and then replaced the barrel with a section of a 25-gauge
hypodermic needle.
The radiator, which is largely unseen, was painted steel. I did a scaled
down radiator in Photoshop and made a print on InkJet decal paper. After
a coat of artist's fixative and a coating of Superfilm on the sheet, one
each was applied to the front and rear of the radiator. The small vent
doors for the radiator and oil cooler are separate also, nice touch, eh.
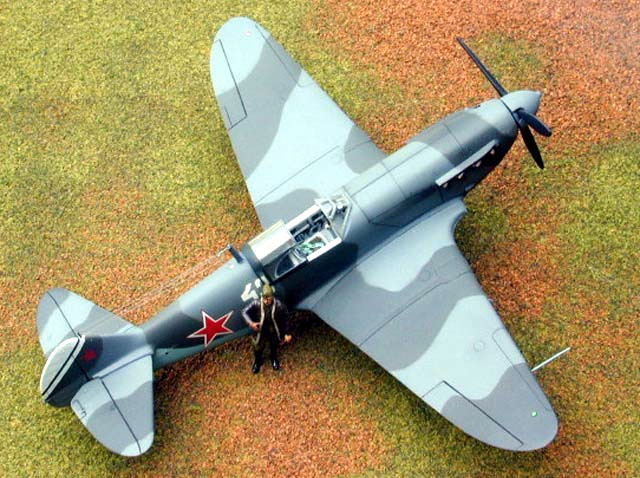
Exterior
One can look at the finished model and tell I didn't have too many
problems here. Oh, I could nitpick about the small step in the wing to
fuselage join, but I'm not. The whole kit is much less a fit problem as
the TOKO.
Canopy pieces are very thin and crystal clear. So thin in fact, that
I had to get a second kit to replace the center sliding section I broke
peeling masking from the first. Engravings are just right and there was
no filler anywhere other than my normal insecurity and having to apply
little CNA to all seams. The horizontal tails were even painted separate
and installed in the final assembly. This also aids in masking.
After masking the canopy pieces with Bare-metal foil, I painted them
Light Ghost Gray. The front canopy was attached to the model, but the
rear section was left off; it was to be temporarily attached when
painting the camouflage scheme. The radiator and all other openings were
masked with damp paper towel (just damp enough to tamp down). The
cockpit opening and rear window opening were masked with masking tape.
The model was primed in Polly Scale Light Blue (a German color meant to
match RML 76, I do believe). A little sanding and fixing and the
undersides were masked, after which the upper surfaces received a coat
of Polly Scale Russian Topside Gray. After several email transactions
with Russian friends, I was able to ascertain that the other color was a
dark gray, similar to German RLM 74, not Black-Green, as many would be
lead to believe. Thusly I ran off some enlargements of the instructions
to scale and cut out masks for the surface to remain medium gray. After
applying these I shot the remaining uppers Polly Scale RLM 74.
Masking was removed, excepting canopy and radiator, and then all
surfaces received two coats of clear gloss. The kit decals were used for
the markings and it's a good thing I bought the second kit, as the white
is very translucent, so I had to double up here. The white tail unit
markings are done with white decal trim film. I also substituted some
Soviet star National Insignia from a Superscale sheet of such. After the
decals had set, I gave them a sealant coat of clear gloss. I lastly
applied some India ink to all control surface recesses and engine
accesses. Exhausts stains are done with powdered black and medium gray
pastels. Two finish coats of clear flat were applied and this was
lightly rubbed down to sheen it a day later. Wing navigation lights,
which are molded on the model, were painted Bright Silver, followed by
Clear Red and Clear Green. Masking was removed from the canopy pieces
and the glazings polished with Meguiar's Mirror Glaze #3 and given a
coat of Future. The antenna wiring is done with smoke-colored invisible
thread.
The figure is a Prieser Miniature German Luftwaffe figure in 1/72. I
primed it in medium gray and hand painted it using a colored print I
have of a Soviet pilot from one of the Osprey books. Shadowing and
highlighting were done using ink and powdered pastels.
Model, Text and Images Copyright © 2001 by
Caz Dalton
Page Created 30 October, 2001
Last Updated 04 June, 2007
Back to HyperScale
Main Page
Back to Features Index |
 Home
| What's New |
Features |
Gallery |
Reviews |
Reference |
Forum |
Search
Home
| What's New |
Features |
Gallery |
Reviews |
Reference |
Forum |
Search