|
Sd.Kfz.139
Marder III
by
Valentin E. Bueno
|

|
|
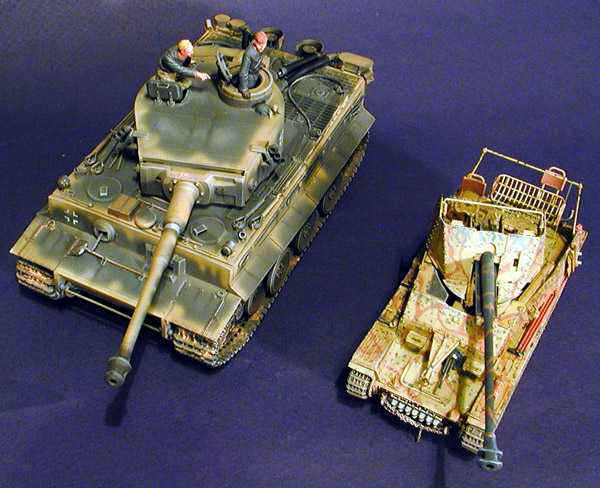
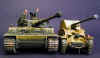
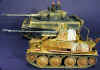
Marder III
|

HyperScale is proudly sponsored by
Squadron
You're kidding, right?
I uttered those words when this kit was announced at the 2001
Spielwarenmesse Nürnberg (Toy Fair). I never thought Tamiya would
make a 38(t) based vehicle. Personally I was waiting for them to
release a new M5 Stuart or DUKW kit.
Tamiya's
1/35 Scale Marder III
|
When my kit arrived from Hobby Link Japan, I was astounded. I was
presented with five beautiful tan sprues. The detail was gorgeous. I
had to sit there and stare in awe at the parts for awhile before
putting them away to start my research. Luckily I had some Achtung
Panzer articles from the Japanese magazine Model Graphix. This was my
primary source for information. I put all my other projects to the
side and started on this kit.
I compared the kit to the drawing in the Achtung Panzer articles
and found very little missing. A few tie down loops, a bracket here
and there, and covers for the shell storage. I'll get into these
missing parts as I go along. What I also found astounding was that
they included much of what was in the AP drawings. Correctly shaped
scopes, hatches, hulls, running gear, bar cage, folding seats, and
much more. Tamiya molded a real winner this time!
What was disconcerting was the complete lack of an interior.
Nothing nada zip zero. Oh well, Verlinden or Jaguar will come out with
something soon, I'm sure.
Mud
Pack
Curiously enough, Tamiya decided to go the multi-part lower hull
route for this kit. Usually seen on Eastern Bloc kits, Tamiya-san uses
it here to add more detail to the parts. The location points are
thoughtfully designed and feel tight and secure when assembled.
After the lower hull was assembled and allowed to cure, the entire
exterior was splashed with a liberal amount of mud and debris, making
sure the location points for the running gear remained clean. I like
my tanks dirty.
I painted the interior scale black due to the lack of an interior.
My aim was to detail the exterior, and not the interior.
The running gear was added according to the instructions. No
surprises there. One side of the kit tracks was glued together and
added to the model. The stock length was a found to be slightly long
in my opinion. I shortened the other side by one link and this fitted
better.
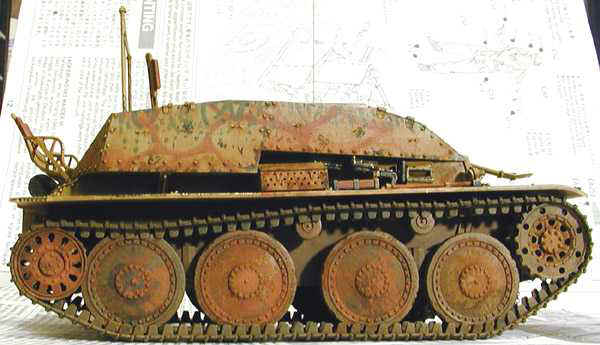
The tracks were also liberally coated with mud and grass. I added
the fenders after installation of the track as I figured it would be
easier this way. Funny how Tamiya has you install the track after the
fenders. Oh well.
That
Russian Gun
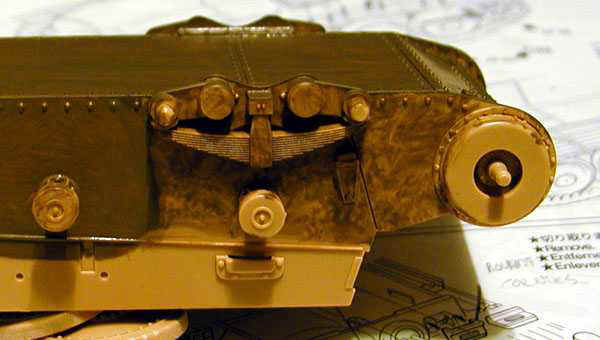
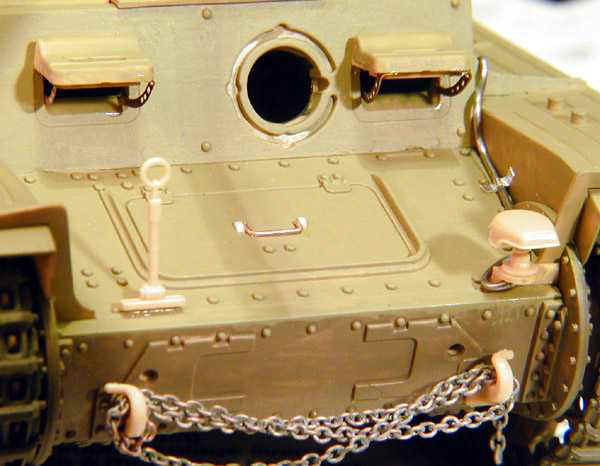
I started on the gun next. I assembled the gun barrel, cradle and
trunion without modification or trouble. The seam down the middle of
the cradle was sanded away, no filler needed here! The rivet detail
that was sanded away was replaced with sliced Evergreen rod. More
sliced rod and stretched sprue was used to add various bolt and grease
nipple detail all around the trunion. I decided early on to include
the chains that connect the equilibrators with the gun cradle. This
means that the gun on my model will not be able to raise and lower in
elevation.
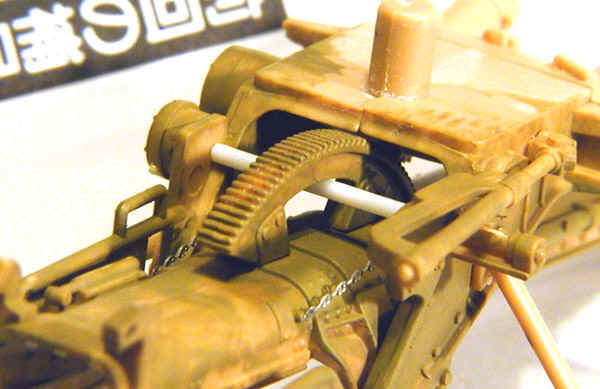
The parts were first given their first coat of Polly S Dark yellow
and glued together. I used medium sized anchor chain from a 1/700
scale photo-etched (PE) anchor set from Gold Medal Models. The
connecting shaft from the elevation control wheel to the elevation
gears was added, passing through the elevation gear (the white rod in
the picture to the right).
The telescopic gunsight had the eyecup drilled out and the smallest
Greif lens added.
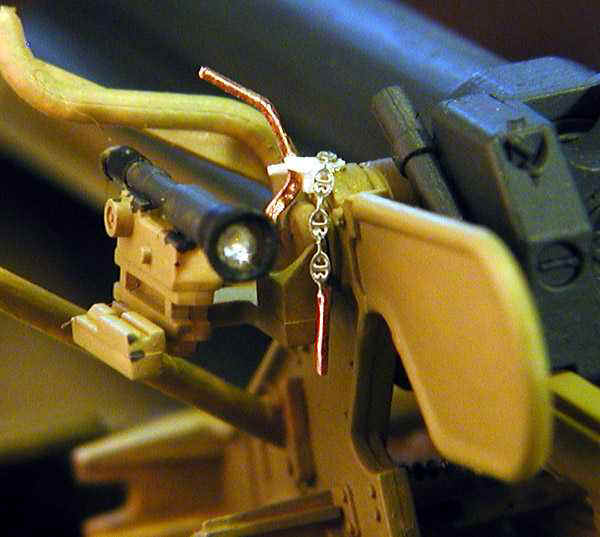
The telescopic gunsight was added to the gunsight bracket and the
assembly added to the trunion. It was at this point that I noticed
that the trigger arm for the gunner was missing. This was fashioned
from shaped and flattened copper wire. A bracket for the trigger was
made from slices of I-section Evergreen strip. A safety pin and chain
from were also added.
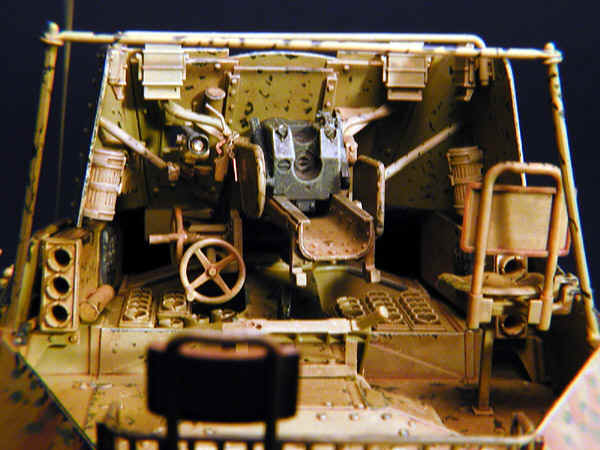
The gunshield was put together next. Retaining straps and
L-brackets were added to the gas mask containers and the toolboxes.
Retaining bolt heads were added to the two brackets that held the
sliding portion of the gun shield in place, five bolt heads each. The
interior of the gunshield was painted before attaching to the gun
trunion.
The
Super Duper Superstructure
The superstructure was worked on while the gun parts cured. The
side panels had some nasty ejection pin marks that needed to be sanded
off first. Once cleaned up, they were added to the main superstructure
part. The antenna base on the exterior of the superstructure plates is
missing a vertical portion and the two braces. The Tamiya box art
clearly shows the missing bracket parts. These were added from strip
plastic and sliced rod for bolts. On the inside of this was the radio
connection for the antenna and the communication conduit for the
crew's intercom. These were fashioned from thick plastic strip and
rod. The actual wires were made from wire solder.
The floor mounted shell storage bins were added and the entire
interior given two coats of Polly S Dark Yellow. The communication
junction boxes were painted RLM 66, scale black.
MP-40 Ammo pouches taken from a Tamiya Germans Weapons set were
added to the inner sides of the ammo bins for the main gun.
The tie downs for the cold weather tarp were added to the exterior
of the superstructure. These were fashioned from a strand of copper
speaker wire formed in a jig. The desired size and shape of the loops
were first created in plastic in male and female forms. The wire was
laid across the forms and the male and female parts mashed together to
form the uniform tie down loops.
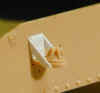
Click the thumbnails
below to see the full-sized images of the tie-down manufacturing
technique:
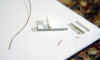
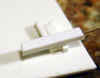
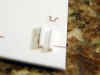
A total of 16 were used - four on the front glacis plate, and three
each on each of the two sidepieces.
The cage at the rear of the vehicle was assembled. There was a
little bit of flash that needed cleaning, but nothing to write home
about. Four bolts were added to the exterior underside of the
superstructure. They were added were the superstructure floor steps up
from the fighting compartment to the driver's compartment. Got That?
Good.
I also added the power line conduit for the Notek light, a handle
for the transmission hatch, and retaining chains for the caps of the
smoke grenades on the rear of the vehicle. I had decided to display
the driver and radio operator's hatches in the open position.
Retaining arms for the visors were added from 1/72 scale Bf 109 cowl
framing photoetched parts cut in half and added these to the open
visors.
"We
all live in a Yellow Overly Weathered and Rusted Marder III"
(with apologies to McCartney and Lennon)
It was at this point the entire vehicle was painted Polly S Dark
Yellow. The gun barrel itself was painted Polly S Scale black to
represent a gun salvaged from an overall gray vehicle. I also painted
one panel on the driver's hatch dark gray. The camouflage was added
using thinned Polly S Red Brown and Olive Green. The Red Brown was
painted on with a brush in a pattern reminiscent of tree trunks. The
Olive Green was then added to represent leaves on said trees. Picasso
I ain't, but I thought it looked neat enough. It was at this point
that I ruined the model.
I started adding paint chips using Model Master Metallizer
Titanium. I started adding and I couldn't stop myself! Remember that
less is more. Oh well, next time I'll do better. I gave the model a
wash of Burnt Umber Oil Paint. This added the perfect shading to all
the lovely Tamiya details. It also subdued the paint chipping I did
earlier. Highlighting was done with a thin drybrushing of white oil
paint. I use oil paint for my drybrushing because a little goes a long
way and it is slightly transparent. It allows the camouflage colors to
show through.
Mud. What armor model would I build without it? None I hope! I lay
the model on its side and proceeded to add a wash of oil paint and
powdered pastel to the running gear. I was interested in seeing which
would come to the fore, the oil or the pastel? The pastel won. The
running gear had a very dusty dry look to it after a day of drying. I
couldn't tell which of the wheels I had painted gray or yellow the
dust was so thick. Less is more! Why couldn't I remember that simple
mantra while building this model? Oh well. It did set up a nice
contrast with the slight sheen on the superstructure from the oil
paint and the dull dusty look of the running gear.
The muffler was painted with Metallizer Exhaust with some powdered
black and orange pastel mixed in. It's a little too dark and not rusty
enough for me yet, maybe I'll add more rust later. The markings were
hand painted using Stencilit PE stencils as a guide. I'm really not
into specific unit histories or vehicles. I like to model generic
vehicles or vehicles with interesting or weird markings. It's my
Luftwaffe '46 side rearing its ugly head.
"My
Marder for a Spanner!"
With all the general painting done, I could start adding all the
little details to the exterior of the model, namely tools. I painted
all the tools and stuffs prior to adding them to the model. Wooden
areas were painted Red Brown, the metal areas with Titanium, and
weathered with a wash of oil and highlighted with silver from a Berol
colored pencil.
Whatever parts that weren't added yet were added and the whole
thing given a bashing over with the weathering sticks. I did add a
crosspiece for the two-tarp uprights that Tamiya gives you. They were
also angled back a bit to make them more vertical. They way Tamiya has
it looks a little to angled. A length of scale link chain was added to
the front tow hooks along with some spare track link.
Try
wait, I stay not pau yet!
As of this moment I am still adding more to this model. People have
to live in this thing, right?
I have added helmets, canteens, mess kits, rolled up panchos and
more MP-40 ammo clips to the interior of the model. I have assembled
the figures and put Panzerfausts in their hands although I am not sure
what the crew of a panzerjäger would be doing with a Panzerfaust.
I am currently painting up a Verlinden street corner as a scenic
base. So try wait, I stay not pau (Hawaiian for finished) yet!

Model, Text and Images Copyright ©
2001 by Valentin E. Bueno
Page Created 10 May, 2001
Last Updated 04 June, 2007
Back to HyperScale
Main Page
Back to Features
Index
|
 Home
| What's New |
Features |
Gallery |
Reviews |
Reference |
Forum |
Search
Home
| What's New |
Features |
Gallery |
Reviews |
Reference |
Forum |
Search


