Home
| What's New |
Features |
Gallery |
Reviews |
Reference |
Forum |
Search
Home
| What's New |
Features |
Gallery |
Reviews |
Reference |
Forum |
Search
|
|
|
Seversky EP-106 (P-35A) by Werner Scheibling
Development of the EP-106 / P-35A Alexander de Seversky was a World War One fighter ace in the Russian Tsarist airforce. He was a dedicated pilot and air racer even though he had lost a leg in aerial combat. Following the October revolution in 1917, he turned his back on Russia. His career as a member of the nobility would have been not too promising in the new peasant and worker state. He therefore decided to stay in the USA, were he was studying aircraft engineering at that time (in the early 1920s), and set up his own aeroplane company with a fellow emigree countryman Alexander Kartvel. This company would become responsible for a number of designs that finally led to the famous Republic P-47 Thunderbolt. This article deals with the P-47's 'great-grandfather', an aeroplane that would nearly have missed it's place in aviation history if the Swedish Airforce did not decide to place an order of 120 samples with Seversky which kept the aeroplane company afloat in rough times.
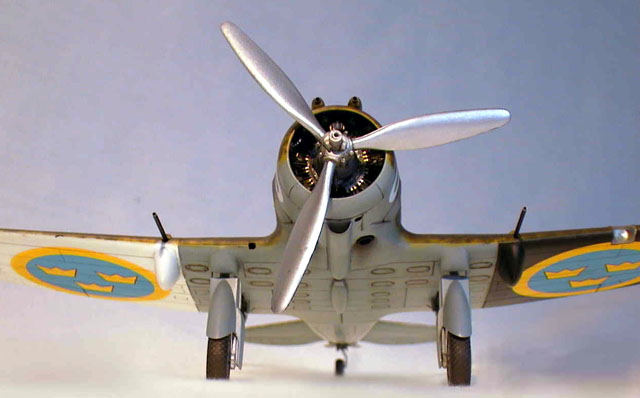
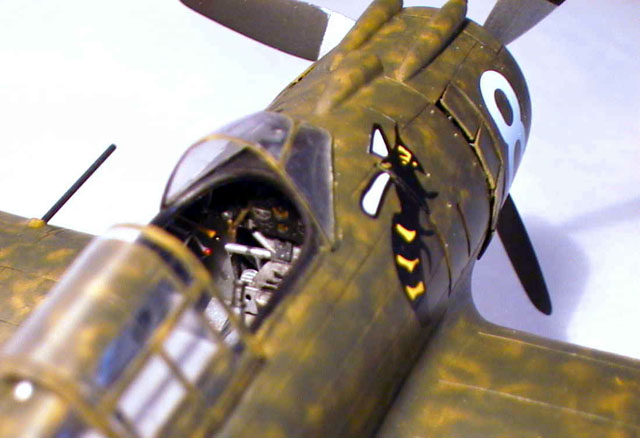
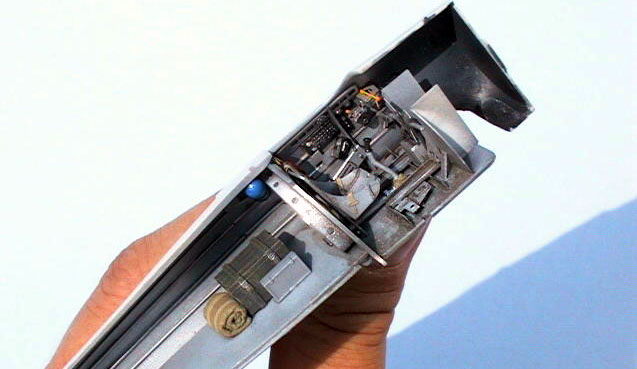
Seversky built the tubby little P-35 for the US Air Corps in the late 1930s, a contemporary of Curtiss' Model 75 / P-36 'Hawk'. The P-35 never made it to substantial numbers though, because Curtiss offered it's 'Hawk' to the US War Department at an unbeatable price. Otherwise the two contestants shared similar performance. In 1939, when Sweden contemplated it's future situation in an inevitable European war, the neutral country frantically looked for a modern frontline fighter that could replace the ageing Gloster Gladiator biplanes then responsible for the defense of Stockholm. The obsolete biplane would have performed rather poorly against the German Messerschmitt Bf 109E and the latest Russian designs then under development (Yak-1, MiG-3, LaGG-3). A modern Swedish design (by SAAB) was still years away. Alexander de Seversky was one of the few who responded to Sweden's call and personally demonstrated his new 'Export Pursuit 1' (EP-1) design to the Swedish purchasing commission. This prototype was a straight descendant of Seversky's AP-7 racer, that mated the P-35 wing with a lengthened fuselage and a stronger Pratt & Whitney R-1830 engine with 1000+ hp. The Swedish commission was sufficiently impressed and ordered 60 samples in two batches, specially built to Swedish specifications. A third order of 60 planes became subject of a US arms embargo. These aircraft were seized by the US War Department off the production line and pressed into service with the US Air Corps in the Philippines as P-35As. The sixty Swedish EP-106s were designated 'J9' (J for 'Jaktflygplan' / fighterplane) in Flygvapnet- service. They remained the most modern frontline Swedish fighter throughout the war, later accompanied by Italian Reggiane Re.2000 / J20. The planes were lovingly kept in top condition. Individual examples soldiered on well into the 1950s. Some airframes were rebuilt for photo-reconnaissance duties with F3 wing after the war. The preserved specimen in Linkoeping museum is one of these planes. You can see a camera mount in the luggage compartment behind the pilot that allowed vertical photography through a glass hatch in the floor or oblique photography through the glass door in the righthandside fuselage. The J9 was armed with two 7,9 mm (0.3 cal.) Brownings in the front fuselage firing through the propeller arc, and two 13,2 mm (0.52 cal.) machine-guns in the wings. These weapons were large-bore Swedish built Colt-Browning M2s. The strange drop-shaped items underneath the wings were collector-boxes for spent cartridges and links. With a Pratt & Whitney R-1830-45, 14 cylinder twin row radial of 1050 hp, the J9 reached a top speed of 310 mph. Another design feature worth mentioning is the so-called 'wet wing' for their P-35 lineage of aircraft. The whole inner wing-structure was covered with a special sealant and thus the wing was turned into one enormous fuel-tank. Lots of inspection hatches are visible along the wing-undersurfaces that also functioned as fuel-drains. However, as the available sealants were not really up to their task, constant fuel leaks had to be dealt with - a mechanic's nightmare. All pictures of Swedish J9s show discolourations around these inspection hatches caused by leaking fuel.
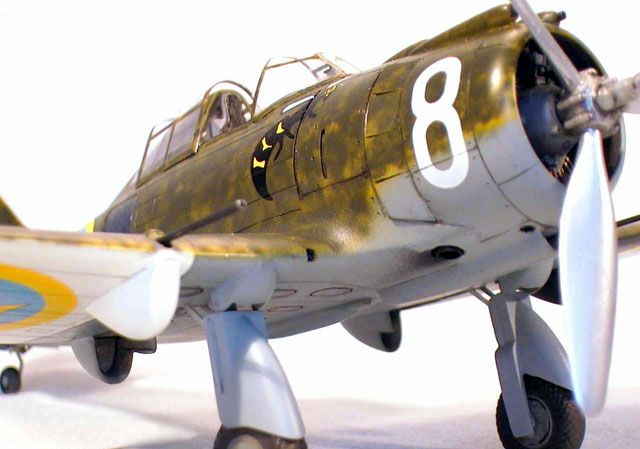
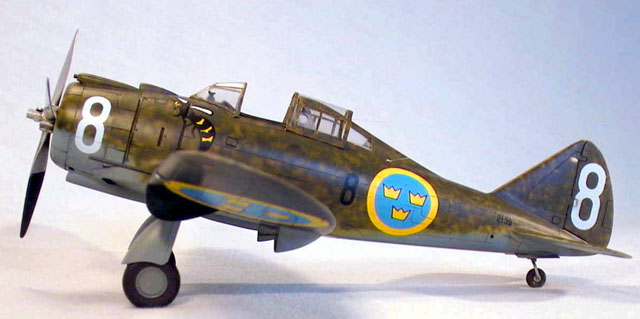
Camouflage and Markings Leif Hellstroem and Leif Fredin have answered all questions that surrounded that mysterious 'Italian' camouflage scheme on Swedish J9s with their book 'Kronmaerkt'. Let me summarise some essentials: This camouflage scheme was an indigenous Swedish design for the J9 (even though it might have been slightly influenced by the Italian mottle pattern then to be found on Swedish Fiat CR. 42 'Falcos'). First, all the upper surfaces were sprayed with zinc-chromate yellow primer, identical with the well known US interior primer. Then, olive-green paint ('olivgroen W 25', very similar to FS 24079), was sprayed on top in an irregular, blotchy but dense pattern, so the yellow primer would shine through. Afterwards this paintjob was sealed with a semi-gloss clear lacquer with an addition of 5% 'olivgroen'. The final result often looks like an amateur paint job where an overall colour was not applied properly.
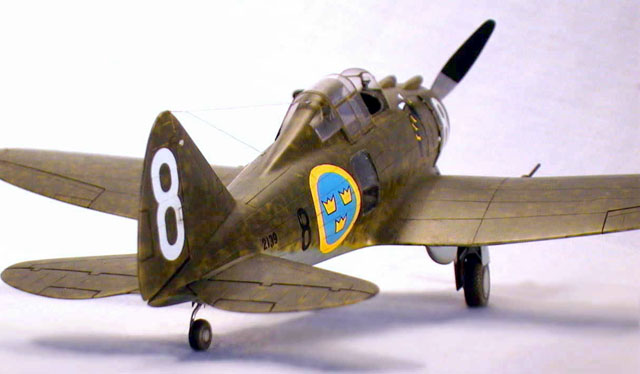
Later in the war a lot of planes seem to have been repainted, with the camouflage scheme now looking more mottled and thus more 'Italian'. I guess the painters were allowed quite a bit of artistic licence during these endlessly long Scandinavian summer days, as every single J9 looks slightly different. Some more blotchy, some very densely mottled, some more stripy. One picture even shows a J9 with it's propeller painted in a meticulous zebra-stripe scheme - nearly a work of art. The undersurfaces were kept in semi-gloss light blue-grey W 26(similar to FS 26176). From August 1940 to the end of the war only the J9s of F8 sported outer wing undersurfaces in black (left) and white (right) with greatly oversized roundels to help friendly AA-gunners with identification. Two months earlier the upper wing roundels had been deleted. The 'Flygflottilj'-number was carried in black left of the roundel on both fuselage sides. From Summer 1942 onwards F8 experimented with several different squadron insignias ( i.e. a ram, a wasp, a gull etc.). It was not before mid-1943 that F8 chose a black eagle on a coloured disc (1st squadron: red, 2nd squadron: blue, 3rd squadron: yellow) for all three squadrons as it's only insignia. Each plane carried it's individual call-number in big white numerals on both sides of cowling and rudder (1st squadron: 1-15, 2nd squadron: 16-30, 3rd squadron: 31-45, 'other aircraft': 46 upwards).
Getting Started This is Hobbycraft's 1/48 scale Seversky P-35A. The kit spent quite some time on my 'to-be-built' shelf. I bought it because it was just too tempting to paint this US type in Italian style 'sand-and-spinach' camouflage and colourful Swedish markings.
However, at the time, I had very little information on this relatively unknown but equally important aeroplane. After I finally decided to tackle this model, I started to investigate, putting my questions on the discussion board of IPMS Stockholm. This is were I met Lars Sundin from Stockholm who, over the last few months, has provided me with an incredible amount of facts, pictures and anecdotes about the EP-106 or J9 as it is known in Sweden. His collection of interesting websites is unsurpassed (see 'references'). Thank you very much for your help, Lars! I'd also really like to thank Jan Waernberg, Swedish aviation historian, who found out the individual airframe number of 'white 8' (2139).
Hobycraft's P-35A Shortcomings The best thing to be said about this kit is that it is available. Hobbycraft fans will have to forgive me, but I had some very 'intense' modelling experiences during the last four months of this kit's construction. This model is not much better than a close approximation of the subject! When you compare the kit's parts to detail photos you'll know what I mean. The most obvious shortcomings in the kit are:
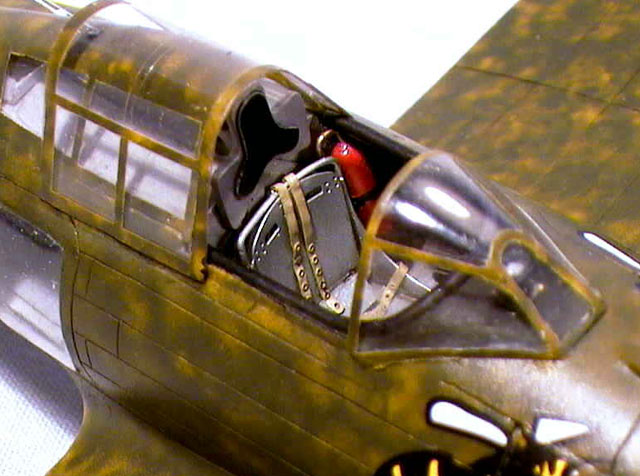
Construction Steps To keep the description to a minimum, I have listed a summary of the most important construction stages:
The EP-106 was delivered to Sweden with it's cockpit interior in natural aluminium colour (I guess protected by some kind of clear lacquer). I airbrushed all cockpit parts with matt light grey acrylics and then carefully drybrushed everything with good old 'Rub 'N' Buff Silver Leaf' from the tube. This is also how I did the propeller blades. You can create every shade of silverish metallic shine with this waxy paste - from dull oxidised aluminium to a highly polished lustre. I've heard of modellers who have dissolved 'Rub 'N' Buff' in white spirit and airbrushed it with perfect results. Washes with strongly diluted matt black and umber enamels brought the detail to life. A few months ago I came across the new range of FS-compatible acrylic model paints manufactured by 'LIFECOLOR' in Italy. I decided to use these on my J9 and picked them not according to FS-numbers but eyesight. First, I airbrushed the upper surfaces with 'Aeromaster' zinc chromate yellow. The camouflage mottle was done with LIFECOLOR #UA 106 'Aermacchi Green'. I used my 'Thayer&Chandler Omni 5000' gravity feed airbrush with the compressor setting down at 0,9 bar (~12 psi). The 'LIFECOLOR' acrylics turned out to be very pleasant to work with. First I thinned them with distilled water in their pot and then added one drop of 'Tamiya' acrylic thinner to the airbrush's cup. This helped to improve the paint flow. I was surprised how smooth and long the paint flows from the airbrush without clogging the nozzle. A nice side effect for people like me without an extra modelling room. The paints are non-poisonous and completely odourless. Thumbs up for LIFECOLOR.
As it came to decalling I had to rely on 'Hobbycraft's' nearly ten year old decal sheet. How would the decals react? I remembered an experience with an older sheet of 'Hasegawa' decals. They broke up into ten thousand tiny splinters upon contact with water. Not to worry - my sample of 'Hobbycraft' decals performed very well considering it's age. The decals are a bit on the thick side, but of good colour opacity and perfect register. Before I applied the two wing roundels I airbrushed a grey disc as a neutral base. I think that otherwise the roundels would have appeared too different with black and white as a base colour. The decals went on a gloss base coat without a trace of silvering, but had to be given a heavy-duty treatment with 'Aeromaster' 'set' and (especially) 'sol' to finally snuggle down into the panel lines. Everything was sealed in with two layers of 'Aeromaster' semi-gloss varnish. No weathering for this one, folks. I guess the sixty J9s were some of the best looked after military aeroplanes that you could find in Europe during the early forties (apart from some Swiss Me 109s perhaps). Very subtle accentuating of the panel lines with strongly diluted matt black enamel and some exhaust staining had to be enough. The only exception were the inspection hatches on the wing undersurfaces that were allowed some fuel leaks.
Even though I might have sounded a bit critical at the beginning I have to admit that I really enjoyed building this kit. If you approach Hobbycraft's P-35A like a limited-run product offering a modelling challenge then you won't be disappointed. I especially liked 'Hobbycraft's' idea to provide the modeller with a generic number set and different squadron insignia options that enabled him (her?) to build nearly any J9 that ever flew in Sweden.
'Academy's' decision to offer this early nineties kit without such a nice decal sheet but at a 'Tamigawa' price is not very ...'customer-friendly', to say it politely... Finally I want to call on all you producers of fine and even finer decals. Study that lovely book 'Kronmaerkt' and surprise the modelling community with a Swedish Airforce Special (or two). Yellow and blue roundels certainly look good on a lot of interesting aeroplanes. And if ever a kit would really benefit from a resin correction set, it would be 'Hobbycraft's/Academy's' P-35A. Now I need a big Thunderbolt to park next to my little Swedish beauty.
Click the thumbnail to view the
image full size.
Model, Images and Text Copyright © 2001 by Werner
Scheibling
|


 This
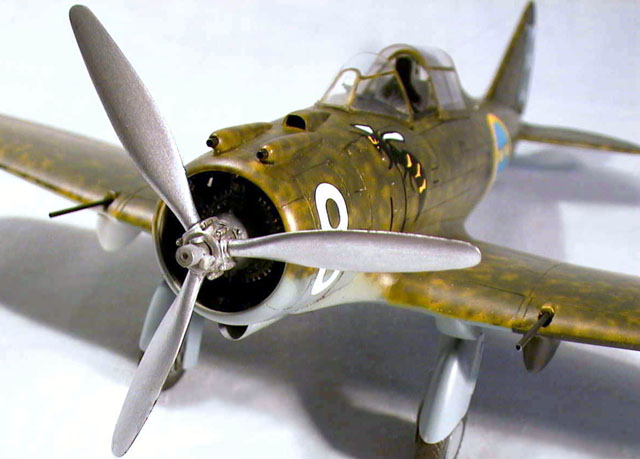
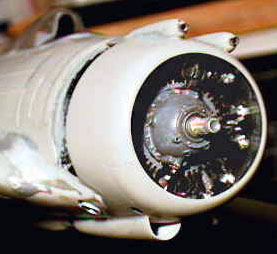
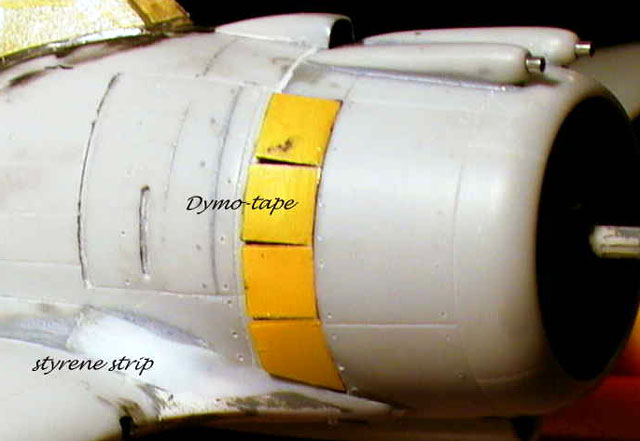
little gem consists, amongst other parts, of 14 cylinder barrels that have to
be glued to 14 cylinder heads, single pushrods cut from copper wire and an
authentic ignition harness from the PE-sheet. You have to see the cylinders'
cooling fins under a magnifying glass to fully appreciate the artist who built
the master for this kit. Unfortunately the 'Hobbycraft' cowling is slightly
too narrow for this beautiful replica (that should rather be displayed on a
stand and not hidden in a model plane). The operation worked, after the
cowling was milled out to nearly paper thinness. Additionally the rocker
covers of both cylinder rows had to be sanded down a little and the first
row's cylinders shortened by 1mm (invisible after the assembly). The 'Aires'
R-1830 is a '-86' model with front magnetos, designed for 'Tamiya's' F4F-4
Wildcat. So the magneto flanges on the reduction-gearbox had to be carefully
cut off and sanded and the engine now looks like a perfect 'early style'
R-1830.
This
little gem consists, amongst other parts, of 14 cylinder barrels that have to
be glued to 14 cylinder heads, single pushrods cut from copper wire and an
authentic ignition harness from the PE-sheet. You have to see the cylinders'
cooling fins under a magnifying glass to fully appreciate the artist who built
the master for this kit. Unfortunately the 'Hobbycraft' cowling is slightly
too narrow for this beautiful replica (that should rather be displayed on a
stand and not hidden in a model plane). The operation worked, after the
cowling was milled out to nearly paper thinness. Additionally the rocker
covers of both cylinder rows had to be sanded down a little and the first
row's cylinders shortened by 1mm (invisible after the assembly). The 'Aires'
R-1830 is a '-86' model with front magnetos, designed for 'Tamiya's' F4F-4
Wildcat. So the magneto flanges on the reduction-gearbox had to be carefully
cut off and sanded and the engine now looks like a perfect 'early style'
R-1830.
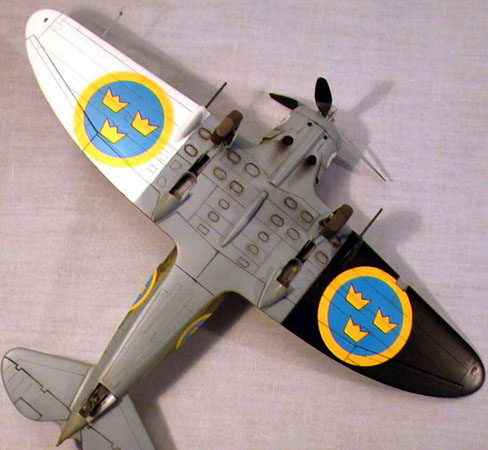 The
undersurfaces were done with 'Aeromaster' RLM black and RLM white. The bluegrey
came from 'LIFECOLOR', too. It is a mix of 80% #UA145 'French Bluegrey' and 20%
#LC 51 'Gloss White'. I let myself be inspired by two colour pictures (one of
them showing my 'white 8') in 'Kronmaerkt' to get the right hue.
The
undersurfaces were done with 'Aeromaster' RLM black and RLM white. The bluegrey
came from 'LIFECOLOR', too. It is a mix of 80% #UA145 'French Bluegrey' and 20%
#LC 51 'Gloss White'. I let myself be inspired by two colour pictures (one of
them showing my 'white 8') in 'Kronmaerkt' to get the right hue.