|
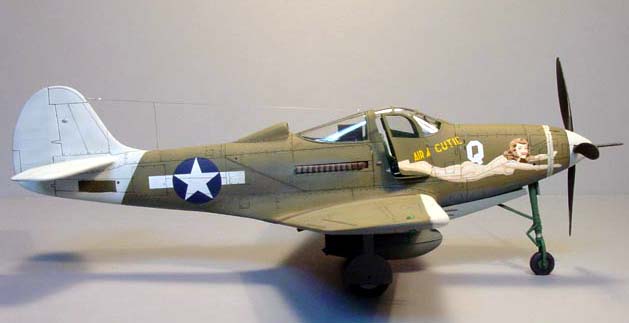
Bell
P-39D Airacobra
by Roy Long
 |
|
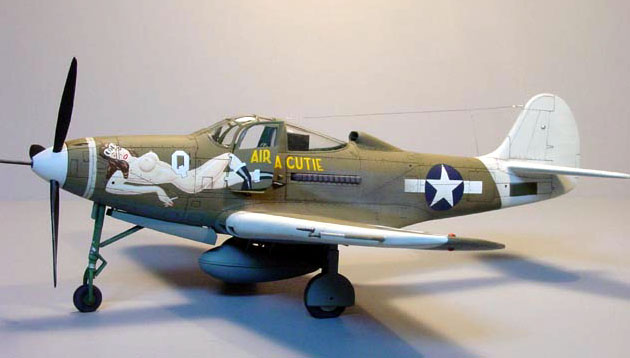
Bell
P-39D Airacobra |

Eduard's 1/48
scale P-39 Airacobra is available online from Squadron.com
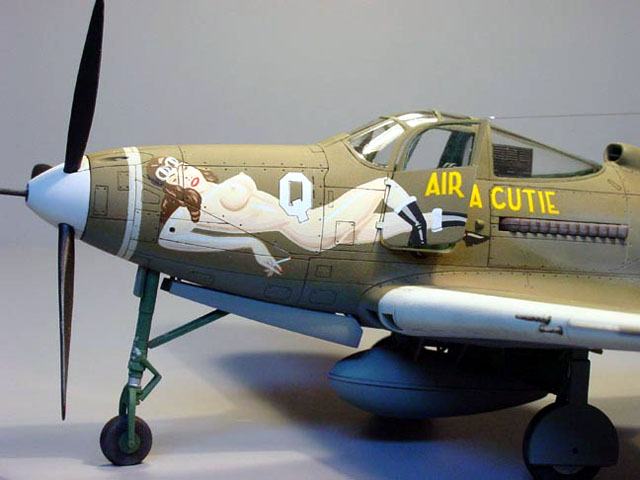
Certainly one of the flashiest and probably the most suggestive
examples of US nose art in WWII. Almost everyone is familiar with its large dual
nudes. It must easily be the most modeled P-39.
When Eduard announced their upcoming release of their P-400/P-39
series, I immediately wanted several and started to collect markings for Russian
marked ones. My wife gave me the first of my Airacobras for Christmas and
happened by when I was flipping through the S/S P-39 in Action. She pointed to
the drawing of "Airacutie" and asked "Why don't you do that one, it looks neat?"
I tried to explain why I would rather do a Russian one. After hearing my story
and looking at a profile or two she said, "Too boring". So, since I had the
Cutting Edge sheet already, I went to work.
I thought initially that due to the great design of this kit and
a fairly easy paint scheme it would be a nice, uncomplicated build. It could be
said that I go overboard when researching a model and "Airacutie" turned out to
be quite interesting. I have to say that the following is my interpretation of
the materials I had available when I built this model and I certainly welcome
any thoughts on this airplane.
In order to begin building this kit there were a few things I
needed to figure out.
The first thing was to determine what mark "Airacutie" was. This
is because of the large amount of optional parts that will allow the modeler to
build any variant of the P-39 from any kit other than the P-39Q and the two-seat
version. References suggest "Airacutie" was a P-39D, E, F, or even a P-400. I
personally believe it was a D or maybe a P-400. This opinion was based on four
photos (one full side profile and three nose shots) found in "Attack and
Conquer". These photos show the transformation of "Airacutie's" markings as well
as identification points. The identification points being the long barreled 20
mm cannon, nose wheel with a small hub and 12 stack exhausts. Probably the most
helpful point in its identification, the serial number, is not visible in any of
the photos. However, the only full side profile shows a distinct dark block in
the white tail area in the area where the serial number is often seen on RAF
allocated P-400/P-39s. This is compounded in the tables in "Attack and Conquer",
as there is no mention of a P-400 or P-39 being coded "Q" in the 36th FS.
Several times the book mentions the expediency, ingenuity and expertise of 8th
FG ground crews making an airworthy aircraft out of wrecks. This could easily
explain the switch from 12 to 6 exhaust stacks as well as any of the other
identification points I mention earlier. Therefore, identification of "Airacutie"
may be an impossibility. But, it is still one of the most well known examples of
US nose art.
I decided to model "Airacutie" as a P-39D and the unnecessary
parts went in the parts box. Construction went on pretty much without a hitch.
Instead of going through the entire construction I'll refer you to the well-done
construction reviews at Hyperscale and Modeling Madness as well as in Scale
Aviation Modeler International. There are a few things I will point out.
-
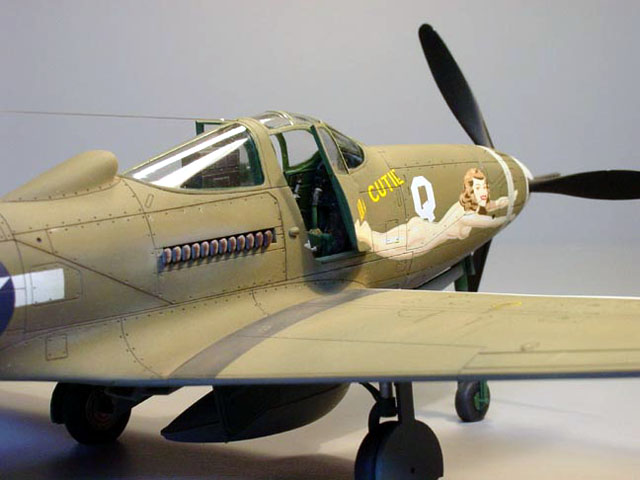
There is a small step around the rear
portion of the canopy on the real A/C.
-
I ran into a bit of aggravation with
the cockpit placement, as is noted in the reviews mentioned earlier, let the
cockpit "float" when the fuselage halves are glued together.
-
The wing trailing edges need a lot of
thinning, (more than what I did).
-
The flat bottom side of the nose
weight is the "roof" of the nose gear well, don't forget to paint it.
-
I added only a few things to the kit
to enhance it. The first is a "splitter plate" in the intake just aft of the
canopy. The second was to add two small pieces of tube to replicate the ends of
the nose guns sticking out.
-
Eduard's masks are apparently not
meant to be left on for an extended period of time. If left on too long they can
curl a bit. Mine did and I ended up with some areas of the canopies that got
painted over. To fix them I gently scraped the paint away with a toothpick and
brush painted some Future over the canopy.
|
Painting and Markings
- 36th FS, 8th FG |
"Airacutie" went through at least three distinct markings
"modifications". There very well could have bee more than one "Airacutie". The
first version sported a white spinner, thin white nose band, nudes on both sides
of the nose with out stretched arms, round national markings and a white tail
tip. The second was very similar with the difference being a repositioning of
the port side nude's arm and white bars added to the national markings. The
third (final ?) was essentially the same as the second with the addition of
white recognition markings on the leading edge of the wings and the entire tail.
I chose this scheme and incidentally, this is where I made two small mistakes;
1) in the photo of "Airacutie" in this scheme, it had 6 stack exhausts and, 2)
no main gear covers.
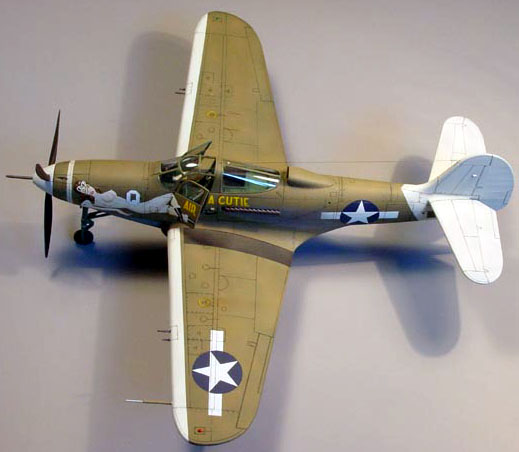
I started painting by spraying the undersides with Model Master Neutral Gray
then spraying blotches of white and dark gray in no specific pattern. This was
then sprayed with a very thin coat of Model Master Neutral Gray. The topsides
were done in much the same way with using Aeromaster Olive Drab as a base and
then spraying light gray and black in patches, then a thinned coat of Aeromaster
Olive Drab was sprayed over that. After the OD and gray dried for a while, I
sprayed a coat of Future in preparation for the decals.

Cutting Edge's decals were easy to use and I encountered no problems with them.
The only tricky part was the nudes as the both have portions on the doors. To
deal with this I used drafting tape to anchor the doors in a closed position
temporarily. I then applied the decals and let them dry. With a new exacto blade
I gut through the decals around the doors and applied a fair amount of Solvaset.
When the decals had dried, I started masking the areas that would receive white
markings. I don't like to use straight white for markings unless they are to
look like they are brand new, so I usually add a touch of gray (Yes, I like the
Grateful Dead) or a touch of the base color. In this case I added a bit of
Neutral gray to the white applied to the tail and wings. I added gray and OD to
the band around the nose. The areas of decals that were white received a misting
of Testors Dulcote with a touch of RLM 02 mixed in. The entire plane received a
coat of Dulcote. The weathering was done with artist's ink and pastel chalks.
The antenna leads are invisible thread with white glue insulators painted white
and tension springs made of thin copper wire formed around a thin stainless
steel wire.
-
Attack & Conquer, The 8th Fighter
Group in WWII, Stanaway & Hickey, Schiffer
-
P-39 Airacobra in detail, Bert Kinzey,
Squadron/Signal
-
Bell P-39 Airacobra, Dorr and Scutts,
Crowood
-
P-39 Airacobra in Action, McDowell,
Squadron/Signal
Click the thumbnails below to view
larger images:
Model, Images and
Article Copyright © 2001 by Roy Long
Page Created 18 December 2001
Last updated 04 June 2007
Back to HyperScale Main Page
Back to Features Page |
 Home
| What's New |
Features |
Gallery |
Reviews |
Reference |
Forum |
Search
Home
| What's New |
Features |
Gallery |
Reviews |
Reference |
Forum |
Search