Home
| What's New |
Features |
Gallery |
Reviews |
Reference |
Forum |
Search
Home
| What's New |
Features |
Gallery |
Reviews |
Reference |
Forum |
Search
|
|
|
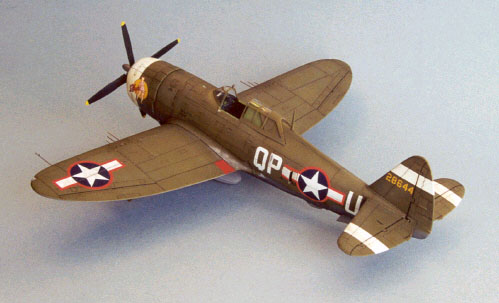
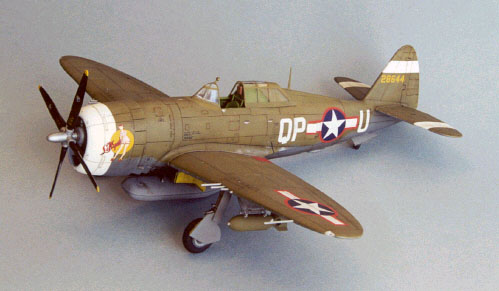
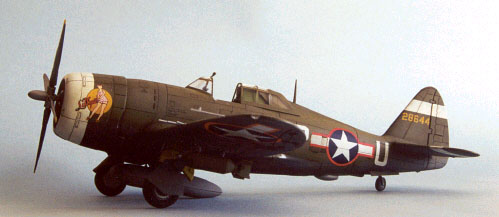
Republic P-47D-5-RE By Ben Backes
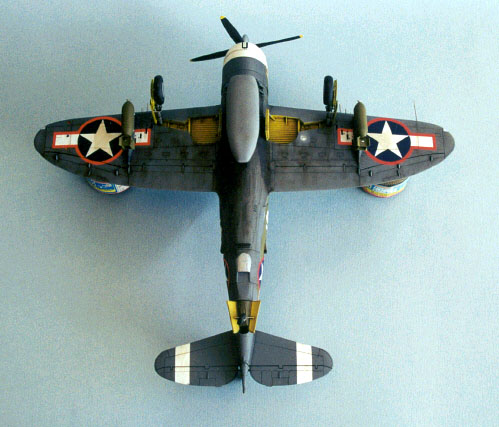
I really wanted to use this model to stretch my weathering skills. I used Model Master Acryl Yellow Zinc Chromate for the wheel wells and gave them a wash with brown artist oils and turpenoid. The rest of the paints were standard MM enamel. I started by painting the white areas, and then I masked those areas using regular Scotch tape. I like to use scotch tape because it’s thin and has nice sharp edges. I darkened the neutral gray to a shade I thought was more accurate and sprayed it. Next I sprayed the olive drab right from the bottle. I have not had good luck using Future as a clear gloss but I decided to give it one last chance.
The semi-rough undersurface would later have an unintended but really cool side effect. Also, the Future turned the neutral gray very dark, but it didn’t affect the green at all. I was assured by a friend that the flat coat would turn it light again, but it didn’t. Take a look at the underside picture. The drop tank was painted with the same paint at the same time as the underside, but I never sprayed it with Future or any subsequent flat coat. Cartograf prints these decals and although the registration and printing was brilliant, they wouldn’t settle into the panel lines no matter what I did. I ended up having to cut along every panel, and that was a pain on the ammo cover hinge. After decalling I applied a black wash on the control surface lines, and a brown wash on the remaining upper surface panel lines. By the way, I do my washes right on the decals, it doesn’t seem to hurt them. I hadn’t intended on doing every panel when I started, but it looked funny with just the panels that I thought would open a lot. I still have some experimenting to do with washes. On the underside I used a combination of black and brown and here’s where that semi-gloss surface came into play. When I went to wipe away the excess some of the paint wouldn’t come off because of the slight “tooth” the future still had. It ended up looking like very authentic oil and fuel staining that would remain if a ground crewman had tried to wipe off fluids. The heavy staining along the centerline (obscured by the drop tank) was based upon a photo in one of the Osprey books and is actually not as dirty as that real Thunderbolt. I painted that on with the oils and smeared it back with Q-tips and my finger.
After an initial flat coat (Testors lacquer) I then took the remainder and added just a drop of a slightly lighter olive drab mix then I used initially into the bottle and painted random squiggles all over the upper surfaces. Because there is little pigment in the mix it at first seems like you can hardly tell the difference, but each time you pass over a spot you already sprayed you get a slightly lighter spot. Eventually you get a very convincing uneven fading. I did follow along any panel lines. I wish it were more visible in these photos. There were also some imperfections that I touched-up using “fresh” olive drab. I also dry-brushed (sort of) with the Q- tips that I used earlier onto the gear doors and drop tank to add some dirt. It looks a lot like pastels but it won’t come off on your fingers. Finally I added just a little brown to some turpenoid and applied it directly to the flat coat to dirty up some of the white areas. I finished off the weathering with paint chips using Rub N’ Buff applied with sponges and toothpicks. Ben Backes Text, Models and Images Copyright © 2000 by Ben
Backes
|
 This
is the Hasegawa 1:48th scale P-47D Razorback kit. Like nearly all of my
models it is built out of the box, with the exception of aftermarket
decals. In this case the decals were from Aeromaster sheet 48-393 “4th
Fighter Group: The Early Days pt. IV.”
This
is the Hasegawa 1:48th scale P-47D Razorback kit. Like nearly all of my
models it is built out of the box, with the exception of aftermarket
decals. In this case the decals were from Aeromaster sheet 48-393 “4th
Fighter Group: The Early Days pt. IV.”
 I’ll
never use it again and here’s why. First, after many coats I finally got a
pretty smooth finish on the upper surface, but it wouldn’t do the same thing
on the bottom! I finally got fed up and used a brush to slather just the areas
that would have decals.
I’ll
never use it again and here’s why. First, after many coats I finally got a
pretty smooth finish on the upper surface, but it wouldn’t do the same thing
on the bottom! I finally got fed up and used a brush to slather just the areas
that would have decals.