|
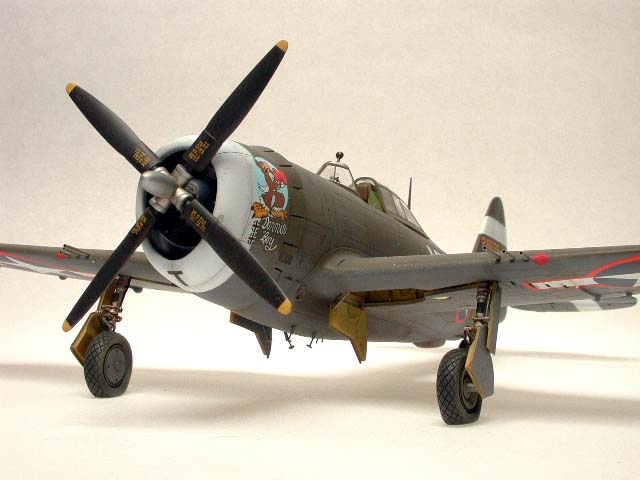
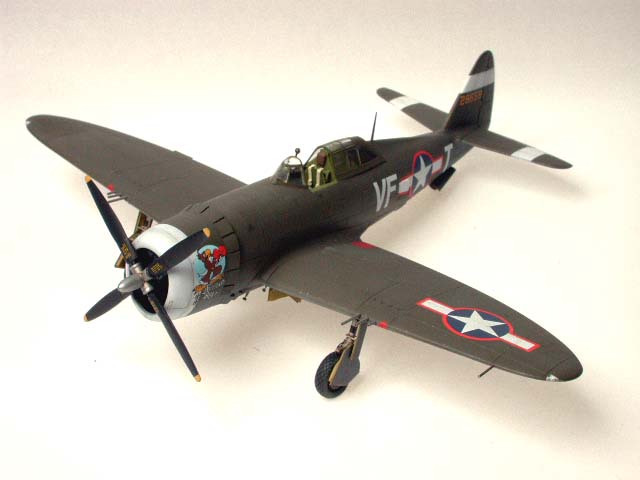
Republic P-47D-5 Razorback
by Floyd S. Werner Jr.
|
|
|
Republic P-47D-5 Thunderbolt |
images by Milton Bell

Hasegawa's 1/48 scale P-47D Razorback is available online from
Squadron.com
I know that this isn’t a German airplane,
but I can build other aircraft. Just don’t tell my wife - she thinks
that I only buy Luftwaffe stuff.
I’ve always liked the Thunderbolt so I
thought I'd take a little detour from my usual Luftwaffe subject matter.
The added benefit was that I could build another Don Gentile’s aircraft.
|
Accessories Summary
|
|
Aeromaster Decals 48-389 4th
Fighter Group: The Early Days Pt. 1
Aeromaster Decals 148-015
P-47 Thunderbolt Stencils
Aires 4077 P-47D Thunderbolt
wheel bay
True Detail 46007 P-47 Wheel
Set (flat disk cover)
KMC 48-6027 P-47D
“Razorback” Cockpit Set
Teknics TK48049 P-47 Landing
Gear Set
MV Lenses L173 Clear Lens
MV Lenses LS501 Colored
Lenses
Squadron 9502 Canopy (not
used)
|
Have you ever built a model where you just
had to have all the accessories? That is how I was with the Hasegawa
P-47D Razorback. I’ve wanted to build Don Gentile’s “Donnie Boy” since I
saw the 1/32nd scale decals from Superscale. I was going to have the
Superscale decals shrunk down for quarter scale but decided to wait. At
a show, I mentioned to Gaston at Aeromaster how much I wanted to build
Gentile’s aircraft both his Spitfire and Thunderbolt, as well as, his
P-51B in 1/48th scale. He just told me to be patient. Aeromaster finally
released the decals about a year later. I was in hog heaven.
I was collecting lots of aftermarket stuff for the Monogram kit and kept
right on collecting after the Hasegawa kit was released. It quickly
became evident that I would spend about three times the kit costs on
after market items. I just had to have it all.
I’ve always loved the P-47, even more than the P-51. As a little boy, I
remember buying the Revell 1/32nd kit with a record in it and listening
to it until my record player broke. I also stayed up late to see the
movie “Fighter Squadron”. It was a great color film loosely based on the
exploits of the Fourth Fighter Group, my favorite American unit. Of
course, there was the great color documentary of Thunderbolts in Italy.
I also enjoyed reading about the exploits of Don Gentile and his
wingman, John Godfrey.
Don Gentile
Gentile was an extremely good pilot with a
colorful, almost gaudily, decorated aircraft. He flew with the Eagle
Squadrons from the early days of Hurricanes and Spitfires through the
P-51B period. He scored his first victories with the P-47 over Dieppe
during the disastrous Allied landing.
By the time he left England he was the
leading American ace, but like any great hero he was fallible. He
crashed his beautiful “Shangri-La” at Debden following his last mission
on a low-level pass for the camera crews. Following this, he went on a
War Bonds tour in a brand new P-51D. Gentile was eventually killed in
the crash of a T-33.
Hasegawa's 1/48 Scale P-47D
Razorback
|
The kit started out life as Hasegawa’s 1/48
scale kit # JT58 P-47D Razorback ‘Southwest Pacific’. It represents the
D-5 variant of Thunderbolt. The D-5 had an enlarged keel to carry more
fuel but was not fitted with wing racks. It had straight cowl flaps all
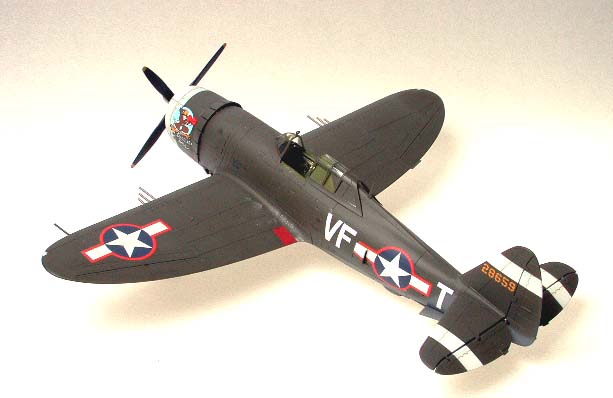
the way down. One of the things that made 4th Fighter Group P-47s
slightly different was that they only carried six guns in the wings.
There were fittings for eight but the logic was that a full load of fuel
and more rounds per gun (longer bursts) were preferred. The early Jugs
did not have that much excess power to carry full fuel and armament so a
compromise had to be made.
Typical of Hasegawa releases this kit comes in light gray plastic with
finely engraved panel lines, clear parts and some good quality, if not
thick, decals.
Fuselage
I started with a KMC cockpit set in my effort to use as much of my
after-market stash as possible. If you can find this set, it is
beautiful. The parts are a marked improvement over the kit cockpit.
Molded in light tan resin the KMC set is bubble free. The only trouble I
had was one section of the wiring harness on left side broke off in
handling and had to be replaced with real wire. The set is designed
specifically for the Hasegawa razorback kit. Construction was
straightforward and fit was exceptional. The entire interior was painted
with Model Master Interior Green and Dry brushed with Polly-S Interior
Green and Model Master Zinc Chromate. Finally the assembly was touched
up with a light drybrush of Titanium white. Silver Pencil was used to
simulate the wear patterns and chipped paint.
I wanted to reposition the control surfaces, but after checking the
Verlinden set and the KMC set with the kit parts I determined that the
rudder and the ailerons would not fit, either the shape or the hinge
line was wrong. I added the horizontal tail assemblies after I removed
the elevators from the kit. The fit was great and I added a tube to the
elevator horn to complete the assembly.
Engine
I decided to build the engine assembly at this time. The instructions
for the kit would have you construct it later in the assembly. I decided
to use the Verlinden engine assembly and the cowl flaps. The cowl flaps
for the D-5 are different than the ones provided in the Verlinden set.
The bottom two flaps were cut out to improve cooling. So with the
Verlinden set I had to fill in the bottom two flaps. I used epoxy putty
on the first flap and the second one was modified with a piece of .010
plastic. The conversion was very easy. If you decide to use the kit part
you won’t have to modify it, provided you use the JT58 kit. The only
problem with the kit cowl flaps is they are molded closed.
The Verlinden engine is beautifully molded with separate cylinders and
crank case assemblies. Care must be used when constructing the two banks
of cylinders to ensure that the whole assembly fits properly. I added
the prop governor and magnetos. The entire assembly was given a wash of
black and burnt umber and dry brushed with some silver. I decided to
keep the engine assembly inside the cowling so as not to disturb the
lines of the P-47. I did want to use one of the engine supports for
cowlings so if you look inside the cowling it is in there. I drilled a
hole completely through the entire engine assemble and the cowl flaps
back plate. This provided a mount for the prop and secured everything on
the engine assembly together. My cylinders were too big to fit inside
the kit cowling (D1) so the cylinders and the cowling were sanded to
allow for a perfect fit. Even with my sanding the Verlinden cowl flaps
weren’t correctly shaped for the front cowling. I heated the cowling in
hot tap water and then clamped it against the Verlinden part before
securing it with super glue.
Wings
I was going to show the 4th Fighter Group’s six gun installation with
the Verlinden set, which includes an open gun bay, but a problem arose.
I folded the photo etched parts as per the instructions but when I test
fitted them to the bottom of the wing I noticed that the distance
between the ejector ports wasn’t the same - not even close. I was then
faced with having to try to show it with the gun port being covered
over. It is an effective way to show it, but not nearly as impressive.
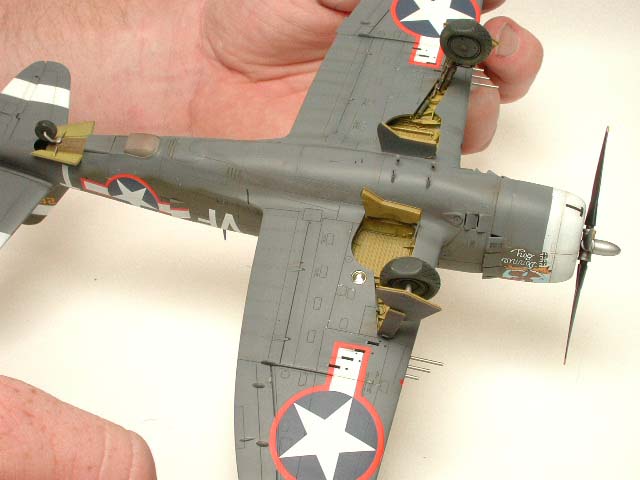
While the wings were apart I had to cut the wheel well detail so that I
could use the Aires wheel well detail set. This set is very impressive.
The detail is exquisite and the fit is a drop in for the kit wheel well
as soon as the detail is cut off the bottom wing. I also drilled out the
holes for the drop tank and sway braces at this time. I decided to paint
the wheel wells before putting them in the wing. I preshaded the entire
assembly and then painted Tamiya Zinc Chromate. The Tamiya color is very
yellow and it is not too opaque. It dries flat and this allows more
weathering to be done sooner. I painted the landing gear actuator silver
and started weathering. I used a thin wash of burnt umber and dry
brushed some titanium white. The whole assembly was then superglued into
the lower wing assembly. Be careful to get the alignment correct. Mine
is off just a little bit. Not that I noticed it until final
construction, of course. The upper wings attached quite nicely. I added
the pitot tube from a hypodermic needle.
The wings were then added to the fuselage and here was the first sign of
trouble. The fit was less than perfect. There were large gaps in the
front of the wings. I decided the way to handle this was to first attach
the upper wings to the fuselage. This did two things, first, it ensured
that the wing to fuselage joint was perfect and, secondly, the dihedral
was set correctly. Next I attached the bottom wing lining up the aft
portion of the joint. This ensured that there wouldn’t be the need for a
lot of filler. Next attach the bottom to the top and fill the resulting
seam. I made sure that the front was squeezed as much as I could to
minimize the front join. The Hasegawa kit has a noticeable valley where
the wings and fuselage meet so I used lots of superglue and filler. Of
course, I had to rescribe it. I checked the work with Alclad Aluminum
and reworked it a few more times until I was happy with it.
Gravity and a shag rug intervened when I tried to add the sway braces. I
lost two of four in the carpet before I knew it. I therefore had to
scratchbuild them. I made them out of tubing with a disk at the end. As
it turned out, I liked the scratchbuilt ones better as they were more
scaled and didn’t require a lot of clean up.
Landing Gear
I used the Teknics brass landing gear. Teknics include the main and tail
struts, as well as, a flattened tail wheel. I was worried about how they
would fit in the Aires wheel wells but the fit was excellent. The
Teknics gear fit the Aires landing gear doors fantastically. The landing
gear just needed a little clean up and a coat of primer. Then they were
painted with Alclad Aluminum and detailed with various colors.
The servicing data was painted flat black and the silver was writing was
added with a sharp knife to simulate the data plate. The landing gear
was finished off with a set of True Detail Wheels painted Aeromaster
Tire Black with the hubs Polly-S Neutral Grey.
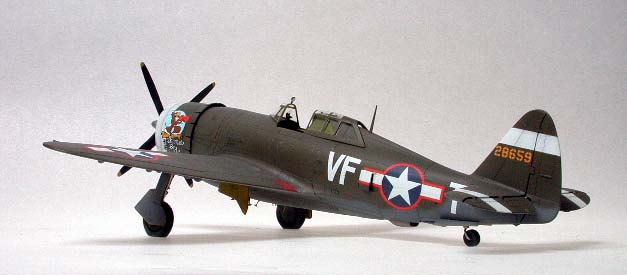
I washed the entire model with Dawn
dishwashing detergent and let it dry over night. I checked the surface
for imperfections by painting the model with Alclad Aluminum. After I
was happy with the results I preshaded the entire model with Polly-S
Flat Black. Polly-S Flat White was painted over the areas where the
identification bands would be. I then masked the stripes and the nose
markings. Note that the identification band on the vertical fin is 12”
and the ones on the horizontal are 15”. This is a small difference but a
noticeable difference. Next the Polly-S neutral gray was added to the
bottom. Finally, I used Gunze Olive Drab 2, which I thought looked
correct. After letting the model dry a day I coated it with Future in
prep for the decals.
I used the Aeromaster sheets for the Eagle Squadron: The Early Days
and the P-47 Data Sheet. A hint here, cut the fuselage stars and bars as
close as you can for the intercooler doors. This will aid in placement.
I had some slight problems with the wing stars and bars, but they were
quite acceptable to me after a few coats of clear. After letting the
decals dry for a few days a coat of Future was applied and the next day
a coat of Polly-S Flat was applied.
I started weathering with a light wash of
burnt umber. I chipped some of the paint to get to the Alclad underneath
and a silver pencil for more layers. Pastels were used on various panels
and for the exhaust stains. I always weather more than I think I should
then I cover the whole process with another coat of Polly-S Flat and
this tones down the finish and weathering. Everything is blended and
secured together.
Finishing Touches
I attached the last little items like MV Lenses for the landing and
recognition lights.
I assembled the prop assembly although I will get a KMC prop later and
add it. The canopy was dipped in Future allowed to dry. They were then
masked with Scotch Brand Magic Tape and painted as the rest of the
fuselage was.
The kit canopy fit so well and looked so good that I didn’t use the
Squadron one that I had.
Finally I added the wing tip identification lights. First I drilled a
small hole in the end of each and added Tamiya clear red and green as
required. Finally I added tubing for the guns.
I found the kit a real joy to build and
will build more. That is the best compliment I can give a kit. The
Thunderbolt will fit perfectly in my collection of Gentile aircraft. My
thanks to Aeromaster for finally putting out the decal sheet, now if we
can get his P-51D. The fit problems may cause some problems for
inexperienced builders but well within most modelers’ capabilities.
The aftermarket stuff was superior. The Aires wheel well set, Teknics
gear, KMC cockpit and True Detail wheels are definitely the way to go.
The Verlinden set while nice was not really necessary. The kit engine
was beautiful, but like the Verlinden engine was hidden. The Verlinden
engine required lots of experience to build properly. I did enjoy the
look of the Verlinden cowl flaps and the elevators are the only accurate
ones available, but don’t think this justifies the cost of the kit. I’m
sure that more of the set would be used in a bubble top P-47. I’ll build
one later for sure.
Model and Text Copyright ©
2001 by Floyd S. Werner
Images Copyright ©
2001 by Milton Bell
Page Created 27 November, 2001
Last Updated 04 June, 2007
Back to HyperScale
Main Page
Back to Features Index
|
 Home
| What's New |
Features |
Gallery |
Reviews |
Reference |
Forum |
Search
Home
| What's New |
Features |
Gallery |
Reviews |
Reference |
Forum |
Search