Squadron.com
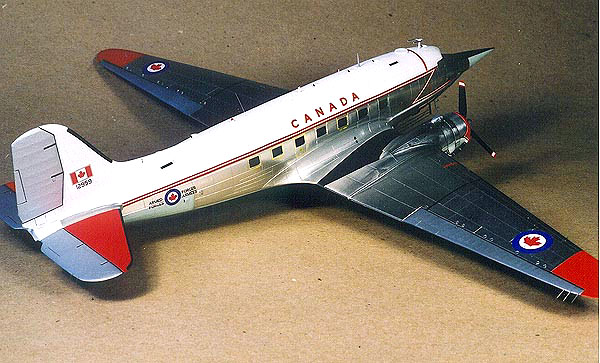
One of two of the fastest C-47’s in the inventory of the Canadian
Armed Forces, Pinocchio was used for tactical navigation training
primarily from CFB Cold Lake in Alberta. Dolly’s Folly was the other
NASAAR equipped C-47, which was equipped with the nose section from an
F-104 Starfighter.
Having purchased the Leading Edge decal/conversion set some years back,
and watching it collecting dust on my wall, I was finally motivated to
open it up and pull an Italeri DC-3/C-47 Dakota kit off my shelves. The
Leading Edge bag contains resin cast conversion parts consisting of the
F-104 nose section, various small scoops and antennae, along with finely
printed decals and a plethora of instructional/reference pages. Markings
are provided for no less than four different aircraft – the CAF’s
Pinocchio, a Lufwaffe NASAAR aircraft, a Lockheed Palmdale test aircraft
with the F-104 nose, and a “normal” CAF machine. The Luftwaffe codes
could also be re-organized to create a regular German Air Force C-47.
In addition to the nicely laid out instructions and reference photos in
the Leading Edge set, I was also lucky enough to have a full set of
walk-around photos of Pinocchio from a visit to Abbotsford Airport in
the early ‘90’s. My photos were of the same vintage as the photo
references in the Leading Edge kit, so accurizing the model was going to
be quite straightforward.
The Italeri kit is very accurate and nicely detailed, however the
preponderance of panel lines could be a debating point. While the
recessed panel lines are relatively fine, they are out of scale and
many, in fact, represent rivet lines on the actual aircraft rather than
real metal panels. I was going to approach this project as a “straight
from the box” exercise, using the Leading Edge parts, with some
superficial detailing to add more interest to the model.
Assembly was straightforward, following the kit instructions. I won’t go
into a lot of detail on the build-up, other than to mention some issues
that other modellers may wish to note:
-
The wing assembly and fuselage joints were
poor and could benefit from some additional structural stiffening,
including a wing spar or two.
-
My kit suffered from a slightly warped set
of fuselage halves that needed some TLC, and assembly with Zap-A-Gap to
set the joints up tightly.
-
The engine cowling to nacelle assembly was
“less than positive” and additional mounting tabs or pins might be
beneficial.
-
The tailwheel strut assembly is too long,
coupled with a shallow mounting well, creates an incorrect ground
stance.
-
The representation of the fabric control
surfaces is too coarse and could use some sanding down with some 600
grit sandpaper to smooth them out.
Some of the additional details I added consisted of the following:
-
Leading edge landing lamps created from a
“pressed foil” lamp with some clear plastic glued over the leading edge
of the wing.
-
Marker receiver antenna posts and wires
under the nose.
-
Brake lines at the landing gear struts
added from small diameter wire.
-
Scratchbuilt cowling scoops and wire “tube”
connectors to the exhaust pipes.
While building the model, I ruminated about how to re-create the bare
metal surfaces of the aircraft. I’d used various paint methods before
and the task of masking, polishing and the fragile finish was never
quite satisfactory. I started painting the non-bare metal areas of the
model first- with Floquil’s Old Silver used for the fabric control
surfaces and landing gear; flat white, followed by gloss white for the
upper fuselage and areas which were going to be painted red later; a
mixture of gloss grey (FS16473) mixed with Humbrol’s Sky to try to
capture that elusive shade of the Canadian Forces Grey 501-109 colour on
the underside; Testor’s Model Master Guards Red for the wingtips and
stabilizors; and finally flat black for the de-icer boots on the leading
edges of all the flying surfaces, the wing walks, and the anti-glare
panel on the nose.
After much thought, I decided to try to use Bare Metal Foil as the
easiest method to create the bare aluminum surfaces. The real aircraft
was kept in very clean condition, and my stock of photos indicated that
the bare aluminum surfaces were kept polished. I felt that the Bare
Metal Foil might simulate this better than a painted-on finish. Well, to
cut to the chase, yes, the BMF was easy to apply and maintain the
existing painted areas, but the actual finish was too shiny and toylike.
It just lacked the depth and sheen of real aluminum. Well, I could have
stripped it off and used another method, but by then I just wanted to
get the model finished, to make room for my next projects. I applied the
decals, which went on beautifully, but some patience and care is needed
to apply those long fuselage cheat lines. I cut mine into sections to
make them easier to get onto the model and aligned properly.
Once all the decals were dry, I thought I’d shoot a light coat of
Testor’s Dullcote onto the model to blend in the decal film and maybe
reduce the shininess of the Bare Metal Foil. I mixed some Dullcote with
an equal amount of Glosscote in order to get a satin-like sheen to allow
me to build up an overcoat without getting too flat a finish, spraying
it on the model with my Badger 200 airbrush.
I painted and decalled the props as a separate exercise, using some
Arrow Graphics prop stripes for the red/white/red tips, and I applied
some Hamilton Standard decals from my spares box. They got shot with the
satin finish at the same time as the rest of the model. Final touches
included adding the antennas on the fuselage spine and under the nose
and adding the wing leading edge landing lamps. Some “grunge” weathering
was added to the engine nacelles and wing undersides using a combination
of chalk pastels, dark grey washes and some graphite rubbed onto some of
the bare metal panels. The last thing I did to the model was to add the
trailing edge anti-static wires to the ailerons, rudder and elevators,
using stretched sprue tacked in place with Zap-A-Gap.
It was a satisfying exercise and looking at the finished model, I found
that I was less critical of the Bare Metal Foil appearance, after the
satin overcoat had dried and I did dome weathering.
Model, Description and Images Copyright ©
2001 by Geoff McDonell
Page Created 27 October, 2001 Home
| What's New |
Features |
Gallery |
Reviews |
Reference |
Forum |
Search
Home
| What's New |
Features |
Gallery |
Reviews |
Reference |
Forum |
Search
