|
Panzer
IIIL
by
Mike Millette
|
|
|
Panzer IIIL
|

HyperScale is proudly sponsored by
Squadron
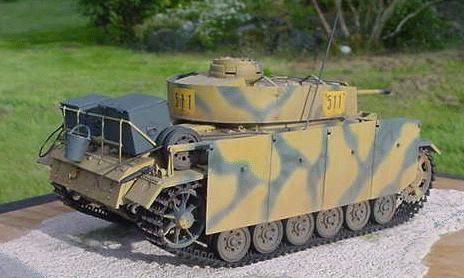
One German armor subject that I have wanted to model for some time
was a Panzer III L with some rather unique markings. This Panzer III
shows up in both the Squadron Signal "Panzer Colorss" and the
Kagero "Panzer III ausf. L/M". Both books include a color
profile that interprets this vehicle with a gray base coat covered by
fine lines of olive green over sprayed with large "clouds" of
panzer dark yellow.
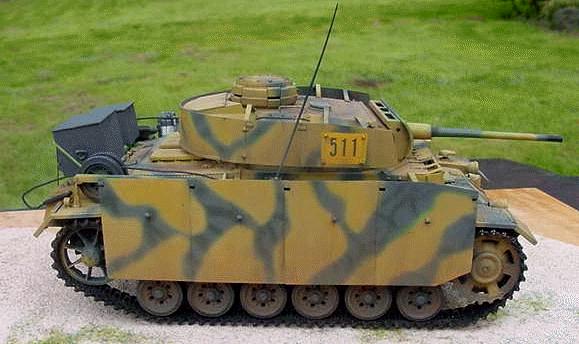
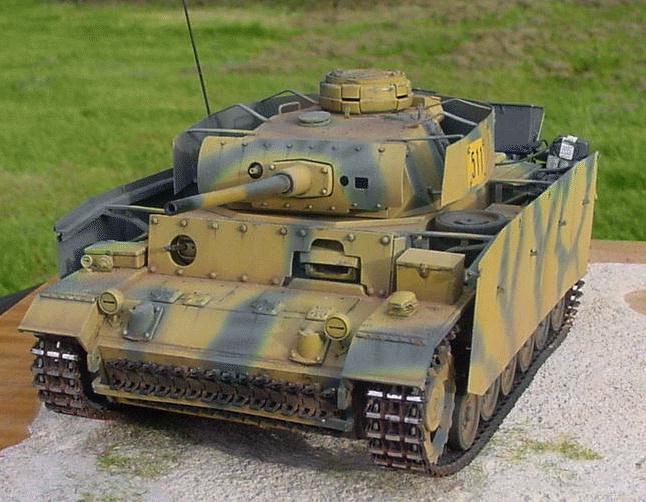
The vehicle carries the tactical number "511" in what
appears to be a yellow rectangle on the back and sides of the turret
skirt.
This is a conversion of Dragon's 1/35 scale Flammpanzer to a Panzer
III L
To start with, one might ask why did I go to the trouble of
converting Dragon's Flammpanzer when Tamiya makes a perfectly good Panzer
IIIL. That's easy - I was able to purchase the kit from a local hobby
store for $15US. Also, after examining both the Tamiya kit and the
Dragon kit, it seemed to me that it would be easier to convert the
Dragon kit into an L than it would be to convert the Tamiya kit into a
later version, which I also wanted to do. I'll use the Tamiya kit to
build an ausf M.
Fortunately the Flammpanzer kit, as it is designed and packaged,
consists of a number of sprues that carry parts for multiple versions of
the Panzer III. This is the happy result of Dragons approach to model
sales, which is to maximize the number of common sprues for to enable
the marketing of a wide variety of versions. The kit itself looks quite
nice and with a few additions makes a very nice model. There are of
course a few things to look out for, but all in all construction is
rather straightforward.
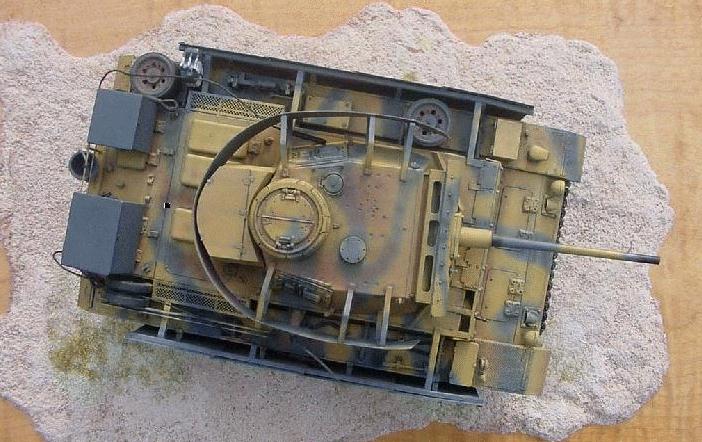
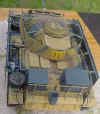
The kit was detailed using a variety of products.
-
The hull skirts were added using Aber's
excellent PE set.
-
Aber's Photo-Etched grilles for the
engine air intakes were also used.
-
The turret skirts were made from thin
sheet plastic and thin brass strip to make the support brackets. I
had such a difficult time trying to get Aber's turret set to line up
properly that I ended scratch building these items.
-
Bolt heads were added using short
sections of plastic rod with a hex shaped cross section. These were
cut using "The Chopper".
-
Wiring was added for the driving
lights.
-
The tow cable tie downs were made using
leftover PE "sprue" from a couple of different Aber sets.
These were then detailed with PE wingnuts.
-
The cargo rack was constructed using
the same brass strip used to make the turret skirt brackets.
-
The cargo boxes were scratch built to
match the two boxes shown carried by "511" in the
photograph. They are made of sheet plastic with lead foil & wire
handles.
-
The dangling bucket was
"borrowed" from a Tamiya SdKfz 251.
-
Tamiya's "German Fuel Drum"
set provided the jerry can. It has a white cross painted on it to
distinguish it as one used for carrying water.
-
A Tamiya Panzer III L turret was also
used. During construction, I damaged the Dragon item beyond repair
and replacing it with the Tamiya turret, ordered from Tamiya's parts
service, turned out to be the easiest solution.
-
Fruil's ATL 04 pinned track set was
used. I love these track sets because I can paint & weather them
and then once finished, lightly rub them on a piece of 400 grit
sandpaper and "viola" perfect looking track wear. They
also sag just right, not that you can see it with the skirts in
place, but I know it's there!
-
The tow cables are a combination of
Karaya cables and the Tamiya cable ends that come with the Panzer IV
OVM sets. These cables look great and best of all they are super
easy to work with.
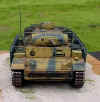
The kit was painted using a combination of Model Master, Aero Master
& Floquil enamels.
First the kit was painted in Model Masters Panzer Gray which was
lightly highlighted and shadowed using tinted versions of the base
color. Then Aero Master's RLM 70 was used to paint the fine green lines.
Finally a lighted version of Floquils SP Panzer Yellow was used for the
large "cloud" pattern. This was further lightened and sprayed
randomly within the "clouds".
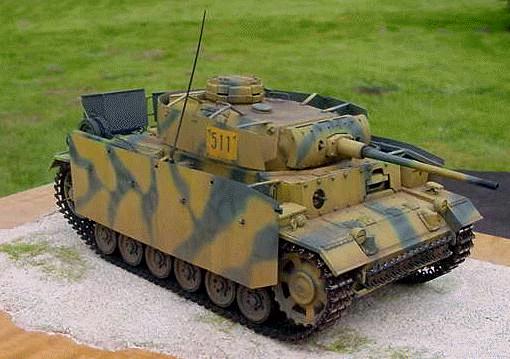
The markings were applied by first masking off a rectangle for the
background. Clear gloss was applied to the turret skirt and decal
numbers were applied. I could not find the correct decals so I used some
railroad decals with approximately the right font and then sliced them
up so that I could add extra pieces to "stretch" them. The
entire kit was then sprayed overall with clear flat lacquer. Rather than
applying an overall wash I sprayed a heavily thinned mixture of
red-brown and black randomly over the entire model.
A localized pin wash was applied where shadows would appear around
raised detail and finally pastels were applied to simulate that last
layer of road dust.
Aside from the frustration involved with the odd fit of the Aber
turret skirts, trashing the original kit turret and a few irritating
clean up tasks in delicate areas (the idler wheels in particular) this
was a fun build.
I like the combination of the green and yellow over the gray base
coat and all in all I'm pretty satisfied with the effort. I'm really
happy with the way the pastels simulate the accumulated road dust.
Click the
thumbnails below to view images full-sized.
Click the "Back" arrow on your browser to return to this page.

Model, Images and Text Copyright © 2001 by Mike
Millette
Page Created 06 June, 2001
Last Updated 04 June, 2007
Back to HyperScale
Main Page
Back to Gallery Index
|
 Home
| What's New |
Features |
Gallery |
Reviews |
Reference |
Forum |
Search
Home
| What's New |
Features |
Gallery |
Reviews |
Reference |
Forum |
Search