|
Consolidated PBY-2 Catalina
by Gil Hodges
|
 |
|
Consolidated PBY-2
Catalina |

HyperScale is proudly supported by
Squadron
The Consolidated PBY Catalina flying boat is world
famous. It set the standard that all other flying boats are judged by
for range, durability, and dependability. It's illustrious history is
well documented. Suffice it to say that the pre-WWII models set new long
distance cruising records; it gained fame as the plane that found the
Japanese fleet at Midway; it saved many lives as it patrolled over
lonely stretches of water; dropped bombs under the guise of "Black Cat"
squadrons; and still soldiers on today toting supplies to remote regions
and fighting fires as a water bomber.
My interest in the PBY-2 stemmed from two sources. The
first is a natural love of those gorgeous 1930's US Navy planes with
"chrome yellow" wings. The second is a relative who flew them. My great
uncle, Ed "Pappy" Bankston, joined the Navy in 1934 as an aircraft
mechanic. He was able to qualify for pilot training and graduated from
Pensacola in the spring of 1937. His first assignment was to report to
San Diego and take a brand new PBY down to the Panama Canal Zone. He
went on to fly for the Navy until 1957. He flew Devastators on the
Yorktown at the beginning of WWII (a very interesting story for another
time!), ferried aircraft the latter half of the war, and eventually
ended up performing acceptance testing of the F9F Cougar towards the end
of his career. When Belcher Bits released their conversion set for the
Monogram 1/48th PBY-5, I was primed and ready.
The Belcher Bits Conversion
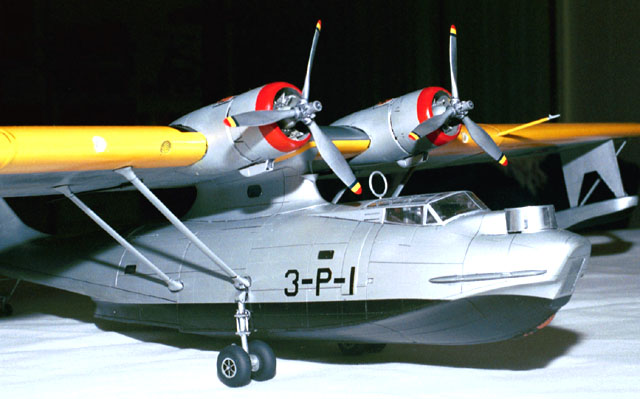
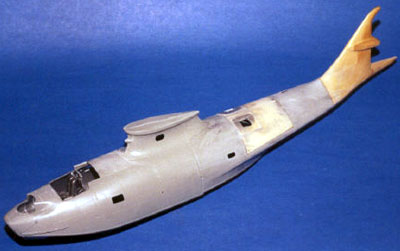
The Belcher Bits conversion set is nicely molded. It
contains a new solid tail with a separate rudder, a middle fuselage
section with "hatches" to replace the bulged waist blisters of the -5,
two sets of engine plugs, oil cooler scoops for the wing leading edges,
early style prop hubs, and spinners for the hubs. The parts are very
well molded, with almost no pin holes and delicate indented panel lines.
You can build a PBY-2/3/4 with the parts provided. The instructions also
tell how to modify the kit parts to build a PBY-1.
The model was built straight from the box except for the
conversion work.
 The
conversion itself is pretty straightforward. The fuselage has the
heaviest work. The kit tail has to be removed. The instructions clearly
show where to do this. The
conversion itself is pretty straightforward. The fuselage has the
heaviest work. The kit tail has to be removed. The instructions clearly
show where to do this.
The fit of the resin tail to the Monogram fuselage was
very good. The area of the waist section that has to be cut away is a
little trickier. The cut lines don't all fall directly on panel lines.
The instructions are very good in this area also, and the fit of my part
was good. Just go slow, test fit as you remove sections, and remember
it's a lot easier to cut more plastic away than it is to fill and sand
later! Also, it will help the fit of the new waist section if the gun
mount pedestals in the interior are cut down a bit.
I didn't bother to detail the waist section since the
hatch windows limit viewing the interior. The conversion set would
require a bit more work if you wanted to open the hatches.
Once the new parts were in place and sanded smooth, all
the adjacent panel lines were rescribed. This led to the only
shortcoming in the conversion kit. The Monogram fuselage has fine
indented rivet detail. There is none on the resin parts, and you lose a
lot on the rear section after sanding everything smooth. Be prepared to
reapply all those rivets so that the new and the old blend together. I
tried a ponce wheel (no luck), but ended up drawing lines on the model
as a guide to "riveting" the model with a sewing needle.
 The wing is a lot easier. The wing is a lot easier.
The wing was first assembled
and then the kit engine nacelles were cut off flush with the leading
edge of the wing. Next, the appropriate -2 resin nacelle plugs were superglued
into place. These were the best fitting parts in the Belcher Bits set.
Next, the kit cowlings were shortened according to the
instructions. They have to be cut at a spot that is flush with the rear
of the kit engines. I placed the engines in each of the cowls and then
wound a strip of tape around the outside to mark the cut lines. This
insured that the backs of the cowls would be "squared up" after cutting.
The engines were painted and installed, and the cowls
were mounted onto the resin nacelle plugs. Two holes were drilled into
the leading edge of the wing to accept the resin oil cooler intake
scoops. That completed the conversion for the wing.
The rest of the modifications were minor. The kit prop
blades were cut off of their hubs. I drilled holes (#72 drill bit) into
the ends of the blades and the resin hubs. That allowed me to insert
bits of floral wire into the holes to act as mounting pins. The kit
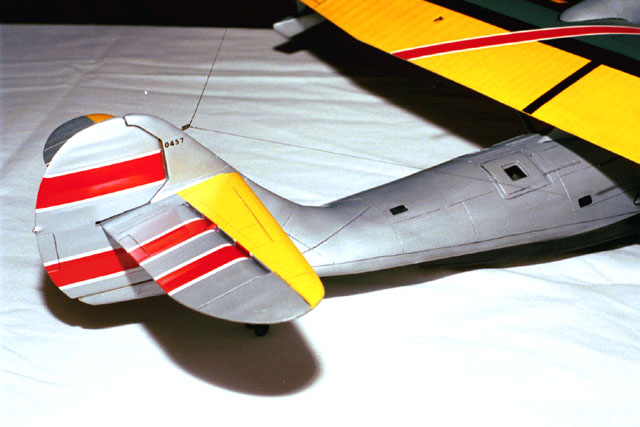
horizontal tails were used by sawing off the molded mounting stubs, and
"squaring up" the gluing edge. The resin tail has bumps that serve as
locators that fit the holes left in the kit stabs after the mounting
stubs are cut away (thoughtful engineering).
The canopy was masked with Tamiya tape. The hatch
windows were blanked off with sheet plastic cut to shape and the turret
area was stuffed with tissue. I didn't worry about the small windows.
The kit wing lights were replaced with sections of clear sprue that were
sanded to match the wing leading edge and then masked off. The entire
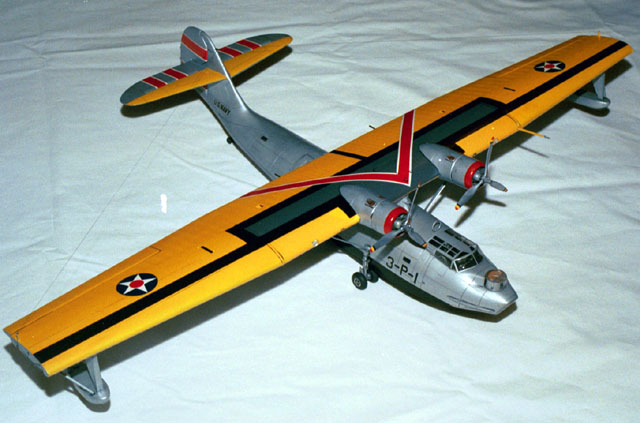
model was then sprayed Floquil Old Silver. The initial coat served as a
primer. Blemishes were touched up and then more Old Silver was applied.
Model Master Chrome Yellow was used for the wing and the stabs. The wing
walk area on the top wing was painted in black and RLM 66 (sacrilege!).
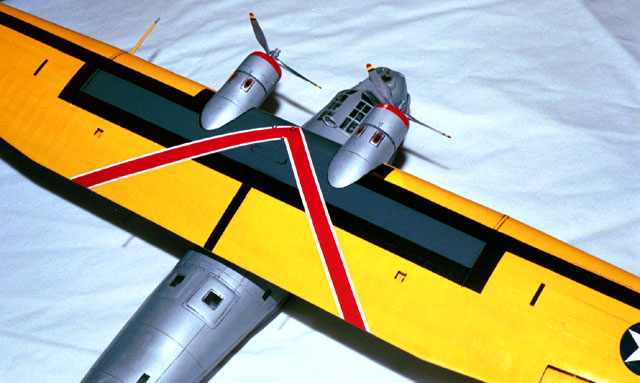
The markings are supposed to represent Patrol Wing 3 in
1937. The model was masked to ready it for the chevron, cowl paint, and
the tail stripes. First silver was sprayed on so that the next color,
white, would cover easier. When the white had dried, it was masked and
the red was applied. The 3-P-1 and the serial numbers on the tail are
dry transfer lettering. The stars and the US Navy are spare decals. I
couldn't find a Pat-3 emblem anywhere. Perhaps I'll be able to add one
in the future.
All of the small parts were added to complete the model.
The only variation here was that the loop antenna was moved from the
wing to just behind the canopy. Hatch windows were cut from clear sheet
and cemented into place with a generous coat of Future. The small
windows were all filled with Micro Crystal Clear (they took a week to
clear up!). The props were painted with SNJ silver, which eased the
masking and painting of the blue/yellow/red tips. The tail gear was
beefed up with wire after the heavy resin tail broke the kit piece.
All in all, this was an enjoyable project. I highly
recommend the Belcher Bits set to everyone with a hankering for
something "big, yellow, and flashy" on the shelf. My collection now has
a more personal connection to the past.
Happy modeling everybody!
Click the
thumbnail below to view larger images:
Text, Images and Model Copyright © 2001 by
Gil Hodges
Page Created 13 December, 2001
Last Updated
04 June, 2007
Back to HyperScale Main Page
Back to Features Index |
 Home
| What's New |
Features |
Gallery |
Reviews |
Reference |
Forum |
Search
Home
| What's New |
Features |
Gallery |
Reviews |
Reference |
Forum |
Search
