|
Spitfire VIII
Converting Hasegawa's 1/32 Kit
by
JD King
|
 |
|
Supermarine Spitfire
VIII
|

Hasegawa's
1/32 scale Spitfire Mk. Vb is available online at
Squadron
The RAAF received the first of its 410 MK VIII Spitfires in Oct 1943.
Their first operational service was in the defence of Darwin in Northern
Australia. Here they replaced tropicalised (using the deep Vokes filter)
Spitfire VC’s that were struggling to compete due to their single stage
Merlins. Other Squadrons joined the push north into the island chains
between Australia and Japan. Principally operating with other RAAF and
USAF units from the island of Morotai. RAAF Spitfire operations ended
with the cessation of hostilities with Japan in late 1945. Large numbers
of aircraft were no longer required so those lacking performance (P-40N)
and range (Spitfire) were replaced by the Mustang and scrapped.
I am normally a 1/48 scale fan, but every now and then a 1/32 scale
aircraft begs me to built it. As an avid modeller of Royal Australian
Air Force (RAAF) subjects (and a glutton for scratch-building and
home-made decal punishment) my “top 3” have been the Avon Sabre, F-4E
and Spitfire Mk VIII. The controversy over the dimensions of the 1/48
Hasegawa Spitfire Mk IX a while back, gave me the incentive to pull a
long awaited project of the shelf, the Mk VIII.
|
Hasegawa's Kit and the Paragon
Conversion |
The base kit used was the aging but still very sound Hasegawa 1/32
VB. Other than a complete rescribe of the raised panel lines the kit
builds an effective replica with little effort. The conversion used was
from Paragon Designs. The set contains a 3 piece 2 stage Merlin cowl
with separate exhaust assemblies, tropicalised carburettor intake,
spinner, 4 individual propeller blades, four-spoked bulged main wheels,
large radiator, pointed rudder, late type elevators, retractable tail
wheel, C wing cannon blanks and blisters, and high altitude wing tips
(for the modeller keen on a VII). All are cast in a light cream resin,
with finely engraved panel lines and little flash.
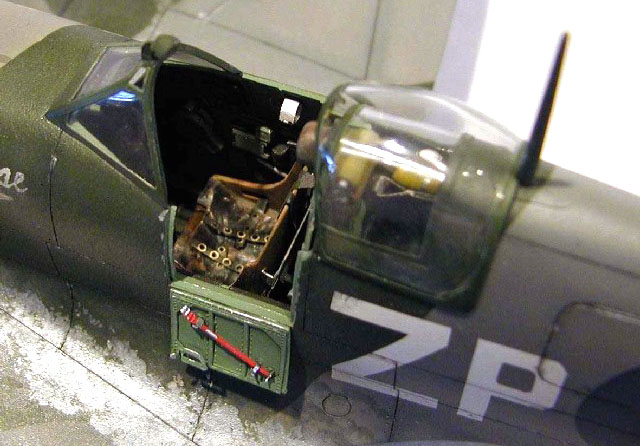
To give the kit that extra something the relevant bits of Eduard’s
photo etched VB interior and exterior detail sets were also used.
I began construction with preparation of kit parts to accept the
conversion. The simple instructions show shaded areas that need to be
removed, mostly the cowling forward of the fuel tank, fixed tail wheel
and small area of fuselage, rudder, elevators and oil cooler. If you
intend to rescribe the raised panel lines do this first. I found that
with the nose missing, the remaining fuselage lacked some of its earlier
rigidity. Once rescribing was completed the cockpit was started.
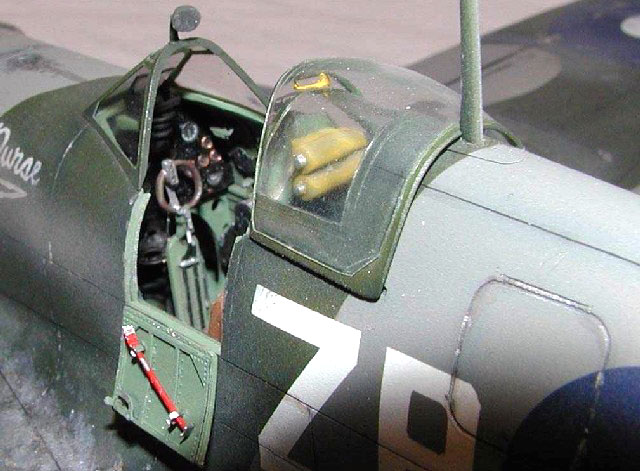
The cockpit is about half modified kit parts and half photo etched. Most
of the work was spent improving the sidewall detail, removing moulded
and replacing with photoetched parts. The photo etched seat was found to
be too big. It even looked oversized to the naked eye, so it wasn’t
used. The kit seat was modified by shaving some of its height off and
cut, drilling the slots found in the sides and rear. A small leather
seat cushion was made by layering some aluminium foil and cutting to
shape. This way the surface rippling could be achieved. The instrument
panel and control collum were modified with scratchbuilt and PE parts.
Finally the PE Sutton harness was added, including the connecting wires
that head toward the radio in the rear fuselage. Humbrol enamels and
some oil washes were used to complete the look. The two fuselage halves
were then joined with no filler required.
The three piece cowl was then constructed. I found that the join between
the upper and lower was not good. The uppers did not have the curve of
the lower. The three pieces were taped together before CA glue was
inserted into the joins. The assembly was then reshaped and rescribed as
required. The fit to the remainder of the of the fuselage was
surprisingly good. The only filler required was to where I had butchered
part of the original cowl removal.
Now for the wings.
The MkVIII had a C wing so significant work is required to modify the B.
The conversion provides resin inserts that are placed inside the
original cannon blisters. Once set, these permit the outer wing to be
sanded flush. The small oil cooler is the cut out and a symmetrical
radiator inserted. Careful filing and dry fitting are essential during
this step to avoid a later filling nightmare. Scratchbuilt details are
added to the undercarriage bays before the wing halves are secured. Wing
vents, spent case ejection ports and landing light panels are then
filled along with the outer 7mm of the aileron. The wing is then
rescribed as a “C” variant, including leading edge fuel tanks and short
span ailerons. Resin blisters and cannon blanks are added and new
ejection ports cut. The wing is then mated to the fuselage. Styrene
spacers were used the lift the upper wing at the centre in order to
achieve a join that required little filler. The remainder of
construction is straightforward, less the propeller.
The conversion provides four separate blades and a solid one-piece
spinner. The blades are attached to the spinner via a simple butt joint,
so a jig is in order to achieve correct alignment, but even that can be
muffed so I tried something else. After preparation, each blade had a
hole drilled into its base. A corresponding hole was drilled into the
spinners locating points. A length of styrene rod was then inserted into
each blade and the exposed rod into the spinner. With careful drill size
selection no glue was required and pitch and alignment is achieved
through simple twisting or a slight bend.
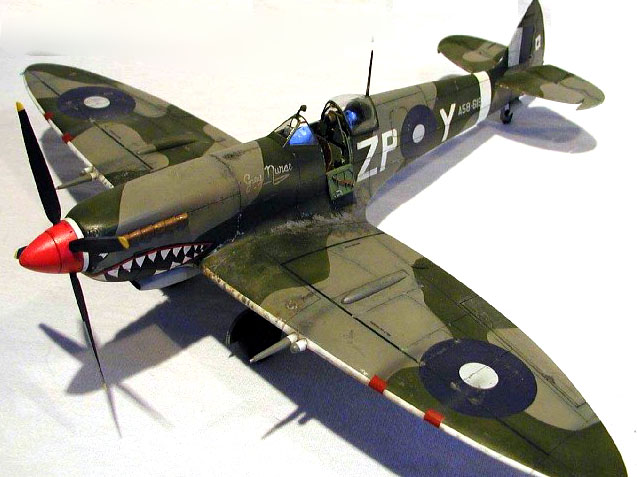
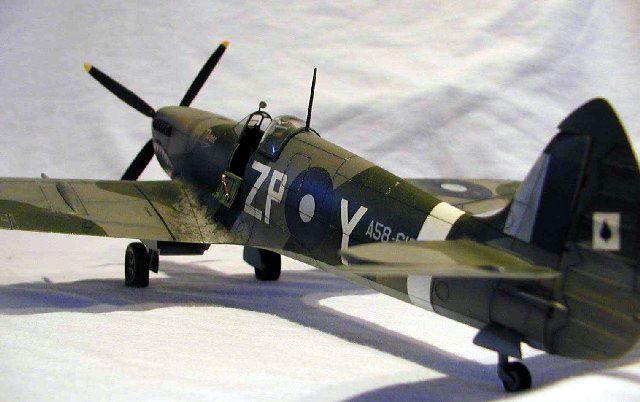
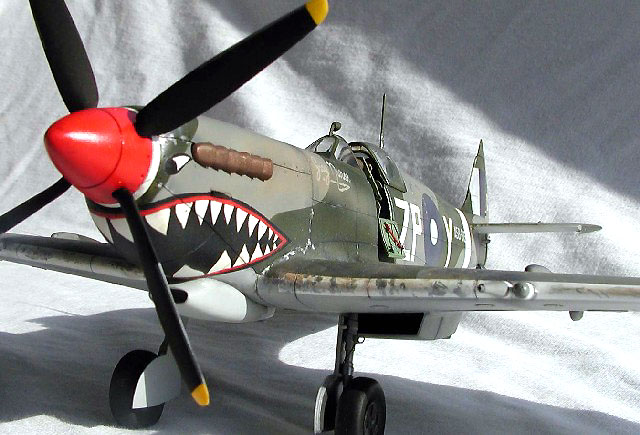
The aircraft depicted is HF VIII A58-615 ZP-Y of 457 Sqn RAAF. It is
depicted as it was just before it was converted to components in 1945.
It carries the final (large) version of the squadron’s famous shark
mouth and a white fuselage band that was applied not long before its
demise. The finish is Humbrol and Aeromaster Warbird enamels. I wanted
to achieve the worn and faded look the aircraft quickly developed whilst
operating from the island of Morotai. Pre shading with black on a white
primer was used in conjunction with lightened versions of the (RAF) dark
green, ocean grey and medium sea grey camouflage. Paint chipping was
achieved with Model Master Stainless Steel buffing metalizer applied
with a brush.
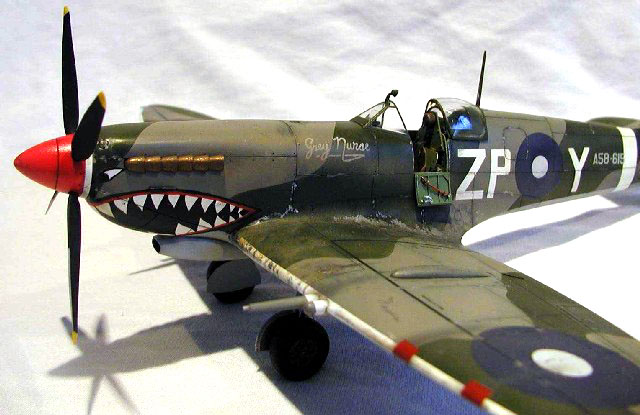
Squadron codes were made with home made masks placed over the primer
before pre shading. Roundels and fin flashes are from Aussie Decals WWII
sheet. The “grey nurse” and Ace of Spades are hand painted directly onto
the model. If I had my time again I would have used some decal film to
pre-paint the artwork before applying it to the model. Serials are from
Aussie Decals range of 72/48/32 A Numbers in pale grey.
The shark mouth was painstaking. Firstly the basic shape was masked out
and sprayed white. Then teeth were masked out with Tamiya tape cut by
hand and placed on individually before a layer of black was applied.
Finally the red was masked out and sprayed. A similar method was used
for the eyes. A fiddly procedure but not a bad result.
The kit was completed over a period of about two and a half months.
This was my first real forte into such a project where major surgery and
complete rescribing is required. I found it to be a reasonable challenge
and a very enjoyable project that could be completed without necessarily
being a very advanced or experienced modeller.
I would recommend it to anybody wishing to build the best looking of
all the Spitfire Mk’s particularly with 457 Sqns wonderful markings.
Now where did I put that Sabre...
Text, Images and Model Copyright © 2001 by
JD King
Page Created 09 December, 2001
Last Updated
04 June, 2007
Back to HyperScale Main Page
Back to Features Index |
 Home
| What's New |
Features |
Gallery |
Reviews |
Reference |
Forum |
Search
Home
| What's New |
Features |
Gallery |
Reviews |
Reference |
Forum |
Search