|
Spitfire Mk. XIVe
by Brett
Green
|
 |
|
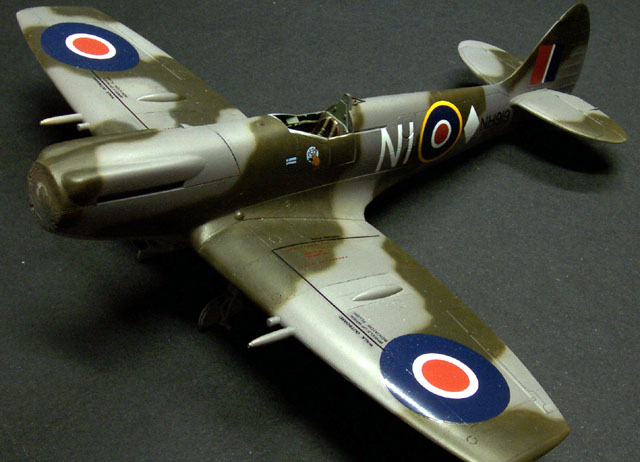
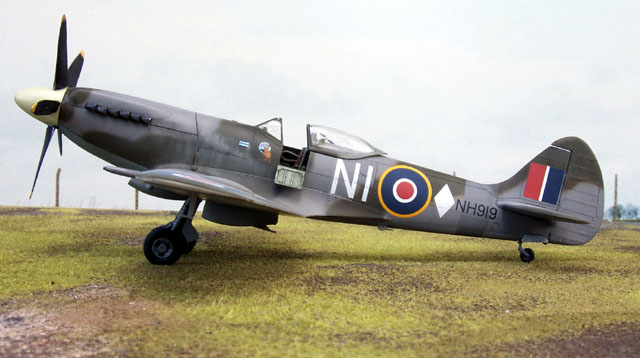
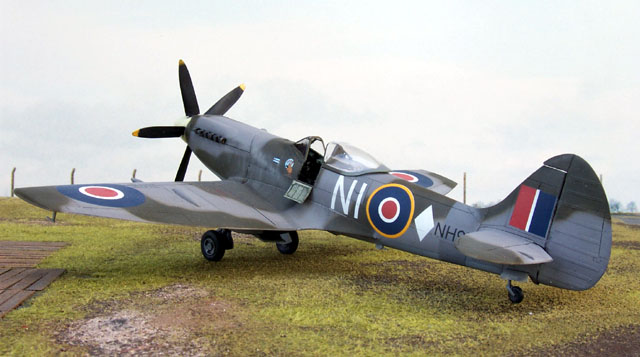
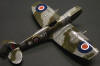
Supermarine Spitfire
Mk.XIVe
451 Squadron RAAF, Germany, 1945 |

Academy's
1/48 scale Spitfire XIVe is available online at
Squadron
The role of the Royal Australian Air Force in the occupation of
Germany is not well known. In particular, 451 Squadron RAAF's final
service is often misreported or ignored.
This Squadron formed in Bankstown (a suburb of Sydney) before being
deployed to Egypt in May 1941. 451 Squadron served with the Desert Air
Force in an Army co-operation role. There was little opportunity for air
to air combat until the unit was transferred to the United Kingdom at the
end of 1944. 451 Squadron then conducted ground attack, bomber escort and
fighter missions over Europe. In May 1945 the Squadron moved to Germany to
support the occupation effort. 451 Squadron was eventually disbanded in
Germany during January 1946.
I have always been keen to build one of these post-war Australian
Spitfires. When Red Roo Models released their new decal sheets for two
451 Squadron aircraft, I knew that I had found the excuse I needed to
take advantage of the 1/48 scale Spitfire XIV accessories I had
accumulated over the years!
|
Academy's 1/48 Scale Spitfire XIVe |
Academy released their 1/48 scale Spitfire XIVc and XIVe kits during
1997. Initial excitement made way for disappointment upon closer
examination of the contents. The biggest issue is the bloated appearance of the nose,
resulting from inaccurate contours of the engine cowl and spinner. There
are more subtle problems in addition to this very noticeable flaw:
-
the sidewalls of the underwing oil
cooler housings are depicted at 90° to the wing, not perpendicular
to the ground as they should be.
-
Academy has added an extra
"step" to the area behind and below the sliding section of
the canopy on the Spitfire XIVc kit. This step does not appear on
the real aircraft. The fixed glasshouse area behind the canopy is
therefore noticeably short, and the relationship between shapes in
this area looks odd.
-
only the narrow chord rudder is
supplied. The broad chord rudder was almost always fitted to the
bubbletop Spitfire XIVe and Spitfire XVIII.
-
the profile of the propeller blades is
poor
-
"fishtail" exhausts are not
included, although these were commonly seen on the Spitfire XIV
-
the four-spoke wheels supplied were
more commonly seen on earlier Spitfire variants (eg Mk. VIII/IX).
The Spitfire XIV was typically equipped with three-spoke wheels.
-
wing cannon bulges are somewhat
overscale due to the gimmicky inclusion of cannon in the bays.
-
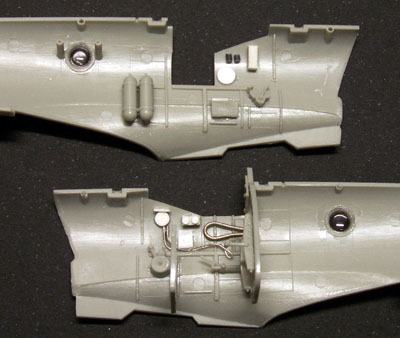
The cockpit upper sidewalls are totally
devoid of detail. This is surprising, as the remainder of the
cockpit is really very good.
This list of shortcomings may seem to condemn Academy's Spitfire XIV
as irrecoverably bad. However, the model does have a number of redeeming
features.
First and foremost, it is the only injection-moulded 1/48 scale
Spitfire XIV available. The surface detail is very crisp and fine, most
of the cockpit is well done, and the overall fit is excellent. Also,
apart from the add-on cannon bulges and oil cooler housings, the wing is
very good.
|
Building a Better Spitfire XIVe |
The task of correcting the bubble-top Spitfire XIVe is somewhat
simpler than the XIVc because it does not have the problems with the mid
fuselage and canopy outline. This means that the biggest issue is
confined to the nose.
There are three options for
comprehensively correcting Academy's 1/48 scale Spitfire XIVe
-
Daco Models' 1/48 scale resin
correction set (recently re-released)
-
KMC's resin correction and detail set (no longer available)
-
cross-kitting Falcon's fuselage from
its Spitfire Mk. XVIII vacform kit.
Minor corrections are also available for the propeller blades (Ron's
Resin and Falcon), radiators, cannon bulges, rudder (Ron's Resin),
exhausts (Ultracast) and wheels (Ultracast, Ron's Resin and others).
I was fortunate enough to purchase both the Daco and KMC correction
sets when they were first released. I also had the Falcon vacform
Spitfire Mk. XVIII.
I chose to use the Daco resin correction set. This set features a
complete replacement nose, spinner, propeller blades, radiator housings,
wheel hubs, exhausts, rudder, seat, cannon bulges and cannon barrels.
White metal replacements for main gear legs and the tailwheel are also
included.
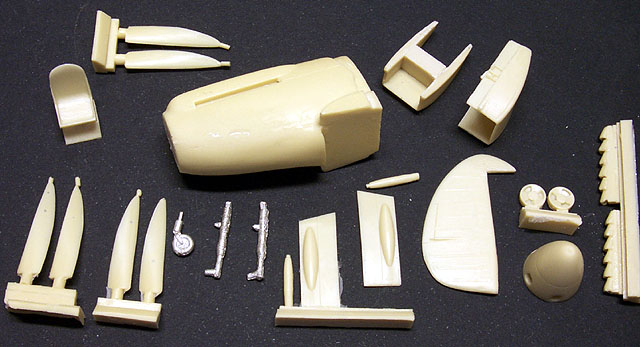
The resin parts are all cast nicely with very little cleanup
required. The large hollow-cast nose displays some scarring along the
lower half of both sides of the engine cowling. The propeller blades
were slightly warped on my conversion. This was hardly surprising as
they are very thin.
Fuselage
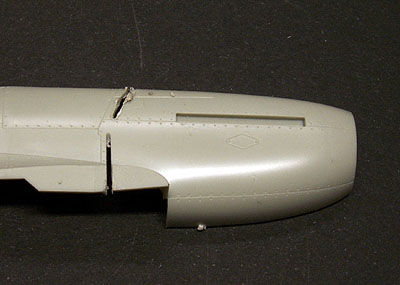 Construction commenced by cutting the nose off the Academy kit. The
demarcation line is easy - just cut along the vertical engine cowl panel
line. Construction commenced by cutting the nose off the Academy kit. The
demarcation line is easy - just cut along the vertical engine cowl panel
line.
I used a cutting disk on my Dremel power tool to slice off the nose a few
millimetres forward of this line, then carefully completed the cut with
a scriber and a sharp hobby knife.
The casting plug at the rear of the resin engine cowling acts as a
structural brace. I sanded it slightly and left it in place.
Test-fitting is absolutely crucial with any major correction or
conversion. It is far easier to identify issues and plan a course of
action than it is to fix a problem (eg gaps and misalignment)
afterwards. I taped the fuselage halves together and offered the resin
nose as a test. I also test-fitted the wing to this temporary assembly
to check for potential problems at the wing root and the lower
wing-to-fuselage joins. The fit of these crucial components looked very
good.
Cockpit
Detail was added to the bare upper cockpit sidewalls. I used small
scraps of styrene to make boxes, fine wire to represent electrical
cables and thick fusewire to depict the
prominent oxygen hose on the starboard sidewall.
The kit seat was
replaced with Ultracast's resin item #48068. This seat features the
mid-late war "Q" type harness, which is quite different to the
more familiar Sutton Harness. The gunsight was replaced with Cutting
Edge's British Mk. 9 "Ace Maker" resin part (item #48159). At
this point I glued the rear bulkhead and mid-cockpit lower bulkhead in
place on the starboard sidewall. The kit-supplied cockpit details were
also added to the sidewalls.
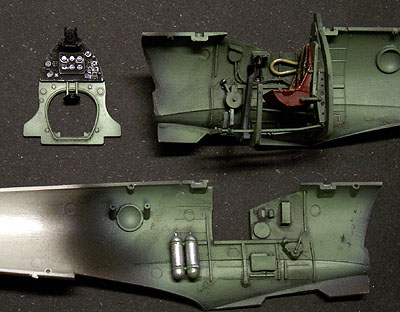
The cockpit parts were pre-shaded with a solid coat of Flat Black,
followed by a British Interior Green (Humbrol Acrylic #5078) sprayed
at an angle that left black paint "shadows" in place. I
usually use decals for individual instruments, but I misplaced both my
Reheat and ProModeler instrument decal sheets. I therefore tried a
combination of dry-brushing and picking out individual features with a
fine brush. The "lenses" of the instruments were then painted with
several coats of Future floor polish. The mounting arms for the compass
are present under the main instrument panel, but the compass itself is
missing. I added this small item from several disks punched from styrene
stock.
The seat was painted dull red to represent unpainted bakelite. The
"Q" harness was painted light brown, then the whole assembly
received a wash of heavily thinned black oil paint.
The remaining cockpit parts were secured except for the instrument
panel. I glued the fuselage halves together then, when the assembly was
thoroughly set, I inserted the panel through the wing cavity. Although
some fiddling was required to align the rudder pedals and control rods
with the bottom of the instrument panel bulkhead, I found that this was
the safest way to ensure a perfect fit between the panel and both sides
of the upper cockpit sidewalls.
With the cockpit in place, I glued the nose to the fuselage using
super glue. Minimal filler was required, but there were some raised
ridges where the plastic met the resin nose. These ridges were sanded
flat.
WIngs
The cannon panels were a drop-fit replacement for the kit parts.
Through carelessness, I accidentally removed a thin wedge of resin from
one of the covers. This was filled using a correspondingly shaped wedge
of styrene strip.
The radiators needed some trimming before they would fit, but they
also proved to be a faultless match for the kit wings after preparation.
The kit radiator flaps fitted the resin radiators without gaps. The
upper wings were now attached to the full-span lower wing. Further
test-fitting revealed a narrow gap on the port side of the forward wing
root. I glued a thin strip of styrene to the inside surface of the port
upper wing. This minimized the gap when the wing was glued in place. I
applied liquid glue to the places where plastic mated with plastic, and
super glue for the resin joins.

The resulting join at the wing roots was very satisfactory. They only
required a swipe of Mr. Surfacer to complete the task.
Finishing Touches
|
Summary of
Accessories Used |
-
Daco Productions
Spitfire Mk. 14 Improvement Set (currently out of
production)
-
Ultracast
Spitfire Seat with "Q" Harness (item no. 48068)
-
Cutting Edge
British Mk. 9 Gunsight (item no. 48159)
-
Black Magic
Canopy and Wheel Masks (item no. CEBM 48182)
-
Falcon White Metal
Accessories for Spitfire XIV/XVIII
|
I decided to use Falcon's white-metal propeller blades instead of
Daco's resin parts. I was concerned that the resin blades may deform
again
after I straightened them. White metal seemed to be the most permanent
solution. The locating plugs were slightly too wide for the holes in Daco's resin spinner, so they were trimmed with a hobby knife then filed
smooth. Some minor pitting on two blades was filled using Squadron White
Putty. The propeller blades were painted black and the spinner sprayed
Sky before being assembled.
The join between the resin rudder and the tail did not look
convincing, so I thinned down the plastic trailing surfaces of the fin.
This permitted the leading edge of the rudder to be slightly recessed
into the rudder hinge line. I wish I had done that before I
joined the fuselage halves!
Spitfire undercarriage is a pretty simple matter. I used the kit
parts but substituted the separate four-spoke wheel hub with Daco's
three-spoke resin part. I also created a tailwheel "bay" by
pushing Milliput into the tailwheel cavity, smoothing it over and
pressing the tailwheel into the pliable putty. This leaves an
indentation similar to the simple tailwheel recess in the real aircraft.
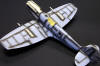
Click the thumbnails below
to view larger images:
|
|

|
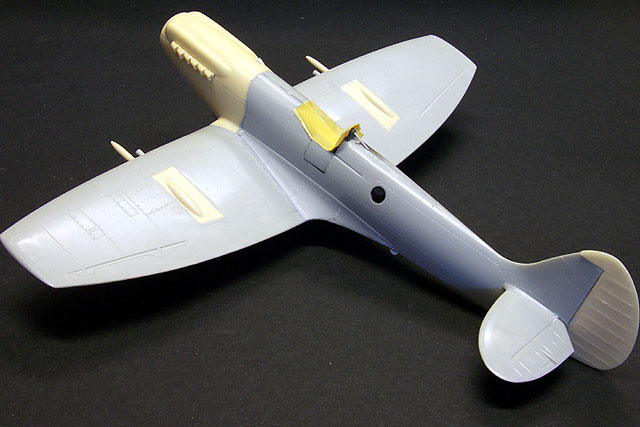
|
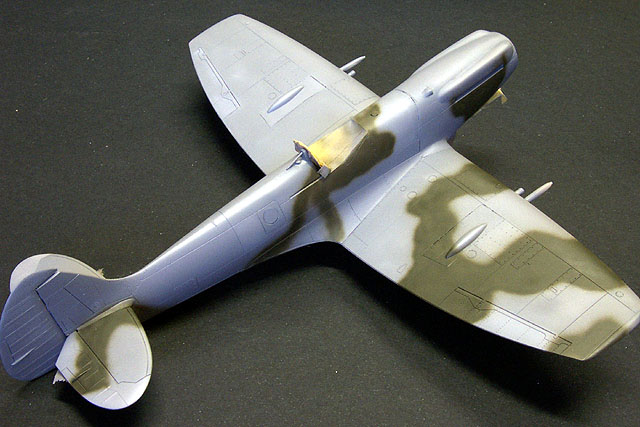
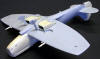
Top view demonstrating excellent fit of parts
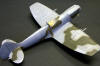
|
|
|
|
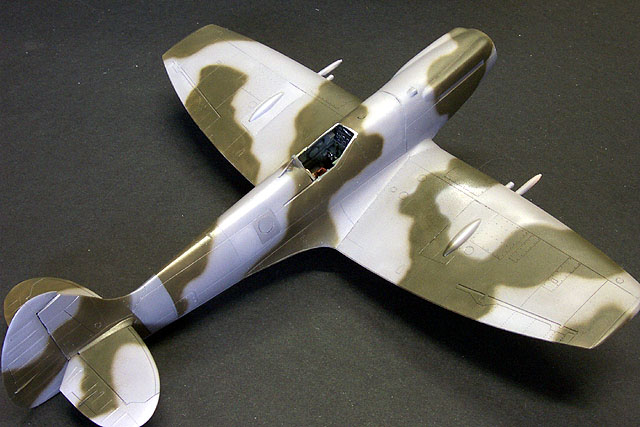
Bottom view. Note filler on lower nose.
|
|
|
The supercharger intake was added. Photographs of the full-sized
Spitfire XIV show a small domed blister on either side of the intake.
Similar blisters are also present on the forward upper wing root. I assume
these are some kind of fairing with raised fasteners beneath. I depicted
these blisters with carefully applied blobs of Araldite, a two-part
epoxy cement. The cement was mixed then scooped onto the end of a blunt
hobby knife. The resulting blobs were then delicately placed on the wingroots and the intake sides. The wingroot blisters took several
attempts, but it was a fairly simple matter to wipe off the wet epoxy
glue and start again.
I also scratchbuilt a small trailing antenna on the lower fuselage
using a semi-circular section of plastic and brass wire.
Finally, panel lines were restored to the nose and the fuselage
sides.
The model was now ready for painting.
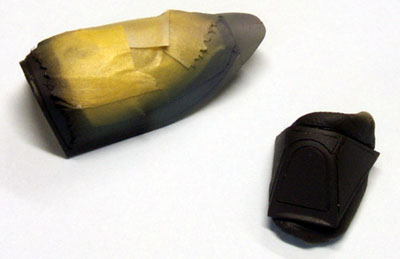
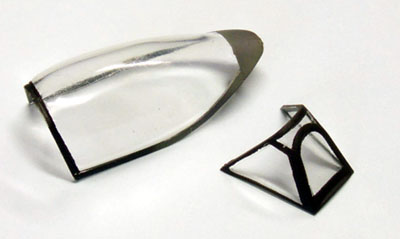
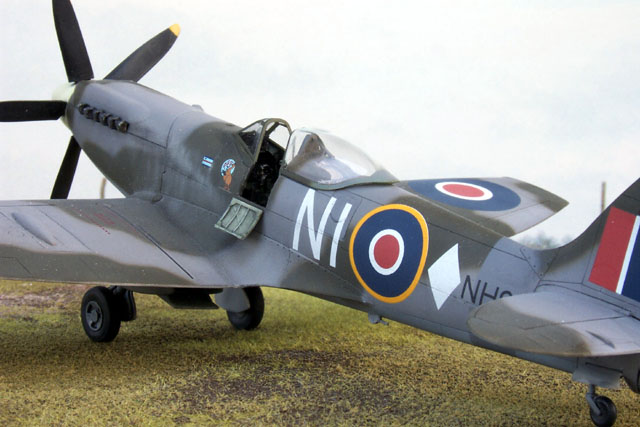
Masking the Canopy
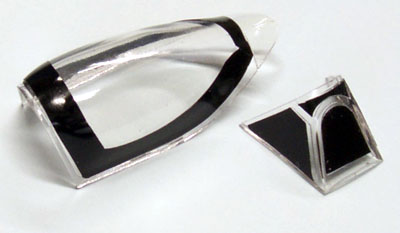
First I masked the canopy parts. I used the relevant Black Magic mask
(item CEBM48182). Black Magic is my favourite masking method. I have
found them to fit snugly against the lines of the kit canopy frames. The
adhesive is also strong enough to prevent paint "bleed"
(leakage under the mask), yet has never left a visible blemish on my
models following removal. Even more importantly, they convert the
tedious, time consuming and sometimes unsuccessful chore of slicing tiny
strips of masking tape into an easy and consistently pleasing activity.
Click the thumbnails below
to view larger images:
|
|
|
|
Step 1: Carefully apply the Black Magic mask
|
|

|
|
Step 2: "Fill in" the large space on the main canopy with your favourite masking medium (I used Tamiya Tape).
|
|

|
|
Step 3: Spray the interior colour first, followed by the camouflage colours
|
|
|
|
Step 4: Remove the masks and viola! A sharply defined canopy and windscreen
|
|
|
Camouflage Painting
Late-war and post-war Spitfires in north-western Europe wore a colour
scheme of Ocean Grey and Dark Green uppersurfaces over Medium Sea Grey.
My subject aircraft, NI - ◊, displays
some interesting variations. The diamond-shaped aircraft identification
is the first point to draw the attention. Next, the Squadron badge
featured a Kangaroo and Joey with the letters "RAAF" superimposed on a
blue circle. A small Squadron Leader's pennant in front of this emblem
identifies the aircraft as the personal mount of 451's CO, Graham
Falconer. Also of interest was the fuselage band. A photo of another 451
Squadron Spitfire XIV clearly shows that the fuselage band has been
recently painted over with a colour darker than Ocean Grey but lighter
than Dark Green. I am assuming that the colour is a fresh, darker
version of Ocean Grey, although it may also be a German colour applied
from local stocks.
I applied my usual painting method. First,
the panel lines of the model were "pre-shaded: in flat black. The
camouflage colours followed. Examination of wartime photos reveals minor
but noticeable differences in the camouflage patterns on these late-marque
Spitfires. There is also variation in the style of camouflage - some
appear to have a soft demarcation and some are hard-edged. Although I had
a camouflage mask with the Spitfire "A" camouflage scheme, I opted to
spray a "hard-soft" edged pattern freehand.
As always, I used my Testors Aztek airbrush
to apply the paint.
Click the thumbnails below to view larger images:
|
|
|
|
Step 1: Panel lines are roughly sprayed black. Precision is not required!
|
|

|
|
Step 2: The base camouflage colours are applied. Control surfaces and random panels have been painted a paler shade of Ocean Grey for variety.
|
|
|
|
Step 3: The disruptive Dark Green is underway. Note that the black barely shows through. We are looking for a subtle effect.
|
|

|
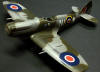
|
The basic camouflage painting is complete.
|
|
|
Decals and Weathering
I used Red Roo's decals for
this aircraft. This decal sheet is
reviewed elsewhere on HyperScale.
The decals are very thin but adequately
opaque. The colours all look authentic.
The decals need to be handled carefully
due to their thinness, but the results are very impressive. I prepared the
model with a gloss coat of Testors' Metalizer Sealer and applied a
generous quantity of MicroSet to the surface before sliding the decals in
place. This allowed the delicate decals to "float" on the plastic and
permitted minor adjustments. The carrier film completely disappears under
a later flat coat.
Kit decals were used for walkways and a
few stencil markings.
451 Squadron's Spitfires were quite new in
late 1945, so I decided not to weather my model too heavily. I applied a
wash of thinned oil paint to panel lines, then sealed the finish with a
coat of Gunze Flat Clear.
Finally, I added a chalky exhaust stain by
first airbrushing vertical streaks of a pale grey mix followed by an
irregular thin black overspray.
Click the thumbnails below
to view larger images:
|
|
|
|
Decals are in-place on the glossy surface. They settled down perfectly
|
|
|
|
A wash of thinned black oil paint is slopped onto the model. After waiting a few minutes, the excess is gently wiped off using a cloth.
|
|
|
|
The results of the weathering are intended to be subtle; not to draw attention to the weathering itself but to add natural variation to the colours.
|
|
|
Daco's 1/48 scale resin
correction set has restored the graceful lines to this attractive Spitfire
variant. Despite the relatively
major nature of the correction, I finished this project in a few weeks of
part-time tinkering.

Not everyone will agree that Academy's
Spitfire XIV needs correction. Those modellers will enjoy building this
kit straight from the box, as the fit is very good and the detail is not
bad at all.
Modellers who feel compelled to pursue
an accurate outline have the option of looking for the KMC or Daco sets
on the "used parts" market, or adapting the Falcon vacform kit. This
last option is probably not as difficult as it sounds, especially if
undertaken in conjunction with resin accessories from Ron's Resin and/or
Ultracast. In the meantime, I
already have plans to build another Academy Spitfire XIVe using the KMC
correction set and Red Roo's 453 Squadron RAAF decals!
Text, Images and Model Copyright © 2001 by
Brett Green
Page Created 03 December, 2001
Last Updated
04 June, 2007
Back to HyperScale Main Page
Back to Features Index |
 Home
| What's New |
Features |
Gallery |
Reviews |
Reference |
Forum |
Search
Home
| What's New |
Features |
Gallery |
Reviews |
Reference |
Forum |
Search