|
Steyr
1500A/01
by
Sohaib Talal
|
|
|
Steyr 1500A
|

Tamiya's 1/35 scale Steyr 1500A is available online from
Squadron.com
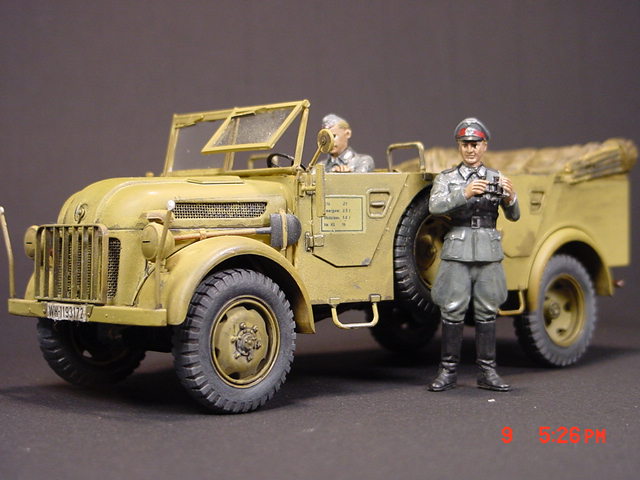
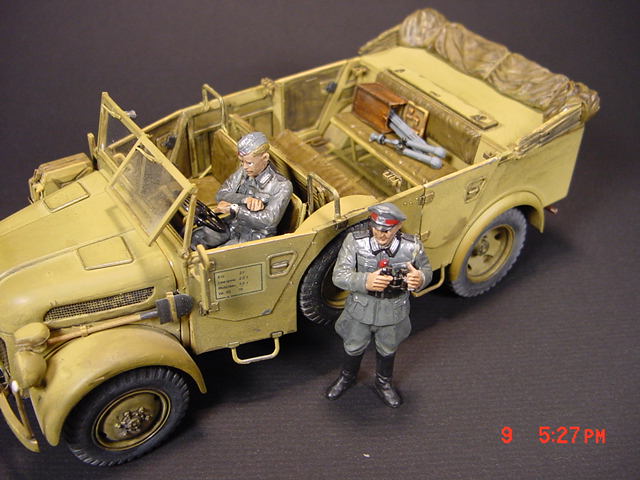
This is a Tamiya 1/35 Steyr 1500 kit. It was built out of the box.
The color scheme is that of a vehcile in North Africa.
This is a great kit. Not only is it simple to build, but also you will
not need to do any extra work like removing flash and filling gaps.
The fit and surface detail is marvelous. This was my first Tamiya kit
and for several days, I kept looking at part trees and wondering
whether to make the kit or let it remain un-built in the box!
I was also highly impressed with the detailed drawings and the artwork
involved in making them. It was definitely a notch above than what I
had experienced until then.
Exterior Color
I used Tamiya’s Dark Yellow acrylic color to paint this kit. The paint
was mixed in 70/30 proportion with Isopropyl rubbing alcohol (70% USP).
These vehicles were normally used in Europe before transferred to
North Africa. I therefore painted a light coat of Tamiya German Gray
(which was the color for German vehicles in Europe) before spraying
Dark Yellow. A thin layer of yellow was sprayed wherever I wanted to
show the faded Yellow color revealing the Gray coat underneath. This
gives a very good effect to the naked eye.
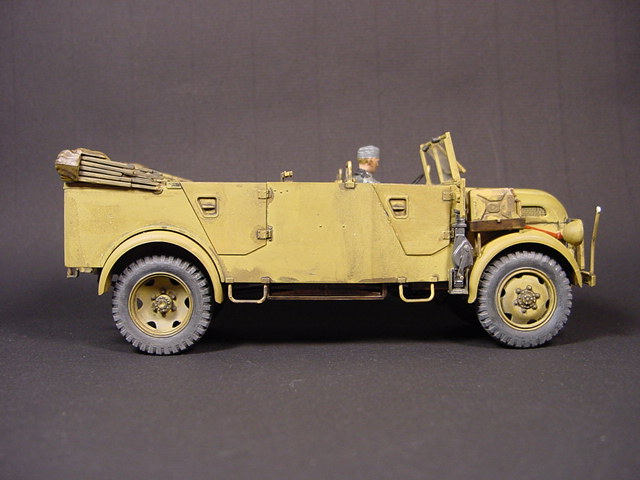
The good thing about Tamiya paints is that they are very flat.
Weathering and fading is obvious on these military vehicles due to
harsh conditions. This effect is very prominent on those areas which
are highly exposed. To get this effect, I used the reverse side of the
paper grocery bag and with gentle strokes on the painted surface in
the direction of airflow, achieved the desired effect. This was
especially done on the top of the engine hood.
The Wash
I applied an enamel wash. This wash was prepared using nine parts of
airbrush enamel thinner mixed with one part mixture of black and brown
enamels. At that time, I was afraid of using oil as wash medium. The
effect of this mixture was not bad either. The only problem is that it
does attack the base color if the brush with which it is applied
remains in prolonged contact with surface of the model.
I used 0 and 10/0 brushes to apply this wash around the panel lines,
floors and inner doors. This was my first experiment with any type of
wash so the application of wash in the interior has been a bit
exaggerated.
Tamiya’s rendition of seat cushion and folded corduroy canopy is a
real treat to paint. After first painting it with Gunze Sangyo’s
khaki, I applied the same mixture of wash and let it run through the
creases. The effect is great.
To show the wear of the handles and mounting steps, a Staedtler 2B
pencil was used sparingly on the areas exposed to most use. This
effect at first looks painted upon. To subdue it, I used a piece of
paper and rubbed gently unless a dull but shiny surface remains.
Small inner details like wiper motors and instrument panel details
were picked with black enamel applied with a 10/0 brush.
The wooden box for the periscope has an excellent wooden grain effect
on it. To get this effect to show up, I gently ran the wash though the
surface after it was painted dark brown. When the wash was dry, the
box looks more of wood than of plastic.
The jack mounted on the right side of truck was also painted black and
then dry brushed with a metallic gray color. The tools were painted
black and then dry brushed with gunmetal color.
The figures included in the kit are life-like. Even the small details
like badges, buttons and facial expressions are molded. I painted the
skin with Testor’s acrylic flesh color. The eyes were painted with a
very fine brush. I have also painted the face of the driver’s
wristwatch and it shows time to be twenty past three. It could not be
caught due to the limit of my camera’s focus.
Lower
Chassis
The undercarriage was painted black. The silencer assembly was painted
with Gunze Sangyo rust color. Then the wash was heavily applied to the
entire undercarriage surface including the wheel wells. It has to be
said again that the level of detail and how explicitly it has been
shown is a great tribute to this kit. I really missed the engine!
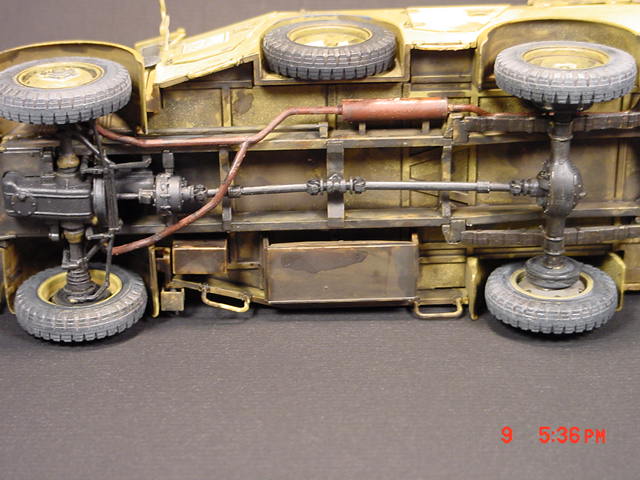
The application of wash is heavier around the oil sump.
Tyres
To paint the tires, I mixed a very dark gray (like German gray) with
black to get a color that is a dark shade of gray. Since this kit
reveals a desert going truck, its tires were exposed to higher than
normal temperatures. To get he effect of heat-weathered tires, I used
a gray shade of chalk pastels and gently applied it on the painted
tires. Afterwards, the chalk pastel powder was removed with a wide,
flat brush. This powder was also sparingly applied to wiper motors at
the top of the windscreen.
Chalk pastel is a very versatile medium in the context of plastic
kits. These are available in various shades at any art store. You can
buy them in sticks or pencils but to make a powder of it, you will
need to rub them against an emery board or a very fine sanding paper.
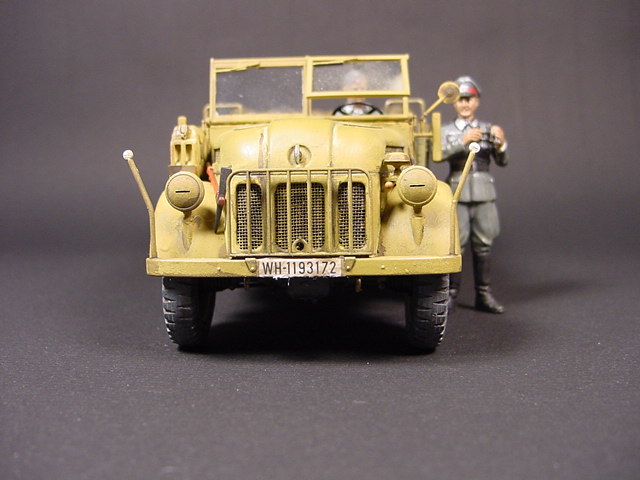
Decals
The decals were limited to the registration plates and the serial
specifications markings on the driver’s door. After the decals were
applied, Model Master dull varnish was applied to cancel any sheen of
the decals.
This kit was very exciting to make. Its details were great and
painting it was a real joy. I completed this kit in two months, on and
off. I can strongly recommend it to anyone.
Model, Images and Text Copyright © 2001
by Sohaib Talal
Page Created 07 August, 2001
Last Updated
04 June, 2007
Back to HyperScale Main
Page
Back to Features
Index
|
 Home
| What's New |
Features |
Gallery |
Reviews |
Reference |
Forum |
Search
Home
| What's New |
Features |
Gallery |
Reviews |
Reference |
Forum |
Search