|
Focke-Wulf Ta 183
by Brett Green
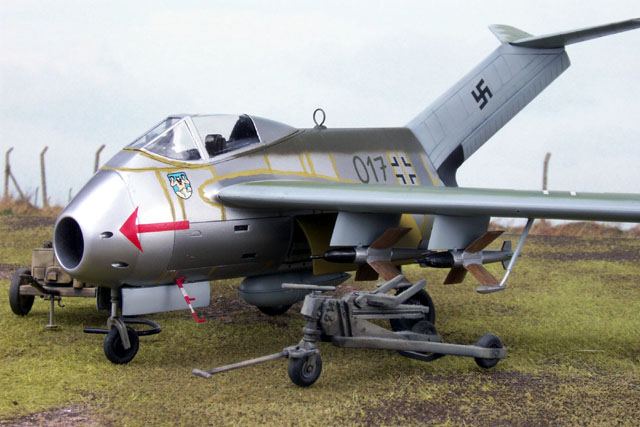 |
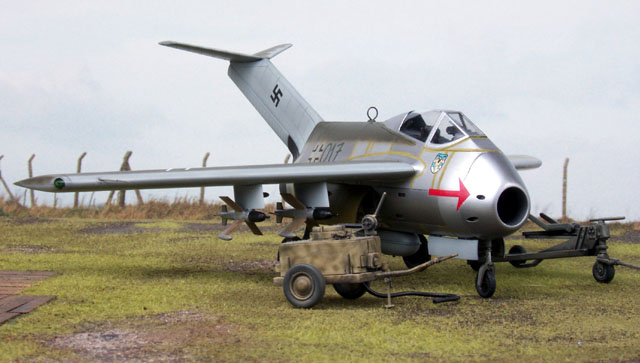
Focke-Wulf Ta 183B-2
3./JG1, Germany, December 1945 (Hypothetical) |

AMtech's
1/48 scale Ta 183 may be pre-ordered
now at
Squadron.com for USD$33.96
For additional information about
this model and future AMtech releases, see
Lynn Ritger's
FirstLook Review and
AMtech's Company
Launch page on HyperScale.
When I showed my assembled but unpainted AMtech Ta 183 to my father last
week, he confidently declared “that’s a MiG”. Indeed, the Ta 183 design
was a direct forerunner of the MiG-15, one of the most influential fighter
aircraft in history.
Professor Kurt Tank would probably be pleased that this incomplete project left
such a memorable legacy.
The Focke-Wulf Ta 183 was a design for a high-speed interceptor/fighter with
mid-mounted 40° swept wings of wooden construction; a high raked fin and angled
horizontal tailplanes. Primary control of both elevation and roll was handled by
the wing-mounted “elevons”. The small tail control surfaces were only used for
trimming. Armament took the form of four MK 108 30mm cannon in the nose, with up
to four wing-mounted pylons and an ordnance bay in the bottom of the fuselage. A
variety of ordnance could be carried, including bombs, drop tanks and up to four
X 4 air-to-air guided missiles.
The first three prototype Ta 183s were to be fitted with the Jumo 004, while the
full production Ta 183B series was based around the He S 011 turbojet. The Ta
183 was due to reach production status in October 1945. Factory assembly jigs
were complete by the end of hostilities in May 1945.
Jigs and plans for the Ta 183 were seized from Focke-Wulf by Soviet occupation
forces and delivered to the MiG design bureau. Six of the German designed jets
were reportedly built from March 1946. The first Soviet Ta 183 flew, equipped
with a British Rolls-Royce Nene jet engine, on 2 July 1947. These early test
flights led to modifications of the original design. Wing fences and
leading-edge slats were added, and the horizontal tailplanes were shifted lower
on the fin. These changes addressed low-speed manoeuvrability and stalling speed
issues.
By May 1948, these improvements had been incorporated and tested. The resulting
design was ordered into production as the MiG-15.
|
AMtech's 1/48 Scale Ta
183 "Huckebein" |
|
Highpoints |
- Excellent overall fit.
- Luxurious quality
plastic.
- Sharp and consistent
engraved surface detail.
- Nicely detailed cockpit.
- Good detail on smaller
items including wheel hubs, tyre tread, main gear doors and actuators,
pilot’s step and landing gear bays.
- Wheels subtly flattened.
- Clever engineering for
simple construction (eg one-piece jet pipe, wheel bays incorporating
engine detail).
- Option of Jumo 004 or He
S 011 (alternate jet pipes).
- Armament options,
including open or closed ordnance bay, up to four X 4 guided missiles
and drop tank.
- No noseweight required.
- Camouflage and markings
only limited by the imagination – in German or Soviet markings!
|
|
Nit Picks |
- Some ejector pin marks
(inside surfaces of main wheels, gear doors, wing pylons).
- Flat sides on
mid-section of X 4 missiles.
- Main wheel axle holes
drilled right through (and axles slightly too long).
- One-piece canopy (will
have to slice the clear plastic to display the canopy open).
- Navigation lights
moulded solid on the wingtips.
- A few surprising
omissions for an operational aircraft – no DF loop, Morane antenna or
pitot tube (although these did not appear on the Focke-Wulf drawings).
|
There is a new model company in town. Amtech is its name. This company will
be releasing some original designs and a few modified AMT moulds over the coming
months.
AMtech’s first release is the totally new 1/48 scale Ta 183 Huckebein.
I was fortunate to receive a set of sprues from early test shots of this kit. It
should be noted that my comments relate to the test shots and, although the
production kit will undoubtedly be similar, there may be minor detail
differences by the time the AMtech boxes hits the shelves. Instructions,
packaging and decals were not available at the time of this preview, so my
impressions are solely based on the plastic.
And the plastic is exquisite!
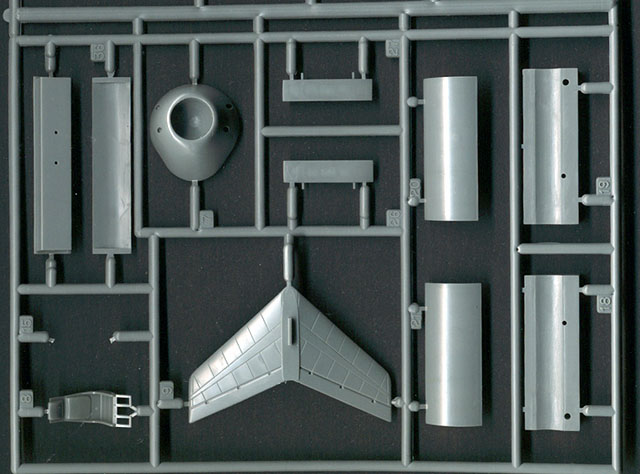
AMtech’s 1/48 scale Ta 183 comprises only 51 parts in medium-grey coloured
plastic, and one part in clear plastic. The quality of the plastic is superb.
The texture is perfectly smooth, sprue attachment points are very narrow, and
surface detail is excellent with fine, crisp engraved panel lines.
This is not a short-run kit. The model has clearly been created in metal moulds,
with all the luxuries of a mainstream kit including locating pins wherever
appropriate.
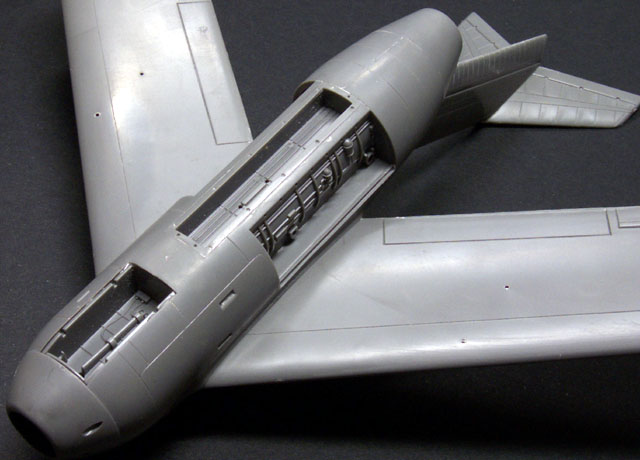
The detail of small parts is very good. The wheel bays are separate parts
incorporating engine detail. The wheels themselves feature crisp detail on the
hubs and tyre treads. The main landing gear is noteworthy, as the main leg, oleo
scissors and the retraction strut are moulded as one part. This makes alignment
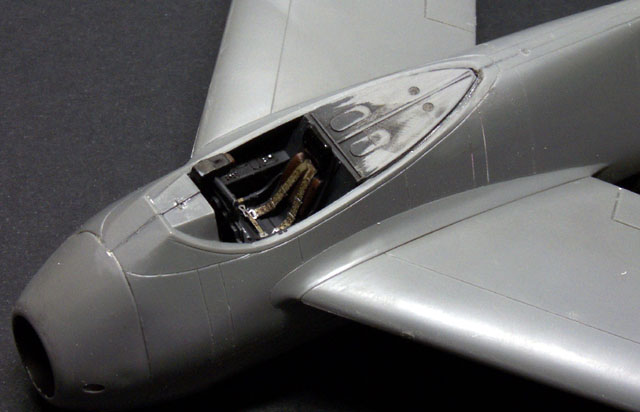
a snap. Cockpit detail is nice, with busy side consoles, raised instrument
detail (and the individual instrument housings protruding realistically from the
back of the panel), rudder pedals and gunsight moulded onto the instrument panel
and a one-piece ejector seat.

There is no flash on my sample but there are a few ejector pin marks on the
inward-facing surfaces of the main wheels, gear doors and wing pylons. There is
also a very shallow sinkmark on either side of the nose. I only noticed this
after I applied the metallic paint!
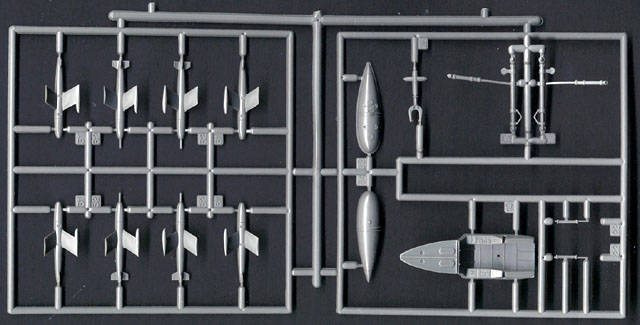
Options include the choice of tailpipe for a Jumo 004 or He S 011 powerplant;
alternate open or closed fuselage ordnance bay, four wing pylons and four X 4
guided missiles supplied in two parts each. Two spare sway braces have been
thoughtfully supplied for the drop tank in case either of the original delicate
parts break during assembly.
Click the Thumbnails below to view
larger images of the sprues:
AMtech have tackled the persistent problem of jet intake seams by designing the
nose and jet intake as a single part. The intake is blanked off with an inverted
dome recessed around 1.5 centimetres inside the nose. There is no seam on this
part whatsoever. When the inside of intake is painted black, the depth is
effectively hidden from everything short of a penlight torch. I am certain that
this approach will find favour with the vast majority of modellers, although
some diehards may want to drill out the dome and add a deeper intake.
Each optional tail cone is also moulded as a single part. The Jumo option
includes a “bullet” to be inserted in the tailpipe.
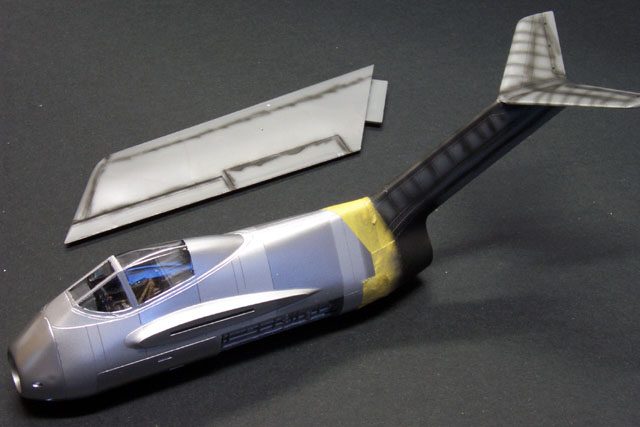
I sat down after dinner one evening with the intention of assembling and
painting the cockpit of AMtech’s Ta 183. By the end of the evening, I had not
only completed the cockpit, but also substantially finished the basic assembly
of the whole model!
With the big canopy giving a clear view into the cockpit, I decided to add an
Airwaves brass harness to the ejector seat. In order to accommodate the harness,
I drilled two small holes under the headrest of the seat, then used a sharp
hobby blade to create a narrow slot by carving out the space between. The
Airwaves harness sashes were fed through these slots followed by lap belts on
the seats. Cockpit components and the fuselage upper sidewalls were sprayed with
Tamiya Panzer Grey in preparation for detail painting and a thin black oil wash.
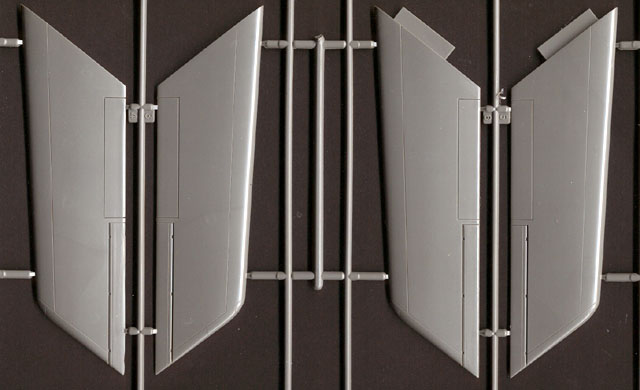
While I was waiting for the painted cockpit to dry, I drilled out the
flashed-over holes for the wing pylons then assembled the wing halves. The
alignment is good and trailing edges are quite thin. Next, I glued the main gear
bays into each fuselage half. These almost clicked into place.
Upon completion of the cockpit, it was time to think about mating the fuselage
halves.
I had a little trouble aligning the cockpit with the fuselage, as there is no
locating point for the tub on the inside of the fuselage halves. I eventually
used the rear deck as the point of reference for alignment. The deck matches a
groove in the top of the fuselage. Unfortunately, I decided to use Tamiya Extra
Thin Liquid Glue to bond the cockpit and the fuselage. Glue leaked onto the
painted cockpit deck due to my excessive handling of the parts, leaving big
fingerprints on the deck and the fuselage in the process! These blemishes were
eventually sanded and polished off the plastic.
I have subsequently been advised that the cockpit can be inserted in the
assembled fuselage halves through the front (prior to the addition of the nose),
with the instrument panel being added from the top. I would advise caution if
this approach is chosen because the fit of the instrument panel is very tight.
With this small obstacle overcome, assembly proceeded at an amazing pace.
The fuselage halves were joined using Tamiya Extra Thin Liquid Glue. This is the
first time I used this product. Tamiya supplies a tiny brush for the application
of glue to the join line. The parts are held together (or taped together) and a
spot of liquid glue is “flowed” into the join. This produces a clean, strong
bond. Despite my unfortunate earlier incident with the cockpit, I was very
pleased with the results.
I added the forward gear bay and the open ordnance bay after the fuselage halves
had set. These parts fitted perfectly.
I decided to build my Ta 183 as the operational “B” variant with the He S 011
powerplant. The tail cone identifying this variant is moulded in one piece. This
means that there are lots of interesting compound curves where the tail cone
meets the rear fuselage. Despite the complex shape, the part snapped positively
into place. There was only a small spot (and I do literally mean “spot”) on each
side that required filling.
At the same time I added the horizontal tailplane to the top of the fin. With
the addition of the nose part, the fuselage was complete.
I now decided to check the fit of the wings. The fit was extraordinary. The
large tabs on each wing establish a tight join even without glue. Furthermore,
with the wings pushed into place there was absolutely no gap at the wing root.
The assembly of the cockpit and the main components as described above took
around 4 hours.
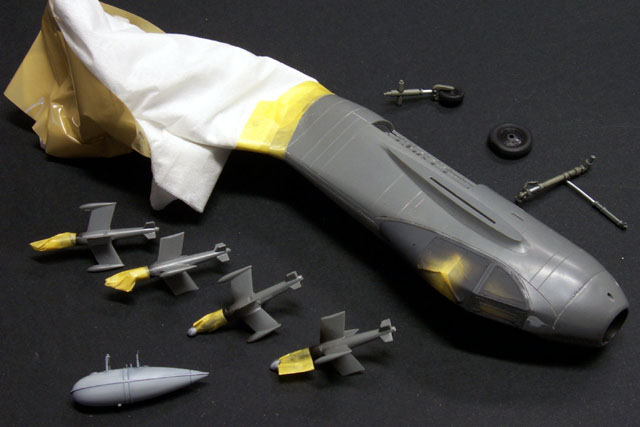
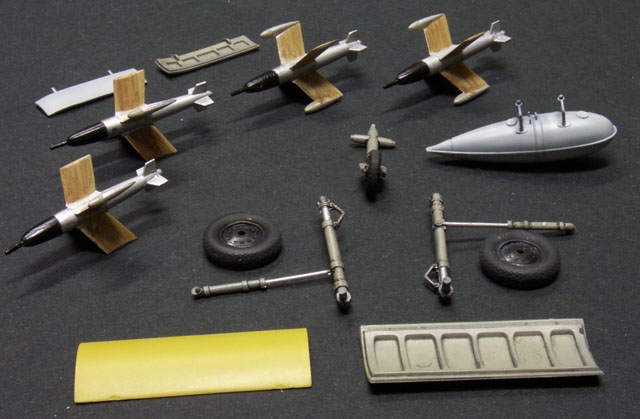
On the following night I assembled and painted the small parts including the
undercarriage and rockets. Take care when assembling the rockets because the
halves are not identical. There are two different configurations – one for the
left wing and one for the right. I am sure that the instructions will make this
distinction clear.
The rockets have a strange flat section on the sides between the main fins. This
flat section also displays a sunken join line. I used Mr Surfacer to cover the
seam.
Painting
Kit decals are not yet available, so I had total artistic license to finish the
Huckebein in any scheme of my choosing.
|
Future - Accept No Substitutes...
Before painting the model I
treated the canopy to a bath in Future. I previously used the Australian
equivalent product called “Super Shine”. While I was in the USA in July, I
searched the supermarket shelves for the genuine “Future” and carried it
all the way back to Sydney, wondering whether I was breaching any Customs
laws. The effort was worthwhile however; as the American ammonia-based
product seems to produce a deeper, harder shine than the Australian
version. |
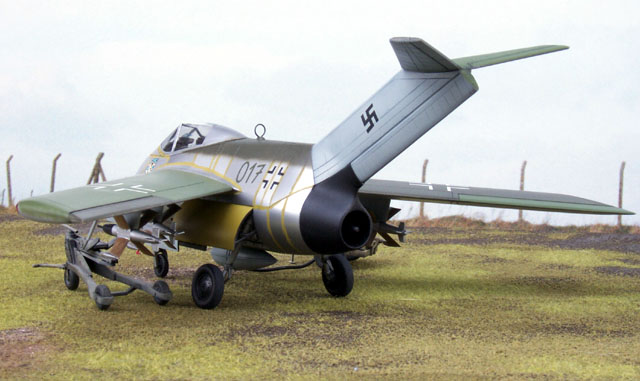
I decided to paint my Ta 183 in a simplified late war scheme similar to those
worn by the Heinkel He 162B. I assumed that painting would be a second priority
to speed of service entry, so I also decided that my model would have an
“unpainted” metal fuselage. Unpainted components were commonly seen on late-war
German aircraft such as the Me 262, He 162 and even the Fw 190. It was also
common to see roughly puttied panel lines over the metal surfaces of these
aircraft.
The wings were removed, then the tail and canopy was masked. I prepared for
the main camouflage scheme by first painting the canopy frames dark grey.
I also masked the warheads of the X 4 missiles after painting them Semi-Gloss
Black. I sprayed the entire fuselage and each missile with Tamiya AS-12 Silver
Metal straight from the can. I do like this metallic paint, although it
sometimes leaves a slight orange peel texture and is hard to buff to a different
level of shine.
To help differentiate panels, I therefore decided to finally try the two bottles
of Alclad II that had been sitting around my workbench for months. My early
experiences with airbrushed metallic lacquers were less than happy. Years ago I
had problems with overspray and paint control so I was postponing my encounter
with this new generation of metallic paint.
Several panels were masked. I loaded one of the unthinned Alclad shades into my
Testors airbrush. I held my breath, depressed the trigger and…. perfect! The
Alclad sprayed exactly where I pointed it. Two light coats were plenty to cover
the undercoat of Tamiya Silver Metal. I sprayed a second shade after masking a
few more panels, then buffed selected panels for even more variety.
The airbrush was successfully cleaned with a blast of Testors’ Metallizer
thinners.
I was delighted with the results and will be looking for another subject on
which to test Alclad soon!
The metallic fuselage was masked before I sprayed the tail. I first “pre-shaded”
panel lines with Tamiya Flat Black paint. Gunze Acrylics were used for all the
camouflage colours. The fin was painted RLM 76 Light Blue. The top of the
horizontal tailplane was painted half RLM 81 Brown-Violet and half RLM 82 Light
Green with a wavy demarcation at the leading edge. The spine of the fuselage was
also painted RLM 81 Brown-Violet. The tail cone was sprayed black.
Now it was time to spoil this pristine metallic finish. I brush-painted
ragged “putty lines” along fuselage panels using Tamiya Yellow Green acrylic.
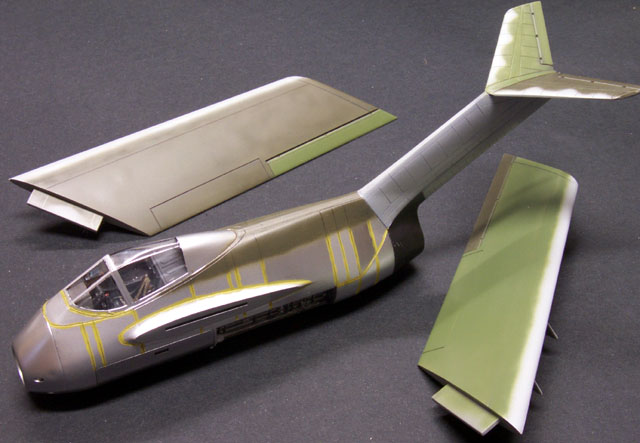
The wings were painted RLM 76 on the lower surfaces and leading edges. The upper
surface of one wing was painted RLM 81, and the other RLM 82. Just for fun, I
painted the elevon on each wing the opposite colour (ie, the port elevon was
painted RLM 81 on the RLM 82 wing). This scheme was intended to reflect the
simplified finishes and component-based painting that was typical toward the
war’s end.
The fins of the X 4 missiles were finished in varnished plywood. I replicated
the woodgrain by painting each fin Tamiya Buff, followed by dry-brushing in
Tamiya Earth Brown. The tips of the guidance pods were painted with Gunze RLM 02
Grey.
The navigation lights are simply scribed onto the wingtips in grey plastic, so I
painted them to represent translucent coloured glass. First, I painted each
entire navigation light lens in medium grey. This was followed by a narrow oval
of white painted on the extreme edge of the light, from the front to the back.
When the white paint was dry, I painted the whole port side light with Gunze
Clear Red and the starboard side Gunze Clear Green.
The pilot’s step on some Luftwaffe aircraft was painted red and white or red
over aluminium as a reminder to stow the step before takeoff. I first painted
the delicate kit step white then masked with two narrow strips of Tamiya masking
tape before being sprayed red.
Panel lines and wheel bays received a wash of thinned black oil paint. The
enamel thinners did not disturb either the Tamiya Silver Metal or the Alclad
paint.
Markings
Markings were chosen to compliment the colour scheme. I used selected decals
(fuselage crosses, swastikas, unit badge and arrow marking) from the Tridecals
sheet for the 1/48 scale Trimaster Heinkel He 162B. I particularly liked the
look of the small fuselage cross on the rear fuselage.
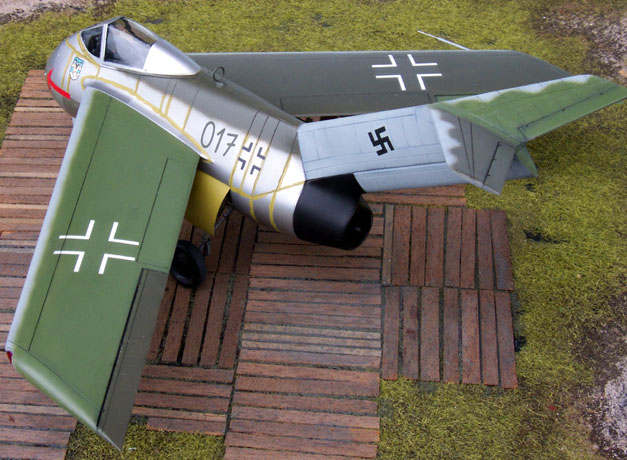
| The Photos
The pictures of the finished
models were taken against a 30" wide backdrop enlarged from the photograph
of an old Luftwaffe airfield at Cheivers. The perimeter fencing is quite
distinctive. This and quite a number of additional photos have been
generously supplied over the last few years by George Pfromm.
I made the base on
architects' foamboard using liquid groundwork, static grass, sand and
stained basswood strips.
Model photographs were
taken using my Kodak DC4800 digital camera, outdoors in the shade. The
aperture was set at F.8 (but was effectively F.13 as the optical zoom was
set at its maximum, 3X), and shutter speed was automatic. |
I could not decide on an individual aircraft number until I came upon the
idea of simply applying the “Last Three” to the fuselage – the final digits of
the aircraft’s werknummer. Late in the war it was not uncommon to see
operational aircraft still carrying this delivery marking.
These “Last Three” numbers came from an Aeromaster decal sheet for the Bf
109K-4 (although they have been chopped up and applied in a different order).
Wing crosses were borrowed from a Cutting Edge decal sheet for a Focke-Wulf Fw
190.
The main gear was super-glued to the gear bays. I adjusted the starboard
gear, which needed to splay out a little further than my first attempt.
I decided to add a few operational items to the aircraft that were not included
in the kit. I fabricated a pitot tube from fine brass rod and tube. This was
added to the starboard wing. I took a DF loop and Morane mast from Hasegawa’s Bf
109G-4 kit – it would not need them anyway – and added them to the Huckebein.
These features were painted in-situ.
The painted missiles were attached to the wings, and the gear doors and
actuators added to the fuselage. I sparingly applied glue and pushed the fully
assembled and painted wings onto the fuselage. The resulting join was flawless.
A selective coating of Gunze Flat Clear over the decals completed my Ta 183B
Huckebein.
One door closes and another one opens.
We have witnessed the recent departure of some notable companies from our hobby,
and reduced participation from other stalwarts. However, we are also seeing new
initiatives from Japan including Tamiya’s amazing 1/32 scale Zero and the
forthcoming large-scale Bf 109G-6 from Hasegawa; plus improved quality products
from Eastern Europe.
AMtech is yet another encouraging omen pointing to the strength and the future
of our hobby.
These days, it is not unusual to use Tamiya as a benchmark for kit quality.
AMtech’s 1/48 scale Ta 183 compares favourably with Tamiya’s recent releases in
terms of detail and ease of assembly. With the exception of a slightly fiddly
cockpit assembly, this really is a “shake and bake” kit.
I thoroughly enjoyed building AMtech’s Ta 183. It was a quick and easy project
that displayed few detail compromises. What’s more, it might just be the
best-fitting model I have ever built.
AMtech’s commitment to quality deserves our support. If you are a modeller of
Luftwaffe or Soviet subjects, you will be making a valuable (and enjoyable)
investment in the future of our hobby by buying AMtech’s Ta 183 as soon as it is
available!
Highly Recommended.
Model, Images and
Article Copyright © 2001 by Brett Green
Page Created 27 August 2001
Last updated 04 June 2007
Back to HyperScale Main Page
Back to Features Page
|
 Home
| What's New |
Features |
Gallery |
Reviews |
Reference |
Forum |
Search
Home
| What's New |
Features |
Gallery |
Reviews |
Reference |
Forum |
Search