|
Aichi
D3A1 'Val' by
Andrew Johnson
|
|
|
Aichi D3A1 'Val' |

Hasegawa's
1/48 scale Val is available online from Squadron.com
Planning to became the dominant power in the Pacific and Asian rim
was very ambitious for a small country with limited resources. Facing
the colossal distances of the Pacific theatre Japan invested wisely in
aircraft carriers and highly trained Naval air groups. How do you make
world-beating warplanes that can strike over huge distances when you
have engines of limited power and limited materials?
Japanese engineers came up with aerodynamic lightweight airplanes,
with large fuel capacities and reliable radial engines. As we all know,
the result was excellent high performance aircraft that shocked the
allies. The downside was aircraft that were dangerously vulnerable to
catching fire in combat.
Pre-war the British and Americans assumed Japanese technology would
be of a much lower level then their own, but in the inter-war years
Japanese engineers had been carefully evaluating foreign designs. The
Aichi team had formed a working partnership with Heinkel, so the
elliptical wings of the D3A1 drew heavily on the Heinkel 51 'Blitz' mail
plane. This design also gave it good maneuverability, as one P40 pilot
ruefully recorded that he was consistently out-turned by a Val.
Despite its spatted undercarriage the Aichi D3A1 was quite fast for
its type with 240-260 mph top speed. Before the war the dive-bomber
pilots were amongst the most highly trained in the navy, having much
practice placing dummy bombs on the radio-controlled battleship 'Settu'.
For the Pearl Harbour operation, the relatively new air groups of
Shokaku and Zuikaku were given the counter-air task of neutralizing the
American airfields, whilst the more experienced crews of the other
carriers were to go for the US carriers. The main role envisaged for the
250 kg bomb of the D3A1 was to neutralize the flight decks of opposing
carriers. The Japanese knew the best weapon to actually sink opposing
battleships and carriers was the 21" torpedo of the B5N 'Kate'. At
the outset of the Pacific war Japan arguably had the best naval air
force in the world. But one thing the Japanese could not afford to lose
was their highly trained aircrews. Within a year of war, however,
American fighters and anti-aircraft guns did just this and the Japanese
Empire was eliminated.
Hasegawa's
1/48 Scale Val
|
If you haven't already guessed, I am a fan of this aircraft and the
kit too! The cockpit is good, but if you want a treat, buy the CMK
cockpit set for this kit. It fits well and is beautifully detailed.
Apart from the resin, you get photo-etched instrument panel, seatbelts
and gun sights. From enquires posted at the Japanese aircraft modeling
site I went with a green-khaki-bamboo colour mix for the interior.
Particular thanks must go to Pearl Harbour expert David Aiken. Knobs
were wood brown and lamp hoods aluminium.
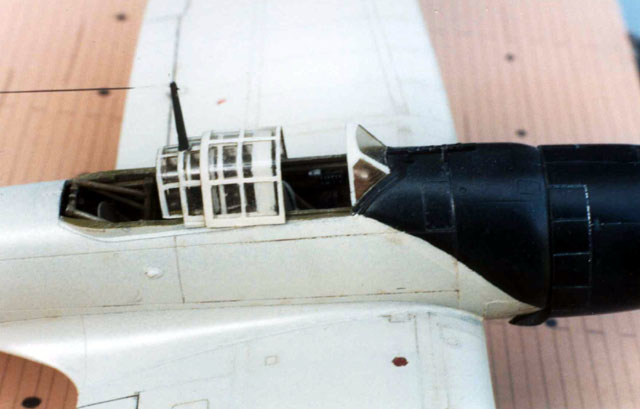
I had the observer's seat facing the radio, figuring this is where it
would be for take-off and operating the radio. The Japanese film footage
of Vals taking off for Pearl Harbour show that the rear 7.7 mm must be
stowed for take off and landing, so mine is down too.
The Mitsubishi Kinsei radial engine was detailed based on a picture
in the Crowood Aviation book on the Val. The push rods were painted
gloss black and 5 amp fuse wire used for the ignition wiring. Careful
examination of the picture suggested each cylinder had only one spark
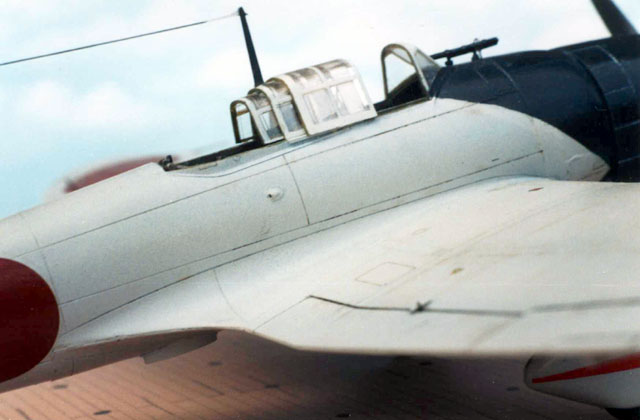
plug! I displaced and offset the rudder and elevators. To help with
getting scale thickness on the slid back canopies I used Squadron signal
vac forms, but stayed with the kit parts for the windshield and central
canopy.
For the painting I used Aeromaster IJN overall grey, although this is
not considered a perfect match of actual 'ami-ro'. Although later
Japanese aircraft had their paint applied to bare metal without a
primer, this 'ami-ro' was considered one of the most durable paints in
the pacific, so no need to go overboard on paint chipping.
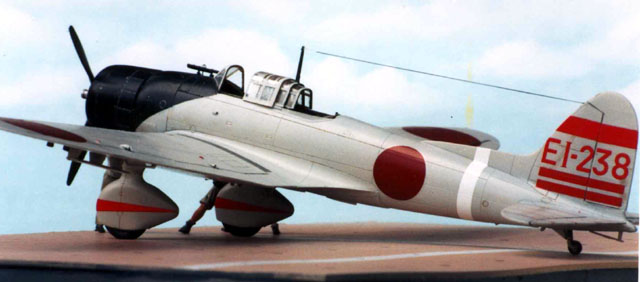
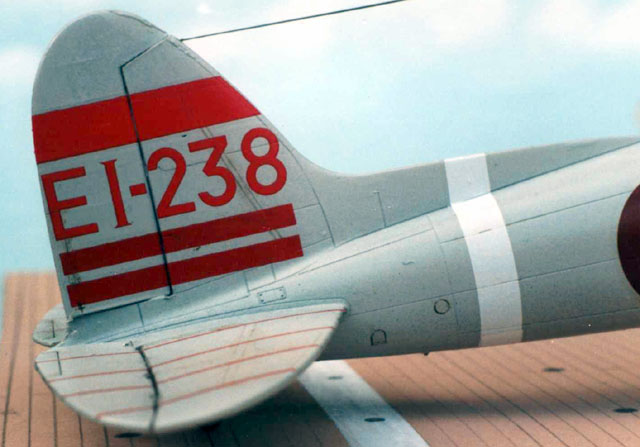
As a template for the cowling blue-black I used a circle set from a
protractor at 100o . At a show I managed to get hold of one of the
much-prized Aeromaster 'Tora, tora' sheets, so my Val is depicted as
that of Lt Cmdr Takahashi, based on Shokaku which led the first wave of
dive bombers. I used then red decal lines on the tail planes as drift
indicators, having first put marks with pencil as to where they should
go. His section of 9 from Shokaku dived down on Pearl Harbour NAS at
07.55 on Sunday 7th December 1941, the bombs starting fires amongst the
PBYs' and Kingfishers.
Following Johnson's Clear varnish I carefully applied a panel oil
wash. Some modelers spurn this technique whilst others go in for it in
spades. The best solution is I think differential panel oil washes.
Looking at photographs, panel lines are most evident at areas where
ground crews do the most work, i.e. cowling, fuselage near the cockpit
and wing root areas. The paneling in the outer wings and fuselage
between cockpit and tail is much less so. The answer is to mix different
shades/dilutions of oil washes. The control surfaces need the darkest
black oil wash to stand out as clearly separate moving parts.
For the blue-black cowling I used both silver-grey artists pencil and
silver oil paint wash. The aircraft was then finished with Johnson's
Clear as Pearl Harbour aircraft looked a bit shiny in the Japanese
newsreel of the event. I learnt from the experts at the Japanese
modeling group that the radio antenna was black and the under wing bomb
carriers were removed leaving only the attachment studs which were red
in colour.
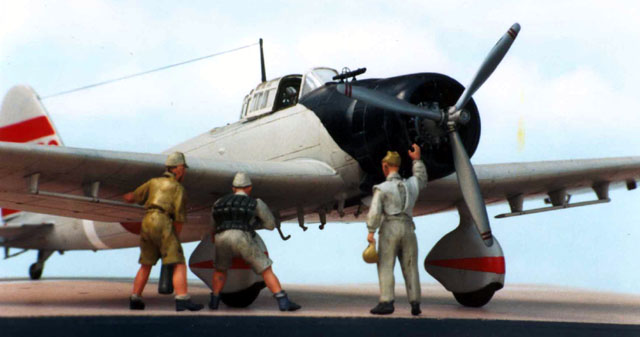
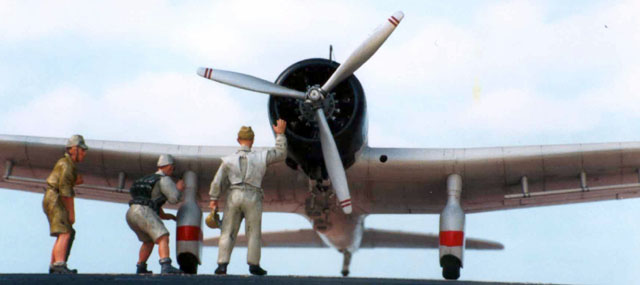
I somehow managed to lose my carefully painted bomb, so you have to
imagine the plane has just returned from its strike! The figures are
from the Hecker and Goros range. The carrier deck is my own contraption
of painted cardboard polystyrene and balsa wood.
The only fit problem I encountered was the wing underside to the
fuselage, but its not that bad.
The aircraft seems small and graceful, like a two seat radial engined
Spitfire. The kit fits together well and looks well, overall highly
recommended!
Model, Text and Images Copyright © 2001 by Andrew
Johnson
Page Created 24 June, 2001
Last Updated 04 June, 2007
Back to HyperScale
Main Page
Back to Features Index
|
 Home
| What's New |
Features |
Gallery |
Reviews |
Reference |
Forum |
Search
Home
| What's New |
Features |
Gallery |
Reviews |
Reference |
Forum |
Search