Squadron.com
 Just
when you thought you were safe from Scooters, I am back again with another
Skyhawk.
Just
when you thought you were safe from Scooters, I am back again with another
Skyhawk.
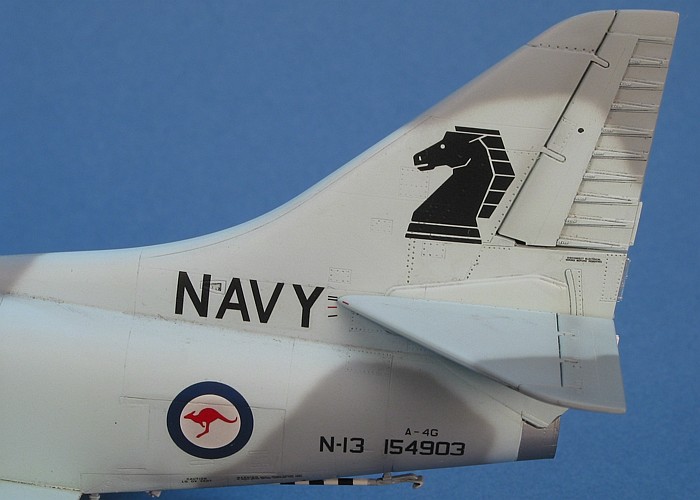
This time it is a non-US machine from Down Under. Richard Chafer from
Gekko Graphics in Australia
contacted me to see if I would be interested in building a Skyhawk using his new
decals.
Richard wanted pictures of models built in his decals to use on his web site.
Since the aircraft in this posting is one I wanted to build anyway, I agreed. It
saved me the trouble of creating my own decals for this aircraft.
I have no review of the kit to write here. See my previous writings on the
Hasegawa Skyhawk for a review. What I do have here are the changes I made using
pieces already in the kit to make an Australian A-4G from the Hasegawa A-4E/F
kit. All the necessary parts are in the box. All you need to do is know which
pieces to use. Built like this, does the model qualify as out-of-the-box, since
the instructions do not mention these parts? I am sure the IPMS would have an
opinion on this.
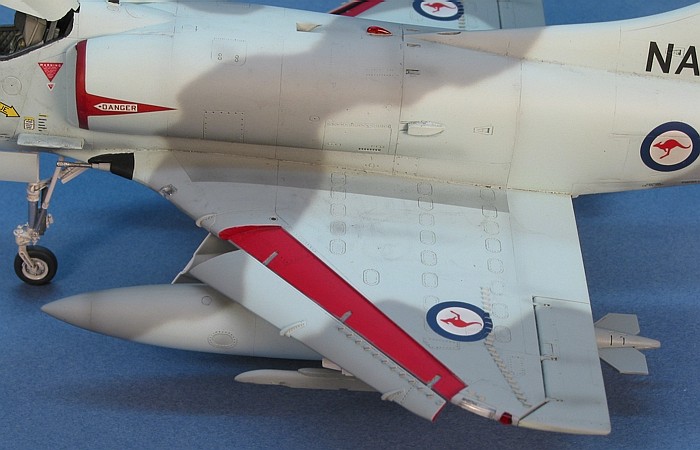
To convert the A-4E kit into an A-4G, I did the following. Again, note that all
these changes use parts that are already present in the kit. Some of the parts
are "grayed out" on the instruction sheet as being not used (on the A-4E/F), but
they are the right parts to use to update the A-4E/F to an A-4G. The step
numbers relate to the Hasegawa A-4E/F kit instruction steps.
Step 5:
-
Remove the small antenna on top of the fin cap
fairing (part A15).
-
Do not use the lower fuselage piece that includes
the chaff dispenser fairing (part A8). Instead, use the part with no dispenser
fairing (part A6).
-
A-4G Skyhawks do not have the avionics hump. Follow
the instructions in the main diagram (for scheme #1) and ignore the directions
in the inset labeled for scheme #2.
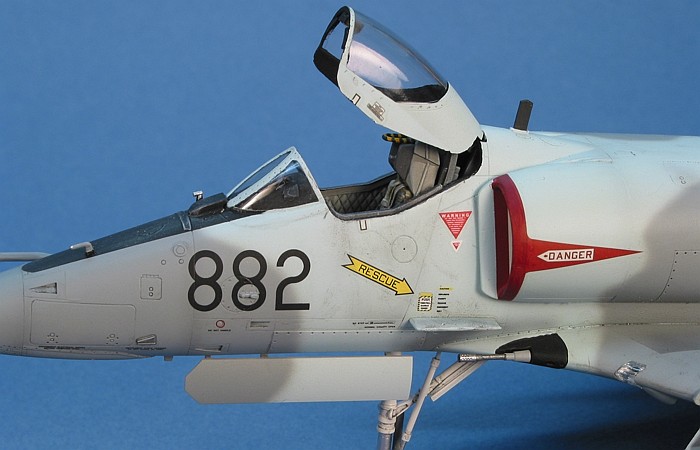
Step 8:
-
Do not use the ECM antennas (parts D19 and E31 or
F22) under the nose. Do not use the other 2 antennae (parts F22) under the
fuselage adjacent the nose landing gear bay.
-
On the nose landing gear strut, apply the pieces
that are labeled as going with scheme #2 (parts E21 and E25). These parts are
the nose wheel steering fit that all A-4Gs had when delivered.
-
Check your references for the wing cannons. Some
A-4Gs have them while others do not. Use the appropriate wing roots for your
needs, either kit parts D8/D9 for cannons or D6/D7 without cannons.
Step 10:
- Do not paint the hook ends of the catapult hooks (parts F23) yellow as
directed. On RAN aircraft, these were white.
Step 11:
-
Do not fit the ECM antennae (parts E19, F21, D17
and D18).
-
When attaching the cover plates (parts A3 and A4)
over the chaff dispensers, fill the gap around them to make them disappear.
A-4Gs were built prior to the retro-fit of the chaff dispensers and did not have
the dispensers or the cover plates.
Step 13:
-
Do not fit the radio antenna (part F4). Use the
alternate antenna (part E11) instead and paint it flat black. Do not attach the
pitot (part F24) immediately in front of the cockpit.
-
Attach the temperature probe and pitot (parts E32
and F24) as indicated in the inset labeled for scheme #2.
Depending on the time period of the particular aircraft being modeled, either
the straight refueling probe (part E8) or the bent probe (part E7) can be
attached. The straight probe was used on early aircraft while painted in the
Gull Gray over White camouflage. Most RAN aircraft had bent probes installed
before the air superiority camouflage scheme was applied to them. As I was
building an air superiority camouflaged aircraft, I use the bent probe.
I got many of these conversion notes from Richard at Gekko Graphics. Other
parts I figured out through my own research. I was not paying attention on my
model and started building it with the cannons. Just before I started applying
decals, I happened to notice the lack of cannons on the specific aircraft I was
building. I contacted Richard on this point and he found pictures with and
without cannons for this aircraft, so I left the model with the cannons on it.
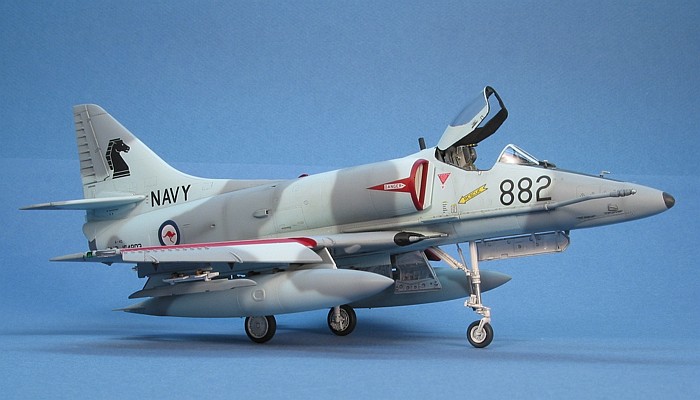
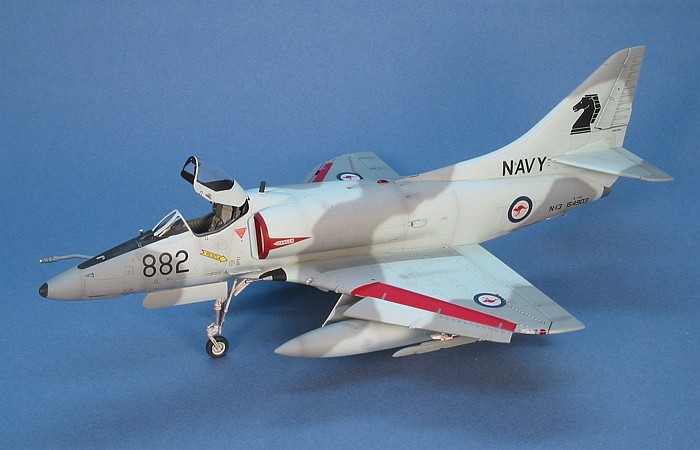
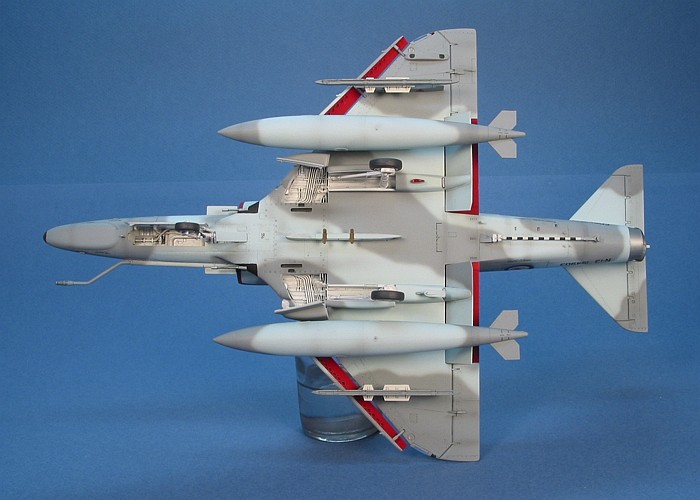
The out-of-the-box qualifications of the model are broken for sure by the use of
an after-market ejection seat. While adequate, the kit provided ejection seat is
a bit simplistic. I replaced the seat with one from Cutting Edge.
I originally wanted to build the model with Sidewinder missiles since the
Australian Navy was the first air arm to fly the Skyhawk routinely in an
air-to-air role. It was not uncommon to find Sidewinders hanging from the wings.
As the kit provides the missile rails and pylon adapters in the kit already, I
painted them up and hung them on the outboard weapons pylons. In the end, I did
not feel like digging out some Sidewinders and left the missile rails empty.
Perhaps I will build some missiles at a later time and attach them.
As I wrote at the beginning of this posting, this model was built at the
request of Richard Chafer from Gekko Graphics. Richard supplied me some of his
new decals to build the model in return for having me provide him some pictures
of the completed model to display on his web site. For a model I wanted to build
anyway, this seemed a fair trade.
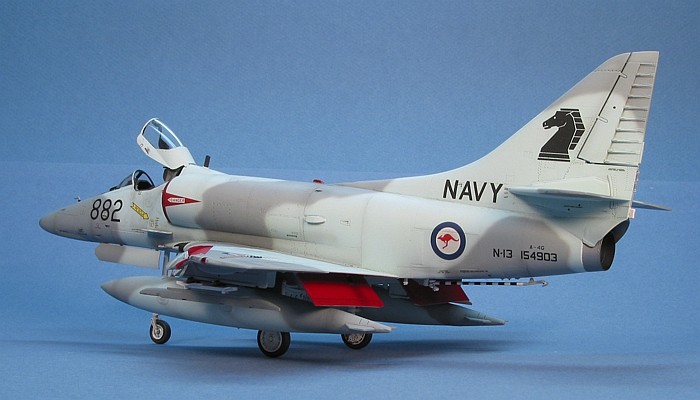
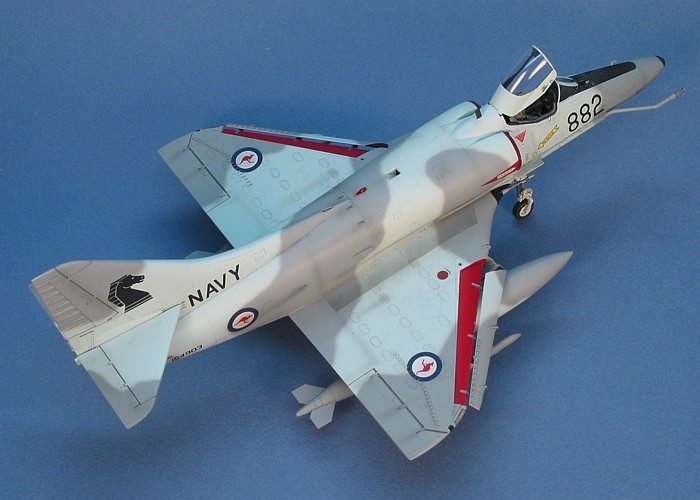
I helped Gekko Graphics with the research on the painting instructions. I used
all Testors Model Master enamel paints. The camouflage colors are Light
Admiralty Grey (BS 381C-697) and Aircraft Grey (BS 381C-693). This is the air
superiority camouflage applied to all of the Australian Skyhawks in the last few
years of Australian service. Eventually, all the surviving Australian Skyhawks
were sold to New Zealand where they retained this camouflage for some time. When
the aircraft were updated to the A-4K standard, this camouflage was removed.
The colors in this camouflage proved to be a bit elusive. I had three sources
that tried to match the closest FS number to these BSC numbers. All of them
disagreed with each other. I found light color matches including Duck Egg Blue
(F.S.35622), L.Ghost Gray (F.S.36375), and Aggressor Blue (F.S.35414). I found
dark color matches including Air Mobility Gray (F.S.36173), Medium Gray
(F.S.36187), and Graish Blue (F.S.35237). These pretty well plastered the
spectrum of choices.
The source with color matches that looked closest to what I saw in pictures was
the instruction sheet from the 1/72nd scale Fujimi A-4E/F/G kit. Fujimi matched
Duck Egg Blue (F.S.35622) as the light color and Graish Blue (F.S.35237) to the
darker color. The few color pictures I had on hand of A-4G aircraft seemed to
match these colors. Hence I test painted the horizontal tails to see what they
looked like on the model.
After drying, I was not happy. The Duck Egg Blue was too light and the Graish
Blue was too dark. This caused the contrast of these two colors to be too great.
So, I substituted Flanker Pale Blue (Model Master #2130) for the Duck Egg Blue.
This is basically the same color as Duck Egg Blue, only slightly darker. To
further reduce the contrast of the colors, I substituted D.Ghost Gray
(F.S.36320) for the Graish Blue. These two new colors had a nicer contrast and
better matched the aircraft I saw in the color pictures I had on hand.
Now seemingly happy with the camouflage colors, I painted the rest of the model
to match the colors I used on the horizontal tails. After these dried, it became
apparent that the Flanker Pale Blue was too green. Richard had cautioned me that
the light color does have a slight green cast to it. The greenish Flanker Pale
Blue seemed like it would be good. Only after seeing a larger area of the model
painted did the color look too green. Time to repaint the model.
I had nothing else in my paint collection that came close to the right color, so
I broke out some paints and started mixing. The mix that finally captured the
light color in the camouflage (IMHO) was as follows:
-
20 parts Flat White (Model Master #1768)
-
10 parts Flanker Pale Blue (Model Master #2130)
-
1 part Flat Sky Blue (Testors "Little Bottles"
#1162)
The White and Sky Blue, by themselves in this mix, create a light powder blue
that is about the same darkness as the Flanker Pale Blue, but has no hint of
green. Adding the Flanker Pale Blue to the mix added a slight green content to
the color.
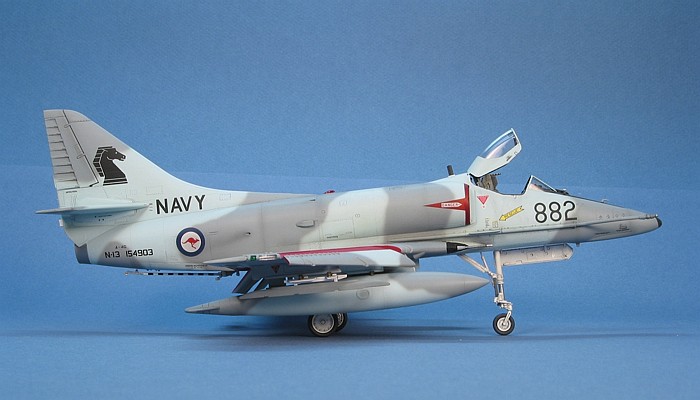
I am sure these colors are still probably up for grabs. The matching I was
doing for these colors is based on photographs which introduces all sorts of
variables into the equation -- color balancing of the prints, lighting of the
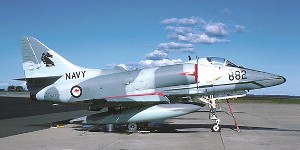
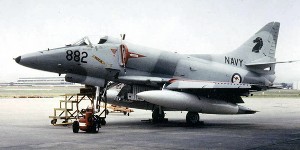
day the pictures where taken, "scale effect", fading, etc. Note the different
colors exhibited by the two images to the right. Both show the same aircraft on
different days with different lighting. Can you tell what the right color is?
Feel free to mix your own colors, but I feel what I have here is a pretty close
representation.
This was the fourth model in the last year where I had to go "above and beyond"
to get the colors to look right to me. Of the four, three required me to repaint
them to fix the issue. I think I will just build models that get simple Gull
Gray and White camouflages or S.E.Asian camouflages for a while ... ;o)
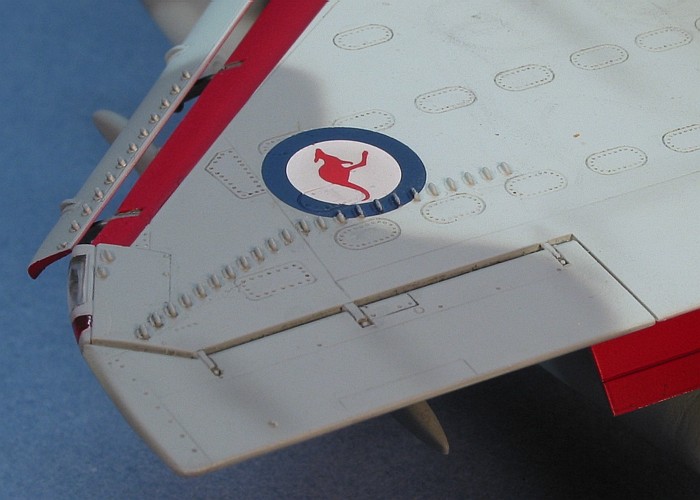
Interestingly enough, the decal sheet from Gekko Graphics is actually for New
Zealand aircraft, not Australian. The single Australian aircraft on the sheet is
provided essentially because it was easy for them to do it. They provide
markings for the same aircraft in New Zealand service, but the only change in
the markings is to the national insignia from its previous Australian service.
Hence, they could provide two versions of this aircraft merely by including the
Australian national insignia. Whatever works is fine by me.
The sheet provides markings for 19 New Zealand aircraft and one Australian. The
Australian and five New Zealand aircraft are in the gray camouflage pictured in
this posting. Five more aircraft are in the original S.E.Asian style camouflage
of two greens and a tan over a light gray bottom. One aircraft is presented in
two forms representing a trial camouflage of all dark green with medium green
markings. One aircraft is in bare metal and carries very interesting markings.
The final five aircraft are in a wrap-around European-I style camouflage of two
greens and a dark gray. There is enough data stenciling and national insignia
present for four complete aircraft, one in each camouflage option.
I used Solv-a-set as a decal setting solution. The decals responded quite well
to this. They are printed by Cartograf, which worried me at first as I have had
bad experiences with Cartograf printed decals in the past. This printing was
good, though, and I had no problems. The decals responded so well that I was
able to get the national insignia to go over the wing vortex generators with no
slicing, ripping, or bubbles. That really impressed me.
For weathering, I used my typical style of thinned down enamel paint washes and
air brush shading. I finished the weathering with some dry brushing to pop out
the surface details. For a more complete discussion of what I do to weather my
models, see my posting on "Weathering Aircraft".
As if I did not already have enough Skyhawks to build on my own, Richard at
Gekko Graphics has given me a few more. Several of the New Zealand A-4Ks on his
decal sheets look quite interesting. I surely will be building some of them.
Stay tuned for another posting in the future where I will discuss the conversion
of the Hasegawa A-4E/F kit into a New Zealand A-4K.
|
Additional
Images and Project Summary
|
Click the
thumbnails below to view larger images:
|
|
|
Project
Statistics
|
|
Completion
Date:
|
25 June, 2002 |
|
Total Building
Time:
|
38.8 |
|
Research:
|
2.8 |
|
Construction:
|
10.5 |
|
Painting
(includes creation and printing of custom decals):
|
19.2 |
|
Decals /
Markings (includes creating and printing custom decals):
|
6.0 |
|
Extra Detailing /
Conversion:
|
0.3 |
|
 Home
| What's New |
Features |
Gallery |
Reviews |
Reference |
Forum |
Search
Home
| What's New |
Features |
Gallery |
Reviews |
Reference |
Forum |
Search