|
BRDM-3
by
Jose
Rodriguez
 |
|
BRDM-3 |

Shanghai
Dragon's 1/35 scale BRDM-3
is available online from Squadron.com
 The
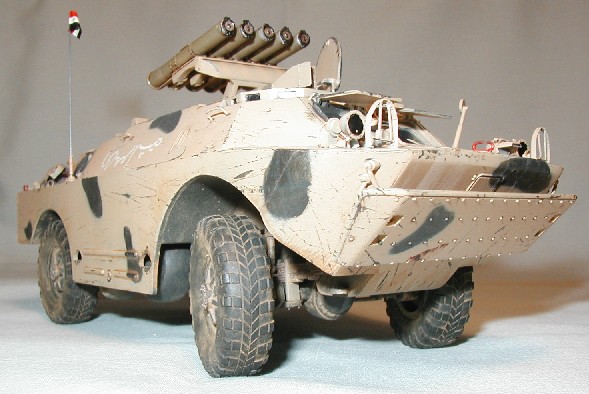
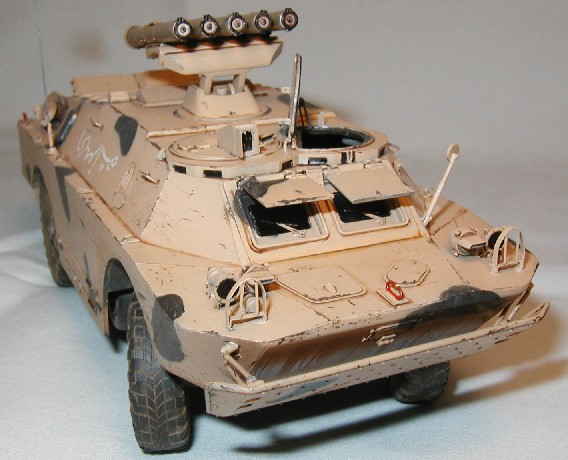
Soviet BRDM-3 is a lightly armored tank killer based on the BRDM-2 scout
vehicle. The
Soviet BRDM-3 is a lightly armored tank killer based on the BRDM-2 scout
vehicle.
The only difference from the -2 is that the -3 has anti-tank
missile launchers and associated sighting system in lieu of the turret armed
with a 14.5 mm machine gun. The designation BRDM-3 is in doubt as such
designation is a NATO given name to differentiate this vehicle from its
predecessor. The official name is more akin to be BRDM-2 ATGM in reference to
the anti-tank missiles it can launch.
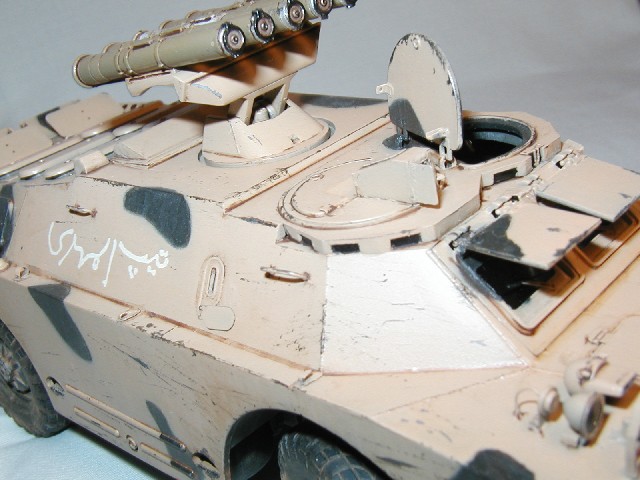
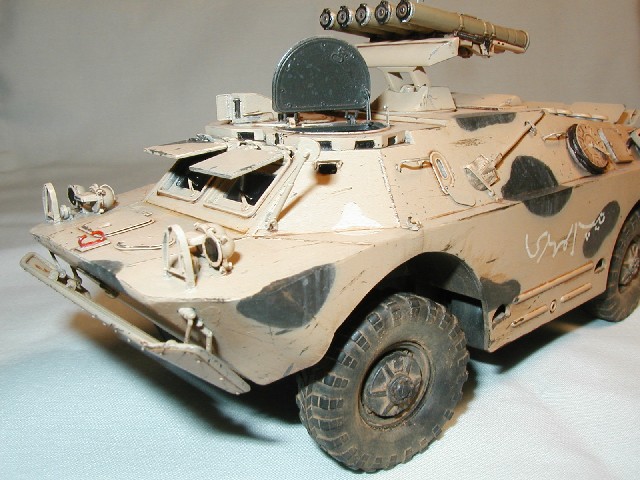
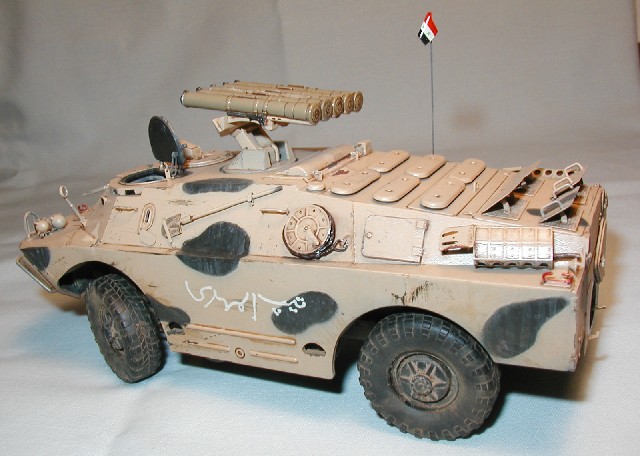
These vehicles, depending on the particular version, can launch
the AT-2/SWATTER, AT-3/SAGGER, AT-4/SPIGOT, and AT-5/SPANDREL. The kit depicts a
BRDM armed with five 9M113 Konkurs missile launchers (AT-5 Spandrels in NATO
speak). The BRDM-3 carries ten additional missiles in storage that can be loaded
from the inside of the vehicle using the top hatch behind the launchers. The 7
Kg (14 Lbs) HEAT warhead in these missiles can penetrate up to 600 mm (23.6 in)
of armor at an incidence of 0 degrees. Effective range for the Spandrel is 4 Km
(2.5 miles). To ensure a hit all the operator has to do is line up the cross
hair in his sight onto the target, like a TOW missile.
Even the name BRDM-2 is in doubt with some analysts calling this vehicle
BTR-40P-2. When it comes to things Soviet, everything is shrouded in the Cold
War traits of secrecy and misinformation.
Instead of me getting you confused with all the designations and variants of
this vehicle, I will let the experts do it for me. These links will take you to
pages where information and history on this vehicle are well presented.
http://www.fas.org/man/dod-101/sys/land/row/brdm-2.htm
http://members.aol.com/panzersgt/Threat/brdm2.html
http://www.nasog.net/datasheets/armour/4/BRDM_2_ATGW.htm
Trying to summarize we can say that this vehicle has a rather
dull reputation. One reason is its thin armor plate with a maximum thickness of
14 mm (.55 inches). Such armor can be penetrated by a .50 caliber machine gun
and by shrapnel.
I read once in Soldier of Fortune magazine how the Mujahideen in
Afghanistan had discovered that a regular 7.62 mm x 39 mm (.30 caliber) round
could penetrate the vehicle if placed in the wheel well area. The exposed tires
are not puncture proof and a single round can flat them out. Now, before bashing
this vehicle you have to consider that it was designed as a scout vehicle; its
mission was to spy on the enemy's movements and report back while protecting its
crew from small arm fire and light shrapnel. This it does well and it can be
argued that it is better protected and it is more capable than the U.S. Hummer
or Humvee. The Hummer is not amphibian and it can get high centered on a boulder
or stuck trying to cross a trench while the BRDM has not much problem in these
areas due to its amphibian capability and odd but effective small four ventral
wheels. Of course, I might be comparing apples to oranges because the Hummer is
a multi-role vehicle designed to replace the Jeep, not to serve as an armored
recon vehicle but it is usual nowadays to see armored Hummers armed with a roof
top machine gun.
Those of you who watched the movie Blackhawk Down need to ask
yourself the question, would you rather be in a Hummer or in a BRDM while
running amok through the streets of Mogadishu under a hail of bullets? Remember
that at the end the U.S. troops had to be evacuated by Pakistani BTR-70's so the
Soviets were not too off the mark regarding their AFV design philosophy, or
maybe we need to take a look at the U.S. Marines decision to use a vehicle as
the LAV-25, similar to the Soviet BTR's.
Another weak point in the BRDM family is the GAZ-41 gasoline V-8 power plant
churning out 140 H.P. For a vehicle that weights 7000 Kgs (14000 lbs) this is
rather anemic. 0 to 60 must be measured with a calendar. My Jeep's four-in-line
puts out 120 H.P. and the vehicle only weights 3000 lbs (1500 kgs), and that
motor is considered low power! The BRDM must have some very low gears to enable
it to get away with just 140 H.P. which means it can crawl but cannot speed up
to its claimed 100 Km/h (62 mph) top speed with its manual 4-speed transmission.
While production of this vehicle has ceased in Europe, the Red Chinese are still
making their own version and have modernized the design by adding side doors for
the crew and installing side windows next to the windshield.
|
Shanghai Dragon's 1/35
BRDM-3 |
This is the Shanghai-Dragon kit number 3514 in 1/35th scale,
from their Modern AFV Series. This kit, or any other Shanghai Dragon kit for
that matter, are not listed in the 2002 Squadron catalog but if you search in
their web site by manufacturer you will find Shanghai Dragon listed, and the
BRDM-3 listed for USD 14.96 (stock number SD3514). The box art is beautiful and
depicts an Arab BRDM-3 in a convoy of other Soviet made vehicles crossing a
military bridge in their way to - Kuwait? The few actual pictures I found on
these vehicles matched the box art rather well so you can use it as a reference.
There are about 111 pieces on four sprues molded in light gray plastic with no
flash. Ejector marks were not a problem and the fit of the parts is good. All
sprues were bagged together and included the lower hull by itself, four vinyl
tires (or tyres) two decal sheets, one clear acetate windshield to be cut to fit
and the instruction booklet. The instructions were well drawn and easy to
follow.
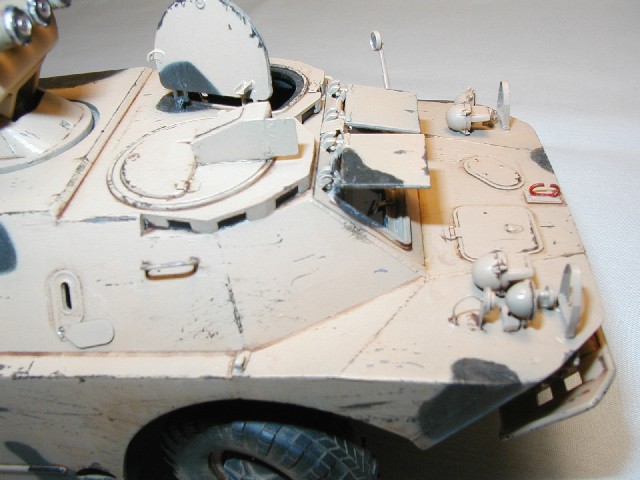
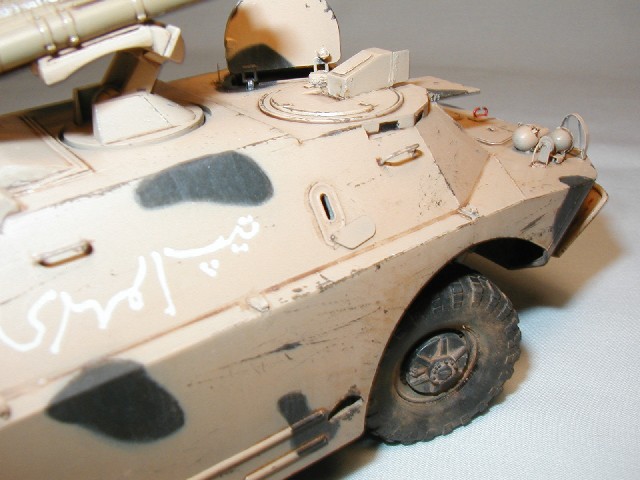
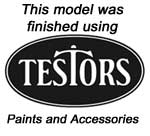
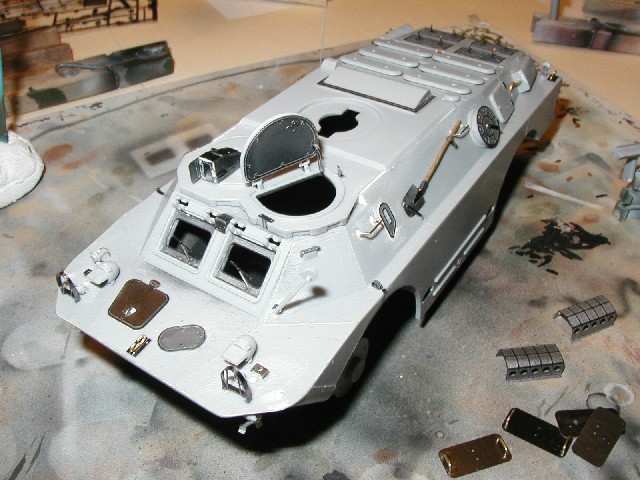
The kit has no interior even though it has a top hatch that can be opened.
Eduard provides an instrument panel but nothing else for the interior, and there
are no aftermarket bits to do the job.
As usual, I ended up buying the Eduard photo-etched kit for this
vehicle, part number 35271 for USD 16.96 from Squadron. I believe the Eduard set
enhances the final result but it requires work and patience to install all those
tiny brass parts on your kit. If you are in a hurry then skip the Eduard set.
The sprues in this kit are mostly BRDM-2 parts, which is to be expected. Three
sprues are marked BRDM-2 and the sprue with the missile paraphernalia is marked
BRDM-2 AT-5 so there you go, a new designation.
There is nothing vicious about putting this kit together. The
photo etched set is painful to install but the kit itself is real easy to build.
I used very little putty to put this thing together. Let me talk about some
small detailing I did.
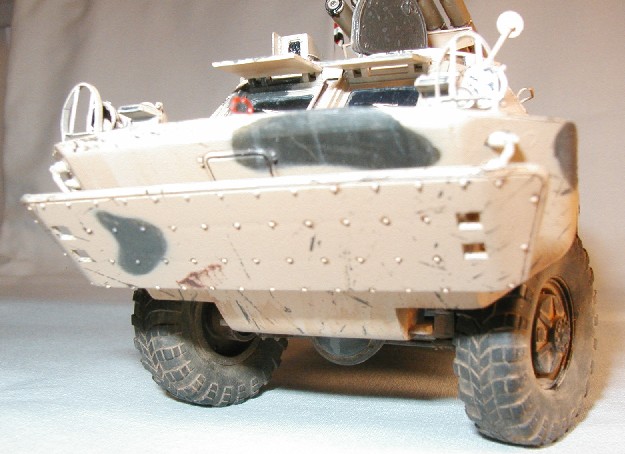
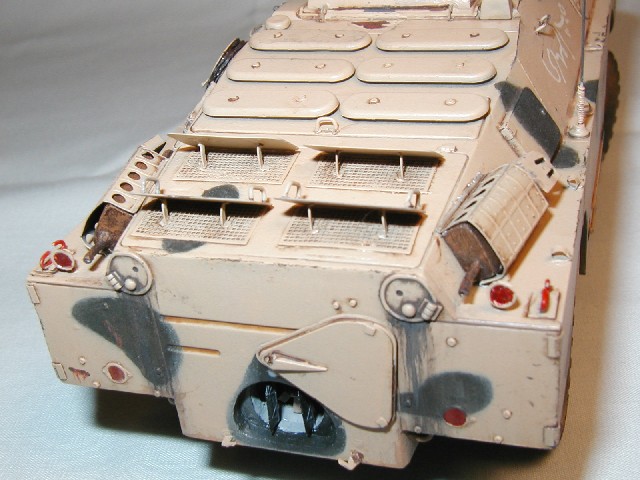
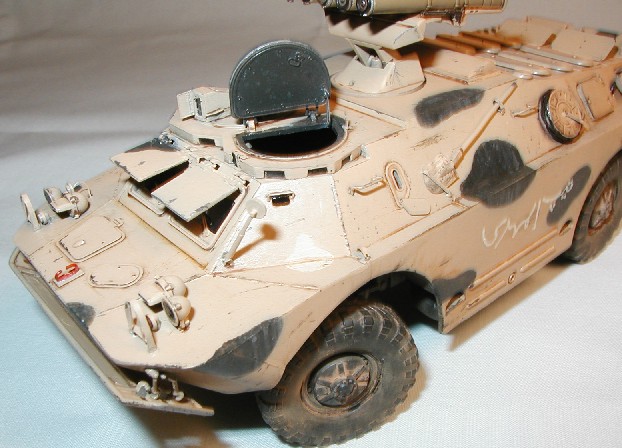
The back of this vehicle has a hatch that swings upward to expose the water
propeller and the jet way. The Eduard kit provides the inlet screen at the
bottom of the vehicle. From this point the jet way moves upward and then bends
90 degrees towards the outlet on the rear. Eduard provides a propeller and the
directional vanes that act like a rudder under water. I drilled out the molded
in propeller and vanes from the kit's rear hull part with a motor tool. I wanted
to create a 3-D view of the jet way and the propeller. I had a web picture of
this area and I used it as a guide. I built the jet way by rolling beer can
aluminum into a tube. Using more beer can aluminum I built the propeller brace
and plugged the rear of my crude jet way. After I painted the parts I glued the
assembly into the rear hull, from the inside. Remember to put some pitch into
the propeller blades if going this route. Because I left the rear panel for last
after the hull had been finished, I encountered some fit problems that I solved
by cutting out the kit's locating tabs and going free style so the unmatched
edge between rear plate and hull ended up at the bottom of the hull where was
easier to trim, instead of at the top.
As far as the bottom of the vehicle goes, it is lacking detail such as brake
lines, air pressure lines, the bolts that hold the differential covers in place,
the drain plugs for the differential cover, the vent lines for the pumpkins
(differentials in 4x4 language). This vehicle is supposed to have double shock
absorbers per wheel. The front wheels came with only one shock each and there
are no shocks for the rear axle. Try to drive a truck with leaf spring rear
suspension and no shocks and you will be on for a rather unpleasant ride. This
is all nitpicking if you don't plan to show your model up side down or on its
side. I decided not to scratch build the missing shocks because all the work
would mostly disappear behind the wheels. Because the differentials are somewhat
visible I added the bolts and the drain plug with dabs of white glue. On my Jeep
these items don't look like the bolts they are because they are covered with
grime so the white glue blobs do the trick quite nicely. How many bolts per
differential? I don't know. The axles look like a GM 12-bolt so I added twelve
bolts. I must confess, I'm a gear head when it comes to Jeeps and I have spent
far too much time under them. Can you spot a Dana 44 axle or an AMC 20 axle
under a Jeep? I can, and sometimes I wonder if too much grease has dropped on my
face that the chemicals make me start to look for stuff like that when I see a
4x4 on the trail.
Continuing with the kit build review, I replaced the grab
handles, exhaust pipe from hull to muffler, and the tow hooks with brass rod. No
piece from the Eduard set was left out and the best parts are the muffler
covers, the radiator hatches, the sight box on the right top hatch, and the
front hatches. As I said, this is a nice set but it takes time to put it on the
kit.
The tires I built as per the instructions so now they spin. Now I can watch the
model roll off the shelf. Because of the play required to let the wheels roll,
they wobble. My advice is to forget about spinning wheels and glue those suckers
to the axle unless you are planning tying a string to the kit and dragging it
behind you around the house. There have been some negative comments about vinyl
tires falling apart after a few months or years. Because of this bad rap there
are resin wheels to replace the kit's original rubber. These resin wheels are
just a copy of the originals so don't expect bulged or worn out tires. My
opinion is that if the vinyl tire is tight around the rim, the radial stresses
will eventually crack the vinyl. I sanded my tires down in the inside until they
had a loose fit over the rim and used white glue so it would give instead of the
vinyl. Only time will tell if I'm right. When installing the tires, remember
that they are directional tires; this means that they are not your common
variety radials that don't care which way they rotate because the thread is the
same in either direction. These tires must be installed with the chevron thread
pointing in the direction of rotation (check the box art for a good pic of what
I'm saying). Reversing the thread on the real world means lost traction and
handling. Of course, only a gear head would know that.
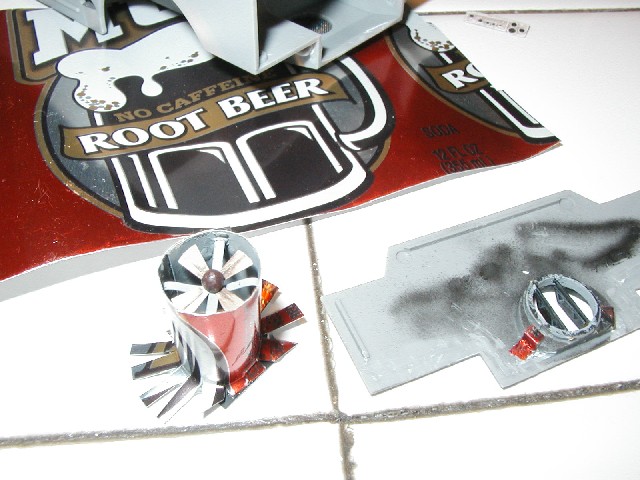
The circular gizmo on the left side of the hull is a detachable cable spool. I
took me awhile to find out what it was because many BRDM pictures on the web
were of disabled and captured vehicles that have been vandalized and picked
clean of anything that wasn't bolted or welded to the hull. I finally stumbled
on a picture of a Polish BRDM with the spool in place showing the cable as it is
shown in my model. I'm not sure if this cable is a towing cable - looks kind of
thin - but then I think of a 12000 lbs winch on a Jeep and the cable is not a
thick cable like the one we are used to see on model tanks or real tanks, so I
have to conclude that it is a tow cable.
In conclusion, this is an easy kit with no mayor flaws or headaches. As far as
dimensions and slope angles matching the original, I don't give a hoot about
stuff like that. It looks like a BRDM to me. For some the kit will be on the
simplistic side but a BRDM vehicle is a simple machine designed to be
mass-produced on the cheap so the kit is not far from the real thing. I
recommend this kit to anyone, and the Eduard p.e. set if you are patient and
willing to put some extra time.
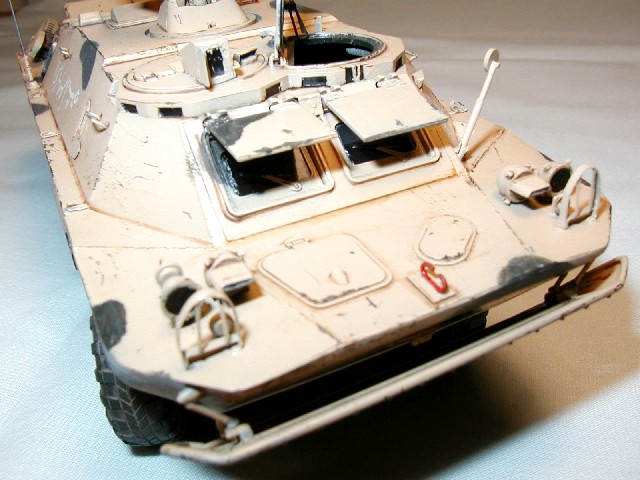
For starters, I finally accomplished my goal of going fully
acrylic, almost. No more nauseating fumes and messy kitchen sinks. My wife is
happy, so I am happy.
The kit provides decals for four vehicles, Soviet, East German, Czechoslovakian,
and Iraqi. The first three are green of one sort of another and the Iraqi is
sand with green blotches. The instruction's color chart references Gunze Sangyo
aqueous hobby colors that happen to be the brand my local hobby shop doesn't
carry. The instructions call for the sand to be RLM Sandy Brown 79. I looked at
this color from another paint brand and it looked way too dark when compared to
all the web pics I had found depicting Iraqi BRDM's in Kuwait.
What to do?
I did what many of you do. I asked the experten on this
site and other armour related sites and I got a few answers. Thank you to all
who answered my survey. I'm sorry I don't have everybody's full name but that is
the way forums work:
Expert Color and Marking Opinions:
We examined and photographed several Iraqi BRDM-2s and a
BRDM-2RKhB for the old Full Detail series. The best matches (from the paint box,
in the field) were overall buff (Tamiya X57, Humbrold #94). Wheel hubs were left
black, although there was often over spray onto tires and such. There was a lot
of chipping to reveal the old Soviet colors underneath.
The paint jobs were done by conscripts who were none too
enthusiastic about the job, so the elaborate schemes are fantasies.
For a photo of an Iraqi vehicle check Concord # 1013.
Ed
Iraq is not a sand lot, but has areas that are lushly vegetated, there are
prairies, swamps, mountains and, of course, deserts. Taking this into account,
there has always been a variety of paint schemes in the Iraqi army, with the
four major colours being brown, gray, green and sand, either singly or in
combination, with the green ranging from a very grassy green to a dark green
similar to Russian green. They even have standardized camo schemes (to a certain
extent) for the major regions.
Quite a lot of the equipment fielded by the Iraqis in Kuwait
actually was painted in a sand base colour with green splotches or bands,
including the BRDM 2 and variants. Not only have I seen plenty of these vehicles
in the field and in captured equipment dumps from Dhahran to KKMC, they are also
well documented:
Verlinden Warmachines No 8, "A Gulf War Eyewitness Report":
- p. 32 + 33 have the BRDM-2 with the "Sagger" in sand and
green as well as a BRDM-2 in plain sand. The green might be the original Russian
green over sprayed with sand, but it could also be a green over spray over sand
Squadron/ Signal "Ground War Desert Storm":
- p.45 has a SA-6 and a SA-6 transloader in sand and green
- p.48 a Panhard AML in sand with green splotches
- p.53 an Engesa EE-9 in sand with very dark green bands
- p.56 T59 in sand with green stripes
- p.57 T55/59, sand with green splotches
These are the sources I just have on hand, if I scanned my personal photos and
dug a little deeper into online sources, there are more photos of bicoloured
Iraqi vehicles.
From my personal experience, which results from my then job as a DoA
"technician" during "Desert Shield" and "Desert Storm", and which took me from
Dhahran to the Wadi al Batin and on to Basra and Kuwait, I'd say the ratio of
uniformly sand coloured to sand and green vehicles was about 50-50, with T-72s
almost always sporting a scheme of uniform sand, but this ranging from sandgray
to sandyellow.
As for your statement "The paint jobs were done by conscripts who were none too
enthusiastic about the job, so the elaborate schemes are fantasies", I cannot
quite subscribe to this, either. The Iraqi army believes in physical punishings
(beatings, even with a stick, denial of food and water) as much as did the
Russian army, so those conscripts would apply those camouflage schemes when
ordered to do so, although the quality of the paints used wasn't always that
good. Just like any other army, the Iraqis weren't in combat constantly and
there is always something to paint, police or grease in the barracks.
No conscript is too enthusiastic about painting equipment, but nevertheless the
Dutch, French, Swiss, German and IDF equipment does have a tendency to be well
painted.
Just my 2 Eurocents
Martin
This is a colour I developed, for Vallejo, especially for this use. It is as
close as I could come to a good all around Iraqi sand colour. The elements, wear
and tear etc will also play a role. I still think this is a good place to start:
Vallejo 819 Iraqi sand
James Welch
I was with C CO, 8th TK BN, 2nd MARDIV during DS. We breached the minefields for
2nd MARDIV. There were many colors, and shades of color on the Iraqi vehicles. I
saw everything from a very yellow colored sand, to a very faded and pale sand
color. Most of the vehicles had paint on the yellower side of MM Armored Sand,
but paler than Tamiya Dessert Yellow. I know this wont help much, but it's the
truth. The point is, you have some freedom here, so paint it to suit your likes
and you will still be close to reality.
Best Regards,
Joe Bakanovic
Sooo... I used Tamiya Dark Green X-61 for the blotches and Model Master Tan 4697
for the hull. I have no idea what this tan color is made for but it looked close
enough to the pics I found.
The launchers use Polly S Israel Khaki. I got a color picture of
a Soviet BRDM-3 in Afghanistan and the launchers' colors match the khaki best
but this could be an optical illusion so you are welcome to do your own
research. I used the dark green as a base color, including the bottom. My
philosophy on applying the sand was that a conscript with a spray gun did the
job so there would be no sand paint underneath the vehicle and the wheel wells
would be over sprayed with sand. The paint would be applied in such a way that
original Soviet green blotches would remain. Applying a light sand color over
dark green gave me the opportunity to experiment with shading. Varying the
thickness of the sand coat I was able to create a shadowing effect on some
areas. Once the paint dried for 48 hours I applied a thick coat of acrylic
Future floor wax. The Iraqi decal sheet has Arabic numerals for many
combinations of ID numbers. The problem is that I don't have any pictures of
Iraqi BRDM's with ID numbers or any markings of any kind. I took an artistic
license and I used the Arabic slogan you see on the model. I have no idea what
it says and I hope I didn’t place it up side down.
Next step was scratches, chipping and scuffing. If you stretch sprue with a
match (under the supervision of a competent adult, with a fire extinguisher next
to you, blah, blah, blah) you end up with the section closer to your hand
tapering from full diameter to a fine threat. Cut the section close to your hand
so you end up with a whip about 2 to 3 inches long. Dip this whip in dark paint
and proceed to scratch your model. I went from front to back to simulate a
vehicle running through the bushes. I did chipping with a fine brush and dark
green paint. I went easy on this technique because it is very easy to overdue.
Some of the chipping was done with a hobby knife and a dental pick by scraping
the sand paint to expose the dark green below. Easy or you will end up showing
the bare plastic.
The wash was burn umber and raw sienna using acrylic artist colors made by
Liquitex of the UK, mixed with soapy water. I removed them after dry using gun
cleaning patches slightly damped in water. No smell, no mess and they work as
good as oil paints and turpentine.
Disclaimer: No dry brushing was used in the making of this model. I have never
seem a real life machine that has been dry brushed; then, why in the world we
dry brushed models while seeking the look and feel of the real thing? Dry
brushing may look pretty - I use it in aircraft cockpits to speed things up -
but it is not real. Some conditions may benefit from this technique but I don't
see it as a panacea that makes a model "weathered"; it is more like a crutch for
the lazy. I'm bracing myself for the flaming email to come from the dry brushing
followers out there.
Next step were rain marks using Tamiya Buff. I diluted the buff
with soapy water, about 9 to 1 water to buff and used a wide and flat brush
damped with the diluted buff to run vertical lines on the sides of the vehicle.
You won't be able to see this rain mark effect at first sight and that is a good
thing because rain marks are not paint but a subtle effect that mimics dust and
pollen streaks running down the flat sides of the vehicle. You need to take a
closer look to observe them, just like in a real truck. Next I took the diluted
buff and splashed random drops of it all over the vehicle. The drop sizes range
from pinhead to corn kernel sizes.
I needed to dirt up the bottom of the vehicle and the wheel wells so I used a
mix of sand chalk pastel dust mixed with soapy water. I slathered this paste on
the model and that was enough for me.
Polly S makes a paint called Dust. I used it to spray the bottom and the wheel
wells. It did nothing. I still have to figure out if the paint can paint or it
is just dirty water. Maybe next time. I just used the sand chalk pastel applied
dry with a brush to dust the vehicle and the wheels. I painted the vinyl wheels
Polly S NATO black to take the shine off. Wet and dry chalk pastels are the only
things on the wheels for weathering effects.
Remember that the vehicle is still covered with a healthy coat of glossy Future.
By now all of you are thinking, "well, now comes the flat coat to seal things in
place." Wrong. Question authority. The pics I have show that the Iraqis used
sand paint with a nice shine. To tell you the truth, the only 100% flat paint
job I have ever seen has been on U.S. Army Cobra and Apache helicopters, and
this is an expensive low infrared signature paint. I think the Iraqis bought
their paint on a hardware store so the shine is going to stay. Because the hull
in this vehicle is a three-dimensional prism, the light impinging upon it gives
each panel a chromatic uniqueness. The buff dried flat so every panel has a mix
of shine and drab spots that contributes to give the model that elusive metallic
sheen. I didn't use any flat coats of anything in this model; after all, real
vehicles are not uniformly "flat" or shinny but a mix of both.
I'm still working on my rust. It is getting better but I still not satisfied. I
use Liquitex acrylics. I start with Red Oxide then over paint it with Burnt
Umber. By now the blotch is thick and has swirls of dry paint so I dry brush the
ridges with Red Oxide and Raw Sienna. It looks good but I still think I can do
better. Next time I will come up with something else to see if I can improve.
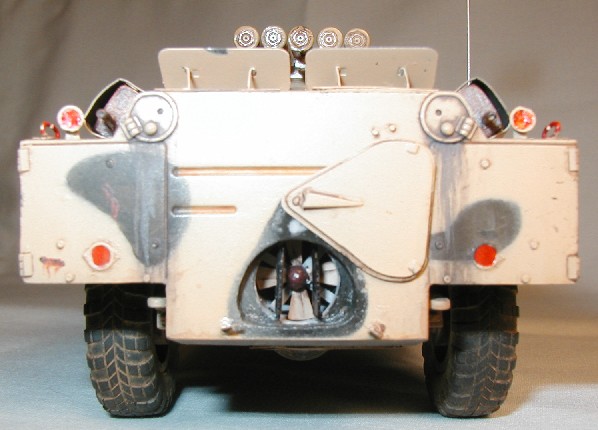
The stop lights are Testor Silver, the only enamel in this project, over painted
with a coat of Tamiya Clear Red.
I used an extra soft 6B pencil to highlight the grab handles, all the sharp
edges and the rims around the hatches. I also used the pencil on the shovel.
The Iraqi flag came from the kit's decal sheet. I placed two Iraqi flag decals
next to each other on a piece of aluminum foil. After trimming the flags from
the foil I wrapped the trimmed foil around the piano wire antenna and glued both
halves together with white glue. I finished the job by painting with a brush any
sliver of silver and gave the flag a realistic fold around the antenna.
Hey, this is why I build models for - to experiment.
Buy yourself some cheap kit and go ape wild with new ideas,
ideas that you are itching to try but are afraid of using on a forty bucks kit
with another thirty bucks worth of resin and brass that took you half a year and
a divorce to finish. Get a ten to fifteen dollars kit, built it straight out of
the box and dare to be different while having fun. If your ideas don't work you
are out of a little of money and you can email me to tell me what you think of
my pea brained ideas and where to stuff them but maybe you will stumble on that
effect that has been eluding you for years, or you may discover a better way of
doing things.
Click the thumbnails below to view
larger images:
Model, Images and
Article Copyright © 2002 by Jose
Rodriguez
Page Created 21 July 2002
Last updated 04 June 2007
Back to HyperScale Main Page
Back to Features Page |
 Home
| What's New |
Features |
Gallery |
Reviews |
Reference |
Forum |
Search
Home
| What's New |
Features |
Gallery |
Reviews |
Reference |
Forum |
Search