|
Seafire Mk. III
by Ryan Hamilton
|
|
|
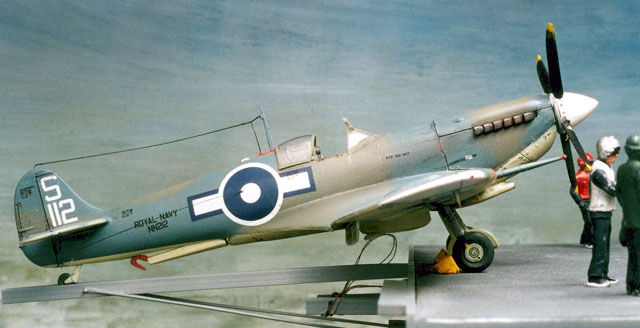
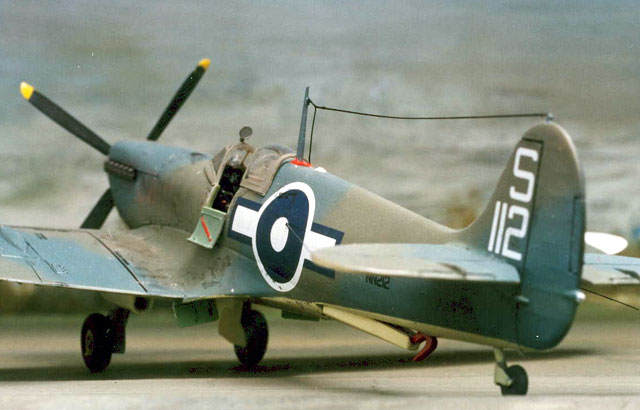
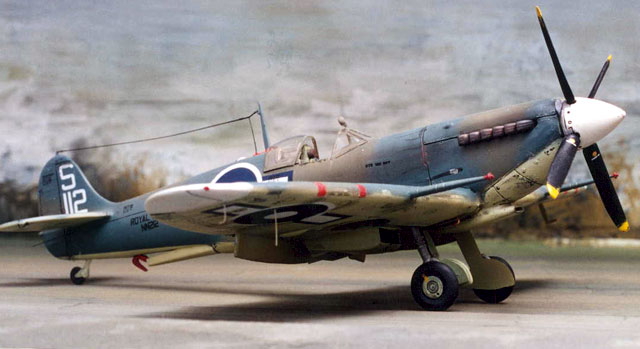
Supermarine Seafire Mk. III |
images by Pieter
Stroethoff

HyperScale is proudly sponsored by
Squadron.com
Rarely has a plastic model brought on
such emotions in me as the “new” 1/48 scale Airfix Seafire/Spitfire Vc –
but unfortunately they are all the wrong emotions.
When I open the box, my first impressions were so bad that, if I hadn’t
already damaged the box, I would have taken it back to my local hobby
shop and asked for a refund.
Technology today has definitely raised
the bar when it comes to models and the engineering that goes behind
their development. I just wish that my first impressions reflected this
expectation, but first impressions aside, let’s get on with building the
kit!
The Airfix 1/48
Seafire III / Spitfire Vc
|
The kit contains 97 parts, including
the original sprues for the Spitfire Mk Vb from earlier years, and four
new sprues containing parts for the updated Seafire/Spitfire Vc. As has
been well documented, the old parts have raised detail, while the newer
parts are engraved, but little work would be required to re-scribe the
fuselage if desired.
The texture (plastic) of the new parts
is also slightly different to those of the old, though it was not
noticeable once the model was completed. The kit contains decals for one
Seafire, and three Spitfires, including –
-
Seafire IIIc
– No. 887 Sqn Naval Air Sqn. - Four bladed prop, single canons, thin gun
blisters, standard wing tips and air filter;
-
Spitfire Vc
- 79 Sqn. RAAF New Guinea - Three bladed prop, single canons, broad
cannon blisters, standard wing tips and tropical air filter;
-
Spitfire Vc
– No.2 Sqn, 7 Wing, SAAF - Three bladed prop, double canons, broad
cannon blisters, clipped wing tips and tropical air filter;
-
Spitfire V
(Special), 103 Maintenance Unit, Aboukir. Four bladed prop, no canons –
four machine guns, no gun blisters, extended wing tips and standard air
filter (my resources indicate that this aircraft was fitted with a
Volker air filter
For those, like me, who like to build
aircraft that were flown by Australian airmen, your in luck as three of
these four scheme’s were associated with the RAAF, or Australia.
Naturally, the 79 Sqn Spitfire was Australian, the Spitfire V special
from 103 Maintenance Unit was operated by 451 Sqn RAAF in North Africa,
while the Seafire spent time in Sydney and Brisbane when not on board
the HMS Indefatigable in the Pacific theatre.
Construction starts, like most kits,
with the cockpit and again, it’s the old Vb cockpit. At this point I
thought about replacing it with an after market set, but the thick
detail on the cockpit wall would have made this difficult. I also
thought about just closing the canopy due to the lack of detail, but
with a little patience the end result of the cockpit was not that bad.
From this point on you will need to decide which version or scheme you
intend to build as all versions differ throughout the construction. The
fuselage is glued together with the cockpit and the tail plane added.
For those who have built a number of Tamiya or Hasagawa Spits, the tail
plane is a complete let down. The trailing edge of the tail is as thick
as the leading edge. To spend time and correct the problem would mean
losing a lot of raised detail.
On to the wings. They are all new. I glued the wings together only to
notice that they are like planks of wood, with only a slight resemblance
to the aerofoil of the SpitfireIt is all down hill from here!
If you are building the standard wing tips, these only have a little
resemblance to the true shape. I chose to replace these with a set of
ICM wing tips I had spare.
Now for the cannon ports. These too differ to which version you intend
to build, and again are devoid of any resemblance to the true shape. I
again resorted to a set of ICM panels I have spare, but they need to be
cut back to fit the wing. I’ll talk about the flaps a little later. The
wings are joined to the fuselage, but good luck with the dihedral. The
engine cowling completed with other airframe parts and the Seafire is
cleaned up for painting. One good point at this stage was there was
little filler needed.
 The
Seafire was then sprayed with Testor's Model Master paints. The
Seafire was then sprayed with Testor's Model Master paints.
The wheels and undercarriage were painted now. I used the kit wheels,
but thickened them with a piece of plastic card. Others may want to use
after-market sets. The kit allows you build the kit with the flaps in
the down position, but Spitfires and Seafire rarely had the flaps in the
down position when on the ground. If you wish to build the kit with the
flaps up, I would suggest replacing the flags with a piece of plastic
card. A little research revealed that Seafires operating from small
carriers had a wedge placed in the flags to give them a 5% flaps down on
takeoff. These wedges would fall out once the Seafire was airborne, so
kept this in mind if you are building the Seafire.
Now for the true heart breaker – the decals.
The decals are well printed, with good colour, except for one problem –
THEY WERE PRINTED OFFSET 3MM BELOW THE DECAL FILM!!!!!! This
rendered them just about useless. I emailed Airfix for a replacement set
but I am yet to hear from them. I sprayed the decals with clear gloss
and hoped they would hold together till they were in place. This
appeared to work and the decals then settled down nicely with a little
decal set. The decals were then sealed and the Seafire given a coat of
flat varnish.
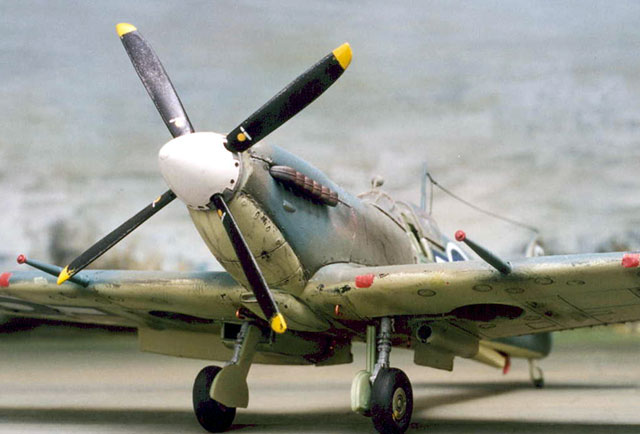
The hook, canopy and propeller assembly were all added. I choose to use
a Falcon canopy because they are much thinner then the kit’s version,
and I also intended to open it. I opened the access door to the cockpit,
but due to the lack of detail, I replaced this with the ICM door
instead. The spinner and propeller were not to bad, though I added a
little detail to the spinner. Hooks for the catapult are omitted from
the kit so they were added with some copper wire.
Weathering was accomplished using pastels and acrylic’s thinned in
alcohol. Then the aerials were added to complete the model.
While researching this kit I came
across some photo’s where Seafire’s were stored on the smaller aircraft
carriers by parking them over the edge of the ship using a rail system.
This was intended to give the ship more room on the deck.

I knocked up a box with plastic card, used a beam for the rail, and
added some external ship detail. The end results accompanies the Seafire
very well. The figures are white metal, though I can’t remember which
manufacturer they are from. Being white metal, they tend to get stripped
back and repainted every time I’m building a Naval aircraft from a
different era.
Though I have been fairly negative
towards this kit, if the truth be known I’ll probably build another one
into a Spitfire Vc. This is only because I have the necessary
replacement parts that to use on another Spitfire.
With all the hard work that Airfix have put into this kit, I only hope
that next time they take a little more time with its development and
give modelers something to the standards that they expect today.
Model and Text Copyright © 2002 by
Ryan Hamilton
Images Copyright © 2002 by Pieter Stroethoff
Page Created 11 November, 2002
Last Updated 04 June, 2007
Back to HyperScale
Main Page
Back to
Features Index
|
 Home
| What's New |
Features |
Gallery |
Reviews |
Reference |
Forum |
Search
Home
| What's New |
Features |
Gallery |
Reviews |
Reference |
Forum |
Search