|
Dornier Do 17 Z
Finnish Markings
Classic Airframes, 1/48
scale
S
u m m a r y
|
| Catalogue Number: |
4114 - Dornier Do 17 Z - Finnish
Markings |
| Scale: |
1/48 |
| Contents and Media: |
104 parts in grey styrene; 19 parts in cream colored
resin; 9 clear injection molded parts; instructions; decal sheet and
painting guide for three aircraft |
| Price: |
MSRP
USD$77.00
GBPŁ36.17 available online from Hannants
USD$69.30
available online from Squadron |
| Review Type: |
FirstLook |
| Advantages: |
Accurate in outline (and no banana-shaped
fuselage); useful options including detailed bomb bay interior, two
250kg bombs and positionable entry hatch; crisp engraved and fine surface detail; high quality plastic moulding;
thin, clear and separately packed clear parts; impressively detailed resin parts;
three interesting marking choices. |
| Disadvantages: |
Some modelling experience helpful for preparing
parts; a bit of flash present; some minor DIY if desired (DF Loop,
"clothes rail" antenna, cowl bracing). |
| Recommendation: |
Highly Recommended |
Reviewed by
Brett Green

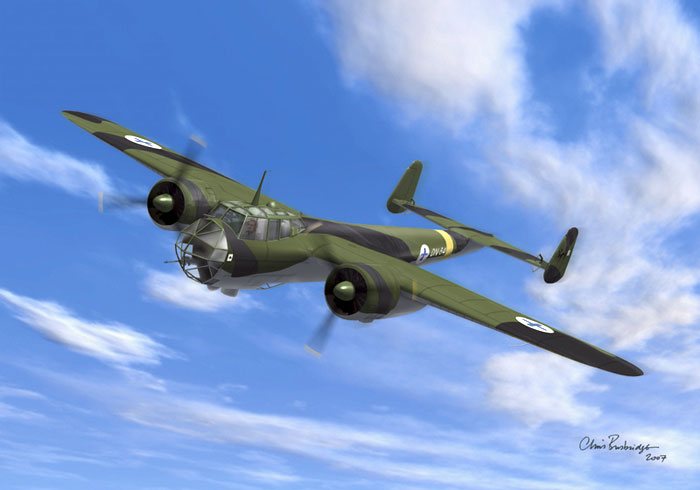
Classic Airframes' 1/48 scale
Dornier Do 17 Z is available online from Squadron.com
The Dornier Do 17 was the first truly modern medium
bomber to see service with the Luftwaffe. Its sleek fuselage design led
to it being nicknamed the "Flying Pencil". During the 1930s, early
versions played an essential role in developing tactics, especially over
the skies of Spain with Legion Condor.
The Dornier Do 17 was limited in its range and bomb
load, but it represented the backbone of the Kampfflieger (the German
bomber force) at the outbreak of the Second World War. Even with the
introduction of superior types such as the Heinkel He 111 and with the
Junkers Ju 88 on the horizon, the Dornier Do 17 remained a
numerical important element of the Luftwaffe's bombing campaigns for the
first year of the war.
The extreme vulnerability of the Dornier Do 17 was
eventually exposed during the Battle of Britain where the final
production version, the Do 17 Z, was shot down by Spitfires and
Hurricanes in alarming numbers. Attempts to upgrade defensive armament
(up to eight machine guns bristling from the cockpit's transparencies)
were not effective, so the Dornier was relegated to second line,
training, night fighter and photo reconnaissance duties.
Although the Dornier Do 17 is undoubtedly a
keystone of the Luftwaffe, it is not well represented in plastic. In
1/72 scale, we only have the very old Airfix (Do 17 E/F), Monogram,
Lindberg and
Frog (all Do 17 Z) derived kits. Although these kits were quite
respectable at the time of their release in the 1960s, they are hardly
state of the art today.
The Flying Pencil has fared even worse in 1/48
scale. Hobbycraft released a series of Dornier Do 17s in the 1980s.
These kits were very poor in terms of both accuracy and detail. More of
these later.
Hopes are therefore high for an accurate and well
detailed Dornier Do 17 in 1/48 scale.
Classic Airframes has now addressed Luftwaffe
modellers' wishes with the first of their 1/48 scale Dornier Do 17 family - a Do 17
Z in Finnish service.
This brand new Dornier
comprises 104 parts in grey styrene; 19 parts in cream colored resin; 9
clear injection molded parts; instructions; plus a decal sheet and painting guide for
three aircraft.
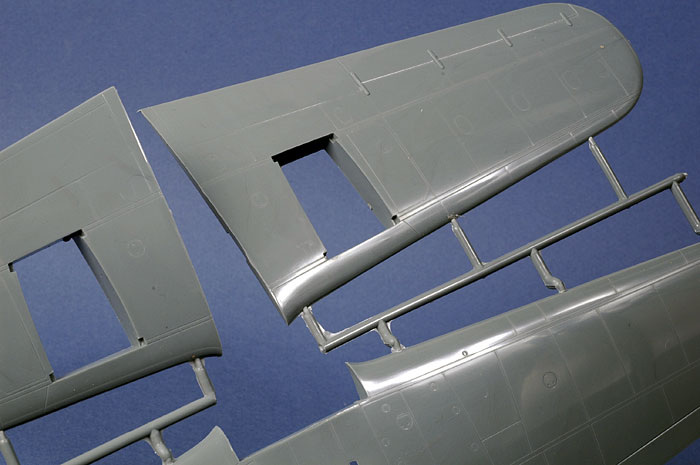
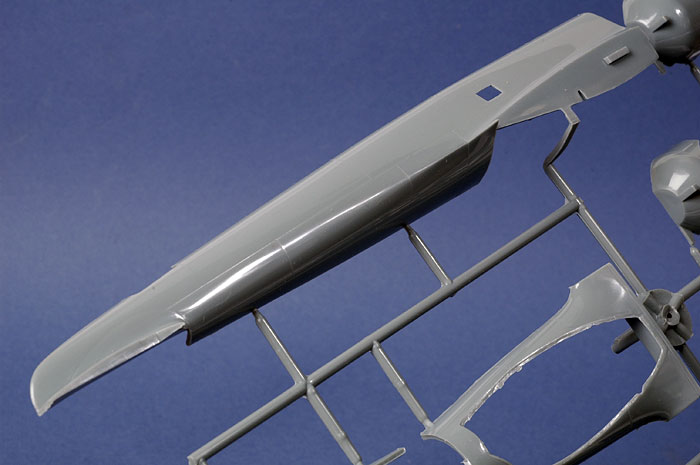
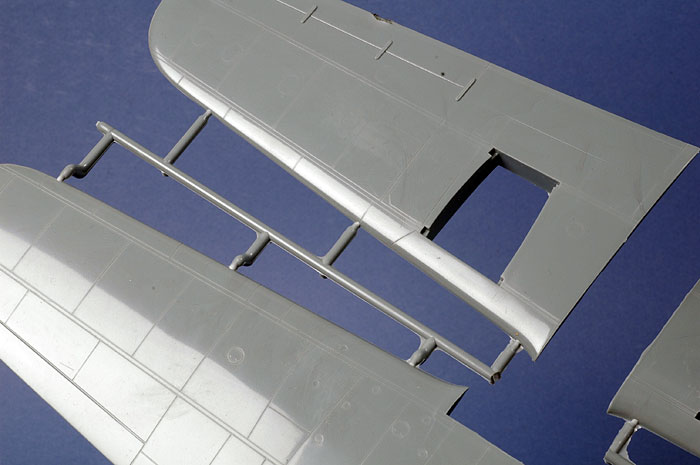
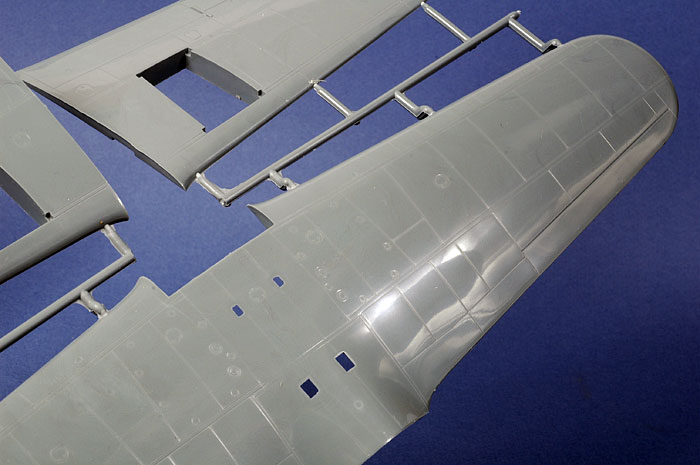
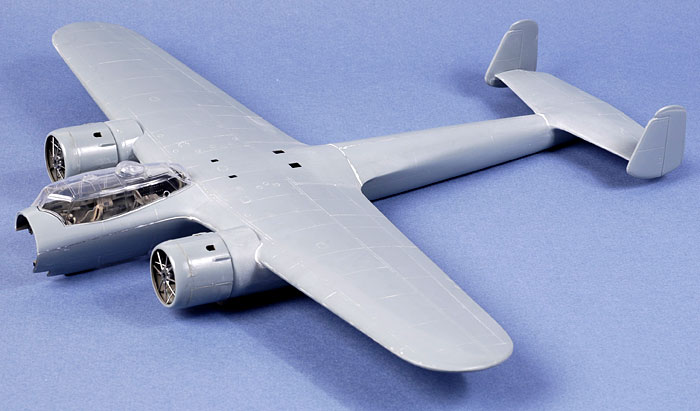
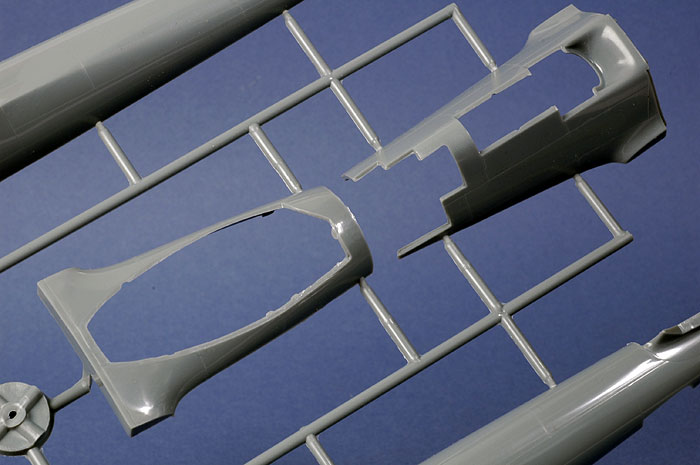
In common with other recent Classic Airframes kits,
plastic parts are presented to a very high standard. Moulding quality is excellent,
this time with a high gloss finish to the surface. There are no moulding imperfections on
any of the exterior surfaces. Panel lines are crisply recessed
and
consistent.
Click
the thumbnails below to view larger images:
There was a little more flash on my sample than I have seen on other
recent Classic Airframes kits, but this may be because I received a very
early sprue shot.
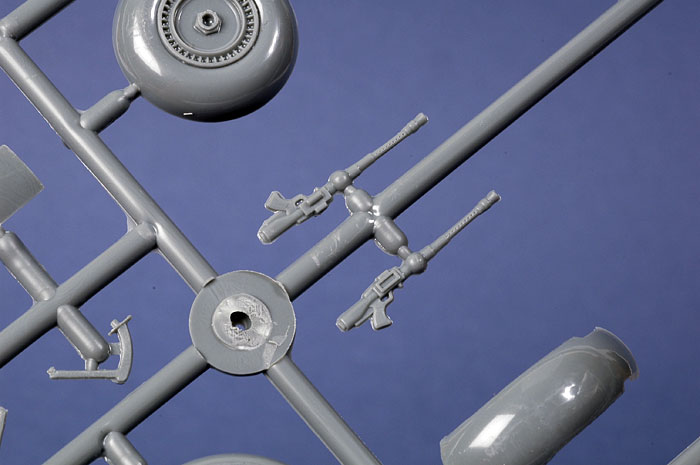
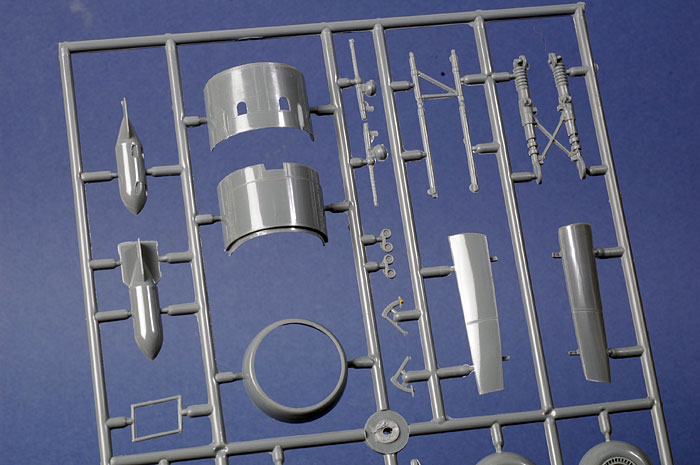
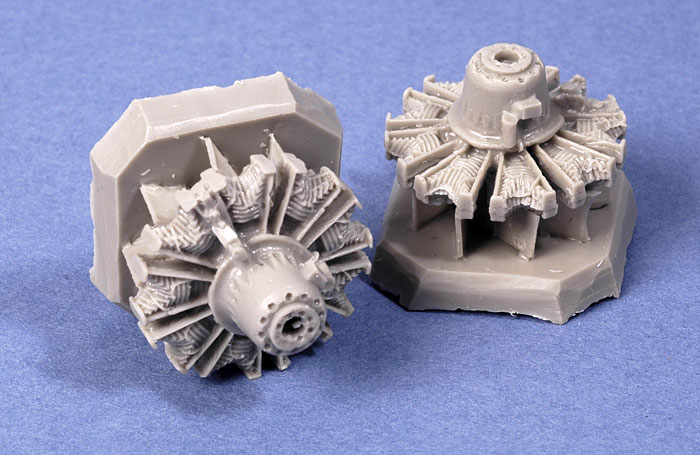
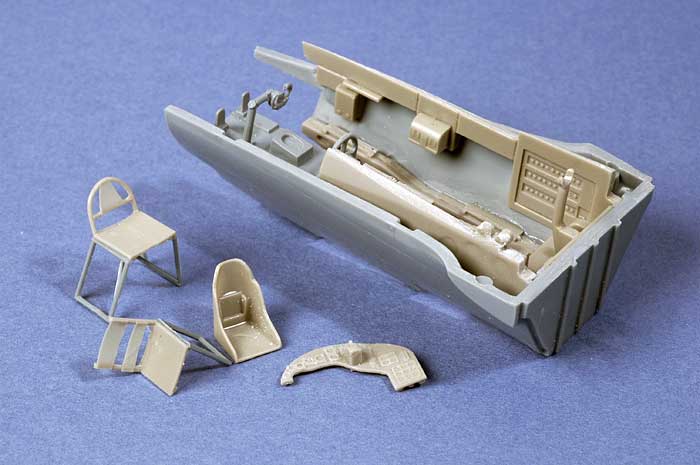
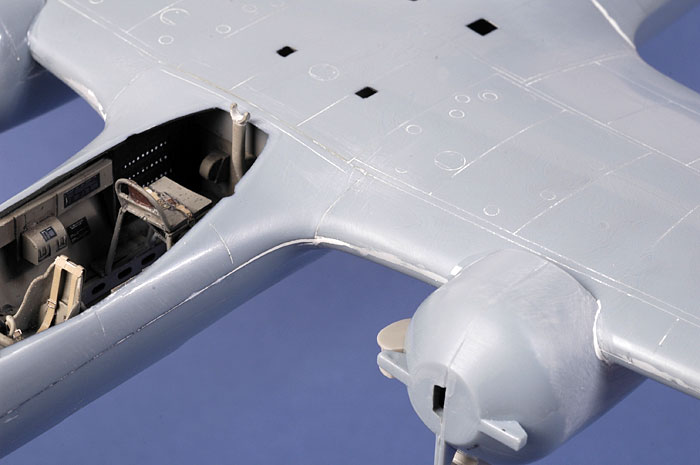
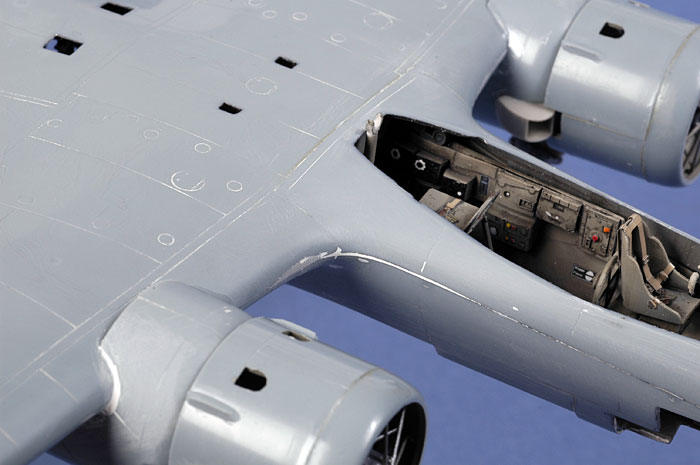
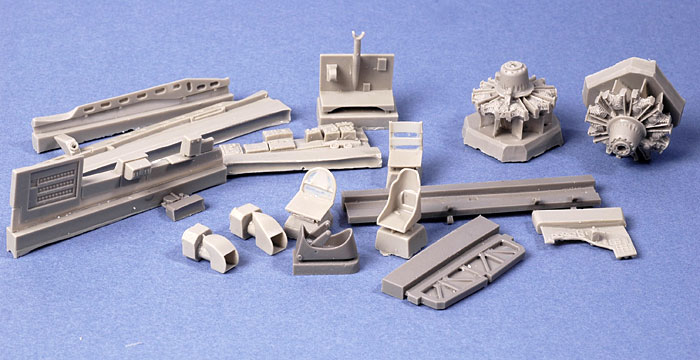
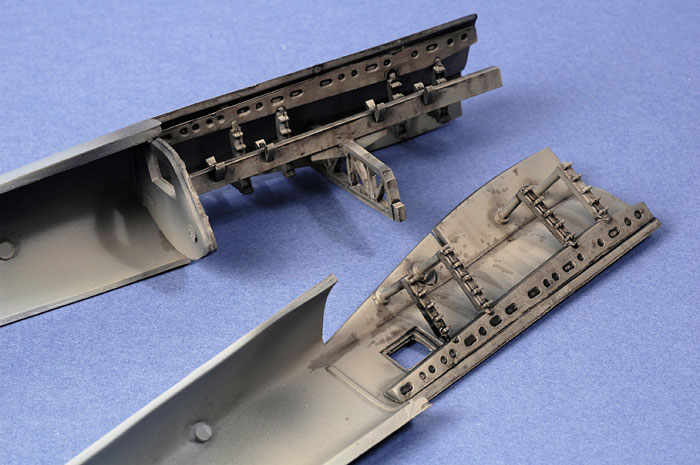
Resin parts are very nicely detailed. These parts are destined for
the cockpit interior, bomb bay and engines.
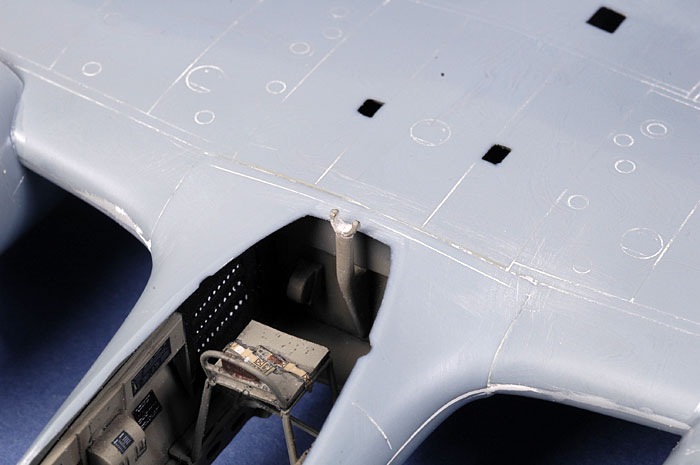
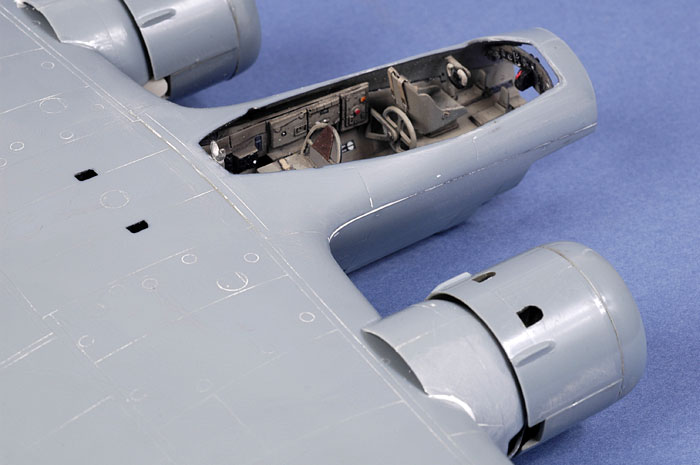
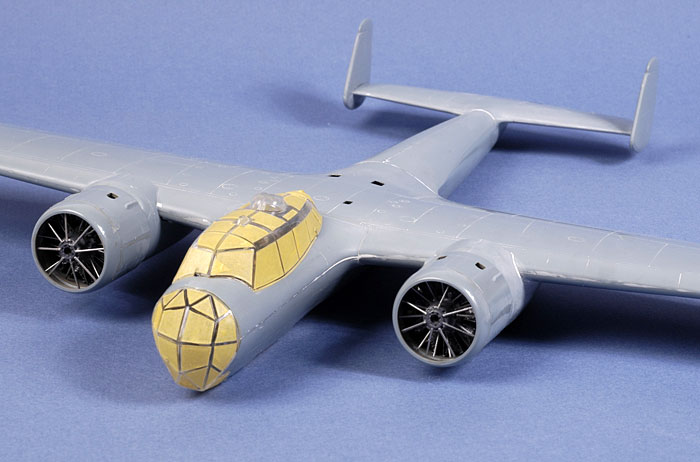
The high level of detail in the cockpit is warranted by its
visibility inside the large canopy and nose glazings. Classic Airframes supplies
seats, structural features, radio gear, switch (fuse) panel and bomb
sight in resin; with machine guns, ammunition, bomb sight and shell collection
chutes in injection moulded plastic.
Click
the thumbnails below to view larger images:
You'll need to provide your own harness straps though. Another surprise
omission is the throttle / mixture / pitch selector quadrants. In
reality, these would be mostly hidden between the pilot's seat and the
port sidewall, but some modellers may wish to add this feature from
scrap plastic.
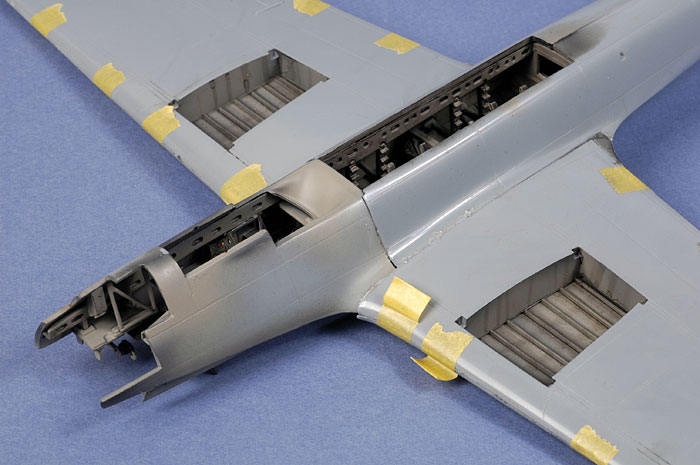
I was pleased and surprised to find a detailed bomb bay interior plus
separate bomb bay doors. The bomb bay is fitted out with a combination
of plastic and resin parts. The small bomb bay windows are supplied as
separate clear parts. Two 250kg bombs are included too.
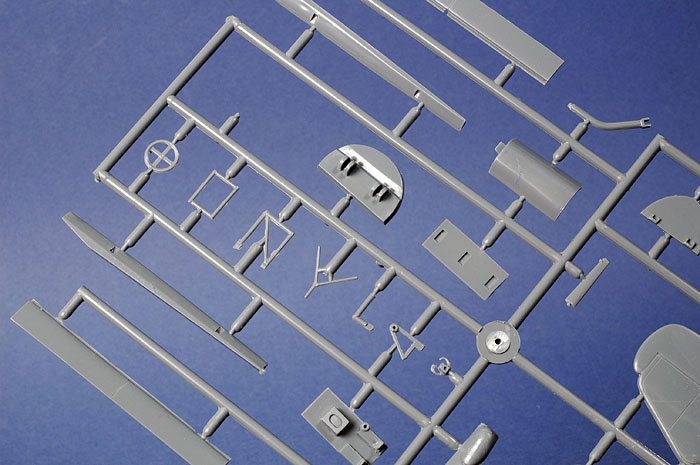
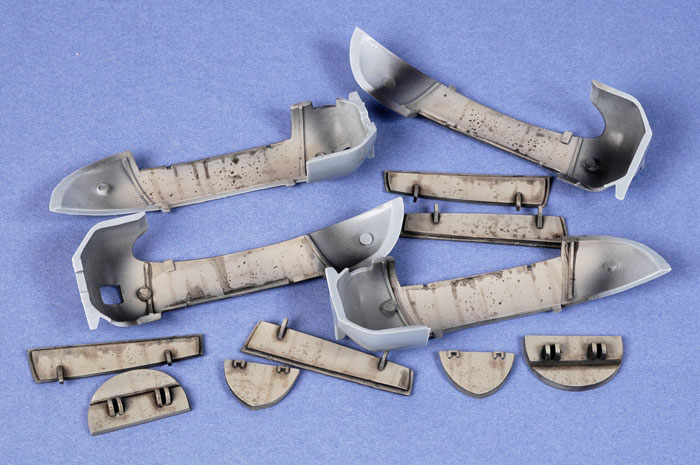
The wheel wells are authentically depicted and suitably deep.
Structural rib detail is moulded to the inside surface of the upper
wing, providing a realistic ceiling to both the wheel wells and the bomb
bay.
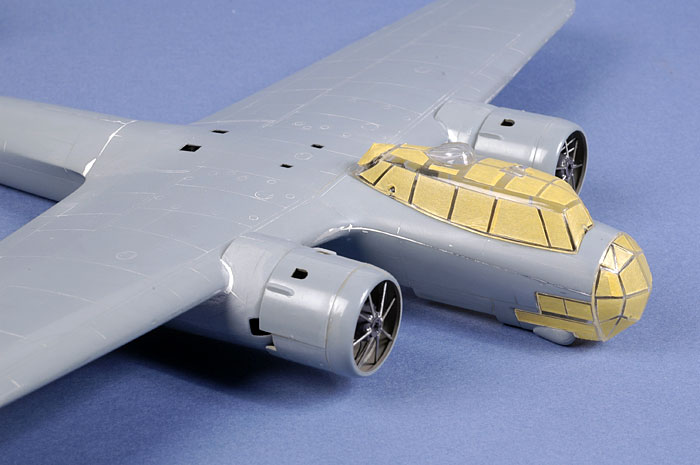
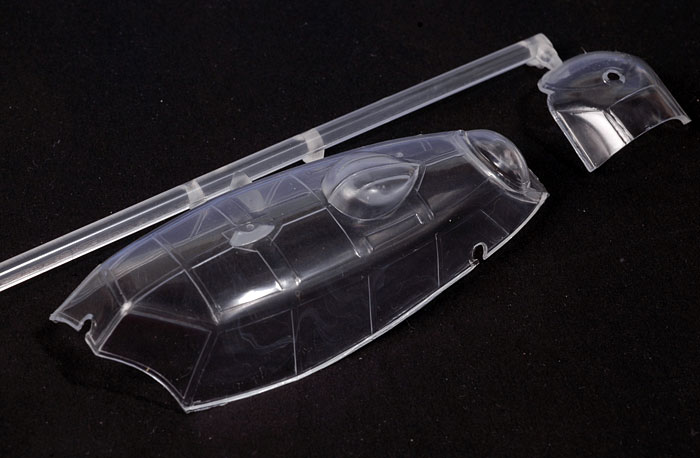
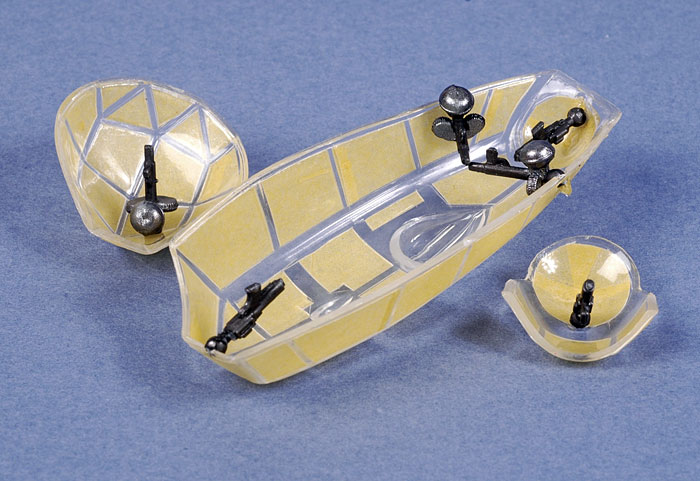
Clear parts are well moulded and distortion free - very important for
this glasshouse canopy and nose. The parts look slightly cloudy in the
bag, but they positively sparkle after a bath in Future floor polish.
Click
the thumbnails below to view larger images:
Options include open or closed bomb bay doors and positionable entry
hatch. Control surfaces are moulded in place, with separate actuators
for the elevators.
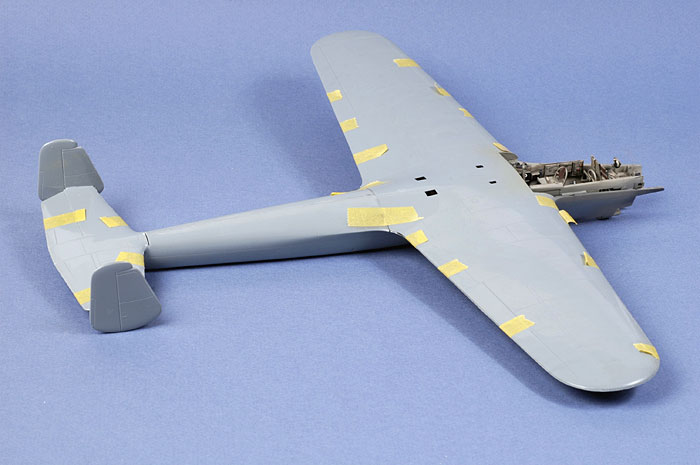
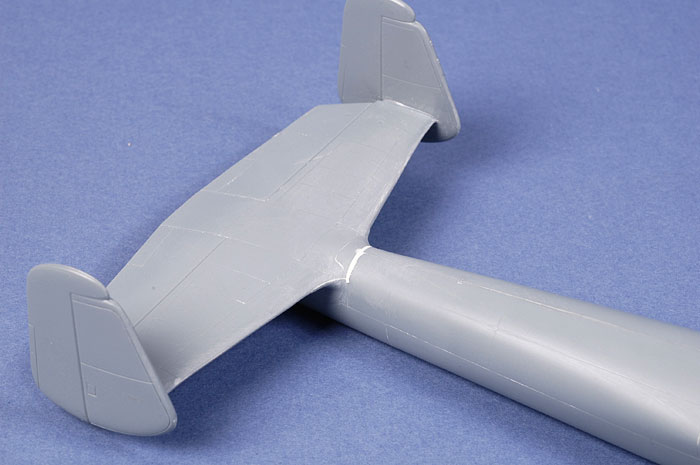
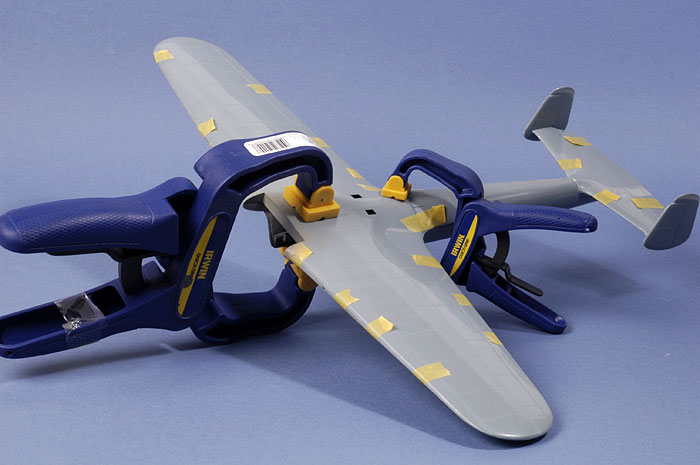
The kit is broken down sensibly for this aircraft design. The upper
wing is full span, ensuring that it retains its flat upper surface. The
nose is separate, being split horizontally, while the rear fuselage is
split vertically. The tailplanes sit over a saddle on the rear fuselage,
and each vertical tailplane is a single piece that locks into large
locating tabs on the ends of the horizontal stabilisers.
Engine nacelles are separate from the wing, suggesting that we may
see some of the Jumo powered variants as well.
The modeller may wish to add a few items that are not supplied in the
kit. These include the large DF Loop antenna (check references because
it was not fitted to all aircraft), the "clothes rail" blind landing
antenna underneath the rear fuselage, and the bracing structure inside
the engine cowlings.
The shape of the model looks accurate compared to published plans and
contemporary photographs. Classic Airframes has also captured the subtle
aspects of the Flying Pencil that were either poorly represented or
missed altogether by Hobbycraft. Happily, the Classic Airframes fuselage
does not sweep upwards toward the tail (the Hobbycraft fuselage did,
leading to the kit often being referred to as the "Flying Banana"!). CA
has also correctly depicted the forward fuselage side windows (missing
completely on the Hobbycraft kit); the nacelle intakes and exhausts, the
intricate shape of the ventral machine gun position and its recess in
the fuselage, and the undercarriage (the Hobbycraft Do 17 Z featured
gear legs of the early series).
In fact, Classic Airframes' 1/48 scale Dornier Do 17 Z is clearly
superior to Hobbycraft's offering in every respect.
Three Finnish marking options are offered - two wartime and one
post-war. Decals are printed in perfect register, and colours look good.
Construction Notes
I received my sample early last week. I was hoping to have the model
finished and painted by now, but careless handling by Australian Customs
meant that my sample arrived minus a number of essential parts.
Even so, I have completed the model with the exception of the rear
nacelle fairings and propeller assemblies, so I can offer some comments
about construction sequence and fit.
If you have built one of Classic Airframes recent larger kits such as
the Anson or the Canberra, you will have a good idea of what to expect
here. The most important step is careful and thorough preparation of the
kit parts prior to assembly, both plastic and resin. I spent around an
hour and a half removing flash from the kit parts and separating resin
pieces from their casting blocks. Care is required with
the delicate undercarriage parts, but the effort is worthwhile as
underlying detail is very good. The backrests of the bombardier's and
radio operator's seats are very delicate too.
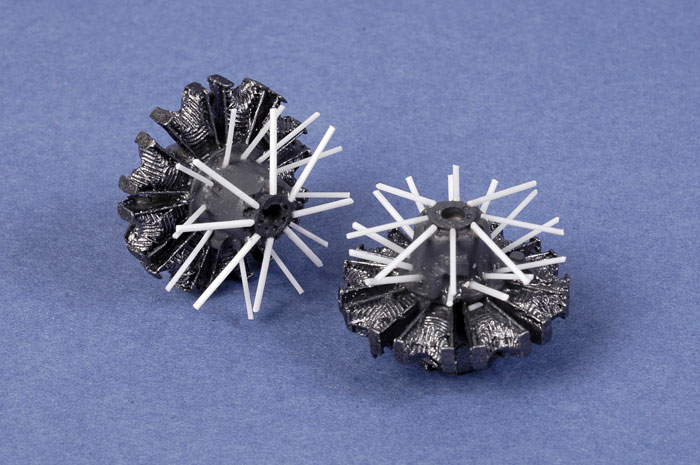
When removing the engines from their casting blocks it is important
to retain the resin stem behind the engine cylinders. Try to cut the
engines flush with the casting blocks. The resin stem behind the engine
acts as a post to mount the engine assembly.
Construction commenced in the well-appointed cockpit. My anxiety
about exact positioning of parts was unfounded, as the plastic cockpit
walls have locating lugs to help position the horizontal rails (resin
parts R1 and R2), which then aid in installing the other parts.
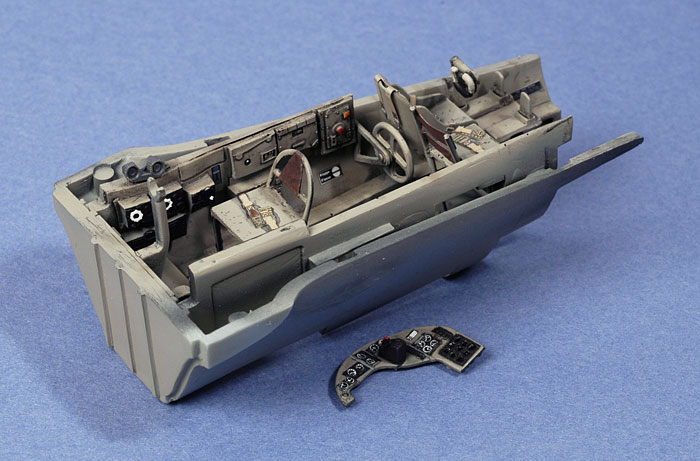
Fit was very good in this area, but painting was
trickier than usual as some of the detail is quite deep inside the tub.
I managed though, with the aid of a toothpick!
The interior surfaces were treated to a wash of thinned
Lamp Black and Raw Umber oil paint.
Once dry, I added harness straps from Eduard's 1/48
scale Luftwaffe Bomber Seat Belts set (49 003).
The sidewalls were spruced up with placard decals from
Reheat Models, and instrument dials were sourced from MDC's Luftwaffe
Instruments decal sheet.
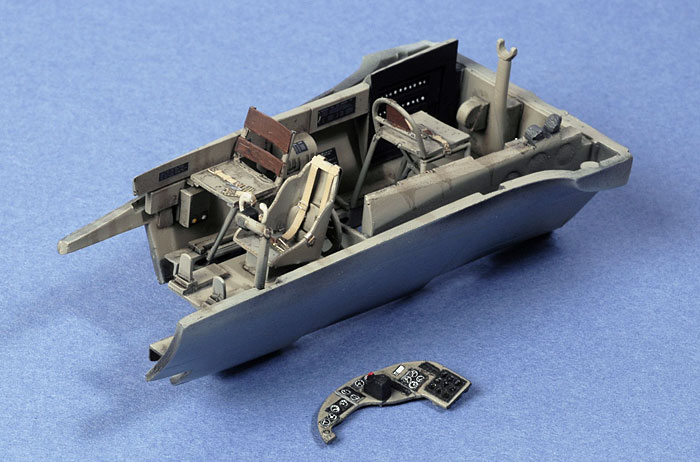
The bomb bay was next. The connecting arms of two of the
vertical bomb racks (part 24) were too long. These were simply cut to the same
length as the other six and glued in place.
I applied fairly heavy weathering to the bomb bay,
partly due to the utilitarian nature of this space; and partly because
the dark recesses would completely obscure subtle weathering!
The balance of construction was fast and straightforward.
I deviated slightly from the instructions in a couple of areas:
-
I assembled the upper and lower wing
parts before offering them to the fuselage. This sequence meant that
the locating tabs on the fuselage wing root interfered with fit, so
I cut them off.
-
A little trimming and thinning around
the inside of the upper wing root was required to achieve a perfect
fit.
-
Alignment of the tailplanes was very
good. The only problem was of my own making. I trimmed too much
plastic from the rear fuselage where it meets the front of the
horizontal stabiliser, resulting in a gap which I later filled with
Milliput.
Click
the thumbnails below to view larger images:
-
I glued the bottom of the nose
section to the main fuselage before adding the top of the nose
section. I believe that this is the best way to ensure alignment in
the most critical areas - the nose to fuselage side join, and the
top nose join at the insert in the upper wing.
-
Once the lower nose, wings and main
fuselage had set, I added the upper nose. I aligned this with the
insert in the upper wing. The compromise was a narrow wedge-shaped
gap between the top and bottom nose halves. This was easily filled
with Milliput once the parts had set, but the result was a flawless
fit between the upper nose and the shoulder of the wing.
-
The left and right engine nacelles
are identical, but the leading edge of the wings are slightly swept
back. This results in a small gap on the outboard join between each
engine nacelle and the wing leading edge. Milliput was once again my
weapon of choice to deal with these gaps.
-
I added the chaotic bracing using
lengths of .020 plastic strip super glued to the front and rear of
the engine crank case. This was easier than I expected, and will
have a big visual impact on the front of the model.
-
The canopy, nose glazing
and side windows were masked with Tamiya tape. I was dreading this
job, but it was actually quite fast. I cut each panel while the tape
was in place on the window, significantly speeding this task.
-
I cut the barrels off
the machine guns and glued the bodies in place behind the canopy.
The masked clear parts were then glued to the unpainted airframe.
-
Several rounds of
trimming and test fitting were required to get the bomb sight
fairing (part no.58) to fit, but all the clear parts fitted very
well with minimal effort.
- Only a little filler was used on the airframe. Milliput
was used to smooth a tiny step at the top wing to fuselage join, and
underneath the trailing edge of the wing root (as well as the
aforementioned tailplane and horizontal nose join).
Classic Airframes' 1/48 scale Dornier Do 17 Z is well detailed,
accurate and buildable.
It is, without question, the best Dornier Do 17 Z kit available in
any scale today.
You will need experience before tackling this project
due to the large size of the kit, the substantial use of resin and the lack of locating pins.
However, with care and plenty of test-fitting, Classic Airframes'
Dornier Do 17 Z
should not present much more of a challenge than most other twin-engine
mainstream kits.
The high level of detail in the cockpit means that after-market
expenditure will be limited to a couple of sets of harness straps.
Modellers who wish to add more detail in the form of cowl bracing and /
or throttle quadrant can do so using scrap styrene and plastic rod.
With the Dornier Do 17 having spent so much time banished to the plastic
wilderness, it is fantastic to see such a good kit from Classic
Airframes.
I can't wait to paint mine after the replacement parts arrive. Stay
posted for a full Construction Feature in the coming weeks.
Highly Recommended to experienced modellers.
Thanks to
Classic Airframes for
the review sample.
Classic Airframes
kits are available worldwide through hobby retailers and from
Squadron.com
Review and Images Copyright © 2007 by
Brett Green
Page Created 22 May, 2007
Last updated 04 June, 2007
Back to HyperScale Main Page
Back to Reviews Page
|
 Home
| What's New |
Features |
Gallery |
Reviews |
Reference |
Forum |
Search
Home
| What's New |
Features |
Gallery |
Reviews |
Reference |
Forum |
Search