|
Hasegawa's 1/48 scale
Aichi B7A2 Ryusei Kai (Grace)
by
Bruce Salmon
|
 |
|
Aichi B7A2 Ryusei Kai (Grace)
|

Hasegawa's 1/48 scale
Grace is available online from
Squadron
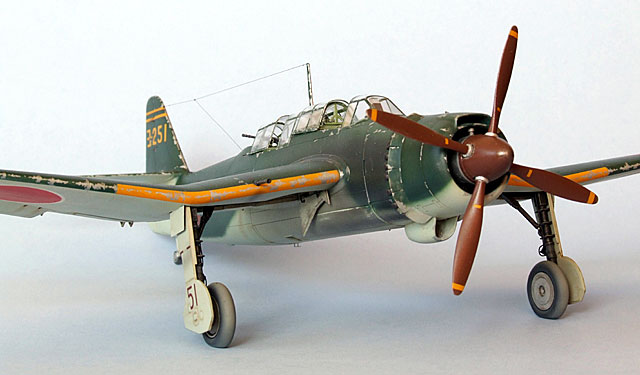
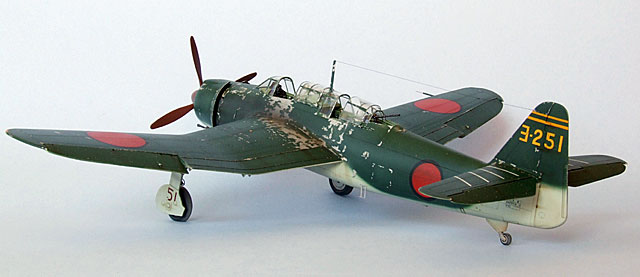
My model of the Grace is that of one from Yokosuka Air Corps on Iwo
Jima, 5 July 1944. Perhaps this aircraft may have been destined for a
later Kamikaze mission.
Aftermarket Products Used
Eduard PE set (48 220) Aichi B7A2 Grace
Squadron (9592) Aichi B7A2 Grace vac-u-form canopy
Cockpit / Fuselage
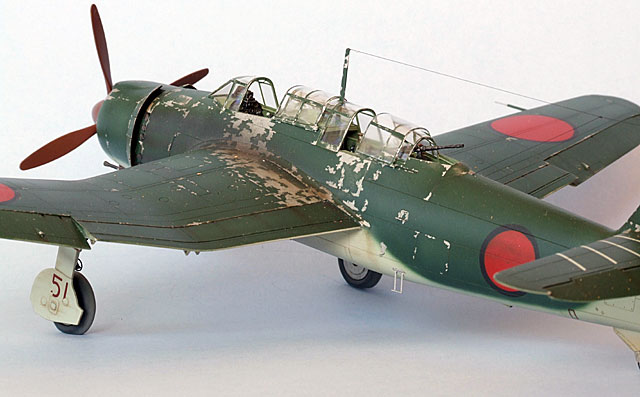
Most of the small PE set is destined for the cockpit but even that
does not add much here. I added extra wiring to make it look a bit
busier. The upper rear section of fuselage just behind the cockpit is a
bit narrow hence I could only display the rear sliding canopy partially
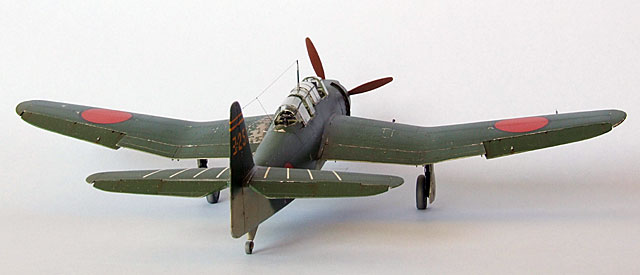
open. I modelled the bomb bay doors closed but now wish I had them
opened – perhaps I can “operate” at a future date…
Wings
These are quite large so I decided that something had to be done to
add some interest here. The flaps lowered would certainly do the job but
I couldn’t find any references for what they looked like in the down
position. The next best alternative was to cut out and reposition the
ailerons. As you can see they are both drooped (yes this is on purpose).
Apparently they could actually be lowered by about 10 degrees to
increase lift!
The elevators were also cut out and dropped to add a bit more life to
the model. The cavernous wheel wells got some wiring and a new pitot
tube was constructed from brass tube and wire. Wings attach positively
to the fuselage with no putty needed.
Engine and Cowl
The PE harness was first added to the engine then the whole painted
black, given a wash and lightly drybrushed with Humbrol H11 Silver to
metalize it.
The engine is quite hidden once the cowling goes on.
Little Bits
I did not add the torpedo as it was oval in cross section and I
couldn’t find a replacement. Afterwards I find out that these later
torpedoes actually WERE oval in cross section!
I replaced the kit canopy sliding sections with vac-form parts. Even
though the kit has separate sections they will not fit in the open
position. These were then masked (a laborious task) using Bare Metal
Foil and painted at the same time as the aircraft.
The propeller was painted using Humbrol H160 German Red Brown and the
machine guns hollowed out at their ends with the point of a knife.
Landing gear was given the PE treatment, brake lines added and then
painted. A light spray with Tamiya XF57 Buff on the tyres simulates dirt
and wear.
First on is the lower surface colour which was then post shaded with
lighter patches. Next the upper surface was sprayed freehand and also
post shaded lightening by adding more H226 and white. Once dry the
Hinomarus and leading edge stripes were masked, sprayed and also post
shaded. Lastly, a gloss varnish was applied only where the decals would
go.
I used enamel paints mixed as follows:
-
Interior: 9 - Tamiya XF71 Japanese
Interior Green / 1 – Tamiya XF2 White
-
Upper Surface: 10 - Tamiya XF11 JN
Green / 2 - Humbrol 226 Interior Green / 3 – Tamiya XF2 White
-
Lower Surface: 1 – Tamiya XF12 JN
Grey / 1 – Tamiya XF2 White
-
Hinomaru: 6 – Humbrol 153 Insignia
Red / 1 – Humbrol 113 Rust
-
Leading Edge Stripes: 10 – Humbrol
H154 Yellow / 1 – Humbrol 82 Orange Lining / 1 – Tamiya XF2 White
-
Exhaust Pipes: 2 – Tamiya XF2 Black /
1 – Humbrol 113 Rust
Decals
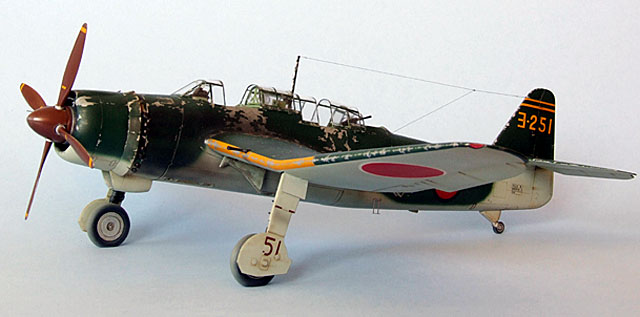
The only decals used are the tail codes, gear door numbers and ID
stencil; everything else was masked and painted. The decals responded
well to Mr Mark Softer.
Weathering
After a coat of satin varnish the model was given an overall wash
using a mix of raw umber and burnt sienna oil with some panel lines
darkened with further washes darkened with black. A few oil stains were
drybrushed on. Chipping was achieved by using Tamiya XF16 Flat Aluminium
applied with a fine brush and worn areas drybrushed with a H11 Silver
and raw umber oil mix. Exhaust and gun staining was with Tamiya X19
Smoke. A matt-ish varnish was then sprayed to finish the job.
Final Assembly
Lastly the little bits go on: Rear machine gun, canopy sections glued
in place with white glue, wing machine guns, gear doors, propeller,
aerial mast and wire.
I also attached the PE retractable steps but have since broken most
off and lost them.
This is a very well engineered kit and is quite straightforward to
build. Any extra detailing you may wish to do is mainly limited to
furnishing the cockpit and turning out a skillful paint job.
Model, Images and Text Copyright © 2007
by Bruce Salmon
Page Created 13 December, 2007
Last Updated
24 December, 2007
Back to
HyperScale Main Page
|
 Home
| What's New |
Features |
Gallery |
Reviews |
Reference |
Forum |
Home
| What's New |
Features |
Gallery |
Reviews |
Reference |
Forum |