|
Pacific Coast Models' 1/32 scale
Macchi C.205
Veltro
by Maurizio Di Terlizzi
|
 |
|
Macchi C.205 Veltro
Serie III
“Paolino IV” |

HyperScale is proudly supported by
Squadron.com
My passion for Macchi aircraft has grown so much since the release of
Pacific Coast Models 1/32 kits that I decided to build them all in
order. My first was
a C.200 Saetta, next the C.202 Folgore, and now my favorite
aircraft: the Veltro.
The aircraft's name was the result of an order by the Italian Air
Ministry that Series 5 aircraft must have a constellation’s name. Veltro
is translated as Greyhound, and I think that the Veltro probably shares
the graceful lines of this superb canine.
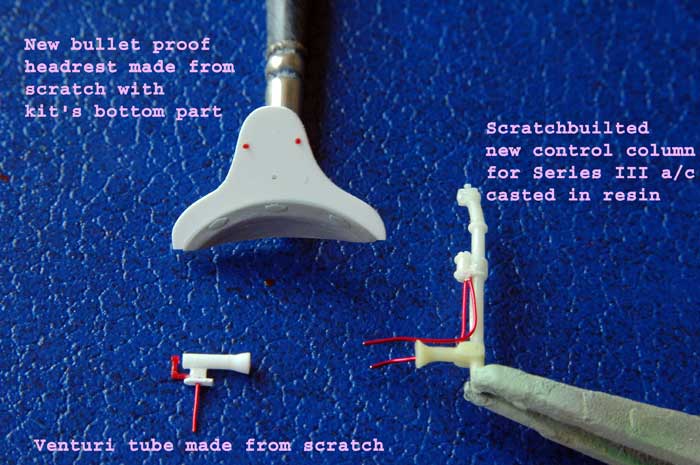
Cockpit
 Pacific Coast Models’ 1/32 scale C.205 has a well detailed interior
with nice resin, plus a photo etched sheet. The only work required is to
add some missing thin wiring on the sidewalls, represented with thin
copper wire. Pacific Coast Models’ 1/32 scale C.205 has a well detailed interior
with nice resin, plus a photo etched sheet. The only work required is to
add some missing thin wiring on the sidewalls, represented with thin
copper wire.
I also added the auxiliary (behind the headrest) fuel tank tube on
the left of the cockpit floor. This was represented with a segment of
guitar chord. Next, I remade the bulletproof headrest using thin
plasticard sheet (0,18 mm. because the original was 5,5 cm.) .
The unique C.205 control column was made as a master part, but it was
missed during the making of the production kit and was replaced by a
C.202’s one. I therefore made it from scratch, cast it in resin, and use
one of the ten that I cast (I will be building more Veltros).
Click on the thumbnails
below to view larger images:
[../../photogallery/photo00030017/real.htm]
Wheel Wells
Thisdifficult area probably scares every modeller who wants to build
any Macchi fighter. In fact, all versions are fitted with a complicated
maze of plumbing, rods and tubes.
To avoid dust to penetrate in such delicate area, tropicalization
provided two shaped thin metal covers, to be fixed inside to seal off
the area. It was a device used rarely on C.200, often in C.202 last
series and was standard on C.205. It is a perfect way to avoid to build
up the intricate pipework, but how should I recreate these covers? I
thought about making the cover from a balsa box, or made them in
plasticard were some of the solution, but a friend of mine spoke many
times about the qualities of the Staedtler eraser. It is cheap, clean,
and can be shaped very well with a razor first, and with medium
sandparer then. I tried reshaping a piece just to come trough the
landing gear bay, then I gave it the curved shape using sandpaper,
obtaining in such way a perfect template to be vacuformed.
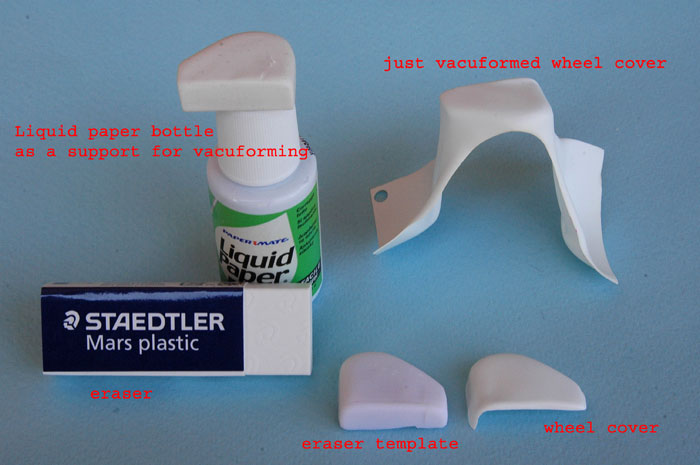
Pictures can explain clearly the work, made quickly and twice,
considering that the two bays are different. I used 0,25 mm. plasticard,
carefully trimmed and dry-fitted. I also set aside the templates for my
future Veltros.
Same as been made for tail wheel gear doors. Problems with the main
wheels has been solved in this way. The kit’s wheel are incorrect in
diameter and also do not have the correct step in the tire section. The
correct diameter is 1,875 cm. so I used the wheel included in “Alitaliane”’s
C.200 resin detail set, added to kit’s hubs.
Click on the thumbnails
below to view larger images:
[../../photogallery/photo00013268/real.htm]
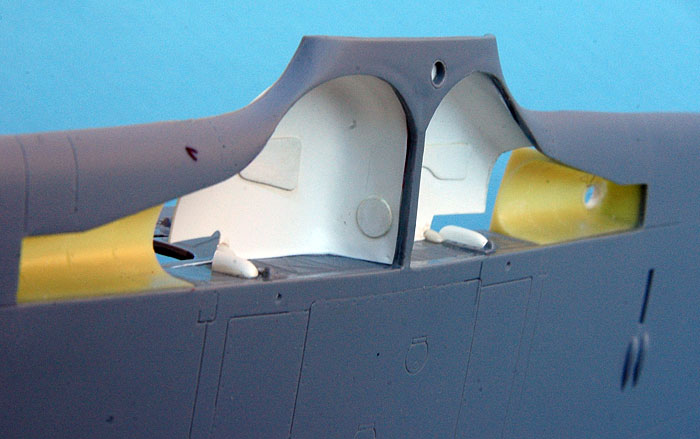
General Assembly
The model is pretty much problem free.
I have heard some comments about the nose tip, spinner and propeller
back plate, but they are not really issues. Only 2,5 mm is missing from
the propeller backplate’s length.
To glue the nose, we have to carefully check the alignment of the
fuselage halves, securing the parts using glue applied with a brush.
Once aligned and perfectly closed, the nose must be fixed with some tiny
drops of cyano glue. Once dry, the nose will have a diameter of 2 cm.
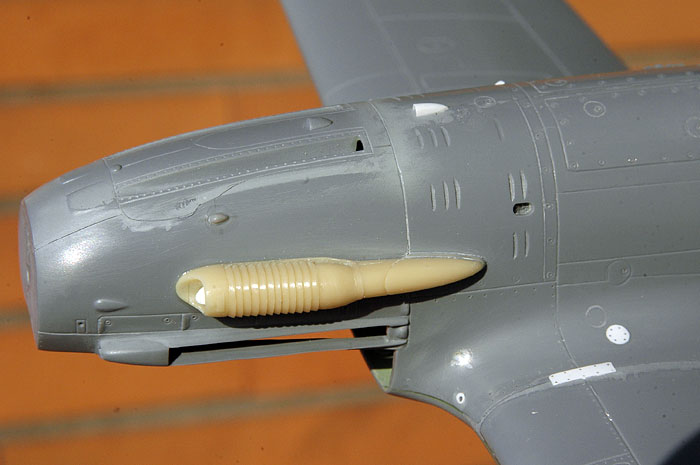
The spinner backplate was added with a 2 cm. diameter plastic disk,
2,5 mm. in thickness. Oncle glued, it received the spinner (do not
forget to enlarge the prop blades “U” shaped slots) and everything was
glued to a 2,5 mm. brass rod. Fixed on a motor tool, it has been
carefully shaped during its run, using a wet medium grade waterproof
abrasive paper. Once finished we have a perfect spinner and backplate
with a diameter of 2 cm. ready to be fixed onto the nose.
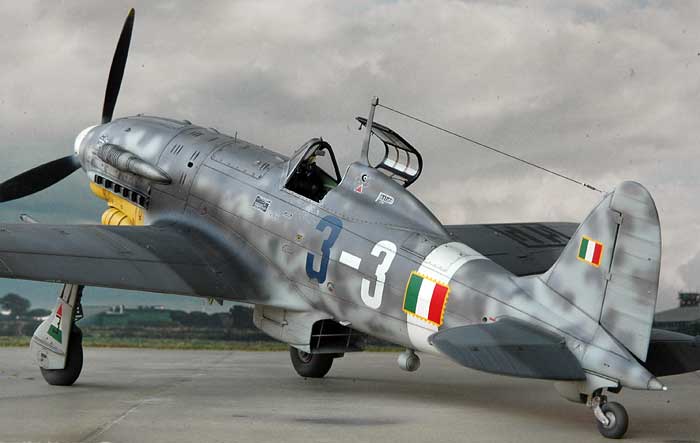
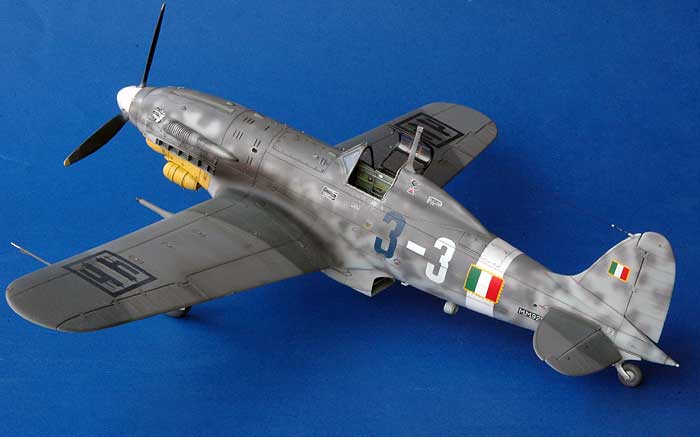
Painting
Although I actually chose all the decals subjects for PAC models, I
decided on a different subject for my project because I like to be
original, even with models. I selected Tenente Marchi’s aircraft, during
the ANR, coded 3-3 and christened (as all his aircraft) with the name of
his dead brother Paolo. In fact, the nickname Paolino IV° (fourth, in
Roman numerals) was painted in white over the planes’s hump.
The colour scheme is with Luftwaffe 74/75/76 colours with the splinter
camouflage in two colours only over the wings and tailplanes, and
mottles over the fuselage sides. Its previous “smoke rings” camouflage
with black spiralled white spinner was overpainted by the new scheme,
and spinner was roughly painted white. A segment was masked and the
camouflage scheme was mottled over the just the white section without
masking the propeller blade roots. The fuselage part containing the
serial (Matricola Militare) was also masked off, remaining intact. I
preferred not to put the last two digit of the serial, leaving the part
blank with Future wax, hoping that in the (immediate ?) future, a
complete serial will be discovered.

My airbrush is a very old A470 Aztek, which I opened and thoroughly
cleaned just before applying the model’s mottling.
Markings
The “Paolino IV°” text was designed on computer and printed with Alps
printer onto a clear decal sheet by Gian Piero, a talented friend of
mine. The blue “3” has been drawn and cut on a frisket adhesive clear
sheet, and painted using this as a mask, directly over the model.
The white “3” and all the other decals come from the kit’s very good’s
sheet.
All colours used are Gunze Sangyo, gloss coat is Future wax, and the
final two satin coats are from Vallejo range.
Exhausts stain has been added with a mixture of 30% RLM 66 Dark Gray ,
15% Gloss Black and 55 % of white spirit.
Pacific Coast Models’ Macchi C.205 Veltro is a very good model, with
perfect lines and appearance, ideal for Regia Aeronautica’s fans.
I took two and a half month to complete my Veltro, and considering that
my new son was just 4 months old… I am more than satisfied!
Acknowledgement
My sincere thanks to Italian author Ferdinando D'Amico, who gave me
very important hints, pictures, impressions and unknown details, in
creating this model.
His latest and well known book - "Camoulflage and Markings of the
Aeronautica Nazionale Repubblicana 1943-1945" written with his fellow
Gabriele Valentini and edited by Classic Publications, is a real must
for all the ANR's enthusiasts.
Click on the thumbnails
below to view larger images:
[../../photogallery/photo00023702/real.htm]
Model, Images and Text Copyright ©
2007 by Maurizio Di Terlizzi
Page Created 16 August, 2007
Last Updated 24 December, 2007
Back to HyperScale
Main Page
|
 Home
| What's New |
Features |
Gallery |
Reviews |
Reference |
Forum |
Home
| What's New |
Features |
Gallery |
Reviews |
Reference |
Forum |