|
Tamiya's 1/48
scale
Nakajima J1N1 Gekko
by
Michael Novosad
|
 |
|
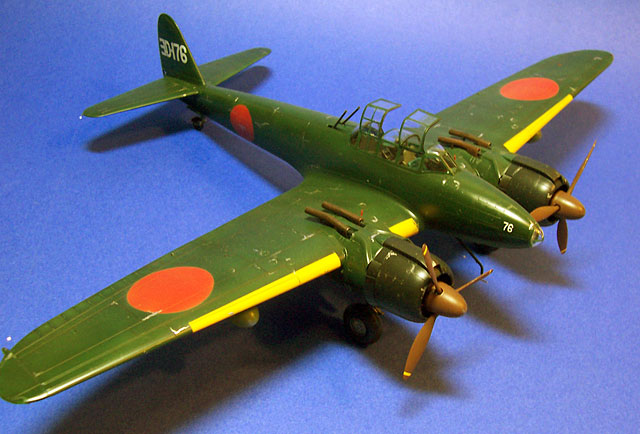
Nakajima J1N1 Gekko |

Tamiya's 1/48
scale G4M Betty is available online from
Squadron
This article will focus on the painting of this model, rather than
the actual construction. I will add only a few comments on features and
treatment to specific areas. For me, the painting of the model is both
rewarding and somewhat nerve-racking: if I am going to ruin the work the
painting phase is normally where it happens. Working with acrylic paints
does have its advantages, though. Models, being as costly as they are
today, cannot be discarded in a fit of rage or disappointment, no matter
how “good” is might feel at the moment. Modeling is mostly about skills,
imagination, challenges and finally rewards.
 The
Tamiya J1Ni Gekko lives up to the reputation of this fine manufacturer.
Tamiya offers two separate kits and variations of this aircraft, but
both are finished in JAF green. Kind of boring, but none-the-less a
challenge to a accepted. The
Tamiya J1Ni Gekko lives up to the reputation of this fine manufacturer.
Tamiya offers two separate kits and variations of this aircraft, but
both are finished in JAF green. Kind of boring, but none-the-less a
challenge to a accepted.
It seems like most of us are always looking for the ”perfect” kit,
paint, adhesive, decals or other finishing product, and we cannot find
it by ourselves. Research and conversations with other modelers may
often result in new techniques, methods or materials that lead us to the
path of the ever elusive goal of perfection. I offer the following as
part of my ongoing quest.
Cockpit Assembly
Before starting this kit I undertook some research on articles by
more notable builders and picked up several pointers that I would apply
along the way. The cockpit interior was the first challenge. First, the
many ejector pin marks were addressed by filler, Mr. Surfacer and
careful sanding. I next airbrushed Testor's non-buffing aluminum on all
of the interior surfaces. After drying for a day, I next applied a
mixture of Tamiya clear blue and yellow to achieve the Aotaki green. It
took two attempts and several paint/thinner mixtures before I got a
color and a finish that I was pleased with. The first applications were
removed with Windex window cleaner. The final mix was a 1:1 ratio of
Tamiya clear blue and green. Tamiya XF-2 was also applied in several
areas in compliance with kit instructions. Everything was then sealed
with an application of Future, and when dry an oil wash was applied. A
light dry-brushing with Rub-n-Buff silver was applied to all raised
detail.
Engine Assembly
The two engines were assembled per instructions. Ignition wires were
added by using .015” lead wire. The cylinder heads and crank case were
painted flat black, with the cylinder fins later being dry-brushed with
Testors Oiled Steel and Silver Rub-n-Buff. The crankcase was dry-brushed
with various shades of grey, capped off with a light application of
Silver Rub-n-Buff. When dry, an oil wash was applied.

Each propeller is comprised of three parts: spinner, backer plate and
blades. The blade tips were airbrushed with Polly Scale Japanese yellow,
which were masked with thin strips of Tamiya masking tape, and the
remainder of the blades, spinners and backer plates were airbrushed with
Tamiya red-brown. The blade hubs were hand-painted with flat black and
later dry-brushed with Rub-n-Buff silver.
Fuselage Assembly
This model includes the option of leaving the rear gun bay open, but
after finishing the interior I decided I did not want to clutter the
lines of the aircraft with an open gun bay. The two oblique-mounted
cannons are a miniature model in themselves, and It would be a shame to
hide them within the confines of a closed comportment, so I finished the
armament and decided to display them separately.
The fuselage was assembled with minimal use of filler. Installing the
cockpit and various bulkhead was a bit tricky, but with patience and an
extraordinary amount of natural talent (AKA luck) everything fit. I
decided that I would paint the model and clear parts separately, so I
masked the clear parts inside and out with Eduard masking and Tamiya
tape, and closed off the cockpit opening with Tamiya tape.
Wing and Nacelle Assembly
The research material proved to be invaluable in this build. When the
wings are assembled per the instructions an opening is left from the
wheel wells to the engine nacelles. This opening is only visible if the
model is viewed from below, but since I knew it was there, I decided to
close if off. I used grooved sheet styrene cut to fit and glued in
place. Two minutes per side and the deed was done. The wheel wells were
airbrushed with Testors non-buffing aluminum.
I drilled one small opening on the inboard top side of each engine
nacelle for the later installation of landing gear down indicators. The
indictors were fabricated from a small diameter plastic rod, and painted
red. Other than that the wing assembly went without a hitch and only
minimal sanding along join lines.
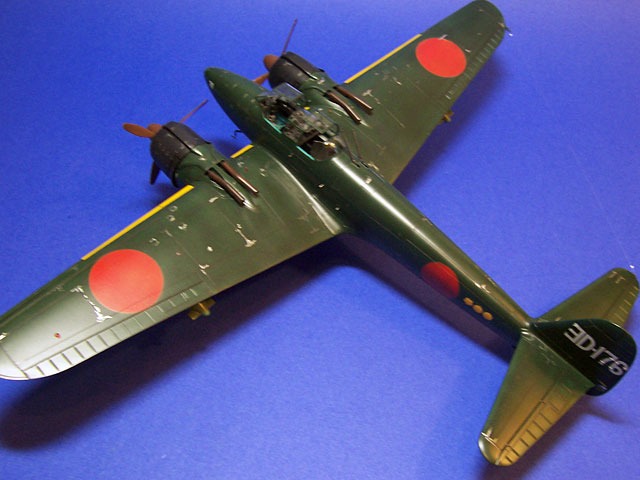
Each engine has a portion of the exhaust manifold cast as part of the
nacelle. I removed the four manifold stubs and replaced them with shorts
lengths of aluminum tube. There are four exhaust shrouds cast as
separate parts to be applied after the exterior of the model is painted.
These shrouds were painted flat black, dry-brushed with Testor’s rust,
and lastly lightly dry-brushed with Rub-n-Buff silver.
Two under wing fuel tanks were included. These were assembled, painted a
light green (celery) and weathered. Since I drilled small holes at the
filler caps to hold the tanks while painting and finishing I used .010”
thick styrene and a 1/16” diameter punch to create filler caps to cover
the holes. These caps were painted silver.
Weapons
The cannon bay armament was described above. The kit was furnished
with two bombs that could be mounted on fuselage pylons. These bombs
were reported used when the Gekko was used in suicide attacks late in
the war and were not used as part of this build.
The Aircraft Exterior
The exterior finish of this aircraft was going to be JAF green. This
being a dark green offered some challenges for weathering and shading. I
would use Tamiya acrylic paints for the exterior finish. I decided to
use a method that I read about to provide preshading and weathering. I
“primed” the model first with Testors non-buffing aluminum.
Next, I applied Tamiya JAF green thinned with 91% isopropyl alcohol at a
paint-to-thinner ratio of 1:1. Next, I used Tamiya JAF green and flat
white at a ratio of 1:4, again thinned with 91% isopropyl alcohol at a
paint-to-thinner ratio of 1:1, and applied this lighter green to the
center of all surface panels, top, bottom and sides of the aircraft. At
this point the model looked rather hideous as I had expected. I then
thinned the Tamiya JAF green with 91% isopropyl alcohol at a
paint-to-thinner ratio of 1:10. This very thinned paint was then
airbrushed in several applications. I noted that this mix dried almost
instantly when it hit the surface. After several applications the
lighter green began to blend with the darker green outlines, and the
shaded effect began to appear. Since the bottom of the aircraft has
little exposure to the sun, I applied more over-sprays to leave less
contrast between the green than what was done to the top and sides.
Last, I used Tamiya yellow-green with 91% isopropyl alcohol at a ratio
of 1:20 and lightly applied some air flow dirt streaking to the top
surfaces, front to back of the wings.
Note: Again, I had read about the use of 91% isopropyl alcohol and
Tamiya paints and gave it a first-time try with this build. Although I
cannot say with any certainty that this thinner performed much
differently than the 70% isopropyl alcohol, I did like the way the final
paint looked when dry. The finish appeared to be much smoother than when
the Tamiya acrylic paint is thinned with the Tamiya thinner or the 70%
isopropyl alcohol. I did experiment with this shading method and thinner
before I tried it on the Gekko and was impressed enough to use in the
build. I have not tried this thinner with other acrylic brands.
National Markings
Rather than use the kit decals I decided to airbrush the national
markings on the wings and fuselage. I first measured the diameters of
the markings and transferred those sizes to Frisket paper, cut with a
circle cutter. Each template was then applied to the surface of the
aircraft in the appropriate location with Tamiya masking tape and paper
toweling. I was very careful to cover the entire model before painting
the markings to avoid the consequences of overspray.
It has been my experience that most reds cannot be airbrushed over
darker colors without a light base paint, or by several applications of
red over the dark paint. Without the light primer the red always seems
to appear as not a true red, plus the many applications can result in a
noticeable ridge in the paint. I airbrushed Tamiya flat white thinned
with 91% isopropyl alcohol at a ratio of 1:1. I did not attempt perfect
coverage, as I wanted some green to show through the white primer, which
in turn would affect the appear of the final red paint applied later.
The white primer application appeared as a heavy fog coat, cover about
75-80% of the green base paint. I mixed Tamiya flat red with Tamiya
gloss yellow at a ratio of 4:1, and thinned with 91% isopropyl alcohol
at a ratio of 1:1. This was then airbrushed over the white primer, again
with an intentional less-than-perfect application.
Wing ID panels. The wing ID panels were painted in a similar manner,
except here I used ModelMaster Japanese yellow thinner with 70%
isopropyl alcohol at a ratio of 1:1. I masked the ID panels with Tamiya
masking tape and did get some paint creep here. I used the JAF green to
touch-up those problems.
Decaling and Weathering
The only decals used were the kit-furnished victory markings and
aircraft numerals. Before the decals were applied I airbrushed three
separate coats of future floor wax, applied about 12 hours apart, with a
final 24 hour dry time before decals and weathering were placed. After
the decals had thoroughly dried I applied a final coat of future over
the decals to blend the decals ridge with the surrounding surface.
Exhaust staining was achieved by using Tamiya flat black thinned with
91% isopropyl alcohol at a ratio of 1:10, and applied lightly and
repeatedly front-to-back behind the engines.
All panel lines received a wash of oils thinned with odorless thinner
applied with a long bristle brush. Chipping of the surfaces was
accomplished with silver paint and a silver pencil. The JAF Gekkos
reported were well maintained, so the chipping was minimal.
Everything was sealed with a coat of airbrushed ModelMaster clear
semi-gloss.
First, as always the Tamiya product is wonderful! It is an absolute
joy to work with, and is highly recommended as are all their products.
Patience and the willingness to “experiment” with methods and materials
can often result in a finished model that is pleasing to the builder and
those who will view it later. When it comes to the “experiment” aspects
it is always smart to test the application on unpainted scrap materials,
with a surface large enough to clearly see and judge the results. Also,
record on paper the paint, the thinner, mixing ratios, air pressures and
noticeable results. This may prove invaluable for future builds.
I was very fortunate to have been awarded a Premier award at the IPMS/USA
2006 National Convention in Kansas City, Missouri. That would not have
been possible without the help of the references noted below.
Appropriate credits are always due to the real modelers and experts
in this field:
Model, Images and Text Copyright © 2007
by Michael Novosad IPMS Number 36721
Page Created 09 August, 2007
Last Updated
24 December, 2007
Back to
HyperScale Main Page
|
 Home
| What's New |
Features |
Gallery |
Reviews |
Reference |
Forum |
Home
| What's New |
Features |
Gallery |
Reviews |
Reference |
Forum |