|
ESCI's
1/48 scale
Macchi MB326H
by Brett Green
|
 |
|
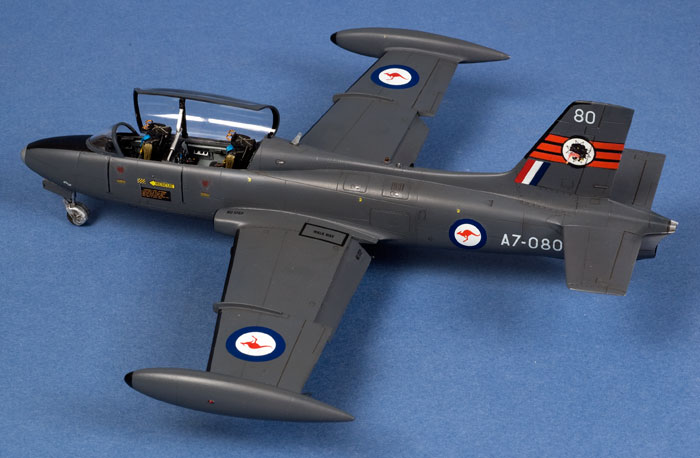
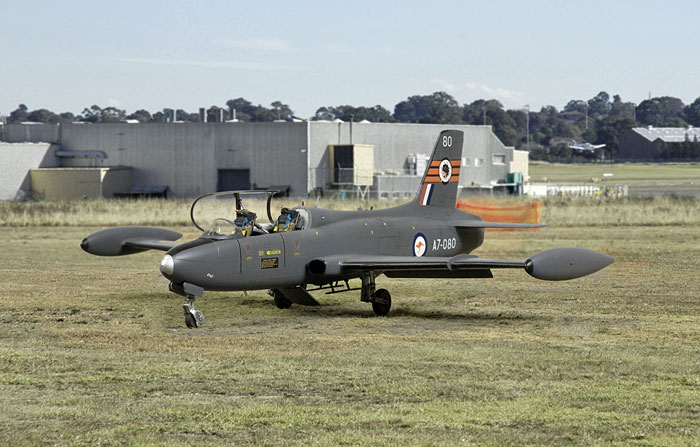
Macchi MB326H
76 Squadron RAAF |

HyperScale is proudly supported by
Squadron
ESCI 1/48 scale Macchi MB326 kit dates from at least
1983, but it is fundamentally a nice little kit with crisply engraved
and very petite panel lines, minimal moulding problems, straightforward
construction and good fit.
Italeri recognised the value of this old kit by
re-releasing the Macchi MB326 under its own label in 2004. It is still
widely available today.
The area that most noticeably lets ESCI's Macchi down is
the cockpit. The rudimentary tub, blank instrument panels and side
consoles and oversimplified seats will be severely lacking under that
large clear canopy. Surprisingly, in more than 20 years since this kit
was first released, there has never been a resin cockpit update set
offered.
Until now.
OzMods of Australia manufacture resin accessories in and multimedia kits
in various scales, with a particular focus on Australian subjects. Their
latest release is a replacement cockpit for ESCI/Italeri's 1/48 scale
Macchi MB326. The configuration is best suited to one of the 97 Macchis
that served with the Royal Australian Air Force and Royal Australian
Navy.
For more information and many images of the Macchi
MB326H in Australian service, see
Darren Mottram's excellent three-part Reference Series from 1998
elsewhere on HyperScale.
Here is
Part Two focusing on the cockpit and seats
and
Part Three, Exterior in Detail
OzMods' Cockpit in the Box
When I received the OzMods sample earlier this year I
decided that my ESCI Macchis had lingered in the garage for long enough.
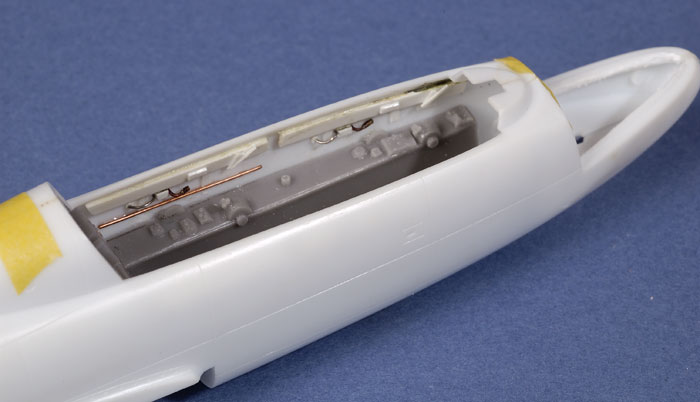
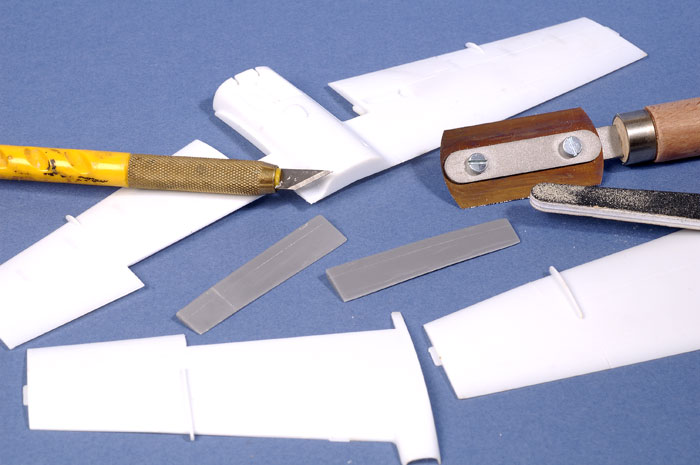
OzMods' 1/48 scale Macchi cockpit comprises just nine
parts in grey resin. All the parts were well presented with no casting
imperfections present on my sample. The biggest component is the
one-piece cockpit tub. This is ready to use, with the casting tub
already sawn off the bottom.
Side console detail is very well done. Similarly, the
instrument panels feature deep and authentic detail - a vast improvement
over the ESCI plastic parts. The seats are another highlight. They are
dressed with the various RAAF cushions and packs, but they are lacking
any harness straps and ejection pull handles. These should be added
using lead foil and wire (or similar materials).
The remaining pieces are control columns, canopy brace
and canopy support.
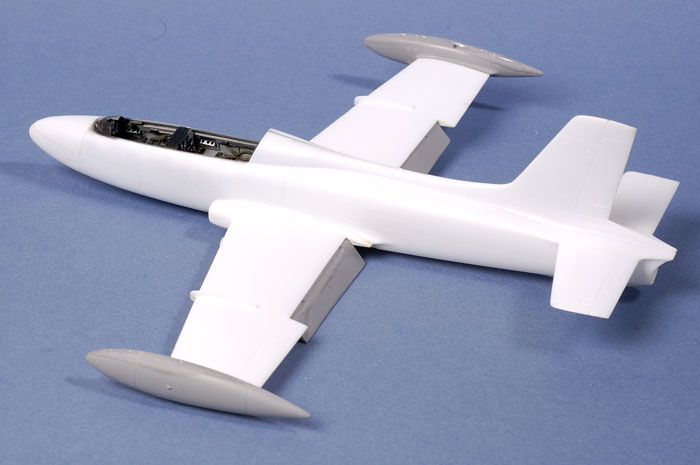
Starting with the Cockpit...
Surprisingly, upper sidewall detail is not addressed in
the OzMods cockpit so the first task was to measure and mark the
interior sidewalls, then add some detail using plastic strip and wire. I
also fabricated four oxygen hoses by wrapping very fine wire around
slightly thicker wire.
Click the thumbnails below
to view larger images:
[../../photogallery/photo00030871/real.htm]
Next, harness straps were added to the seats. I wanted
to dress the seat with the harness straps off the seat (stowed beside
the seats on the consoles), so I used lead foil to permit me to position
the straps after everything else was painted and the seats were
installed.
I painted all the components black. The various black
panels were masked off with Tamiya tape before the cockpit tub and
instrument panels received their coat of Gunze Barley Grey. This might
not technically be the correct colour, but the slightly glossy light
grey looked appropriate.
Details were picked out with a fine brush. Decals were also used for
more precision in tricky areas such as the instruments and fuse panels.
Many of these punched and cut out of the relatively ancient ESCI decal
sheet.

A number of Reheat placard decals were also applied. Washes were used
only sparingly to maintain a clean look in the cockpit.
The fit of OzMods' cockpit components was perfect. No trimming, sanding
or adjusting of the kit parts or the resin cockpit tub was required.
There is also plenty of space for weight in the nose and under the
cockpit to prevent this model from resting on its tail skid.
I spent more time on this cockpit than on most, but I was pleased with
the result.
Click the thumbnails below
to view larger images:
[../../photogallery/photo00020128/real.htm]
General Airframe
In addition to their cockpit set, OzMods also offers the
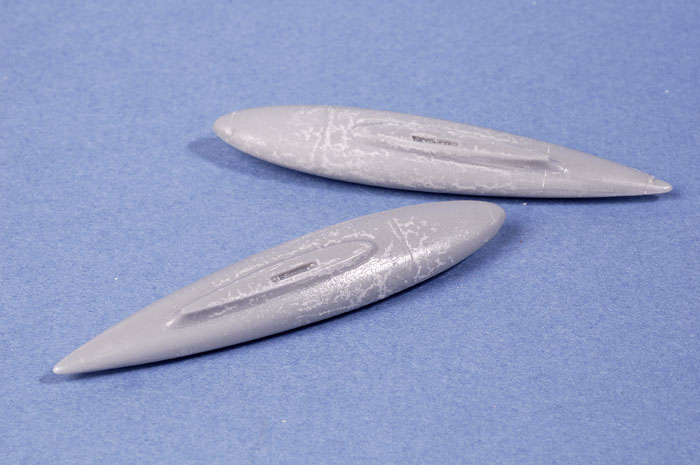
big 90 gallon wing tip tanks almost exclusively used on all but the very
earliest Australian Macchis, machine gun pods, flaps and replacement
nose gear for ESCI's old kit. I used all of these resin parts except the
gun pods.
Casting of these parts was not up to the standard of the
cockpit. The wing tip tanks suffered noticeable crazing and some
misalignment along the centre line. Even so, this set was better than a
second pair that I also had in my collection, so I slathered the
affected areas in putty and sanded the surface smooth. The tanks
eventually looked fine under a coat of primer.
One of the resin flaps was warped, but it was quickly
straightened after dipping in hot water, followed by a second dip in
cool water to freeze the corrected shape.
The flap sections were carefully removed from the upper
and lower wing halves using a JLC Razor Saw and a sharp hobby blade, and
the interior surfaces were bevelled to accommodate the new resin flaps.
The extra time spent in the cockpit and on the flaps was
easily compensated by the balance of construction, which was completed
in a few hours.
Fit was very good indeed with only minimal filler
required.
 All
paint was applied with my Testor Aztek A470 airbrush fitted with the
fine tan coloured tip. All
paint was applied with my Testor Aztek A470 airbrush fitted with the
fine tan coloured tip.
Painting started with a coat of Alclad
Grey Primer. The black leading edge boots and anti-glare strip were also
masked and sprayed at this stage.
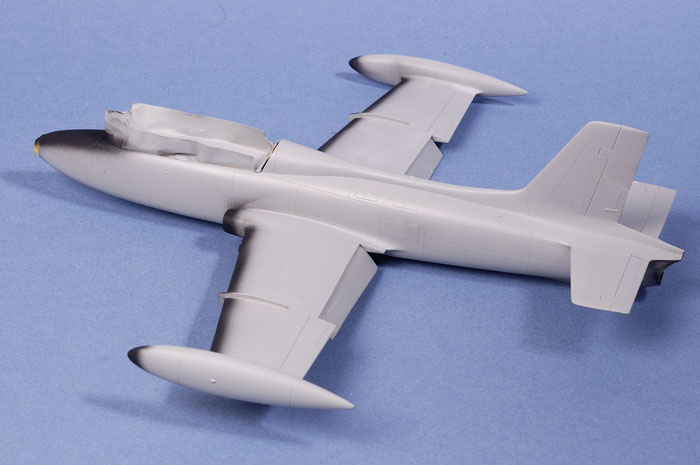
Next, the dark grey was sprayed over
the entire airframe. I used Tamiya Spray AS-4 Grey Violet for this
shade, decanted from the spray can into my airbrush paint cup. This
colour looks too dark and too neutral for the Luftwaffe colour, but was
just about right for my purposes on the Macchi.
I originally planned to have a
slightly patchy finish on a well worn airframe, but I was not happy with
the effect after several attempts.
I also started testing the ALPS decals
from Hawkeye and found that the white backing decals remained
translucent over the dark grey. I therefore painted white underneath
some of the larger markings.
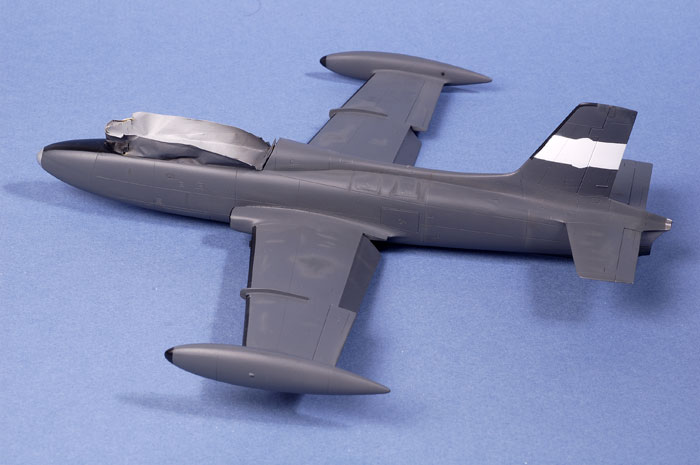
At this point, I was feeling a bit
disheartened with the appearance of the model so I set it aside.
Five months later, early this week, I
literally dusted off the plastic and resumed with a new enthusiasm.
I eventually decided to abandon the
heavily weathered look, and sprayed over the patches. Two coats of
Future were sprayed over the model for a glassy gloss in preparation for
the delicate ALPS decals.
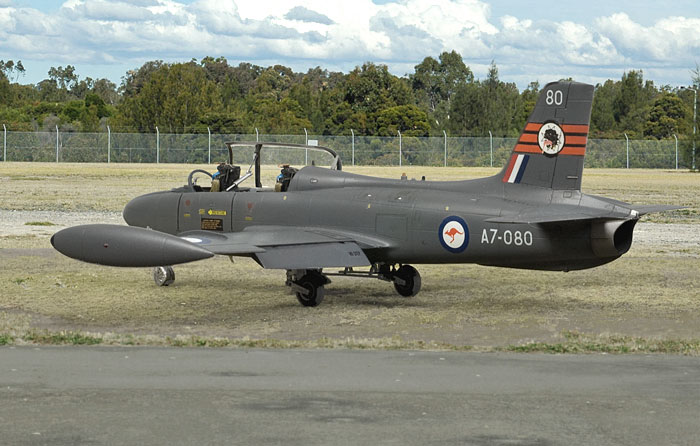
I wanted to build a particular
machine, one of two transferred from the RAAF's 76 Squadron to 25
Squadron in Western Australia. Before transferring this Macchi, 76
Squadron "zapped" their emblem on the fin. The 76 Sqn Black Panther
could be seen mauling a pink duck, their interpretation of the 25 Sqn
Pink Swan emblem.
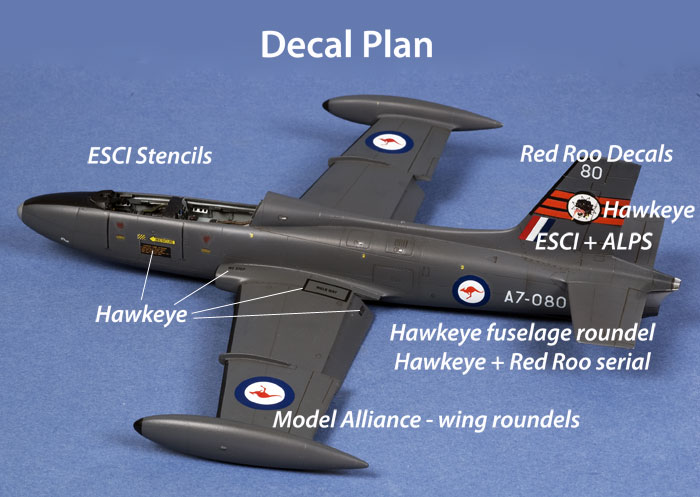
Hawkeye Models produced ALPS decals
for a similarly "zapped" Macchi in grey/green camouflage, A27-05, but I
wanted to depict the overall grey aircraft. I therefore needed new
serials and some different stencils.
I sourced decals from all over the place, including the mauled pink swan
from Hawkeye, ESCI kit decals, and several Model Alliance sheets.
Click the
thumbnails below to view larger images:
[../../photogallery/photo00012932/real.htm]
 Polly
Scale Flat was sprayed over the newly applied decals. There was no
sprayed post-shading on this model, but I did add a wash of thinned oil
paint to the control surface hinge lines, and Tamiya Semi-Gloss Black
thinned with water in other panel lines. Polly
Scale Flat was sprayed over the newly applied decals. There was no
sprayed post-shading on this model, but I did add a wash of thinned oil
paint to the control surface hinge lines, and Tamiya Semi-Gloss Black
thinned with water in other panel lines.
Smaller parts were now added,
including the undercarriage and "disco lights"- the orange strobes on
the top and bottom of the fuselage. Other details not included in the
kit such as blade and vane antennae were cut from plastic strip and
card, and glued in place.
The kit canopy parts are thin and
beautifully clear, so I did not bother to dip them in Future. OzMods
supplies a cross brace and strut for the canopy, but the exact placement
is not shown in the instructions and I could not find a clear reference
photo. I hope that I have it right!
ESCI's (and Italeri's re-released) 1/48 scale Macchi MB326 is an
underrated kit.
The release of OzMods' 1/48 scale Macchi MB326 cockpit was a welcome
surprise and makes a huge visual impact on the bare front office of this
otherwise respectable model. You will be further rewarded for your extra
efforts in the areas of sidewall detail and seat harnesses.
With the addition of the big wing
tanks and dropped flaps, the model takes on an aggressive yet graceful
stance.
There are also a huge number of
colourful marking options for this truly international jet trainer.
Photography
The model was photographed in
HyperScale's studio using a Nikon D70 digital SLR. Illumination was via
two studio flash units - one Bowens 250 and a generic 100 flash - on
stands and illuminating from a high 45º angle from each side of the
front of the photography table.
The camera was fitted with a Micro
Nikkor 60mm lens.
ISO was set to 250, and the manual
shooting settings were 1/100 of a second at f.29. The high aperture
ensures good depth of field.
For the composite photos, the model
was placed on a base of static grass and photographed, then cut out of
the image and dropped onto background photos taken at Bankstown Airport
close to my home in Sydney. Various tools in Photoshop were used to
integrate the model and airport photos.
Click the
thumbnails below to view larger images:
[../../photogallery/photo00027784/real.htm]
Model,
Images & Text Copyright © 2007 by
Brett Green
Page Created 25 October, 2007
Last Updated
24 December, 2007
Back to
HyperScale Main Page |
 Home
| What's New |
Features |
Gallery |
Reviews |
Reference |
Forum |
Home
| What's New |
Features |
Gallery |
Reviews |
Reference |
Forum |