| When I was a
kid, I bought the aircraft carrier ship models
just so I could play with all the little
aircraft. When I was just ten or twelve, a
J.C.Penny store in a mall near my house had a
built-up USS Enterprise (I think it was
Monogram 1/400th
scale) in a case. I stared at that model for
hours just dying to get my hands on all those
A-4 Skyhawks, F-4 Phantoms, and F-8 Crusaders on
the deck. My love of playing with these little
aircraft has survived the decades since back
then.
This project is a dry-run for a larger
project that has been rattling around the back
of my head for many years. I want to make a
diorama of my "dream air show". Since this would
be impossible to create in any scale bigger than
about 1/700th
scale , this is where I have been turning my
attention. I have spent more money than I care
to admit accumulating the 1/700th
scale aircraft to populate my "dream air show"
diorama.
As a test, in a less ambitious size, I
decided to create a diorama of the end of a busy
runway during the Vietnam conflict. In books, I
have pictures of the ends of busy runways with
all sorts of aircraft grouped together, just
waiting their turn to take-off -- fighters,
transports, gunships, patrol aircraft, etc... I
think it is interesting to see this mix of
aircraft. One of my main inspirational pictures
is this image from the Squadron Publications
book Air War Over Southeast Asia, Vol.1
(Stock#6034 / ISBN 0-89747-134-2).
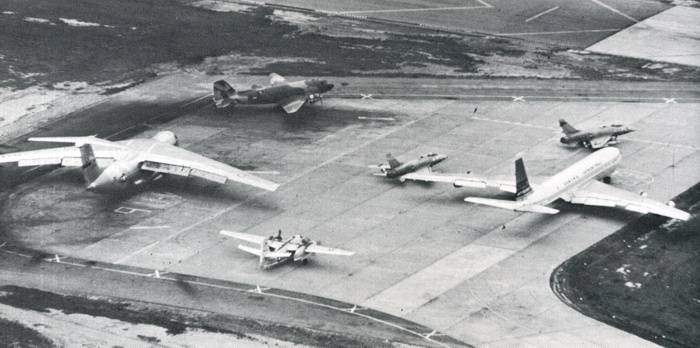
Bien Hoa, December
1965 |
I prefer later war
aircraft, though, which are also easier to find
in 1/700th
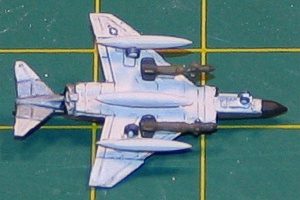
scale. I had just picked up the recent release
of F-4J Phantoms from Trumpeter (for use
in the air show diorama) and found them to be
very nicely detailed. In this small scale, only
the camouflage paint makes these F-4Js any
different from F-4Cs or F-4Ds. This played into
the idea to creating a diorama of the end of a
runway. I could update the above picture to
about 1972 and use F-4 Phantoms, then test some
modeling concepts that would later apply to
doing my "dream air show" diorama.
Good dioramas have some story line to help
define the scene being created. This story line
evolved as I selected the aircraft for the
diorama and chose markings to place on the
aircraft.
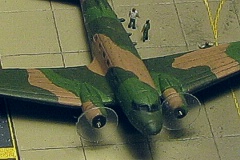
It is early evening, say 5pm, in late 1972 at
Ubon RTAB. The mail plane for the next day's
mail is just arriving (a C-141A) as an AC-47D
"Spooky" is waiting to take off in support of a
firebase that just came under attack. While the
"Spooky" is waiting, a strike package of F-4Ds
from the 8 TFW loaded with 2000lb laser bombs
taxi up to get their last-chance checks done
before taking off for a mission "up north".
The Kits and
Supplies
Trumpeter gave me most of what I
needed for the F-4s. The weapons on the Phantoms
came from a 1/285th
scale GHQ aircraft (500lb LGB in 1/285th
scale made convincing 2000lb LGB in 1/700th
scale). To get the other aircraft, I turned to
Pit-Road (SkyWave). They have been making
all sorts of 1/700th
scale stuff in support of their line of model
ships for a lot of years. Pit-Road (SkyWave)
gave me a C-47 (which I converted to an AC-47)
and a C-141B (which I converted to a C-141A).
The trucks came from still another Pit-Road (SkyWave)
set.
It is almost hard to think of the aircraft as
"kits". The Phantoms, out-of-the-box, are all of
six pieces -- a one-piece airframe, three
landing gear legs, and two wing fuel tanks. The
C-47 is three pieces without the propellers -- a
one-piece airframe and two landing gear legs.
The C-141 is the easiest to think of as a kit
since it is comprised of fifteen pieces.
The last ingredient for the diorama was
people. I was unsure how to deal with these,
then a friend e-mailed me a link to an Eduard
etched set of 1/700th
scale people (stock#17-502). The people were
even pre-painted! Unfortunately, the set was
designed for ships with the figures painted in
Naval uniforms, but this could be fixed.
Building the Aircraft
Building the various aircraft started out as
being fairly straight-forward. It was not like
the "kits" had too many pieces or anything.
Although, my needle-nose jeweler's tweezers did
get quite a workout. Many of the pieces were too
small to be able to pick them up with just my
fingers.
Using the provided pieces in the kits, I
attached the landing gear to the AC-47 and
Phantoms. The landing gear then provided a
"handle" for me to hold as I painted them. I
also attached LORAN antenna racks onto a couple
of the Phantoms. These are just 0.010" brass
wire, cut to length and glued to the aircraft
spines. Careful painting gives this the
impression of being a real "towel rack", but it
is just a wire glued flat onto the spine.
The AC-47 started as a WWII C-47. I converted
it to being an AC-47 by drilling out the rear
door, then drilling out the rear two windows
just ahead of the door. Into these places I
mounted 0.010" brass wires to represent the
mini-gun barrels sticking out the side of the
gunship. A little more careful painting
highlighted and enhanced these modifications.
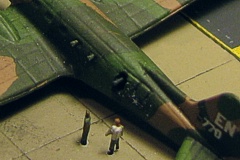
AC-47 Guns |
|
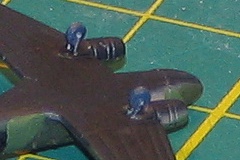
AC-47 Rebuilt Lagging
Gear |
|
AC-47 Propeller Disks |
Propellers in 1/700th
scale are an interesting concept. The AC-47 will
have its engines running in the diorama, so I
did not want to just put props on the aircraft
that would make it look like it was parked and
not running. The "clear disk" concept has also
never sat well with me. Models with this detail
always look like they have plastic disks glued
to them, not spinning props. Besides any clear
styrene sheet I could find would be way too
thick for the purpose.
I solved the problem one evening while
clearing stuff off my modeling desk. I had a
couple empty plastic baggies that different
detail sets had come in. The thought occurred to
me to use the plastic baggies to punch out some
disks to represent the spinning props on the
AC-47. The material is very thin, and unless the
light hits it the right way, almost invisible. I
drilled holes in the centers of the engine cowls
and added prop hubs with 0.010" brass wire. Then
I punched out some disks from a plastic baggie
and pierced their centers with a needle. These
where then super-glued onto the prop hubs on the
AC-47. The effect was great, with props that
were mostly invisible unless the light catches
them just right.
I was going to leave the "lollipop" landing
gear on the AC-47 as is, but some friends
stopped by and convinced me that I should
correct the landing gear. The C-47 (thus the
AC-47) has dual landing gear struts that bracket
the wheels between them. I punched out some
appropriate size disks in 0.020" styrene, then
glued 0.010" bras wire to eight side of the
disks. Then, I cut away the kit-provided landing
gear, drilled receiving holes for the new
scratch-built landing gear, and glued the gear
in place.
The nose gear on the Phantoms is a similar
story. I e-mailed an image to a friend that
commented on the nose wheels looking like the
balloon tires on bush planes. So, I decided to
cut the wheels off and replace them with
punched-out disks of a more appropriate size and
thickness. As a couple of the Phantoms are in
the process of turning on the diorama, I mounted
the nose wheels at an angle for these to better
represent the action. Then, I could not leave
the nose gear hanging out there "naked", so I
whipped up some wheel well doors from 0.005"
styrene and attached these in the correct
places.
 |
|
| |
The weapons for the Phantoms
come from a few sources. The wing fuel tanks are
provided by Trumpeter in the basic kits
of the Phantoms. The centerline fuel tanks come
from a Pit-Road (SkyWave) set. I stole
the tanks from that kit and added them to these
Phantoms. The 2000lb laser bombs come from 1/285th
scale GHQ aircraft, an A-10 to be exact.
In 1/285th
scale, these are 500lb laser bombs. I cut them
down in length by about a third and they made
very nice 2000lb laser bombs for 1/700th
scale. These were then attached to the
appropriate wing hard point locations of the
Phantoms. Two of the Phantoms also have Pave
Spike pods which also came from the Pit-Road
(SkyWave) set.
| |
 |
| |
The C-141 was supposed to be
easy and right out-of-the-box. Then, a friend
pointed out that for Vietnam-era, a C-141 would
have been a C-141A (the Pit-Road (SkyWave)
set provides stretched C-141Bs). I would need to
back-date the kit to the earlier version of the
C-141. This amounted to finding out the sizes of
the fuselage plugs that were added in the "B"
conversion and then cutting the fuselage to
remove these. For the record, the plugs are
13'4" in front of the wing and 10'0" behind the
wing. In 1/700th
scale, this amount to 0.23" in front of the wing
and 0.17" behind the wing. I got as close to
these numbers as I could, although I think I
took a little too much from the front section. I
also needed to file away the aerial refueling
point on top of the forward fuselage. Thinking
that was it, I moved on to other topics.
Then, the same friend
pointed out that a landing C-141 would have its
wing flaps deployed. Argh! OK, out came some
styrene stock so I could scratch build some wing
flaps. I used 0.015" sheet styrene for the
flaps, themselves, and 0.005" styrene for the
ribs/actuators. The adding of the flaps to the
kit was fairly simple. Since the Pit-Road (SkyWave)
set provides the C-141s with one-piece wings, I
considered how I might carve out the flap wells,
then I realized that the completed model would
be a scant inch or so over the base, making it
very hard to see anything on the underside, so I
ignored carving out the flap wells and just
painted them a darker color to simulate the
well.
The last added detail on the C-141 was a late
addition when I realized that the prominent
pitot spike on the front of the horizontal tail
was missing. I added this using some 0.010"
brass wire and faired it into the tail with
super glue.
I used Testor's Model Master enamel
paints for most of this project. Any color
references here that do not explicitly state the
manufacture are Testors Model Master
enamel paints.
For the AC-47 and Phantoms, they are finished
in S.E.Asian camouflage -- Tan (F.S.30219),
D.Green (F.S.34079), and M.Green (F.S.34102) on
top with either black or Camouflage Gray
(F.S.36622) on the bottom. After the initial
painting of the AC-47, I found the contrast
between the two greens was not enough to even
tell there were two greens, so I substituted
Marine Green (F.S.34097) for the Medium Green.
This made the colors different enough to see the
difference.
I started by air brushing the bottom-side
colors on the AC-47 and Phantoms. The AC-47 and
two of the Phantoms are black on the bottom. The
other four Phantoms are gray on the bottom. I
then carefully air brushed the tops using the
lightest of the top-side camouflage colors --
the Tan. By keeping the brush always shooting
from the top of the aircraft, I could keep from
painting the already painted bottom of the
aircraft. This worked good and gave me a nice
even paint coating of the base colors.
Next, I hand brush painted the green colors
of the upper camouflage. It was a bit
troublesome to get all the right camouflage
patterns, but in the end, I was satisfied with
the look of the aircraft. I took a little time
to plan the Phantom camouflages and included a
few accepted deviations in the patterns so the
aircraft would not be totally identical.
The C-141 was a little easier as the colors
were simple masks (if you can consider anything
in 1/700th
scale to be "simple"). The majority of the
aircraft is Aircraft Gray (16473) with a white
upper fuselage. I started by painting the white.
I masked off what was to remain white, and then
I painted the Aircraft Gray. Various leading
edges are left in bare metal, so I masked off
the leading edges and painted them in Steel
metalizer. The last item was the wing walkways.
These are some dark gray color -- I chose D.Gull
Gray (F.S.36231).
| |
|
|
You would think that aircraft
this tiny would not need decals, right? Well,
you would be wrong. I found that the aircraft
were not quite small enough to make the markings
invisible, so I whipped up some art work on my
PC and printed it using my ALPS printer. It is
only the big markings like tail codes, serials,
and national insignia, but having them present
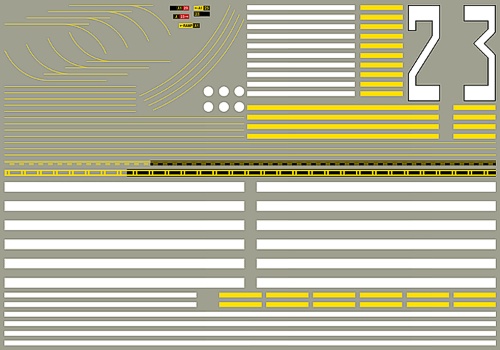
really improved the look of the aircraft. The
image to the right shows my completed decal art
work (reduced in size to save space).
As you can see from the
art work, I sized and spaced the tail codes and
serial numbers to make them work as one decal on
the aircraft. Basically, the whole of each side
of the AC-47 and Phantom tails is just one
decal. Concern over print register forced me to
print the national insignia as two decals with
separate white backings for each insignia. I
needed to make new national insignia as the ones
in the Pit-Road (SkyWave) and
Trumpeter sets were too large.
I created the C-141 wing walkways as one big
decal, carefully sized to match the wing panel
lines. The cheat lines on the side where simple
black stripes. I printed the blue stripe for the
MAC sash on the tail, painting the yellow first,
then applying the blue stripe and the MAC
letters.
The scale of the aircraft did not change my
weathering style. For weathering, I used my
typical style of thinned down enamel paint
washes. Highlighting the panel lines added some
depth to the aircraft, even if the panel lines
are a scale two feet across on the airframes. I
finished the weathering with some dry brushing
to pop out the surface details. For a more
complete discussion of what I do to weather my
models, see my posting on
"Weathering Aircraft".
The following images show the aircraft after
the major painting and decaling was completed. I
still needed to dry-brush them to tone down the
camouflages and enhance some detailing. The US
quarter dollar coin provides a good sense of
scale to the images. Depending on your screen
size and resolution, the images show the
aircraft two to three times their actual size.

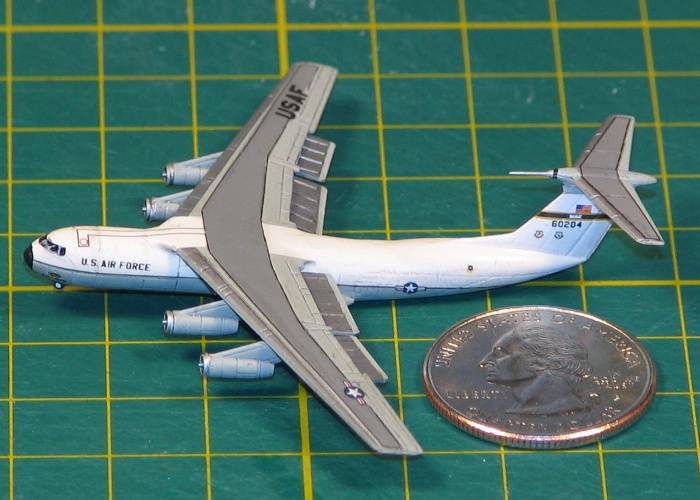
Phantoms and AC-47 --
70 Decals in a Three-inch Square
|
C-141A -- 33 More
Decals |
| |
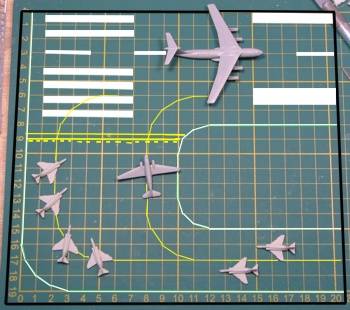
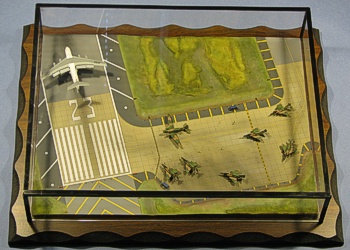
Initial Concept
|
|
I wanted to tie all these
aircraft together into a small enough area to
keep the diorama a manageable size. The end of a
runway seemed logical to make this happen. To
the right is the initial concept diagram I put
together to share with a friend.
After determining the
aircraft markings and doing research on runway
and taxi way sizes, I substantially revised this
layout.
Once I chose the 8th
TFW for the Phantoms, I started looking for
information regarding Ubon RTAB (home of the 8th
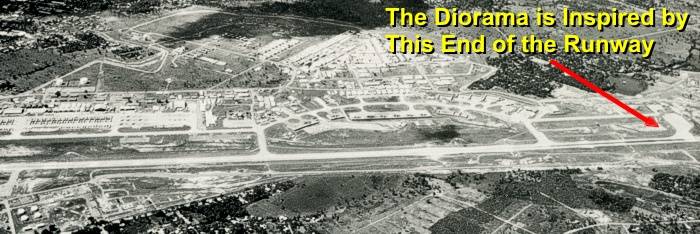
TFW during the Vietnam conflict). I found an
aerial view of the base in the Squadron
Publications book Air War Over Southeast
Asia, Vol.3 (Stock#6037 / ISBN
0-89747-148-2). Based on this image, I could get
a good feel for the layout of the runway end. I
used this picture to plan the diorama base
layout. This is the revised layout.
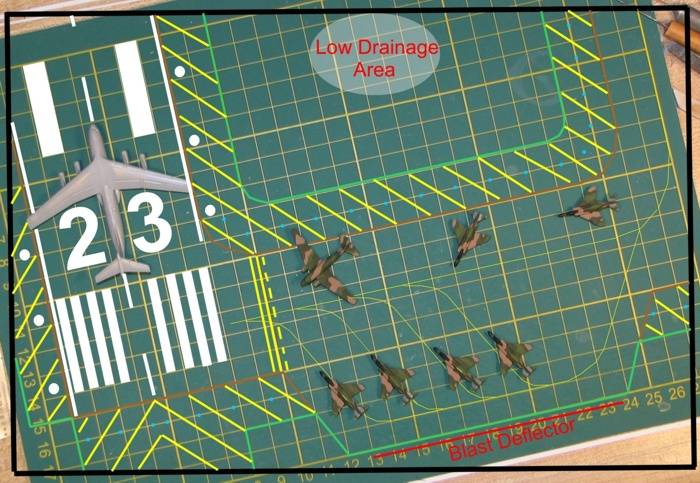
Improved Concept
|
Ubon, Late 1972
|
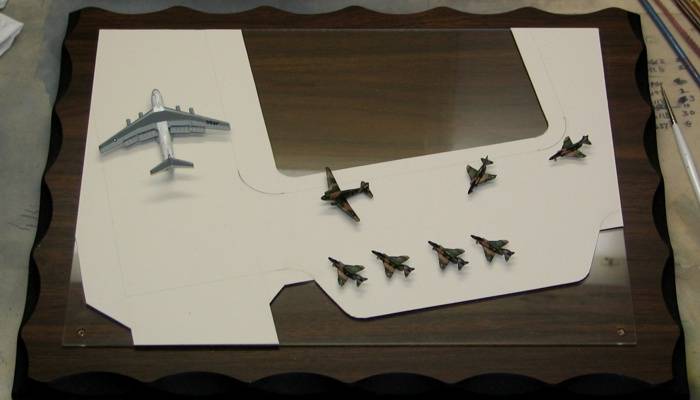
Each aircraft in the group
has a reason to be there and a reason to be so
close to other aircraft.
- The C-141 is landing.
- The AC-47 is holding short, waiting for
clearance to take off (presumably once the
C-141 clears the runway).
- The Phantoms are all lining up to have
their last-chance checks done.
This would make for an exciting five minutes
with all this activity on the end of the runway.
Just as I was getting ready to decide how to
construct the diorama base for this project, my
wife found an old picture in the bottom of a box
in the attic. The picture was junk, but the way
it was framed held promise for my diorama. It
was a wood plaque with the picture trapped under
a plexiglass cover. The plexiglass cover was
precisely the size of the diorama I was
planning. When my wife agreed that she had no
need for the thing, I took it and chalked it up
to fate that such a perfect wood base would turn
up just as I was going to need it.
I decided the best approach was to use the
piece of plexiglass as the diorama base and
construct the diorama on the plexiglass. Then,
when I was done, I could simply attach the
plexiglass (diorama and all) to the wood plaque.
This way I could keep the wood plaque nice and
clean while I was working on the ground-work and
painting of the diorama base.
Considering the small size of the diorama
subjects and difficulty I would have dusting
them in the future, I also decided that it would
also be a good idea to construct a plexiglass
cover for the diorama. The lip around the edges
of the plexiglass diorama base would make a
natural locator for the plexiglass cover.
I drew and cut out a poster board runway and
taxi way. This poster board cutout would be the
template for me to layout and cut a piece of
0.080" sheet styrene as the runway and taxi way.
The following image shows the poster board
template on the plexiglass base resting on the
wood plaque with the aircraft sitting in their
tentative positions.
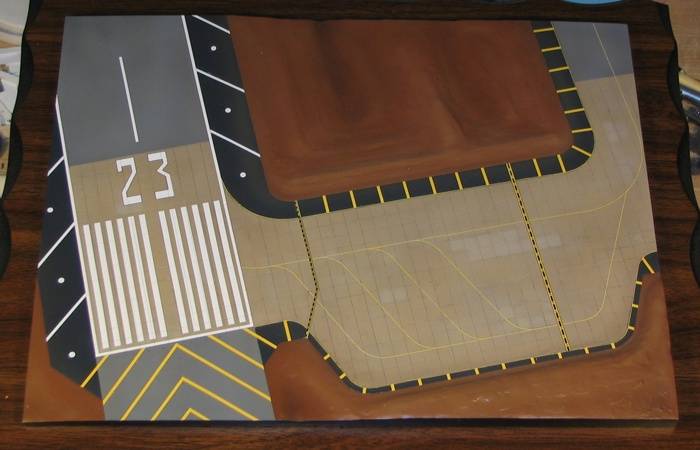
Base Beginning
|
Using the poster board
template, I traced the outline of the runway and
taxi way onto a sheet of 0.080" styrene. I then
scribed the outline onto the plastic. I also
scribed the outline of the blacktop edges to the
runway and taxi way as well as the grid pattern
of the concrete slabs.
With the outline established, I started
creating the terrain. I built up a blast
deflector hill along the outer edge of the
last-check ramp. I built a lower hill along the
inner edge of the last-check ramp. I then cut
away the areas were the terrain level was going
to fall below the runway level. I used assorted
thicknesses of plastic strip to build up rough
slopes. I applied liberal amounts of super glue
and accelerated it so it would cure without
shrinking away to nothing.
The image below shows the base prior to
priming the surface. The dots along the runway
and taxi way edges are from me doing planning on
the locations of runway and taxi way lights. I
did these with a Sharpie marker. I found it
amazing that while sharpies are impervious to
most things, they did soak off and into the Mr.
Surfacer I used for priming.
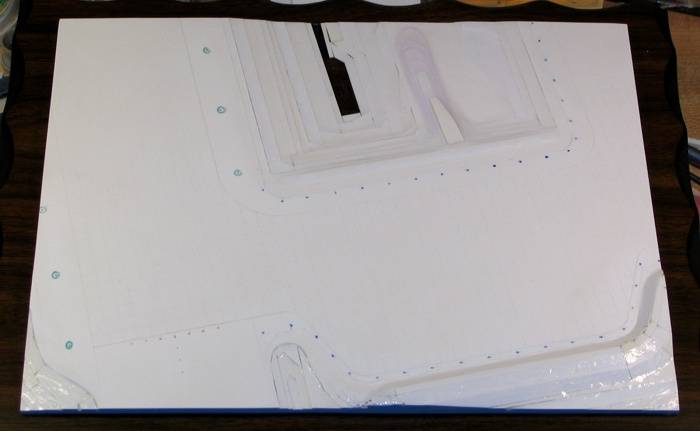
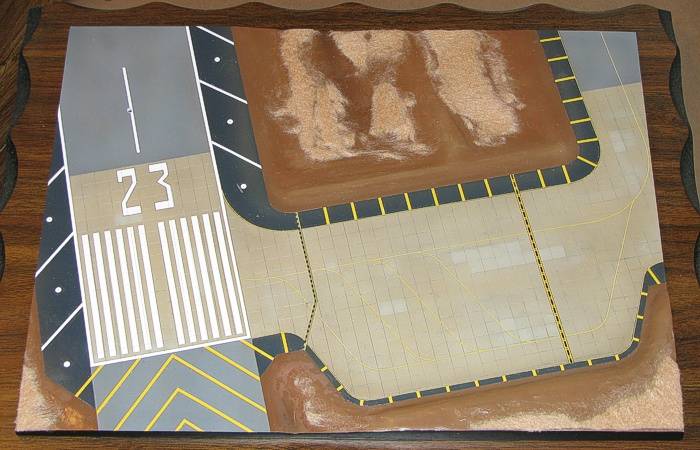
Unprimed Base Terrain
|
If you look carefully at
this image, you can see the lamination of
styrene I used to build up the terrain. With
super glue being clear, it made things difficult
to tell when I had effectively built the
terrain. The clearness does help show the
styrene lamination, though.
With the base terrain established, it was
time to apply some paint and see how well the
terrain looked. I primed the base using Mr.
Surfacer 1000. After the first coating, I fixed
a few minor issues in the terrain details, then
applied a second coating of Mr. Surfacer. The
following image shows the base after priming it.
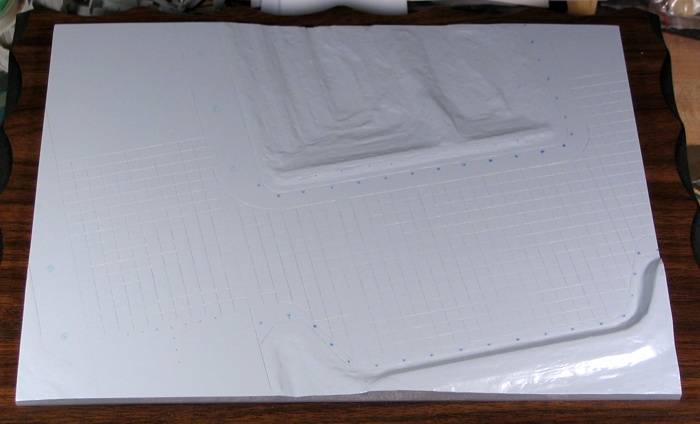
Primed Base Terrain
|
Better seen in this view
are the grid lines of the concrete pad. Through
dumb luck or fate (not sure which), my runway
and taxi way sizes worked out just right to be
multiples of the concrete pad sizes. I should
have calculated the size of the concrete pads
first, then made the runway and taxi way size
work from that. Having it work out just right,
even though I did it backwards was unusual. I
was not going to argue, though.
Sixteen feet in 1/700th
scale is roughly 1/4". Flight lines I have
walked on seem to use sixteen foot squares as
the breakdown of the concrete slabs, so I made
the grid scribing 1/4". The concrete covers the
last-check ramp and two inches of the runway and
taxi way. This would be enough to cover the
areas were heavily laden aircraft would be
turning. The straight stretches of the runway
and taxi way would be asphalt.
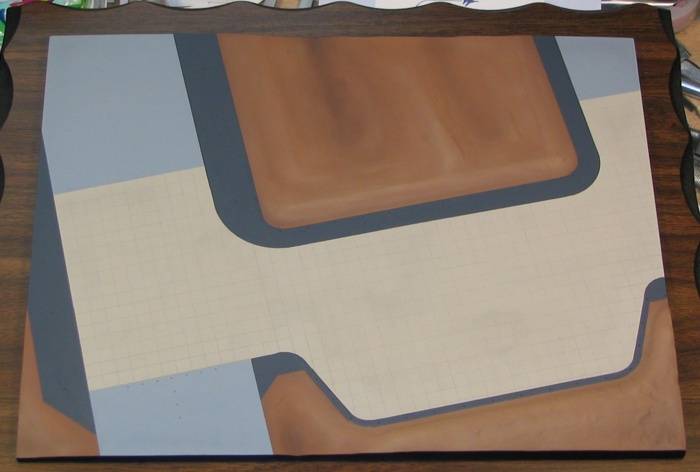
At the advice of a couple friends, I
re-worked the hill on the lower right of the
diorama board, then re-primed the base. Happy
with the results, it was time to paint. The
image below is after an afternoon of masking and
painting the various portions of the base. The
paints are as follows:
- The concrete color is a mix (1:1:1) of
Floquil Railroad Color Foundation, Floquil
Railroad Color Concrete, and Flat White.
- The asphalt areas are Air Motility Gray
(F.S.36173).
- The black-top areas are a unmeasured mix
of Interior Black and Air Motility Gray.
- The ground is a base coat of Military
Brown (F.S.30117). Highlighting was done in
Wood. Shadowing was done with an unmeasured
mix of Military Brown and Interior Black.
It was so great to finally have colors on the
base.
Base Terrain with
Initial Painting |
I was not completely
satisfied by the even tone of the concrete and
asphalt sections, so I took some time at this
point to "distress" the colors, adding fresher
concrete sections and over spraying the areas in
various contrasting colors. The end results were
much more pleasing to me.
Who says decals are only for
vehicles and aircraft? I needed a bunch of
markings for the runway and taxi way. At first I
considered masking and painting them, but the
yellow taxi way lines changed my mind -- they
should be only 0.008" in width. While I could
probably mask that small, it would be easier to
use decals. So, I whipped up some art work. The
image to the right shows my completed decal art
work (reduced in size to save space).
So, the next step was to
gloss coat the base in preparation for the
decals. I printed the decals out on decal paper
and was a bit apprehensive about the yellow
items. There was what seemed to be significant
pixelations in the yellow. For a time I
considered if there was any other method to make
the yellow markings, then I remembered my own
advice to others concerning ALPS decals.
"They never look as good when naked on the decal
paper as they do once applied to the model."
So, I test applied some of the yellow items and
was pleased to find my advice was true.
After applying 119 decals, the following was
the result.
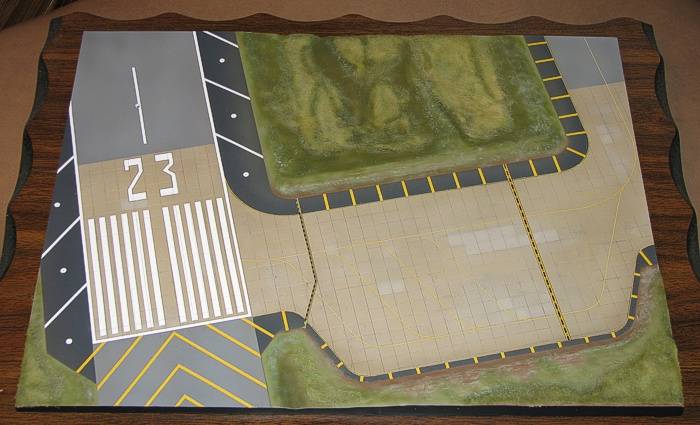
Base Terrain, Gloss
Coated with Decals
|
The next step was to add
vegetation. I stewed on this for eight months
before I got up the courage to give it a try. As
nice as things had turned out so far, I did not
want to ruin the diorama with poorly done
vegetation.
There would be no trees in the area of the
runway, so that was simplified, but there would
be lots of grass. I needed to come up with a way
to do grass in 1/700th
scale. Any commercially available grass material
(for model railroading) would be twelve to
twenty feet tall in 1/700th
scale. I did not just want to paint the grass,
though. While that would get the thickness
right, I wanted some texture to represent the
grass.
What I ended up trying was a thin tan-colored
felt. I ripped some pieces so the edges would
not be too well formed, then soaked the felt in
a diluted white glue solution. This allowed me
to apply the grass to the diorama base and make
it stick. It also gave me the ability to soak it
off if the effect was not what I wanted. The end
result, before doing any painting, was as
follows. It almost looked like the base had
grown mold.
Base Terrain, Felt
Grass Applied |
I was pleased with this
result. If I could carefully paint this "mold",
the effect would be the different texture I was
looking for in the high grass areas.
Three shades of green and one shade of tan
later, I had what you see below. While this is
not exactly what I had in mind when I started, I
am happy with the outcome.
Base Terrain, Flat
Coated with Grass Areas Painted
|
I got this effect by first
applying a medium green and a dark green with an
air brush. I purposely did not attempt to get
complete coverage, I wanted the colors to show
through each other and even in places allow the
brown ground to come through. I then dry-brushed
a light green and the tan color to highlight
things and provide a different texture to some
areas. All this messing around paid off with
what I felt was effective ground work for 1/700th
scale.
The last thing to do, just like on any model
is to do weathering. Typical runways have a
rather dark stripe that runs down the
centerline. This is from the soot of jet engines
and the screeching of tires as the aircraft
touch down on landing. I also noted a lot of
dirt in the last-check areas from heavily laden
aircraft turning and twisting on their tires as
well as general dirt from fluid leaks.
I accomplished most of this with a misting on
of Interior Black, thinned out with about two
drops of paint for every dropper-full of
thinner. While I was at it, the grass color
seemed too bold, so I toned down the green with
a misting of gray and light tan over the grassy
areas. Also, in this last image, the taxiway and
runway lights have been added.
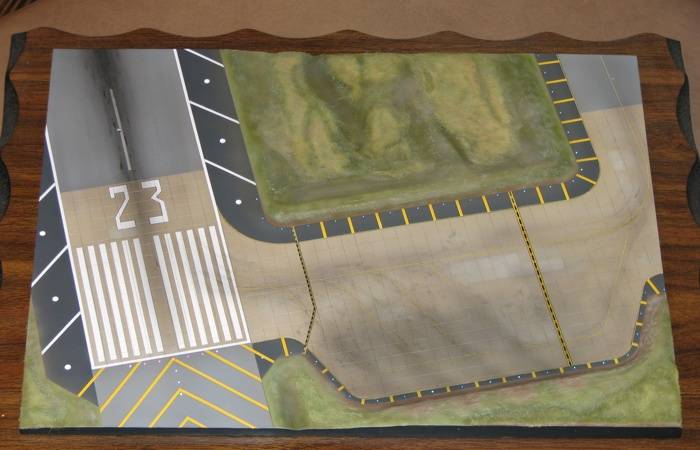
Base Terrain,
Weathered and Ready for Aircraft
|
It was time to get back to
the aircraft and finishing details.
With the base coming together nicely, it was
time to turn back to the aircraft and related
items. First on that list was people. In 1/700th
scale, people are more than just trivial. I
needed to come up with some ground crew for the
Phantoms. As I mentioned earlier, Eduard
makes etched metal people in 1/700th
scale for use in model ships. I bought a set
(stock#17-502) and found they even came in
multiple poses. The images below give some
detail to the people. The inclusion of a US ten
cent piece in the right image provides some
scale. The people are about the size of a grain
of rice.
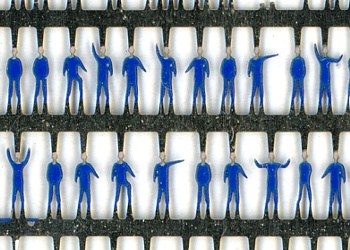
Eduard 1/700th
Scale People |
|
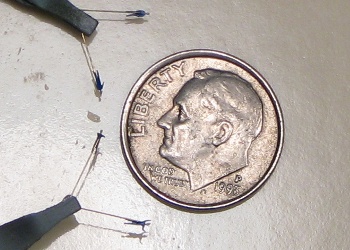
Eduard 1/700th
Scale People |
Eduard has the
people pre-painted, but they are in Naval
uniforms. I needed to re-paint them into what
would be appropriate for Air Force personnel on
the flight line in Tailand. To paint the people,
I cut them free and mounted them to 0.005" brass
wire. This would allow me to hold the people as
I painted them. The wire would also be the way I
would mount the people in the diorama by
drilling holes at appropriate places and
inserting the wires. The wire is visible on the
people if you look for it, but some excess super
glue and a heavy coating of paint helped to hide
the wire.
I had some specific poses in mind for the
ground crew as they marshall the Phantoms into
place for their last chance checks. Most of the
poses were present in the Eduard etchings
already. For the few poses that were not in the
set, I found I could take some of the existing
people and bend their arms to create the pose.
This also made some of the people seem more
three dimensional.
Mounted on wires, I then painted the people
into proper colors for Air Force personnel in
Tailand. I used SAC Bomber Green (F.S.34159) for
the uniform color. Some of the people have white
T-shirts in place of their uniform shirts. I
used Armor Sand (F.S.30277) for the flesh on
white crew and Field Drab (F.S.30118) for flesh
on the black crew (yes, I accounted for both
blacks and whites in the diorama). I also gave
them all black boots. My Optivisor magnifying
visor got a real workout doing this painting.

Eduard 1/700th
Scale People -- Painted as USAF Ground
Crew |
Now, these people could
not get to the end of the runway just walking.
Well, I guess they could, but it is a long walk
from the Phantom revetments to the end of the
runway. Anyway, in many of the Pit-Road (SkyWave)
aircraft sets there are support vehicles to go
with the aircraft. One of the sets provide Air
Force crew vans. I clipped these out (they are
just one-piece items) and cleaned up the mold
marks.
To allow some of the ground crew to interact
with the van more realistically, I decided to
open the rear doors on the vans. This would
permit me to have some crew at the back of the
vans like they were just getting out. I used
some strip styrene to create the doors and
punched out the windows with a my Waldron
Micro-Punch set. I then painted the vans in dark
blue and glued them in place on the diorama.
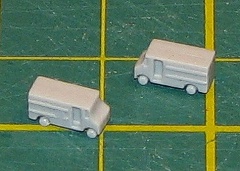
Unmodified Crew Vans |
|
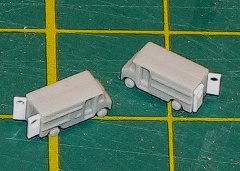
Detailed Crew Vans |
|
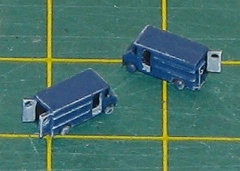
Finished Crew Vans |
Runway and taxiway lights
were something I thought about quite a bit. I
one point I was going to have the lights be
functional using fiber optics. After a few
minutes of thinking how to hide a light and
power source under the diorama, I regained my
senses and decided to just use thin brass wires
stuck into pre-drilled holes in the base. I
planned to paint the wires in yellow to
represent the mounting, then just the very tip
in blue, red, of silver to represent the light.
Then, one afternoon, I found a better
alternative. It is funny what you can find when
you are not even looking for it. I was with my
wife at the fabric and craft store that she
frequently visits. In the isle that covers
scrap-booking, I came across small tubes full of
tiny glass beads (0.5 mm) in assorted colors.
They are intended as a form of glitter for
glueing onto scrap-book pages. My mind started
racing, "These blue, red, and clear beads would
make excellent lights on my runway diorama". I
picked up three tubes, one in each color, and
used them on the diorama -- blue for the taxiway
lights, red for the threshold lights, and white
(clear) for the runway lights.
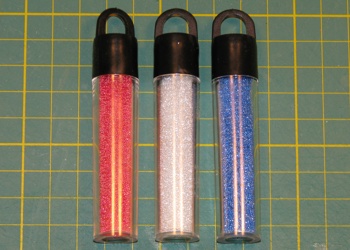
Glass Bead Tubes |
|
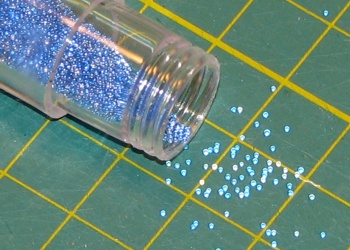
Glass Bead Detail
(The camera flash lit them up.) |
|
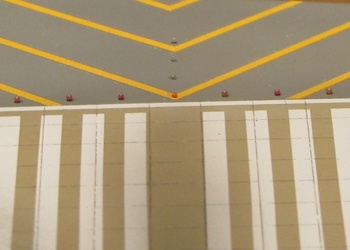
Threshold Lights
Detail |
|
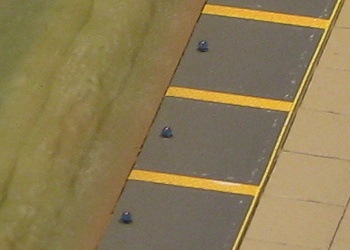
Taxiway Light Detail |
With the lights attached
in place, it was time to start attaching the
rest of the stuff. I started with the ground
crew. I placed (without glue) the aircraft in
their final positions, then started drilling
holes at the appropriate places for the ground
crew. I attached the crew men with super glue,
slipping the wire pegs I had attached to the
crew men into the holes I was drilling.
With the crew men being permanent on the
base, I next attached the Phantoms and the
Spooky. The crew vans came after the Phantoms
and the Spooky.
To have the C-141 suspended over the runway
as it was landing, I drilled a 1/16th
inch hole in the diorama base and in the bottom
of the C-141. Since I did not have any clear rod
in 1/16th inch
size, I took some 1/8th
inch clear acrylic rod and used a candle to melt
and stretch it to get a 1/16th
inch size. It took a couple attempts before I
got a rod I could use because I usually am
making thin antenna wires when I stretch sprue.
Not wanting to make such a thin piece meant that
I had to be careful not to overheat the acrylic
before I pulled it. The third attempt was the
charm.
I cut the stretched acrylic rod to the
appropriate size, then glued it into the C-141
belly. The effect was fantastic on the diorama.
The clear rod suspends the C-141 and is nearly
invisible in the shadow of the C-141, unless the
light catches it just right. I left the C-141
sitting loose in the hole on the diorama base
until I was totally done everything else. I had
broken the wing flaps on several occasions and
did not want them broken again with the C-141
stuck permanently into the diorama base.
Adding airport signs and the runway threshold
light pads finished the diorama portion project.
The only thing left was to create a clear case
to cover the diorama. The last thing I wanted to
do was to have to dust this diorama. I am
certain that dusting the thing would probably
remove half of the fine details...
Plexiglass Cut --
Frame Pieces Created and Painted |
|
Assembled Dust Cover |
The case is 1/16th
inch clear Plexiglass. I cut it to size and used
strip styrene (painted black) to create a frame
to hold the Plexiglass. Safely underneath the
dust cover, I glued the C-141 into place and
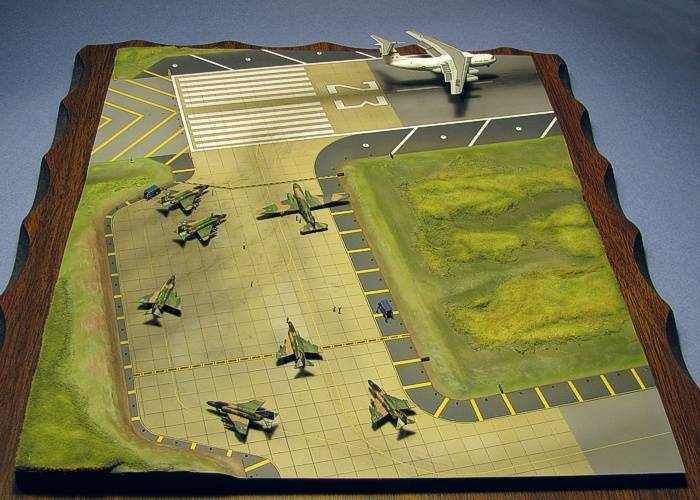
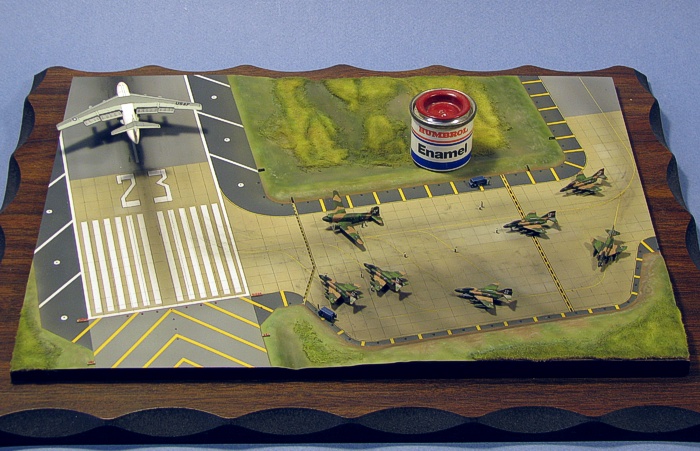
declared the project complete.
This was a fun "little" project. While the
project took almost a year to complete, I did
not work full time on it, completing three other
models throughout the year while I worked on
this one. It was a great stretch of my abilities
to see how well I could pull off details in this
tiny scale. And, while it did not seem like it,
a friend pointed out that this was a massive
scratch-building project for me since the entire
base was created without any kits (or even
directions).
I got to relive some childhood and play with
the little airplanes one more time. And, I am
feeling more prepared to take on that "dream air
show" diorama, if only I can get up the courage
to do 50,000 people in 1/700th
scale. But, I think my next tiny-scale project
will be an aircraft carrier with a deck full of
Tomcats at sea ... someday.
|
 Home
| What's New |
Features |
Gallery |
Reviews |
Reference |
Forum |
Home
| What's New |
Features |
Gallery |
Reviews |
Reference |
Forum |