|
Czech Master Resin's 1/72 scale
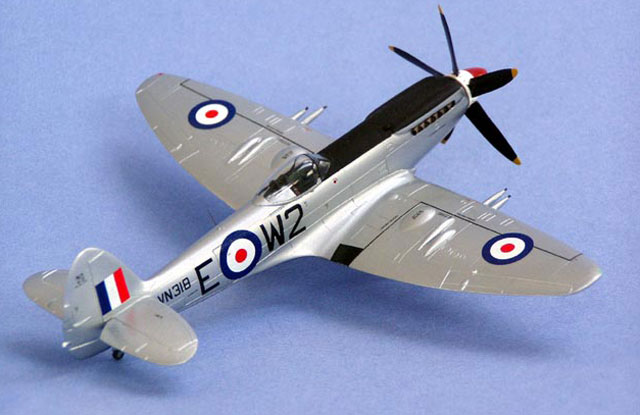
Spitfire F.22 / F.24
by Bernie Hengst
|
 |
|
Supermarine Spitfire F.24 |

CMR's 1/72 scale Spitfire F.22
/ F.24 is available online
from Squadron.com
Earlier this year a friend gave me the CMR Supermarine Spitfire F.22
/ F.24 resin Kit. Compared to the Dekno Kit of the Bellanca 28-70 that
he gave me some years ago this kit from the Czech Republic is absolutely
beautifully moulded with very precise detail, fine recessed panel lines
and very few (10) air holes. I was impressed.
The parts are carefully packed in small groups and sealed in individual
plastic bags. This protects them from damage in transit. Also separately
packed were two vacuformed canopies. Three and four spoke wheels and two
different sets of tail planes are supplied, as well as two sets of
rockets for the F.22 or F.24 versions.
The instruction sheet consists of two pages in A4 format showing the
construction sequence and also the differences for the F.22 and F.24
versions that can be built. Five further sheets cover paint schemes and
markings for two RAF and one Syrian A.F. F.22 and one RAF F.24 and one
for the RHAAF. The decal sheet from Tally Ho is beautifully printed and
the decals I used for my model settled down without using any decal
solution. The decal sheet comes with a separate instruction sheet
showing the placement for the large number of stencils.
Before I received the kit, I had purchased Air Enthusiast No.127, Jan. /
Feb. 2007 and the magazine had a short report with a number of colour
photos about Spitfire F.24s in service with the Royal Hong Kong
Auxiliary Air Force. I decided to build the model as one of the RHAAF
aircraft.
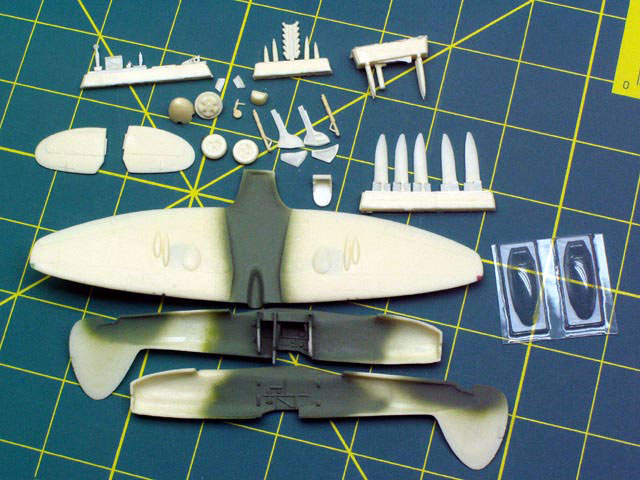
Using a fine razor saw I cut the parts from the moulding blocks and
cleaned them up using a X-acto knife for scraping, fine emery boards and
different grades of sand paper. Only the gun barrels, exhaust stacks,
propeller blades and some very fine cockpit parts were left on their
casting blocks. (Picture 1) All of this took less than two hours.
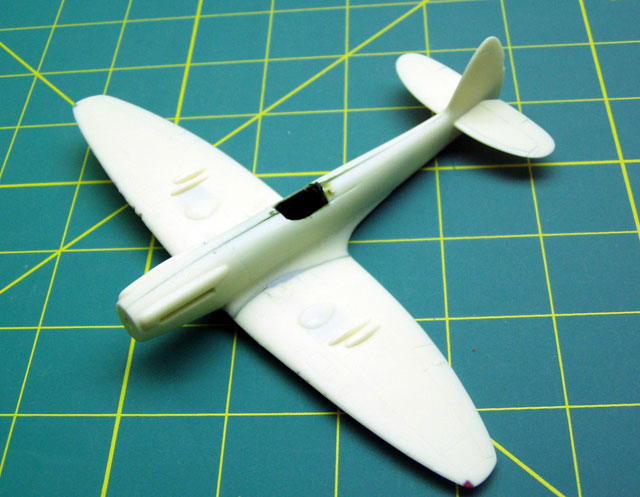
The cockpit parts were assembled using Cyanoacrylate and the assembly
was attached to the starboard fuselage. The cockpit and the centre wing
section were sprayed with ModelMaster RAF Interior Green. After some dry
brushing the fuselage sides were glued together using superglue. After
setting for 30 minutes the seam was carefully sanded and the one-piece
wing was glued to the fuselage and the air intake was also added. All
the joints were filled with thick superglue and after approximately one
hour lightly sanded. Any fine air holes were enlarged with a # 70 drill
and filled with a tiny drop of thin superglue. Small cutouts were made
on the leading edge wing tips and clear green and red section cut from
toothbrush handles were glued in place. Before I put the model away for
the night all the seams got a light brushing with Mr. Surfacer 500 to
find and fill any imperfections.
The next day the seams and pinholes were carefully sanded with
progressively finer grades of emery. The wing tip position light were
filed to an approximate shape and finished off by sanding. The assembled
radiators, pre-painted and masked on the inside were added to the lower
wings.
I drilled the holes for the guns on the leading edge of the wings a
little deeper and dry-fitted the gun barrels. The instruction drawings
show the Spitfire F.24 of the RHKAAF with the long barrels, but after
studying the photos in the Air Enthusiast magazine I went with the short
barrels. I filed the front’s flush; drilled out the tips out so that
later, when the model was completed small pieces of stretched Q-Tip
handles can be inserted as gun muzzles. I now glued the gun barrels to
the wing leading edge.
Next the tail surfaces were glued to the fuselage and the seams thinly
covered with Mr. Surfacer 500.
The cockpit was finished by installing the painted rudder pedals,
control column, seat, headrest and gun sight, the later was completed by
a small square of thin, clear plastic.
The canopy, previously brushed on the inside with Future, was cut
out, the edges carefully sanded until it fitted properly. It was then
attached with white gluedl
The propeller blades were removed from the casting block and cleaned up,
the same was done to the propeller hub and the back plate. The hub and
the back plate were glued together, making sure they lined up properly.
The propeller hub was stuck onto a toothpick and the propeller blades
held by clothes pegs ready for priming.
 The
next day the seams on the tail surfaces were sanded and short pieces of
toothpicks were pushed into the holes for the main and tail landing
gears. All the landing gear doors were stuck to masking tape fixed to
wooden stir sticks, wheels stuck on toothpicks, the tail wheel assembly
held by a self-closing pair of tweezers and the main landing gear legs
held on the axle stubs by cloths pegs. After masking the canopy and the
wing tip lights with Tamiya tape the model was primed. I use Tamiya
primer, siphoned from the can, in the airbrush. For the silver Spitfire
I used the white primer. The
next day the seams on the tail surfaces were sanded and short pieces of
toothpicks were pushed into the holes for the main and tail landing
gears. All the landing gear doors were stuck to masking tape fixed to
wooden stir sticks, wheels stuck on toothpicks, the tail wheel assembly
held by a self-closing pair of tweezers and the main landing gear legs
held on the axle stubs by cloths pegs. After masking the canopy and the
wing tip lights with Tamiya tape the model was primed. I use Tamiya
primer, siphoned from the can, in the airbrush. For the silver Spitfire
I used the white primer.
After drying over night the model and the separate small parts were
checked, problem areas lightly sanded with fine sand paper and touched
up with white primer. Six hour later the complete model was polished
using Master Casters polishing sticks. All but the propeller hub were
airbrushed with Tamiya AS-12 Silver. This paint is again siphoned from
the can and thinned with Sherwin-Williams lacquer thinner before being
sprayed onto the model and all the small parts. The Propeller blade tips
were sprayed with Model Master Insignia Yellow FS 33538. When dry the
tips were masked and the blades sprayed flat black. The main landing
gear legs were sprayed Pactra steel. The propeller hub rear was masked
and the front sprayed Humbrol matt red # 60.
In preparation for the decal application the model was given a coat of
Floquil Crystal Cote and left to dry for 24 hours. The decals settled
down with out setting solution and after the roundels, codes, fin
flashes and serial numbers had been applied I let the model sit for a
day to allow the decals to dry completely before applying the multitude
of stencils.
The main landing gear legs, the wheels and the gear doors were installed
as well as the tail wheel and its doors. After the pitot tube was added
the model received a very light weathering with dark grey pastel powder
to add some depth to some of the panel and hinge lines on the rudders,
flaps and ailerons. A small amount exhaust staining was applied to the
fuselage and the model sprayed with a semi matt mixture of Floquil
Crystal Cote and Floquil Matt. This was left to dry for a couple of days
before the anti-glare panel was masked and sprayed matt black. The
exhaust stacks, drilled out and painted with a mixture of Humbrol Rust
and Gloy Steel were now glued in with white glue and the gun muzzles,
painted gun metal, installed into the gun tubes. At this time I also
installed the propeller with a small amount of white glue. The tail
position light received a tiny trop of white gloss paint.
The masking from the canopy and the wing tip position lights was removed
and a whip antenna, made from stretched sprue, installed on the top
fuselage.
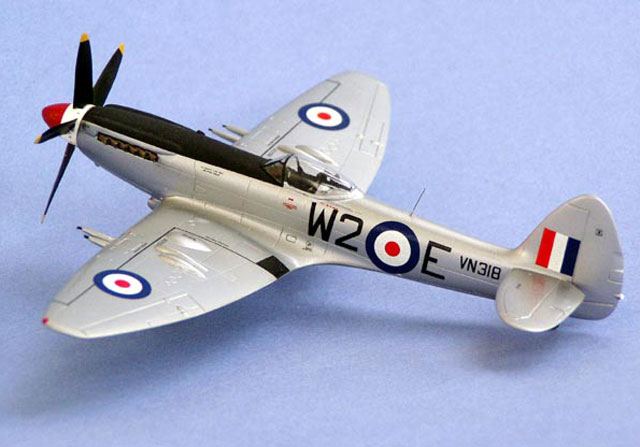
The model was finished, and after taking a few pictures, it made its
one and only flight into the showcase.
Building this model was a real pleasure and gave me a new perspective
on resin models.
Thanks to Bill and Petr from CMR.
Click the thumbnails below to view larger images:
[../../photogallery/photo00013577/real.htm]
Model,
Images & Text Copyright © 2007 by Bernie Hengst
Page Created 26 November, 2007
Last Updated
24 December, 2007
Back to
HyperScale Main Page |
 Home
| What's New |
Features |
Gallery |
Reviews |
Reference |
Forum |
Home
| What's New |
Features |
Gallery |
Reviews |
Reference |
Forum |