|
De Havilland Venom FB.1
Classic Airframes, 1/48
scale
S
u m m a r y
|
| Catalogue Number: |
4109 - De Havilland Venom FB.1 |
| Scale: |
1/48 |
| Contents and Media: |
around 60 parts in grey styrene; 24 parts in grey colored
resin; 2 clear injection molded part; instructions; decal sheet and
painting guide |
| Price: |
MSRP
USD$50.00
Available for USD$45.00 online from Squadron |
| Review Type: |
FirstLook |
| Advantages: |
Finely recessed panel lines; impressively detailed
resin parts; conforms to latest plans; colourful marking options; includes
drop tanks and rockets;
separately packed clear parts; good fit. |
| Disadvantages: |
You'll need to scratch build some small antennas
and pitot tube. |
| Recommendation: |
Highly Recommended for experienced
modellers |
Reviewed by
Brett Green

Classic Airframes' 1/48 scale Venom FB.1 may be ordered online from Squadron
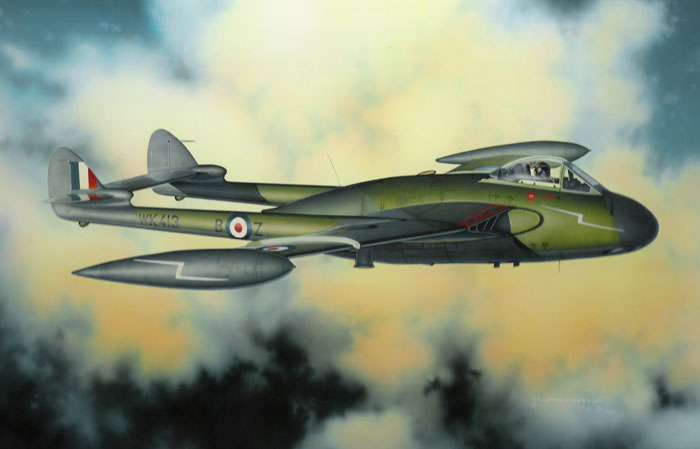
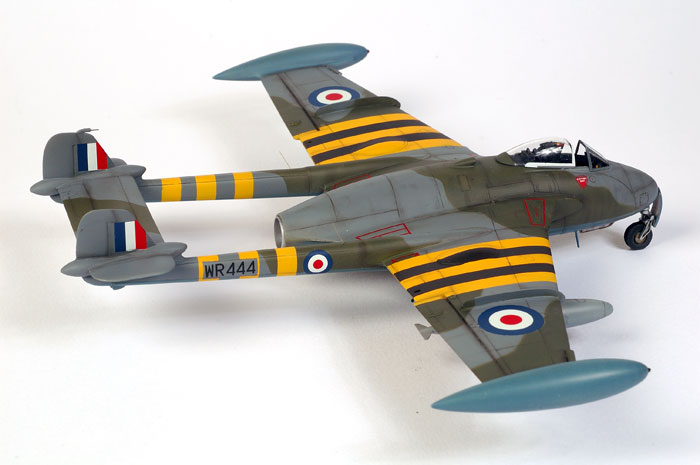
The de Havilland Venom bears a strong family
resemblance to its immediate predecessor, the Vampire, but it was in
fact a substantially new aircraft. The Venom featured a larger fuselage
pod, bigger wings with a swept leading edge, fixed wing tip tanks and
the more powerful de Havilland Ghost engine. The later FB.4 variant
featured powered ailerons of larger surface area. The increased
aerodynamic forces delivered by these powered ailerons necessitated the
installation of larger fins and rudders of a revised design.
It was logical that Classic Airframes should add
the de Havilland Venom to its growing family of post-war British
fighters. The first release is the Venom FB.1.
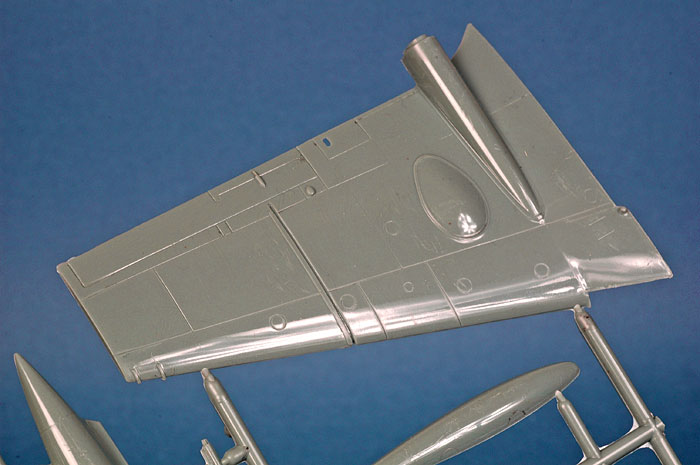
Kit number 4109 comprises around 60 parts in short-run injection moulded plastic,
two parts in clear, plus 24 grey resin pieces. The plastic is shiny and
smooth, with finely recessed panel lines. There are no imperfections on
the exterior surface of any parts, but there are a number of raised
ejector pins that will need to be removed from inside surfaces before
assembly, most notably inside the wing halves.
Click
the thumbnails below to view larger images:
[../../../photogallery/photo00012278/real.htm]
There is some flash on a number of pats. This can be quickly removed
by scraping with the back of a hobby knife.
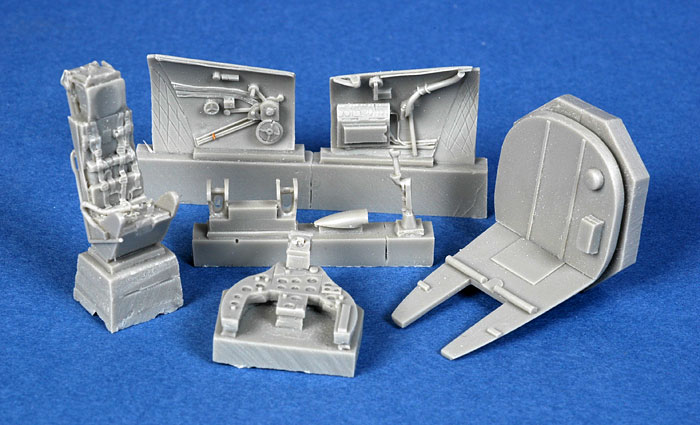
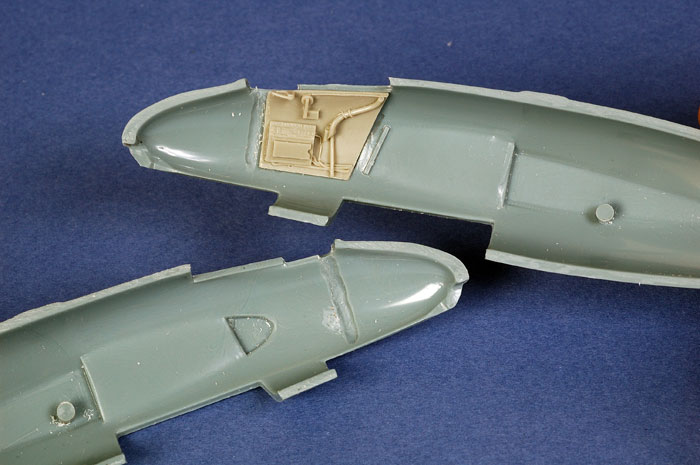
The resin parts are beautifully detailed. The instrument panel (with integrated coaming
and separate night-fighter console)
is very impressive indeed. The cockpit sidewalls are also noteworthy, as
they have cabling detail, throttles and even the trim wheel cast onto
the parts. The Martin Baker seat is very impressive, with harness straps
and other details cast in place.
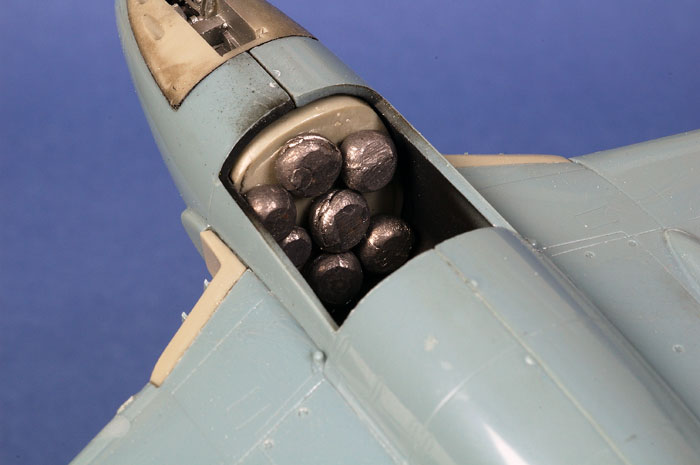
Outside the cockpit, resin parts include the jet fan, intakes, rocket
fins, nose wheel bay (integrated with the forward cockpit floor), inner
sections of the main wheel bays and wheels.
Click
the thumbnails below to view larger images:
[../../../photogallery/photo00001129/real.htm]
Some of the resin parts, including the main cockpit floor, the seats and
the instrument panel, are cast onto stout blocks so a combination of a
good razor saw and caution will be required when preparing these components.
Optional parts include underwing drop tanks and rockets. The sprues
for the FB.1 also include the large powered ailerons as separate parts,
but these are not used on the FB.1 variant.
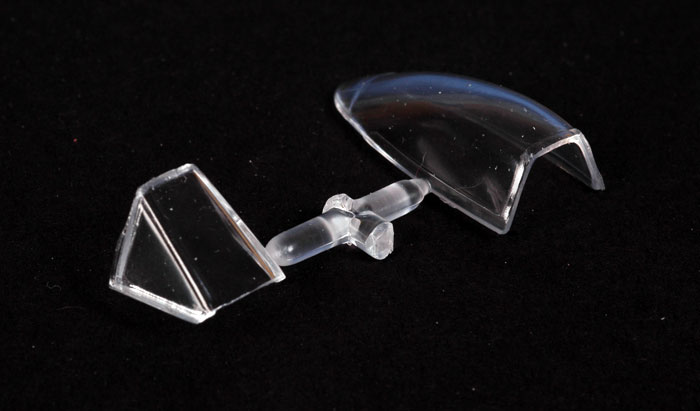
The canopy is provided as two parts in injection moulded clear
plastic, making it easy to pose the sliding section open. The sliding
section is moulded with the distinctive lower forward frame - a nice
touch that will be obvious on the finished model. The canopy parts may
appear a little cloudy on the sprue, but they positively sparkle after a
bath in Future. If you prefer a thinner option, the Aeroclub vacform
Vampire canopy should fit the Venom too.
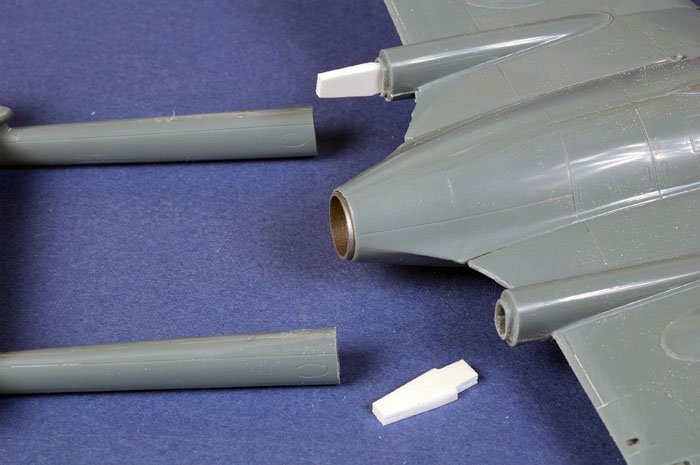
Surprisingly, the pitot tube, two small scoops underneath the
fuselage and the rod antennas are not included in the kit, but the
instructions do identify the locations and suggest that they should be
added from rod and plastic.
I have carefully compared the kit to new drawings prepared recently
by John Adams for the entire de Havilland Venom and Aquilon family, and
I am pleased to report that the kit matches almost perfectly in terms of
profile, outline and main structural features. Details look good too.
It is especially pleasing to note that parts that were common to the
Vampire were completely retooled. One example is the booms, which were
slightly skinny on the earlier Vampire kit but which appear to be
perfectly dimensioned in the Venom.
Construction Notes
I was fortunate to receive my review sample some time ago, so I have
already had the chance to build the kit. My kit cam without instructions
or decals, and with both sets of booms (for the FB.1 and the FB.Mk.4). I
finished mine as an FB.Mk.4 using decals cobbled together from a number
of sources, but construction is identical except for the booms. The
build was quite straightforward and fit was generally very good.
I can offer a few observations about engineering and fit, especially
compared to the earlier Vampire kit:
-
The main wheel well detail is moulded
onto the inside surfaces of the wings. This makes it much easier to
assemble the wings - no griding down resin parts and thinning
plastic to squeeze the parts inside. The small resin inboard gear
bays fit with no grinding or thinning required, and they provide a
secure fit for the gear legs.
-
The instrument panel was slightly too
wide to fit between the fuselage halves. I ground a channel on the
inside of the fuselage to accommodate this resin part (it is also
possible that I positioned the part slightly too far forward - test
fit and check before gluing anything in place.
-
I glued the rudder pedal part to the
top of the nose wheel "hump". I then slid the cockpit floor prongs
underneath the rudder pedals, before gluing the cockpit floor and
rear bulkhead to one fuselage sidewall. I did not glue the resin
forward wheel well either to the cockpit floor or the fuselage until
the fuselage halves were joined. This offered a tiny amount of play,
resulting in a perfect fit when this resin insert was finally glued
into place.
-
The only additions that I made to the
cockpit was to add an ejection handle to the top of the seat, and a
small box made from scrap styrene behind the pilot's headrest. I
assume this was a radio or avionics of some description.
-
Plenty of nose weight is required,
but there is ample space inside the nose (above the forward gear
bay) and immediately behind the cockpit (I glued sinkers to the back
of the resin rear bulkhead through the open gun access panel)
-
I added reinforcements carved from
thick styrene strip between the booms and the wings, and brass pins
to strengthen the joins at the tail surfaces, drop tanks and rocket
rails.
-
The fit of the wings to the fuselage
pod is much smoother than the same join on the Vampire. There is no
step at the shoulder. However, some trimming and test-fitting will
be required where the resin intake meets the side of the fuselage.
The de Havilland Venom is a welcome addition to Classic Airframes'
post-war British line-up. The Venom wore some of the most colourful
markings of the era on its booms and tip tanks, and was deployed
worldwide as the sun set on the British Empire.
Classic Airframes' Venom will need a little more cleanup
and preparation of parts than a long-run kit from Tamiya or Hasegawa.
Also, the lack of locating pins will call for extra care and
dry-fitting. In other words, modelling skills are required, but
anyone who has already built a Classic Airframes kit should not have any
trouble coming up with a good result straight from the box.
In my opinion, Classic Airframes' 1/48 scale Venom is a great kit
that captures the aggressive lines of this unique fighter. It is
accurate using a relatively small number of parts, but delivers a very high level of detail.
Highly Recommended to experienced modellers.
Thanks to:
-
Classic Airframes for
the review sample
-
John Adams of Aeroclub
for access to his excellent drawings and knowledge, and
-
Derek Pennington for
photographs from his personal collection.
Classic Airframes
kits are available worldwide through hobby retailers and from
Squadron.com
Review and Images Copyright © 2007 by
Brett Green
Page Created 12 March, 2007
Last updated 24 December, 2007
Back to HyperScale Main Page
Back to Reviews Page
|
 Home
| What's New |
Features |
Gallery |
Reviews |
Reference |
Forum |
Home
| What's New |
Features |
Gallery |
Reviews |
Reference |
Forum |