|
Mitsubishi G3M Nell
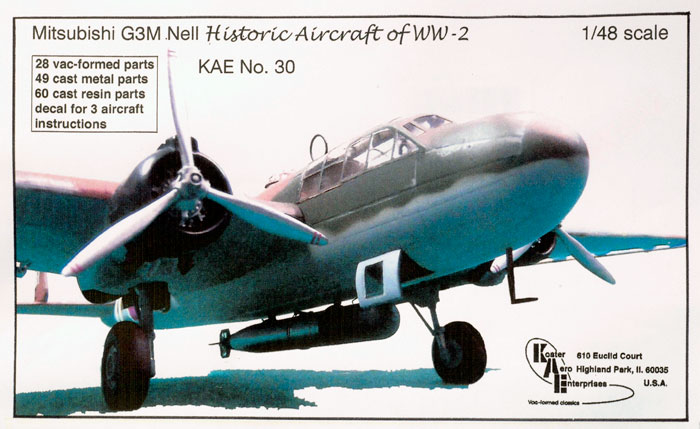
Koster Aero Enterprises, 1/48 scale
S
u m m a r y
|
| Catalogue Number: |
Koster Aero Enterprises Model Kit No
KEA 30 - Mitsubishi G3M Nell |
| Scale: |
1/48 |
| Contents and Media: |
28 vacuum formed parts in white and
clear styrene; 49 cast metal parts; 60 cast resin parts; markings for
three aircraft |
| Price: |
USD$69.95, available via email
direct from Koster Aero Enterprises
wkoster2@comcast.net
or online from Great Models
Webstore |
| Review Type: |
FirstLook |
| Advantages: |
Excellent decals; crystal clear vac
formed transparencies; good surface detail; crisply cast resin and metal
parts; three colour scheme options; clear instruction sheet detail |
| Disadvantages: |
Vac form (but not really a
disadvantage if you are an experienced vac form builder); no history
details on colour schemes |
| Recommendation: |
Recommended |
Reviewed by
Mick Evans

HyperScale is proudly supported by Squadron.com
The new vacuum formed release from Koster Aero
Enterprises of the World War II Japanese twin engine torpedo bomber the
Mitsubishi G3M Nell is a welcome release in the 1/48 scale arena. The
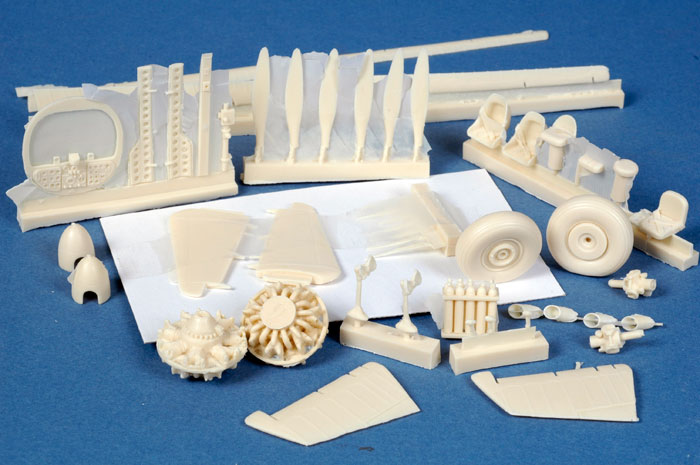
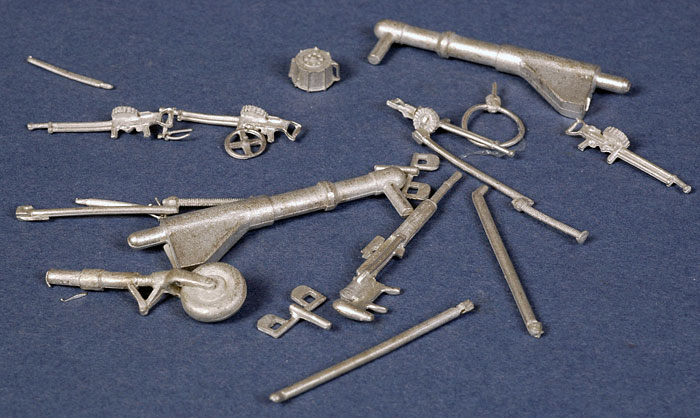
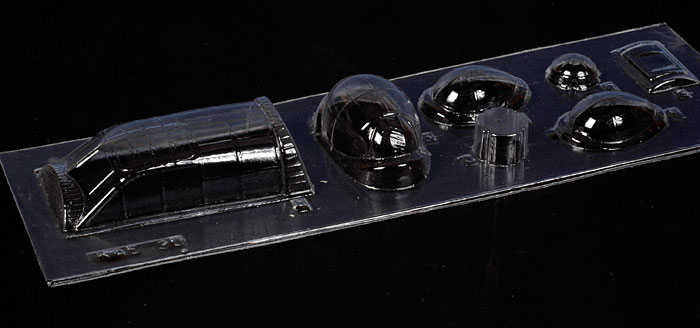
kit contains 28 vacuum formed parts in white and clear styrene, 49 cast
metal parts, and 60 cast resin parts. Markings are provided on a decal
sheet covering 3 different schemes.
Click
the thumbnails below to view larger images:
[../../../photogallery/photo00023581/real.htm]
The kit parts are typical of previous high
quality multi-media kits manufactured by Koster.
The vacuum formed parts are crisply formed with
good panel detail. The interior cockpit side walls, bulkheads and floors
are vacuum formed. At first I was skeptical as to whether the detail
would be replicated crisply enough in vac form but on closer inspection
I was pleasantly surprised, and once the metal and resin parts are added
the area will look very busy and well detailed. The only challenge that
I could foresee with the vac formed parts is the elevated platform for
the upper waist gunner position has been stretched to the limit in the
moulding process and will need to be reinforced with plastic card to add
some strength, but for most vac form builders this is barely a
challenge. Two vac formed wing spars are provided to give a firm
mounting point and sets the wing dihedral correctly.
Assembly starts with the assembly of the interior
fit out. This involves the fitting of the vac form side walls and wing
spars. The cockpit is built up with vac formed floor and rear bulkhead.
The front bulkhead which includes the instrument panel is cast crisply
in resin. To this assembly are added the resin pilots and navigators
seats. The controls are a mix of resin and metal parts.
The build up of the rear fuselage is a similar
build with a mixture of vac form, metal and resin parts. The
instructions make mention of fitting 4mm x 5mm reinforcement tabs cut
from the spare vac form plastic to the inside of the fuselage seam line
as a method to increase the strength of the join. Having built quite a
few vac form kits this is a mandatory part of construction and can avoid
a seam failure on the completed kit.
One the fuselage is full assembled I would
suggest fitting the vac form transparencies. This has two advantages,
the first is that it prevents the ingress of dust into the fuselage and
the second advantage is that it allows for easy access to blend the
transparencies to the fuselage.
Once the fuselage is completed assembly can
commence on the wings and tailplane. These are constructed from vac form
parts including the wheel well ceiling and lower engine nacelle
mounting. These can be then attached to the fuselage. The two vertical
fins and rudders are cast in resin and attach cleanly into slots cut in
the horizontal tailplane.
The engines are beautifully and crisply cast in resin with separate push
rods cast in metal to be fitted to each cylinder. Once the engines are
built they are installed into the vac forme nacelle cowls. The cast
resin exhaust stubs are the final part of this assembly.
The undercarriage is crisply cast in metal with
resin wheels and undercarriage doors. These parts locate into mounting
holes drilled into the wheel well ceiling. The propeller is constructed
from a resin hub with individual resin blades. Once assembled a resin
spinner is installed before fitting the assembly to the engine.
Full length resin flaps are provided along with
seven resin hinges and two balance horns. These should attach easily to
the underside of the wing surface. The torpedo is made from two vac
formed halves with the fins and propellers being constructed from
plastic card using the templates provided on the instruction sheet.
Colour schemes are for three aircraft in light
grey undersides with dark green and dark brown upper surfaces. The
decals are crisply printed with good colour saturation and thin carrier
film.

The instructions are easy to follow, while the
colour schemes are presented in colour but give no details as to unit
markings where the aircraft operated or the period of operation. These
details are nice to have and make researching the particular aircraft a
bit easier.
Overall this looks to be a beautiful kit and will
sit very nicely beside my Tamiya Betty and Dinah when complete.
Recommended for modellers of above average skill and experience.
Thanks to Koster Aero Enterprises for the sample
Review Text Copyright © 2007 by Mick Evans
Page Created 02 October, 2007
Last updated 24 December, 2007
Back to HyperScale Main Page
Back to Reviews Page
|
 Home
| What's New |
Features |
Gallery |
Reviews |
Reference |
Forum |
Home
| What's New |
Features |
Gallery |
Reviews |
Reference |
Forum |