|
Monogram's 1/48 scale
Consolidated B-24D Liberator
by James Matthews
|
Consolidated B-24D Liberator |

HyperScale is proudly supported by Squadron.com
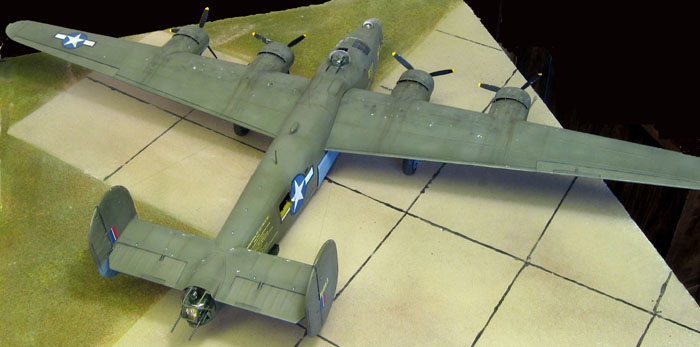
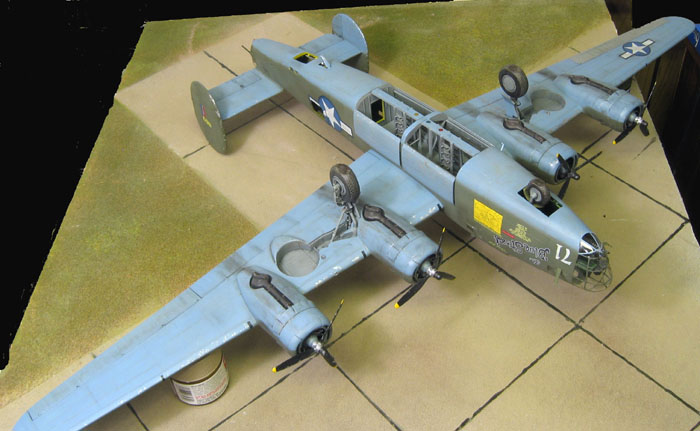
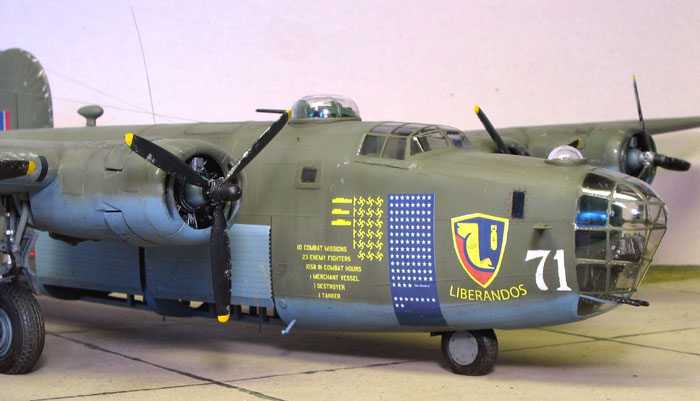
Here is my 1/48th Scale Revell-Monogram B-24D built as the The Blue Streak.
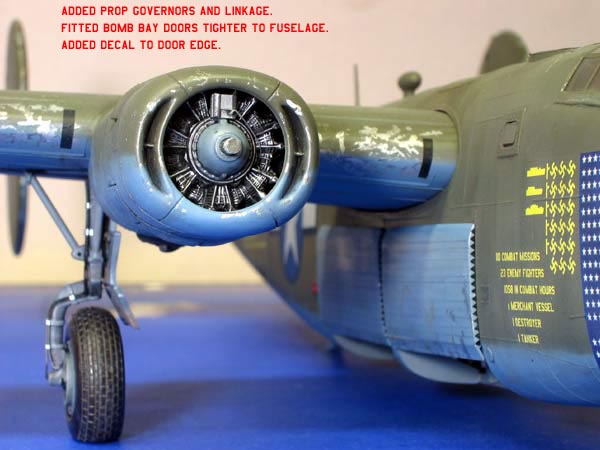
The Blue Streak was originally named Florine Jo Jo, SN# 411163. She was a member of the HALPRO group that eventually became the 376th Bomb Group. I believe the aircraft was a veteran of the first high level Ploesti mission in 1942. It was not part of the 1943 low level raid. The Blue Streak went on to survive 110 missions with the 376th bomb group and was sent home for a war bond tour. This must have been quite a feat considering most missions were flown from primitive airfields in the desert. She survived 19 months of battle overseas, and 1,058 combat hours. Her scoreboard reads one destroyer, one merchant vessel, one tanker, and 23 enemy aircraft destroyed. She dropped 297 tons of bombs, and never lost a man. The ship required 19 engines, two new wings, one new rudder, and many aluminum patches during her career. As a youngster the Blue Streak captured my imagination.
I remember seeing the colorful old 72nd Revell kit on my uncle’s shelf, and taking it down for a few unauthorized missions over Ploesti. Needless to say it contributed to my love for modeling today. So go easy on those young flyers.
The Kit
The Revell/Monogram kit is the only game in town for a 1/48th Liberator. The kit has mostly pros and a few cons to deal with.
The biggest problems are the transparencies. The turrets have seams through them and the cockpit glass ends up looking a bit shallow. The clear parts can be improved with vacuform sets from Squadron and Bill Koster.
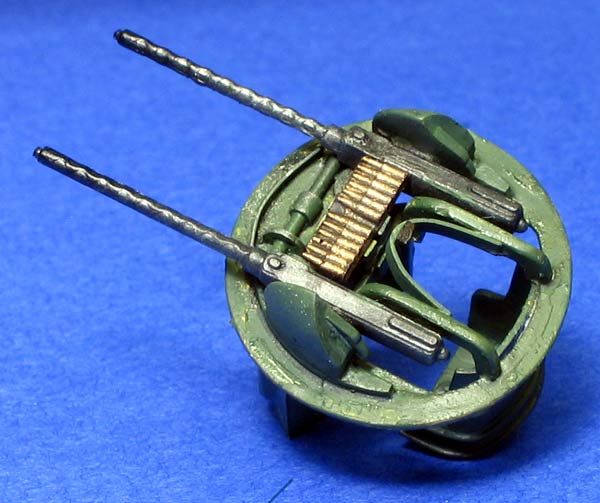
Some argue that the vertical stabilizers tilt back more than the 2.5 degrees on the real aircraft. The open bomb bay doors also need attention. The kit is based on the earlier B-24J release and has some inaccurate features for early Liberators. D model Liberators did not have the left aileron trim tab or the fuel vents on the top of the wings. Also the rudder trim tabs were shorter on the D at 2’10 and 5/8 inches. I did not correct these tabs. The rear turret is an A6B model and should be an A6A with offset guns and no breech covers. The bomb sight mount location is not correct if installed per the kit instructions. The kit has raised panel lines.
Depicting an early B-24D requires a few modifications. I also wanted to add additional detail. The left cheek window was filled in. The original Halpro aircraft carried two fixed 50 caliber guns mounted in the lower nose that could be fired by the pilot. The unused cheek guns were used for the fixed mount. The pitot tubes were moved from the high to the early mid mounted position. The paddle blade props were modified to the early narrow type.
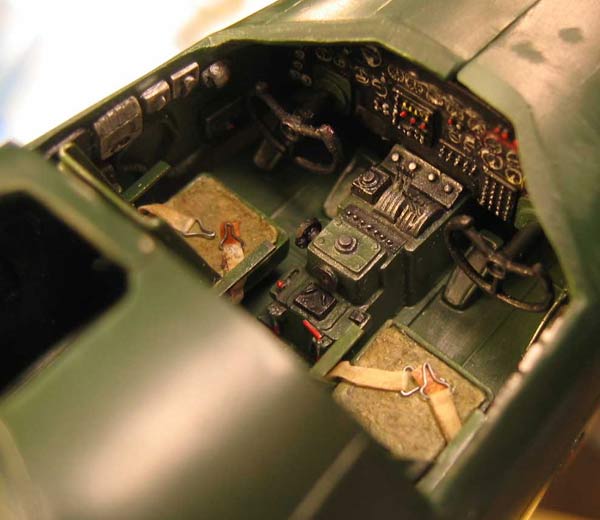
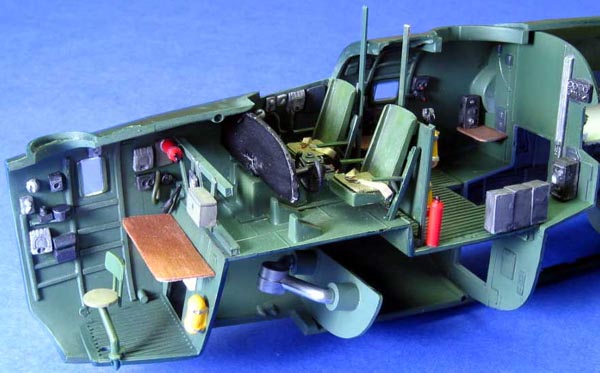
I started construction with the fuselage. First up I removed the raised area around the cockpit in preparation for the vac canopy. The dark dull green interior areas were painted Polly Scale medium green with the remainder painted in neutral gray, and zinc chromate. In hindsight, it may have been more common for the tail section to have aluminum skin with longerons and stringers primed in yellow chromate. Next various details were added from scratch. I tend to use stuff that’s cheap and readily available, sprue, styrene, aluminum, and wire. Many of the interior parts I used have been scratch built, molded and cast in resin from a previous B-24 project. The cockpit, greenhouse nose, and waist area are very visible. I also chose to open the top inward opening hatch. Adding detail in these areas was worthwhile.
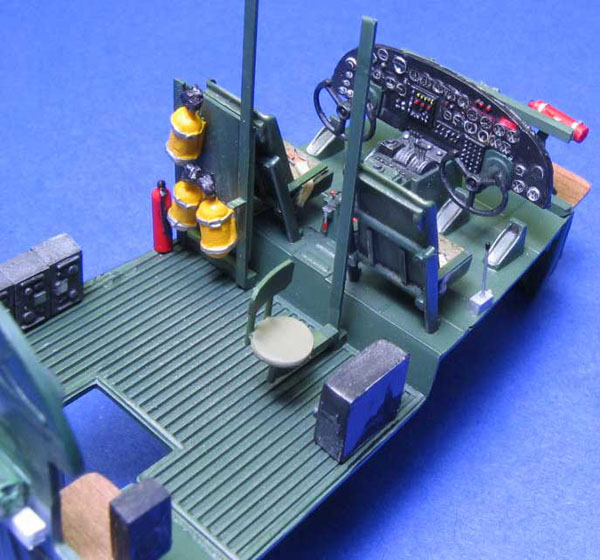
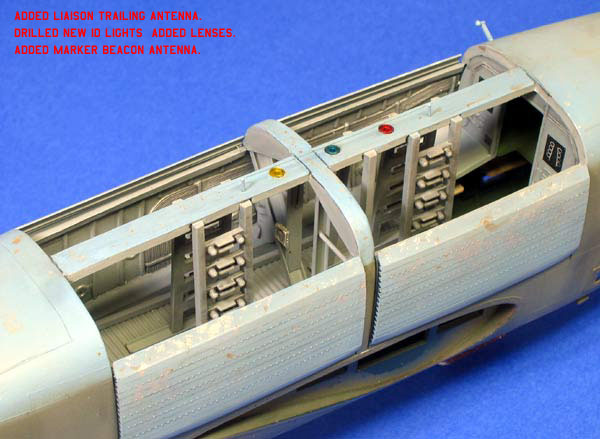
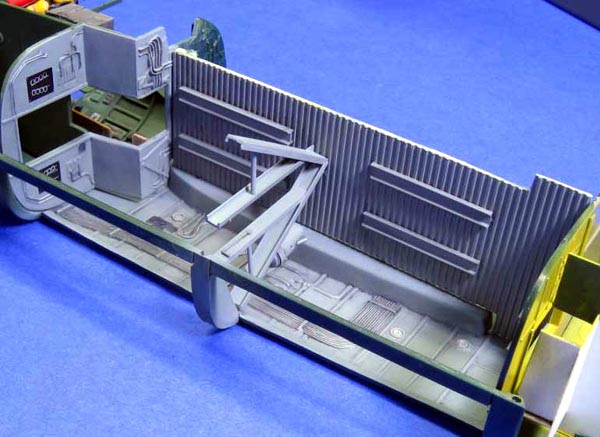
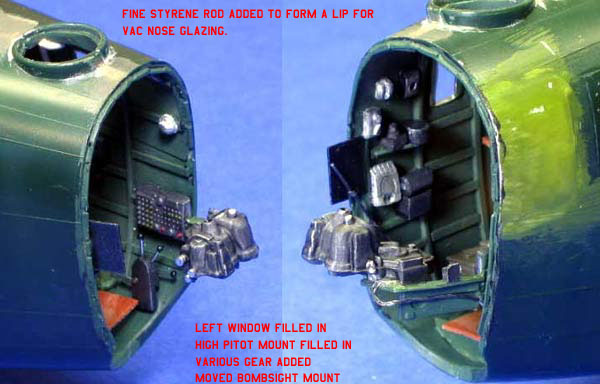
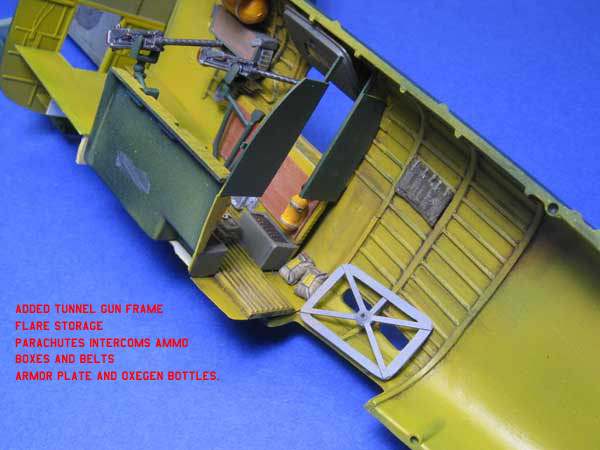
Stringers and bulkheads were added to the nose area using styrene strip. Various intercom gear, oxygen bottles, hoses, regulators, ammo boxes, and radios were added throughout. I chose to add a ceiling to the bomb bay along with the center I beam structure. The ceiling was simplified a bit from the real thing to ease construction.
Armor plate, floor structure and a tunnel gun mount were added in the waist area. I reinforced the nose gear bulkhead with sprue and closed the fuselage.
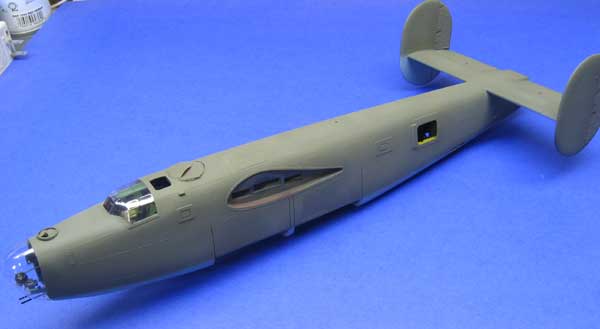
The ball turret insert did not fit well, requiring a course file and filler. I chose to place a crate under the tail skid instead of adding weight to the nose. Next up were the vac canopy parts. I find that adding a ledge made of fine styrene rod around the nose opening helps to align the parts. The dual 50’s were mounted in the nose and new holes drilled through the glazing. A rib support was added to move the bomb sight to the correct position. The vac canopies were then attached with 5 minute epoxy and masked off. Next up I attached the rudders to the stabilizer and attached the assembly to the fuselage. I used a spreader bar and a shim to fill a small gap. The joint was then reinforced with sprue.
Next up were the wings. The rear of the engine nacelles were hollowed out, and the closed cowl flaps removed using a Dremel tool. Sheet plastic and rough details were added to the nacelle to prevent see through. The cowl flap master was made with aluminum and cast in resin. The passing light in the leading edge was made using a shaped and polished clear sprue. The wing halves were then glued together. The nacelles sides do not fit well and require filler. Care is needed to fit and align the cowling fronts. I had to remove the alignment tabs and sand both mating surfaces to get a good fit. The left aileron was filled in and ribbing detail was restored with stretched sprue and putty. The wings were then sprayed rattle can silver as an undercoat for paint chipping.
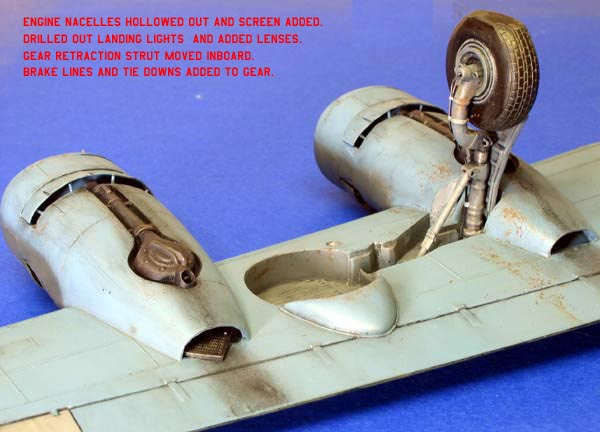
I improved the landing lights, friend or foe lights on the belly, passing light in left wing, and a bomb release light under the rear turret. Lenses were punched from clear sheet and glued in place with future tinted with food coloring. The landing gear was cleaned up and detailed with wire, and foil tape. The True Details wheels were used minus some of the flat tire bulge. The bomb bay door edges were thinned, and a 1/8” strip of styrene added on the bottom edge. This gives more of a curve to the door. I applied decals to the door edge to simulate the corrugated ends. The ribs on the back of the doors were sanded down. This allows the doors to fit tightly to the fuselage.
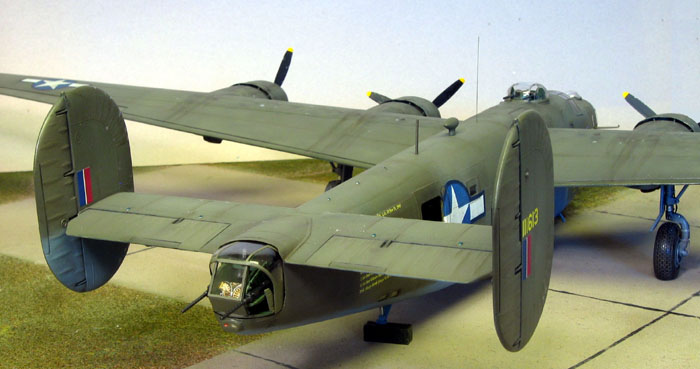
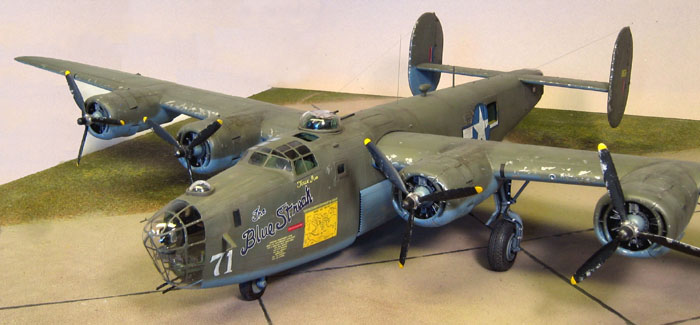
 The Blue Streak was most likely painted in OD 41 with light blue undersides. Pictures show the ship to be heavily weathered at the time of the bond tour markings. I drew up the markings in Adobe Illustrator and sent them to Joe at Fireball Models where they were printed. The Blue Streak was most likely painted in OD 41 with light blue undersides. Pictures show the ship to be heavily weathered at the time of the bond tour markings. I drew up the markings in Adobe Illustrator and sent them to Joe at Fireball Models where they were printed.
New pictures came to light after I had finished the build. They show an additional legend under the horizontal stabilizer, and black and white stripes on the lower rudders. I may add these markings later.
Blends of Model Master Olive Drab ANA613 with a touch of RAF Dark Green and Azure Blue mixed with Neutral Gray were used.
For weathering I used black and brown pastels and washes on the wing areas. Future was then applied with a brush in preparation for the decals.
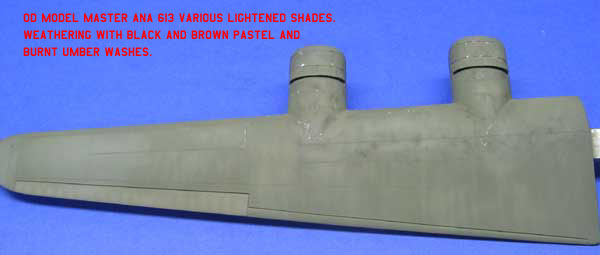
The decals were applied and a wash of burnt umber was applied along panel lines.
Areas along the leading edge of the wings and cowlings were chipped using my fingernail or toothpicks. A silver pencil was also used. The bomb bay doors were chipped using silver paint and a sponge. Once the finish was dry another coat of flat acryl was applied. A very thin mix of black brown was then sprayed over the decals to tone them down. A heavier mix of black brown was gradually built up to simulate exhaust staining.
Finally the turrets were set in place, and the pitot tubes and antennas were attached. The wings have a tight fit to the fuselage, and can be removed for easier storage.
All photos were taken with a Canon Powershot A80.
Projects of this size can be exhausting, but also very rewarding to finish. Kits of this size usually languish in the stash.
The big Monogram kits look great out of the box and are a great value. They are also nice for sharpening your modeling skills to bring them up to today’s standards. Next time reach for that visible B-17 instead of that mustang, and enjoy the ride.
My thanks go out to the HyperScale community for inspiration, motivation, techniques, and information. Thanks Brett for a great resource.
References
- The B24 Liberator- Alan Blue
- B24 Liberator Detail & Scale Vol 64
- Log of The Liberator
- s- Steve Birdsall
- B24bestweb.com
- Don Fenton
- Karl Hauffe
Model and
Text and Images Copyright © 2008 by James Matthews AKA- a20havoc
Page Created 27 March, 2008
Last Updated
28 March, 2008
Back to HyperScale
Main Page |
 Home
| What's New |
Features |
Gallery |
Reviews |
Reference |
Forum |
Search
Home
| What's New |
Features |
Gallery |
Reviews |
Reference |
Forum |
Search