|
Monogram's 1/72 scale
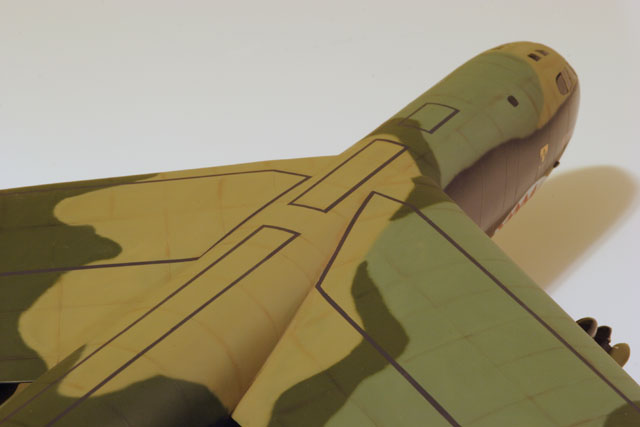
B-52D Stratofortress
by
Ken Lilly

|
Boeing B-52D Stratofortress |

HyperScale is proudly supported by Squadron.com
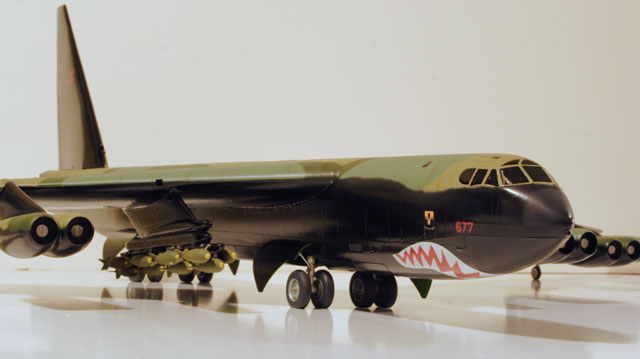
Almost as iconic as the B-52 itself, the Monogram kit is one of the classic plastic kits of all time. First introduced in 1968, the kit has been reissued over the years in several different boxings and markings options, one of the more interesting (and collectible) reissues being the ‘Young Astronauts’ boxing from the late 80’s, this version included and parts needed to model the B-52 NASA used as a carrier aircraft for the X-15 program.
When the HyperScale group build idea was first proposed, I was going to pass since WWII is not my area of interest but the powers that be added some additional kits to the list of “classic” Monogram kits that were eligible for the group build: B-36, B-58 and B-52.
I had all three kits in the ever-growing stash so acquisition wasn’t a problem, but now I had a choice to make, which one to build? The B-36 and B-58 were interesting modeling choices, but both were finished in natural metal and I didn’t look forward to doing all the prep work necessary for a natural metal finish, especially on such a large model. On the other hand, the B-52 kit I had was one of the boxings with decals for the camouflage scheme, making my work a little easier.
Before I started gluing the parts together I had a few choices to make:
-
Did I want the bomb bay closed or open?
-
Flaps up or down?
-
Outboard engine cowling open or closed? (more on this later)
One thing I decided to do before construction was to replace the molded in air intakes on the leading edge of the vertical tail and wings with square brass tubing, the openings as molded were oddly shaped, using tubing would ensure square corners and a more consistent look.
Assembly of the wings and tails was relatively easy, the fit of the parts was largely good with only minor warpage on a couple of corners, not too bad considering the molds are nearly 40 years old. The only problem I ran into is due to the size of the parts, the sheer length of the seams on the wings meant I used nearly all my clamps on one wing and had to resort to masking tape and clothespins on the other wing. After the glue had dried thoroughly I was on to the next step, gluing in the flaps.
As molded in the kit, the flaps are designed to be moved to either the up or down position; I didn’t want moving parts on the model so I decided to glue them up. Fit was below average, the trailing edge of the flaps is noticeably thicker than the trailing edge of the wing and it was obvious that the flaps were not designed to be shown in the up position, so multiple applications of epoxy putty were used to fill the worst gaps, any remaining gaps were filled with 3M Acryl Blue.
The wings were left off until after painting, due to the size of the model it was easier to paint the wings separate from the fuselage and then glue them on later and touch up the seams.
With the wings and tails assembled and the putty drying, I started on the main fuselage. Since I decided early on to have the bomb bay closed, I glued the doors into their respective halves of the fuselage and reinforced the seams from the inside with epoxy.
I also painted the cockpit and pilot and co-pilot figures and installed them in one fuselage half. I also painted the rear gunner and stuck his peg into the fuselage. I didn’t spend too much time painting any fine details in these areas, not much will be seen when finished and in the end nothing was seen since I painted the windows black later on due to dust contamination.
The gear bays were painted Interior Green and the landing gear struts silver, the main gear struts have rather substantial mounting points to the fuselage which is a good thing, the problem is that the struts have to be installed before closing up the fuselage, something I’ve never liked due to the potential for breakage, but there’s no easy way around the problem since part of the strut holds up the roof to the gear bays.
With the fuselage halves glued together and the glue thoroughly dry, it was time to turn my attention to the seams. The fuselage fit was average; the seams have a ‘flared’ effect to them, probably due to wear on the molds, so there’s a prominent ridge when the parts are joined. The major fit problem was at the bomb bay, this was another part that I think wasn’t designed to be shown in the closed position, and so multiple applications of putty and primer were required for an acceptably smooth area.
The fuselage and wings and tails were now complete, all the seams were smoothed, lost detail rescribed and a primer coat had been applied to each, with all of these parts out of the way, the only major parts left to build were the engines. The fit of these parts was worse than the bomb bay, if you’ve built the engines from an AMT B-52 then you’ll know what to expect, the fit problems are similar.
The top and bottom of the pods didn’t fit well and the front section with the engine faces was slightly larger on all sides when compared to the pod, I thought that the fronts might be unique to each pod, they weren’t, all of the fronts were larger than the pods. Multiple applications of putty, primer and sanding were required for a smooth surface, I ended up sanding off most of the panel lines in the process and once the pylons were added I removed what few panel lines were left, I decided not to rescribe any lost panel lines, I ‘drew’ them on with pastels when I weathered the model.
One interesting diversion I had was with the left (port) outboard engine, the kit includes a pod with an open cowling to show off an engine underneath, I decided to show this closed and after a bit of filing, grinding and bending I managed to get the cowling closed. It was at this point that I noticed the extra upper pod half on the sprue. Sigh.
The fit of the pylons to the pods was very poor, I ended up matching the pylon with the best fit to each pod, shims were required to widen the pylons to fit the pods, even with all this work, several rounds of filling, sanding and priming was required to get everything smooth. Like the wings I painted the engines separate from the rest of the model and attached them during the final assembly.
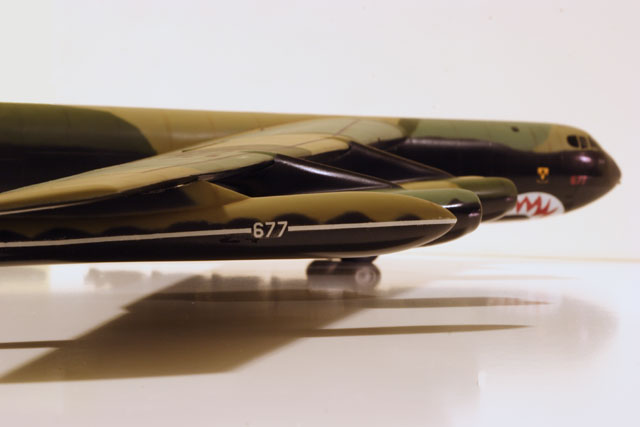
The external bomb racks and wingtip tanks were assembled and the seams cleaned up, fit was good except for the raised seam problem as seen on the fuselage.
One of the last steps in the construction process was to install the clear parts at the cockpit and rear gunner’s station, the fit of both parts was poor, I had to shim the gunner’s canopy and fair both in using the putty and nail polish remover technique.
 All of the parts were primed in automotive lacquer primer and checked for any imperfections, any that were found were corrected and the primer re-sprayed before the color coats were applied. All of the parts were primed in automotive lacquer primer and checked for any imperfections, any that were found were corrected and the primer re-sprayed before the color coats were applied.
I decided that it would be easier to spray the gloss black first, then spray the camouflage colors over it rather than spray the camouflage first then spray all that gloss black.
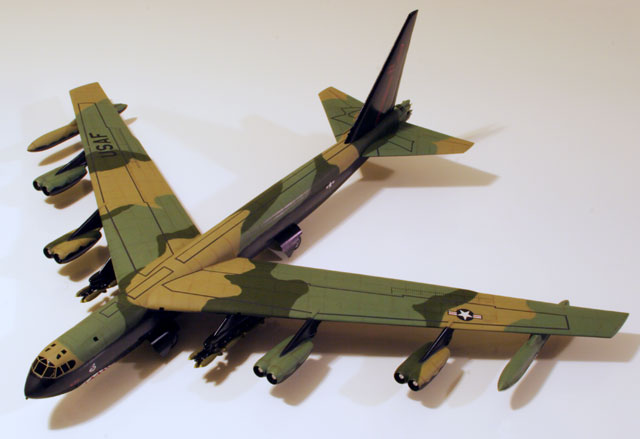
The gloss black is a combination of Tamiya ‘TS’ gloss black that was leftover from another project and Krylon gloss black. The camouflage colors are all Testors Model Master brand paints; SAC Bomber Tan, SAC Bomber Green and Dark Green, I applied all of them using my trusty Paasche H airbrush with a #1 tip.
The camo pattern was lightly drawn on the model with pencil and the spraying commenced with the light green, then the tan, and finally the dark green. Doing a simple scheme on a large model might seem to be a easy diversion from painting smaller models, but the sheer area that has to be covered is overwhelming at times. I spent about 2-3 hours painting the wings, the fuselage took about the same amount of time. While smaller in area than the wings the contours of the fuselage and the need to have a consistent demarcation line made airbrushing the fuselage difficult. The easiest parts to paint were the horizontal tails due to their relatively small size. I ended up using over half a bottle each of SAC Bomber Tan and Green on this model, and nearly a ¼ of a bottle of the Dark Green. Any overspray on the gloss black was “erased” with Tamiya semi-gloss black acrylic; it was the best match for the “sheen” of the spraycan paints. As with most freehand airbrushed paint jobs, a degree of back and forth touchup was required to get a consistent demarcation line between the colors.
At this point the wings were glued onto the fuselage. To ensure the wings were at the correct attitude I stuck the wheels onto the main landing gear and the outrigger gear into their respective bays and placed the whole thing on a large flat surface. I had to shim/prop up the wingtips so the gaps at the wing roots were acceptable, once I had everything set up how I wanted it I used more epoxy to glue the wings on. I wiped off the excess epoxy and let it set for 24 hours to ensure a strong bond, once fully cured I sanded off the excess epoxy and rescribed any lost panel lines and touched up the paint.
The next painting step was to mask off all the walkways. This took a couple of evenings to do, the walkways are represented by raised lines on the kit so while it’s a matter of simply following the lines, there’s a lot of area to cover and ensuring straight lines is a must. The horizontal tails took a long time to mask off properly due to the complicated pattern, but only 5 minutes to spray. All of the walkways were then airbrushed Floquil ‘Weathered Black’ for a proper scale look.
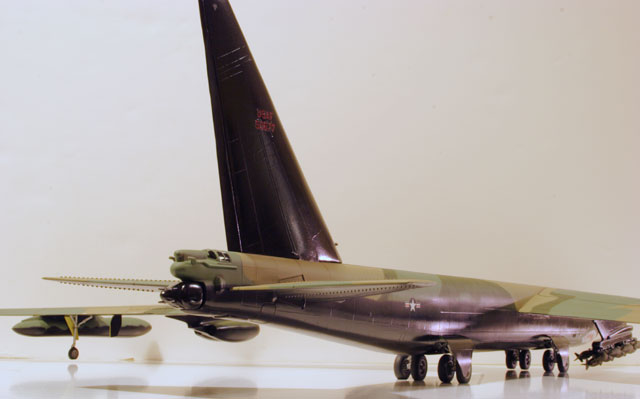
The red walkway on the port side of the vertical tail was masked off and several light coats of flat red were sprayed over the black, I didn’t want a pure red color, but more of a muted red to match what the tail serial number decal would look like once applied over the black.
Decals
The gloss coat was several airbrushed coats of Future floor polish, I shot this over all the camouflage paint to keep the colors consistent. The kit decals were used, quality was average for older Monogram decals, the white sharkmouth did not want to conform to the curves under the nose, multiple applications of Solvaset were needed to get it to conform and smooth the wrinkles out. The rest of the decals except the wing tank stripes went on without problems, the wing tank stripes were cracked on the backing sheet and even though I overcoated them with MicroScale Liquid Decal film, they still cracked when applied and I had to do touchups in several places.
Once dry the any excess adhesive was cleaned off and a coat of Future was airbrushed to seal the decals in. Testors Dullcote was airbrushed for the final flat coat.
Weathering
I decided to go easy on the weathering, so I simply used some gray and earthtone pastels to weather along the panel lines. I apply the pastels with a “stubby” paintbrush, the trick is not to apply the same amount weathering to every single panel line, the end result would be a ‘graph paper’ type look. I call my way ‘even unevenness,’ you want some variation in the weathering on one part of the airplane (i.e. a wing), but try to keep the amount of weathering relatively consistent between the different parts since the entire airplane would have been exposed at the same time to the same conditions that caused the weathering.
Once the weathering was done to my satisfaction, I sealed the pastels in with a final coat of Dullcote.
Final Assembly
The engine pods were glued on with more epoxy, once it had had set I sanded and puttied the seams at the joint between the pylon upper wing and touched up the paint and walkway markings.
When I removed the masking from the windows on the cockpit and gunners positions I was in for a surprise, whatever dust was in the fuselage had managed to migrate to the inside of the canopies, with everything puttied and painted I couldn’t pull the parts off, so I decided to fill in the windows with Tamiya gloss black acrylic.
The bombs took longer to finish than I expected they would, mostly due to the number of bombs, 24. Fit was average, I needed to putty the seams at the tailfins, plus the tailfin insert had 2 prominent ejector pin marks on every one, so that meant I had to fill 48 pin marks.
In order to do the yellow nose on the bombs, I tried masking them off, but the diameter of the bomb at the nose is so small that masking tape can’t conform to the curve, even when cut into very thin strips. I ended up scribing a line around the circumference of the bomb with a hobby knife and using white glue to mask the yellow bands. Once the olive drab was dry, I used the knife blade to pick off the white glue.
The antisway braces are molded into the bombs, I bit the bullet and hand painted the braces on each bomb, and did the same for the hardware on the bomb racks. The attachment tabs on the bombs were painted to give the illusion of 2 sets of antisway braces.
Once the paint was dry, I glued the racks onto the plane with epoxy and once the epoxy had set I glued the bombs on with CA glue. I took me most of an evening to glue the bombs on, I would glue 4 or 5 bombs on and would have to wait for the glue to set so I add more without risking knocking off the ones already on the rack. For a finishing touch I airbrushed some Dullcote on the bombs to hide any shiny spots from the glue.
The main gear wheels were attached with epoxy, I wanted something strong with a slow set time so I could get all the wheels square and aligned properly at the same time. Once the glue had set on the main wheels I added the gear doors and retraction hardware, and glued on the outrigger gear and related hardware. Once the outriggers were on I glued on both wing tanks and touched up the seams where the tank pylon met the wing.
Final step was to touchup any weathering where I’d repainted plus a final touchup with the flat coat to hide any shiny spots caused by the glue.
The model was a definite challenge at times, I thought more than once that I wouldn’t be finished with the model on time due to the fit issues in places, but I’m glad I stuck with it and finished it.
It’s done! Plus I have more free space in the ever-growing stash to fill up with new kits.
Photography
All of the model pictures were taken with a Canon EOS20D Digital Camera with a 28-105mm lens. RAW file size was chosen for maximum detail and all the pictures were processed using Adobe Photoshop Elements 2.0. Photographing a model this large is a challenge, none of the normal backdrops I had on hand would work since the finished model was so large, and I ended up having to use a 4’x 4’ sheet of white Masonite wallboard left over from a home-improvement project as the backdrop. Even as large as the sheet was, I still had problems with the background in some images, so I functioned as my own assistant, setting the camera on timer mode and running over to hold up a sheet of white foamcore board behind the model so I would have a white background.
Model and
Text and Images Copyright © 2008 by Ken Lilly
Page Created 25 March, 2008
Last Updated
25 March, 2008
Back to HyperScale
Main Page |
 Home
| What's New |
Features |
Gallery |
Reviews |
Reference |
Forum |
Search
Home
| What's New |
Features |
Gallery |
Reviews |
Reference |
Forum |
Search