|
Special Hobby's 1/32
X-15A-2
White Lightnin'
by
"Bondo" Phil Brandt
|

|
|
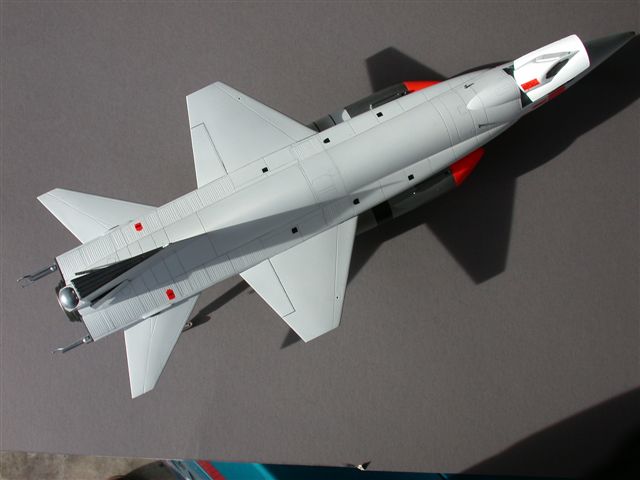
X-15A-2 |

Special
Hobby's 1/32 scale X-15A-2 is available online from
Squadron.com
Background
The X-15 is unarguably the most successful high speed aircraft
research program ever conducted in the U.S. These rocket-powered designs
by North American Aircraft Corporation flew an aggregate 199 sorties
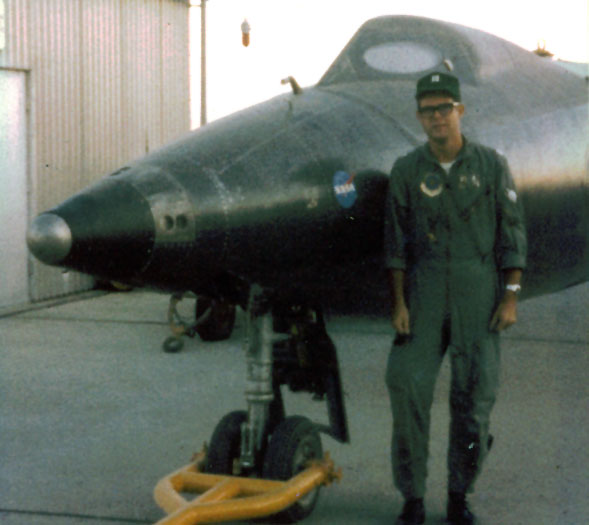
between 1959 and 1968. Of the three X-15s built, the definitive X-15A-2
version (tail number 66671) in 1967 set an unofficial world speed record
of Mach 6.70, a record that still stands today. Piloted by Pete Knight,
the white ablative-coated airframe sustained burn-through heat damage to
the ventral fin and dummy scramjet. 66671 never flew again, but is on
display in its original black Inconel finish at the USAF Museum in
Dayton, Ohio.
Bondo Industries always favors the definitive version of any airplane
and has already completed both black and white schemes on resin1/48
Collect-Aire X-15A-2 kits. Special Hobby’s release of a big X-15 offered
the opportunity to do even more detailing.
The Kit
At the Anaheim Nationals this past summer the Acquisitions Department
of Bondo Industries was most fortunate to score the first two 1/32
Special Hobby X-15 kits sold in the U.S.A. That said, this curmudgeon
was more than a little disappointed to discover that the kit, although
meant to represent the elongated X-15A-2, didn’t include the distinctive
external tanks used only on this version, or the dummy scramjet mounted
on the ventral fin. Further, no decals for the white ablative-coated
airframe were included (although said extra decals were in the 1/48
release.)
When I queried George, the genial Czech MPM honcho, as to whether a
follow-on version was in the works, he just smiled enigmatically. I’m
guessing that Special Hobby will do a 1/32 follow-on with added detail,
just as they did with the1/48 kit. Not wanting to wait that long, I took
the bus to Scratchbuild City, determined to do an accurate portrayal of
the white record setter.
Because I am sure a “tanked” version will be released after the first
run is sold out, and assuming most of our HS brethren would prefer to
skip the practice-bleeding scratchbuild drill and wait for said
follow-on kit, I’m going to skip construction pix.
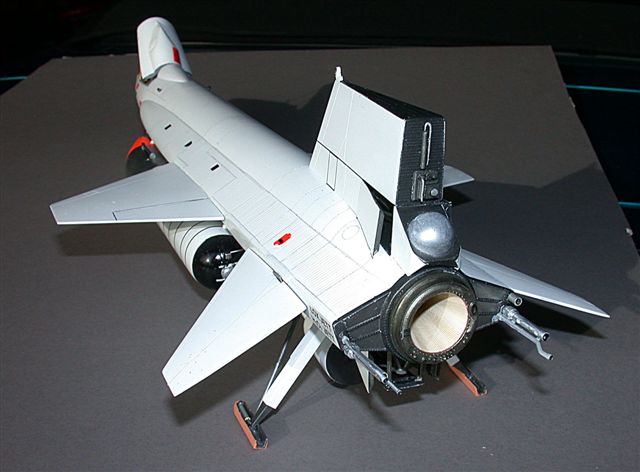
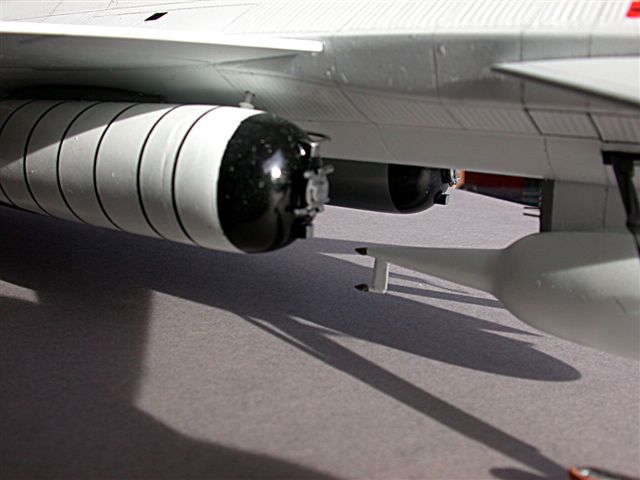
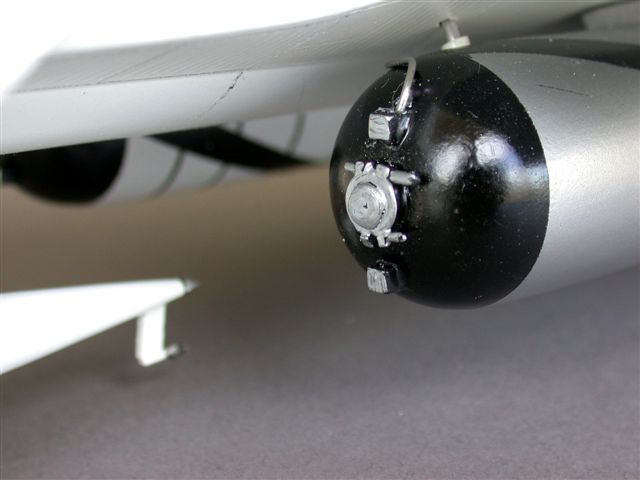
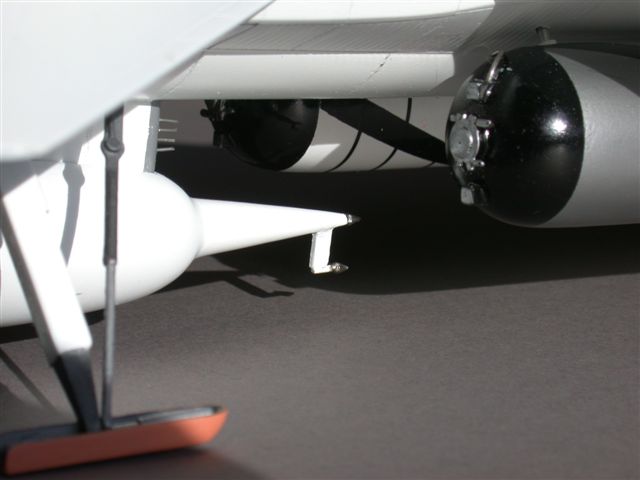
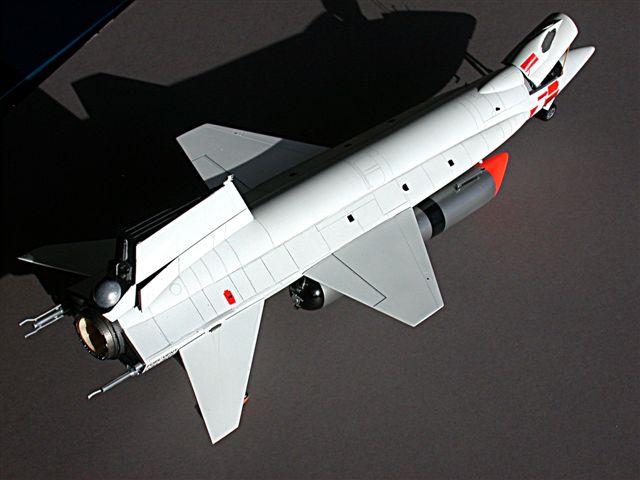
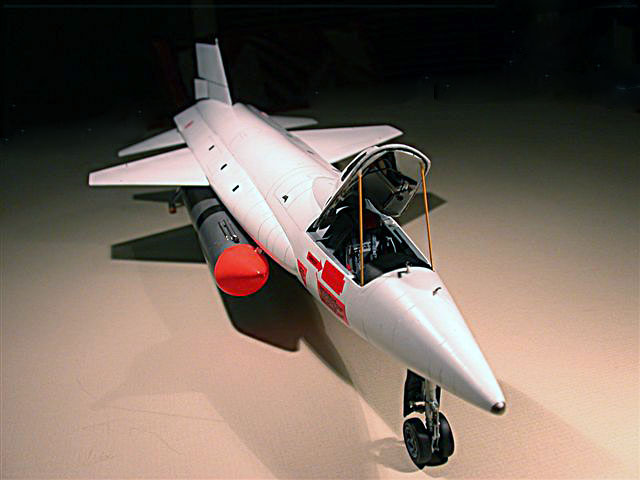
Tanks
The big externals are the most distinctive feature of the longer
fuselage bird, the lengthening of which coincided with a factory rebuild
following serious structural failure–the spine broke--during a
heavyweight emergency landing by famed test pilot Scott Crossfield in
1959.
The basis for the scratchbuilt tanks was 3/4" I.D. PVC pipe from Home
Depot. The outside diameter fell somewhat short of what was deemed
accurate, so multiple layers of plastic sheet were laminated around the
pipe. While this procedure worked, it required many iterations of Blue
Acryl, wet sanding and lacquer priming.
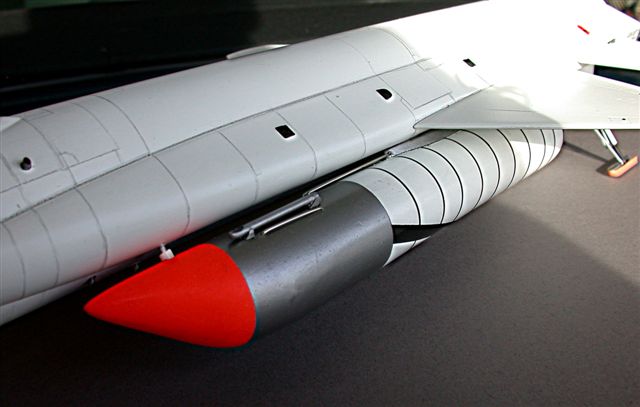
The hemispherical aft end caps were fashioned from PVC pipe caps.
Asymmetrical tank front sections–they contain recovery parachutes in the
real deal--were cast in resin from a carved basswood master. I have
taken many closeup pix of the restored-to-black X-15A-2 at Dayton, and
they’ve been invaluable for detailing the tanks, especially the
lengthwise tubing and other plumbing apparatus. Very thin stainless
tubing (from Kalmbach, the model R.R. folks) was bent and CA’ed to the
tanks after painting.
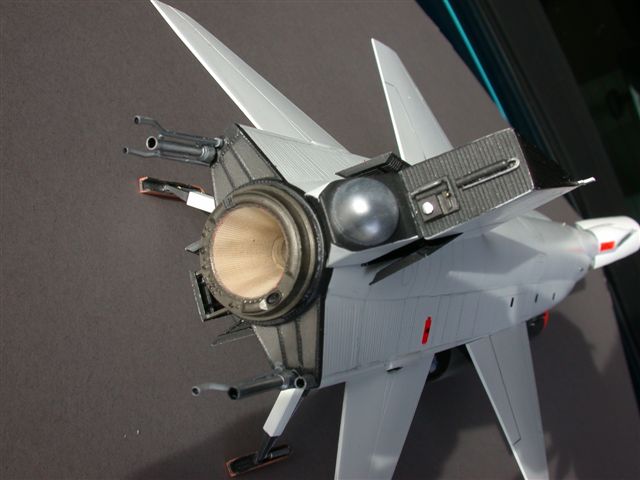
Scramjet
The last flights of the A-2 bird carried dummy scramjet shapes,
mounted to a modified ventral fin, to investigate airflow and heating
characteristics that would be encountered if and when envisioned
scramjet-powered X-15s became a reality. Various components from the
Bondo Industries Reclamation Archives were kitbashed to achieve the
requisite shapes. The Special Hobby ventral fin was shortened in length
and multiple sensor tubes added per pix.
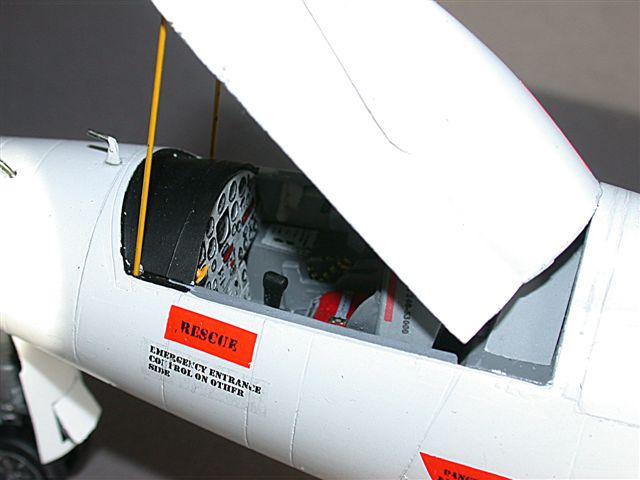
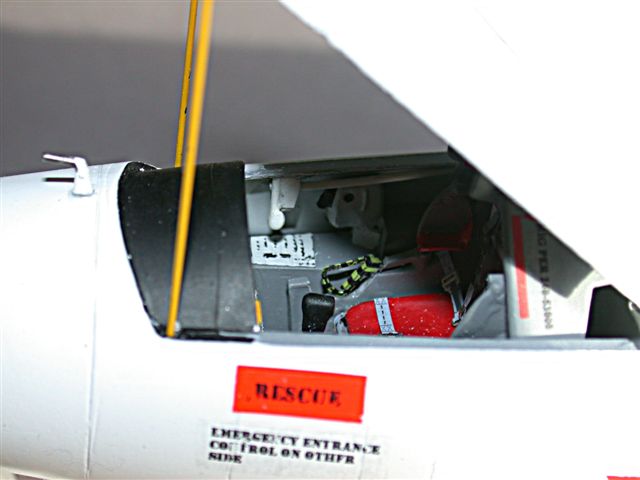
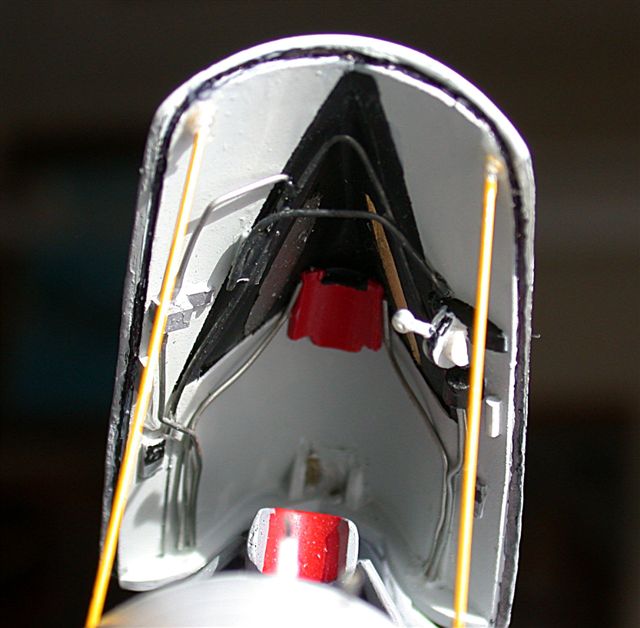
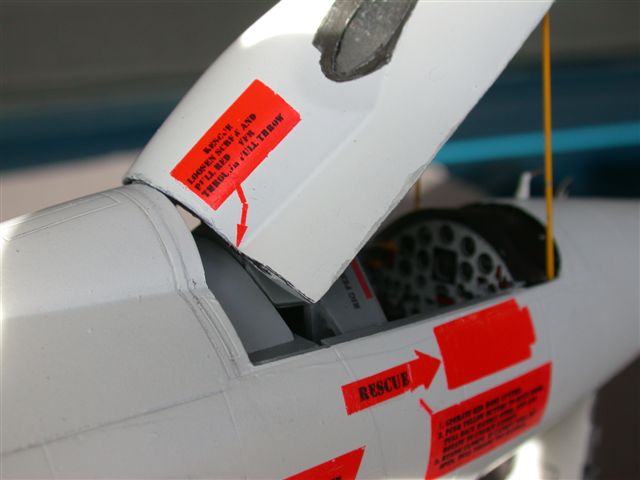
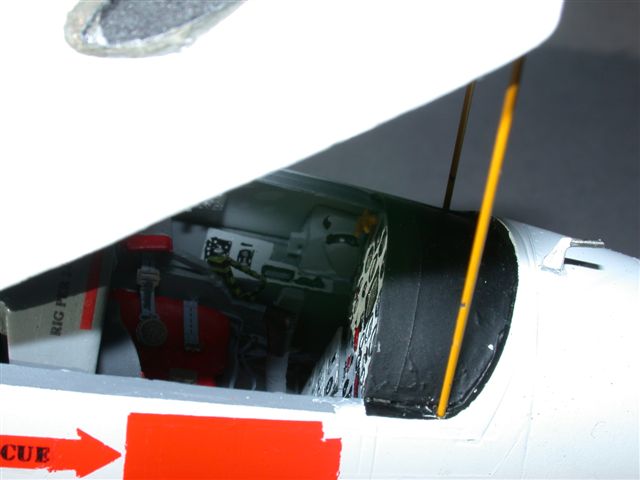
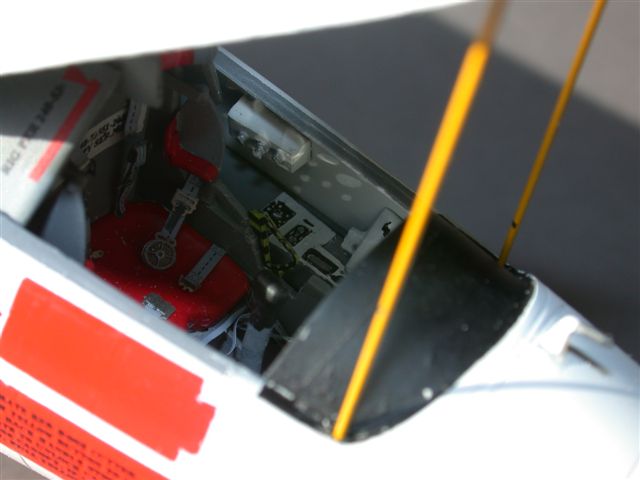
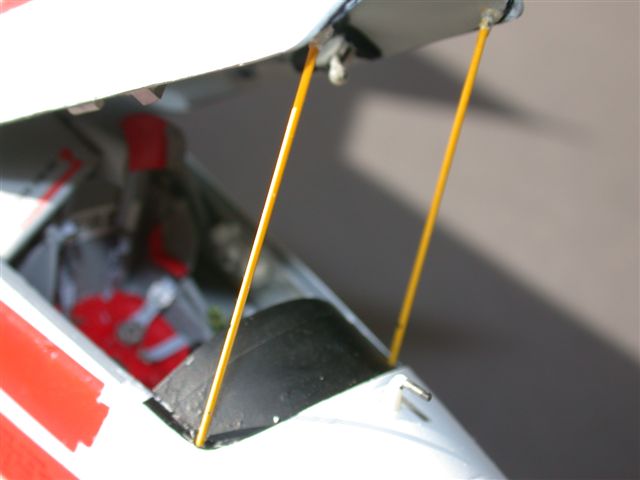
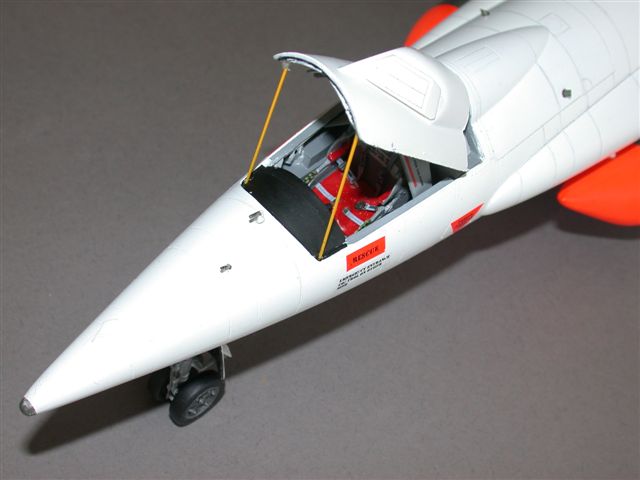
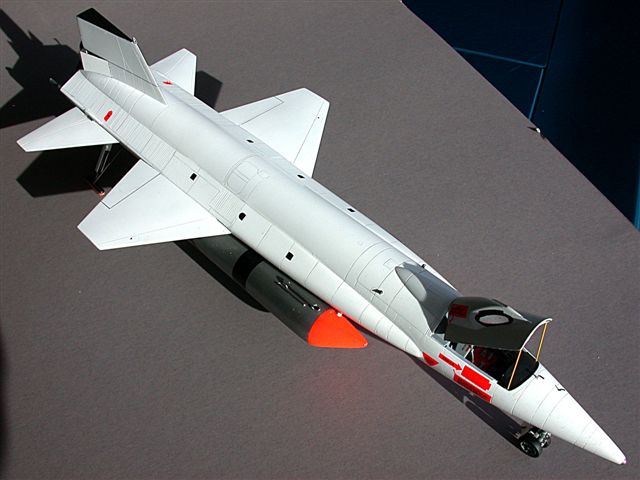
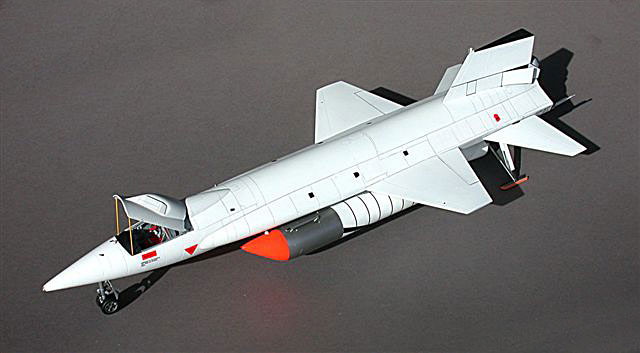
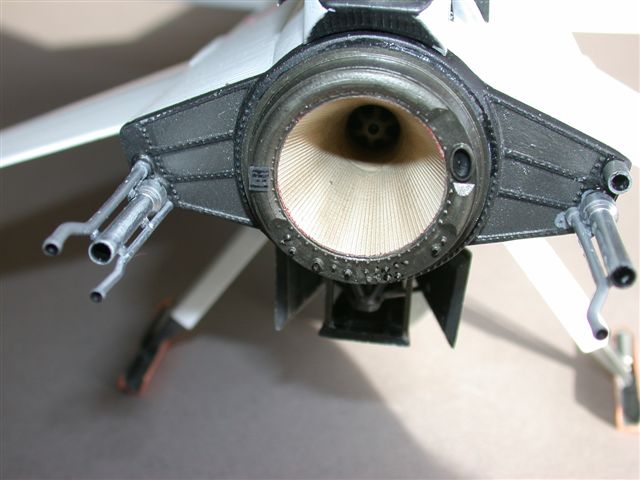
Cockpit
Although Special Hobby provides nice instrument panel representation
through PE and film backing, the rest of the cockpit is too plain if the
canopy is displayed in open configuration. Two types of canopy are
included, one of clear cast resin and a vacuformed one. An apologetic
note accompanied the kit, saying that in the future an injected clear
canopy would be furnished. Even though the windows of the resin version
are cloudy, I chose it because it’s more substantial (read thicker) and
therefore could better withstand the many modifications that would soon
occur.
Pix of the 1:1 bird’s opened canopy reveal that it’s a fairly thick
assembly, so I laminated an extra layer of plastic sheet to the inside.
This inside layer also provides a proper base to which I added
scratchbuilt details and piping. Because of the cloudy resin windows, I
kept the “eyelids” on the left side window closed, as provided in the
kit’s resin components; that cut the cloudy problem by 50%!
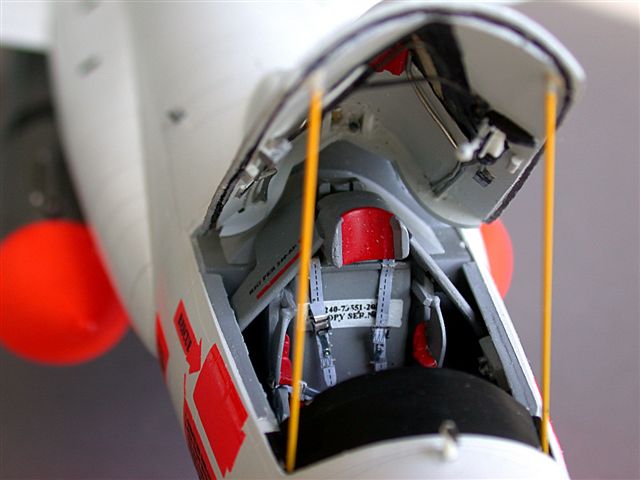
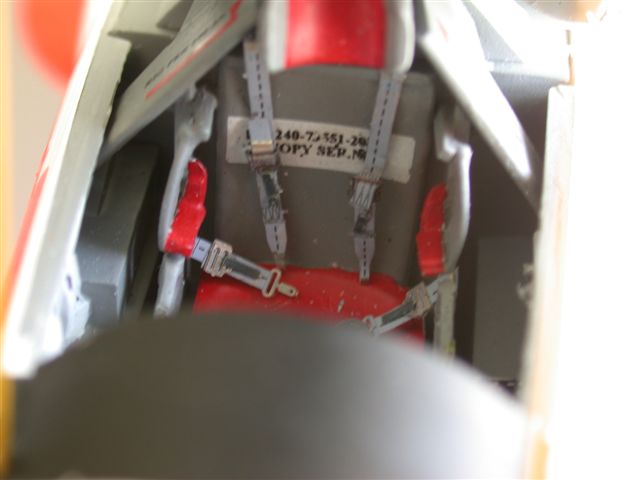
The seat is also somewhat plain, and the provided PE belts and harnesses
are much too narrow, IMO more like “spaghetti straps”. I substituted the
wider color-etch belts and leg restraints–in the RF-4C, we called ‘em
“garters”-- from the Eduard 1/32 F-105 set. Seat stencils were done on a
computer and laser-printed on decal paper.
Sidewall detailing, T-handles added to the main instrument panel and a
scratchbuilt equipment container between the seat back and bulkhead
completed this portion of the project.
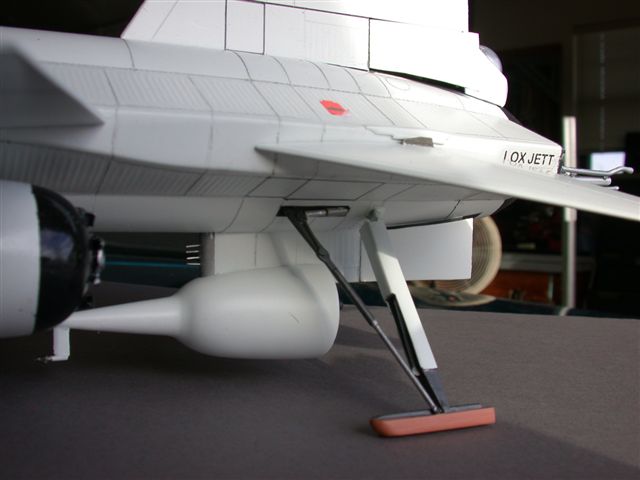
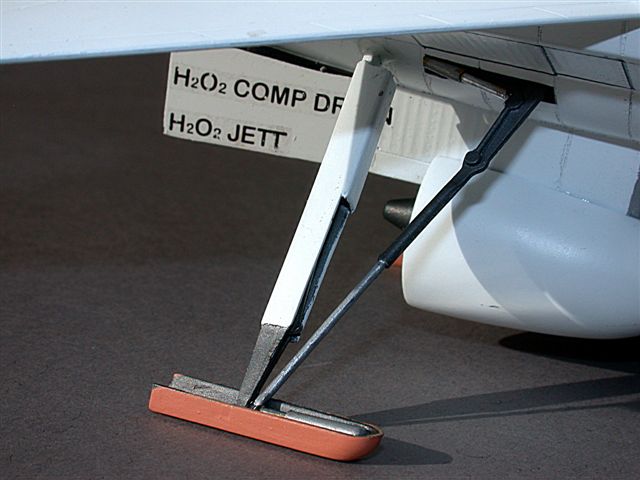
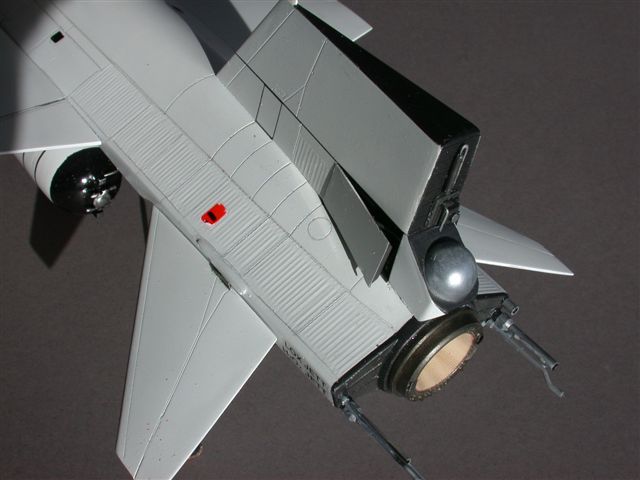
Skid Struts / Nose Gear
The X-15A-2 was never fitted with the dummy scramjet while the
airframe was on its yellow transport dolly; ground clearance was simply
too insufficient. Although the scramjet was mounted after the airframe
had been hung on the B-52 launch pylon, I really didn’t feel like
building a 1/32 B-52 wing section-cum-launch-pylon, so artistic liberty
was taken to pose the X-15 airframe and attached scramjet in a landing
configuration, that is, with deployed skids/struts. The struts had to be
lengthened 1/2 inch to achieve the proper ground clearance. The extra
skids furnished for the inflight configuration provided the additional
lengths of strut.
The Special Hobby mounting scheme of the struts to the fuselage is
seriously inadequate (a tiny plastic pit inserted into a tiny depression
in the fuselage), especially with the added weight of the external
tanks, so brass wire was routed through the fuselage and into
pre-drilled 1/4"-deep holes in the strut mounts. After gluing with
5-minute epoxy the whole assembly became much stronger. Retraction and
shock absorbing cylinders in the struts/skids were made from brass
tubing because the resin items in the kit were too delicate IMO.
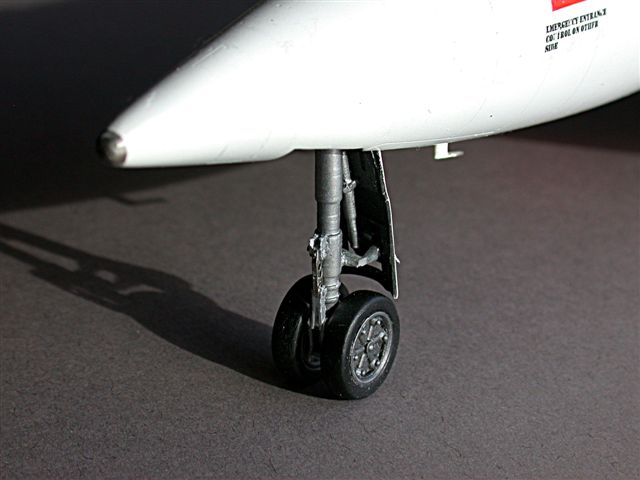
The kit’s nosegear strut has essentially no detailing; not even the oleo
scissors are included, which is hard to believe. I scratchbuilt the
scissors assembly and lengthened the strut 1/4" to partially alleviate
the severe nosedown fuselage attitude.
Per inflight pix of the bird under the launch pylon just prior to the
release for the record attempt, the model’s skids were finished in the
pink ablative color sans the white outer layer.
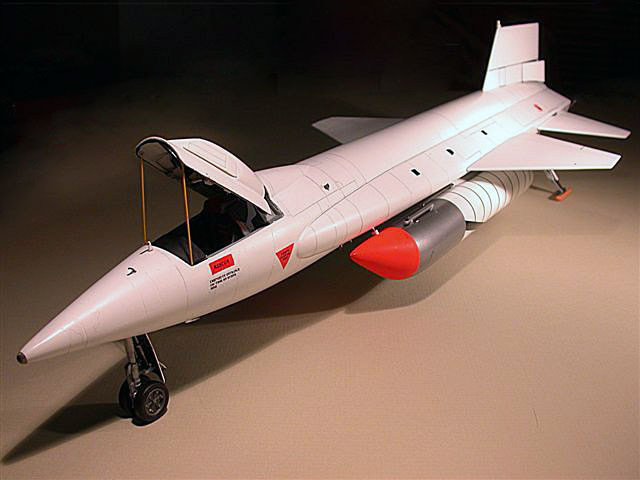
Miscellaneous Details
For the record flight some types of equipment /sensors were mounted
on the corrugated aft face of the vertical fin. I was unable to find
head-on, closeup pix of the equipment, so I simulated them with a
general outline of the ones pictured in sideviews. Per previous OOB kit
reviews, the stabilator tips were lengthened. A small pressure
measurement “rake” was fashioned and added to the top front of the
vertical fin.
Painting
A considerable advantage in doing the ablative-coated record holder
is that only one main color is involved. And, wonder of wonders, Tamiya
makes its outstanding spraycan lacquer primer in white. This stuff is so
fine-grained that it dries not flat, but semi-gloss. Perfect for
appearance and decaling! Plus, it’s completely compatible with later
detail additions of Alclad and Testors Metallizer. After appropriate
applications of Blue Acryl gray primer and wet sanding, the airframe
received three white coats overall. The black Inconel airframe areas
that are not coated with ablative because they’re out of the punishing
airflow and heat received airbrushed Testor's Gunmetal. Testors
Metallizers are fine if not masked over and if used as the topcoat.
The external tanks were done in Tamiya black and white lacquer primer
and overlaid with Alclad as necessary. Fluorescent red is also from ze
ol’ Tamiya spraycan.
Panel Emphasis
At a distance, the blinding white ablative coating appears pristine,
but closeup pix reveal that it’s covered all over with dark panel lines,
many of which are not sharply executed. In the real thing this is
because many black Inconel panel seams were masked prior to application
of the pink underlayer of ablative. When the seams were unmasked and a
thinner white overcoat applied to the pink, the black panel lines showed
through distinctly, but not necessarily sharply. After the
record-setting flight, the panel lines became fairly “messy.” The
model’s panel seams were drawn in with light gray colored pencil.
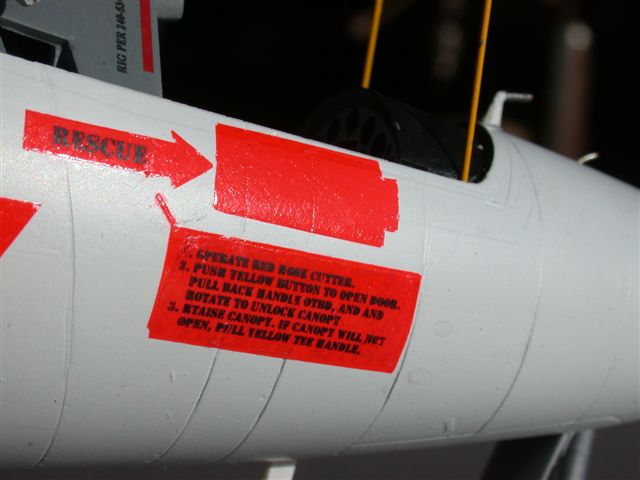
Decals
Practical considerations of the heat and vaporization of the ablative
that would be generated at Mach 6+ dictated minimal stencils as opposed
to the Inconel black versions. Only rescue stencils, ejection symbols
and safety markings on the aft jettison/vent plumbing were used. I
scratchbuilt the stencil backgrounds by spraying fluorescent red on
white decal paper. Stenciling was done by reading the fine print on the
kit decals (through a magnifying glass) and retyping them on the
computer in very small font. Clear decal paper through a B&W laser
printer, and voila!
The X-15 is one of this senior modeler’s favorite aircraft, made more
so on that Fall day in 1969 when it was loaded into our great silver
C-133A at Edwards, and carried by us to Dayton.
-
“North American X-15/X-15A2", Ben
Guenther, Jay Miller and Terry Panopalis, Aerofax, ISBN
0-942548-34-5. This is the original authoritative book on the X-15.
-
“Hypersonic,” Dennis Jenkins and Tony
Landis, Specialty Press. This is the book I really need to buy!
-
“X-15 Photo Scrapbook”, Dennis
Jenkins and Tony Landis, Specialty Press, ISBN 1-58007-074-4. A
great pictorial sequel to “Hypersonic”.
-
“X-15, NASA Mission Reports” edited
by Robert Godwin, Apogee Books, ISBN 1-896522-65-3. This thick book
contains, among other items, the
Dash 1 (flight manual) from the X-15, as well as many other rarely
seen pix and line drawings of X-15 assemblies, systems and
procedures. To top it all off, a CD is included with pix, interviews
etc.
Click on the thumbnails
below to view larger images:
Model, Images and
Text Copyright © 2008 by "Bondo" Phil Brandt
Page Created 03 January, 2008
Last Updated 03 January, 2008
Back to HyperScale
Main Page
|
 Home
| What's New |
Features |
Gallery |
Reviews |
Reference |
Forum |
Search
Home
| What's New |
Features |
Gallery |
Reviews |
Reference |
Forum |
Search