|
ProModeler's 1/48 scale
Messerschmitt Me 410 B
by David W. Aungst
|
Messerschmitt Me 410 B |

HyperScale is proudly supported by Squadron.com
Background
I am no big fan of WWII Luftwaffe, but I do enjoy painting the mottled camouflages.
I had heard a lot of good things about the ProModeler Me 410B-1/B-2 kit, so when I came across the kit at a model kit auction, I could not pass up acquiring it at half-price. I do find the shape of the Me 410 to be somewhat pleasing with its propellers stuck way out ahead of the nose on the fuselage.
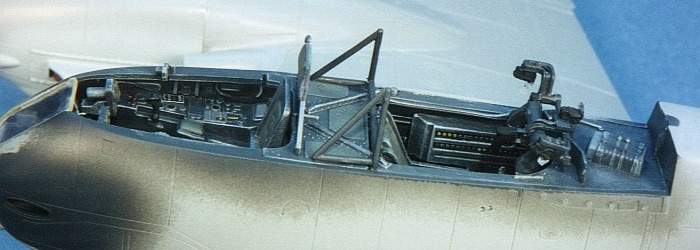
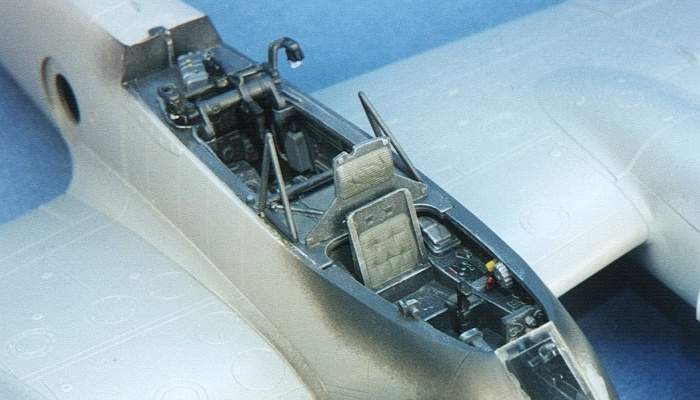
I really liked all the details molded into the kit cockpit, so I started the kit just to see the cockpit painted and assembled. Getting that far into the build, I saw what I started out wanting to see. Then, some tasks that I was just not interested in doing got in the way and I assigned the kit to the "Shelf of Doom" where half-done kits get relegated in hopes of someday being finished.
That was nine years ago...

Recently, I was looking to clean up the "Shelf of Doom" and this Me 410 kit was still sitting there. I decided its time had come and pulled it out, removing about a pound of dust from the kit.
The Kit
ProModeler's 1/48 scale Messerschmitt Me 410 is well executed with lots of molded-in details and a nice looking cockpit, right out-of-the-box. And, since I really don't have much documentation on the Me 410, I could keep the model simple and out-of-the-box. I have very little reference material to tell me the problems of the kit. I did nothing in the line of extra detailing to the kit.
The thing that I think intrigued me the most about the kit was the well executed cockpit interior. I have read a few reviews on this kit where the authors used various after market interiors in the kit. To the last, they all have commented how the after market interiors were hard to use and really were no improvement over the kit provided cockpit. I felt this was justification for maintaining the out-of-the-box style and not doing any detailing in the cockpit, other than painting.
I painted up the interior with Black-Gray (RLM 66) from the old Floquil Military enamel paints line. All the detail painting was done using colors from the Testors Model Master enamel paint line. My results are as follows:
I did have one general complaint, though. This is my second ProModeler kit (the other is an SB2C Helldiver), and both kits have way too much mold flash for what were new kits. I've worked on some old Airfix kits with less flash than this Me 410 kit (and the SB2C) has. The flash was most noticeable (as usual) on some of the most delicate pieces, those being the aiming trapeze for the rear guns and the landing gear. I was forced to spend way too much time on cleaning up just five pieces of the kit.
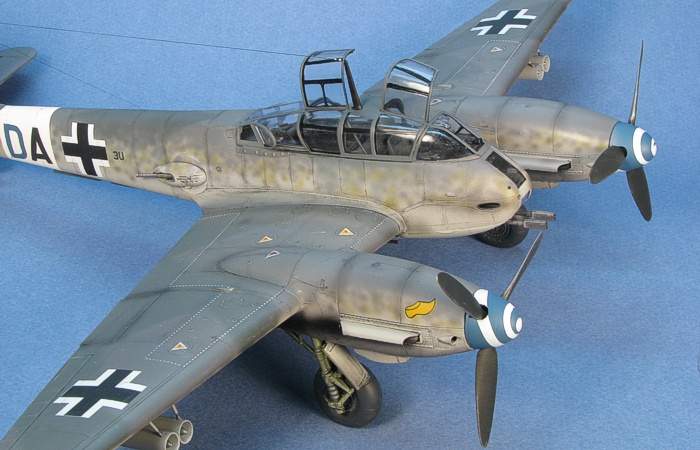
One problem area I had in the kit involved the cockpit glass. It was not the fit of the pieces, though. They fit in place as intended with no filling required. The problem was that ProModeler saw fit to mold the inner framing onto the inside of the clear parts. This forced me to have to paint the inside of the canopies and became a masking nightmare for me. This task is what "deep-sixed" the project nine years ago.
I bought the Black Magic masks for the Me 410 kit because they included pieces to mask the interior, only to find they did not provide me any clue as to how some of the interior masks were supposed to work. I also found most of the masks in this set were undersized to fit in the specific panels they were intended to fit (both inside and outside of the canopy). I ended up ignoring the inside masks and hand painted the frames on the inside of the canopy. This task took me (at tops) 30 minutes, but not wanting to do it had cost me nine years of waiting to complete the kit.
With the inside canopy frames painted, I attached the glass. I started with the windscreen and right side glass. I worked slowly and let the pieces dry before moving to the next step. When the glue for these was set and dry, I added the left side glass. The fit is tight around the rear gun aiming trapeze, but things went together as advertised.
The Black Magic masks for the outside canopy was easier to figure out which panels went where, but the problem was that most of the panels were severely undersized to fit on the canopy. I ended up only using the rear pieces that fit the complex curves around the rear indows. For the rest of the glass, I broke out my trusty old Parafilm-M and did things the old-fashioned way. I was finally ready for camouflage paint.
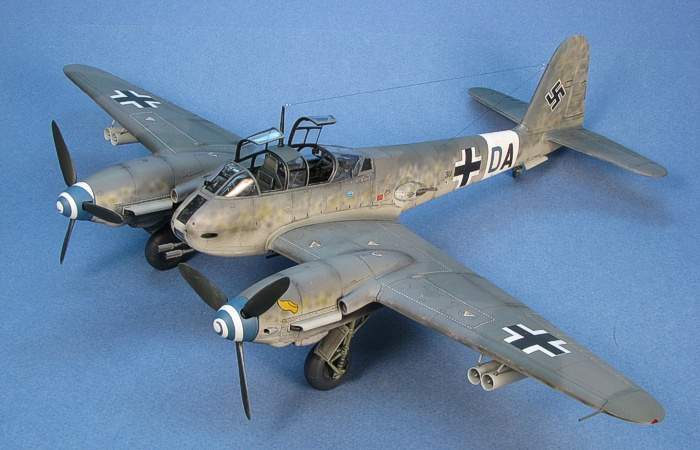
 The camouflage on the model is painted using old bottles of Floquil Military enamel paints that I had saved in my paint stash. All other colors are from the Testors Model Master enamel paint line. The camouflage on the model is painted using old bottles of Floquil Military enamel paints that I had saved in my paint stash. All other colors are from the Testors Model Master enamel paint line.
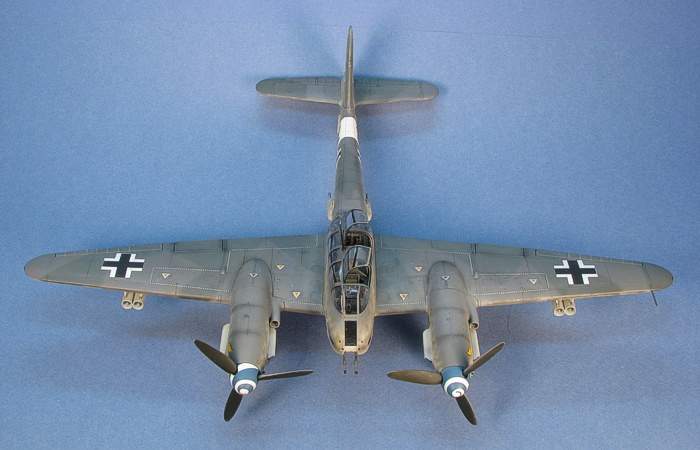
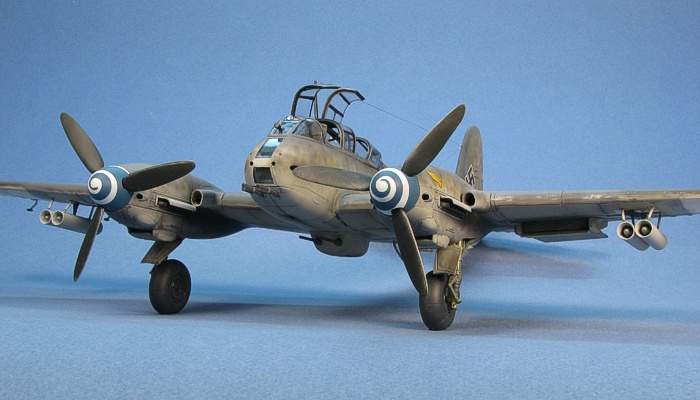
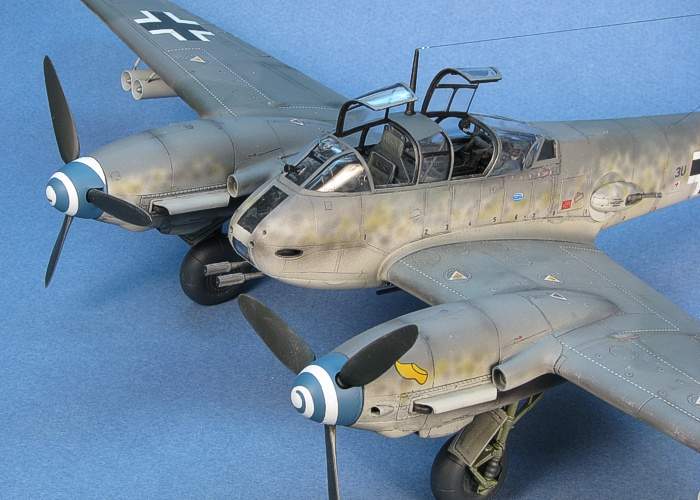
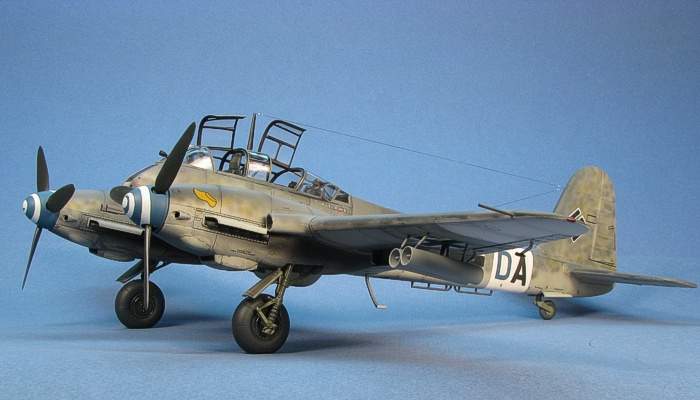
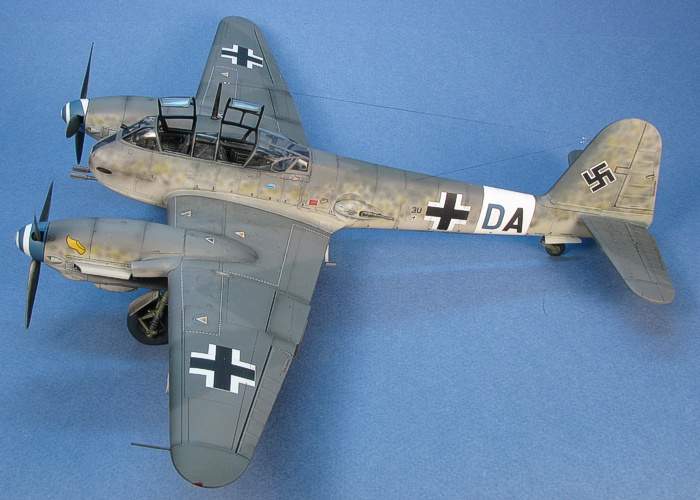
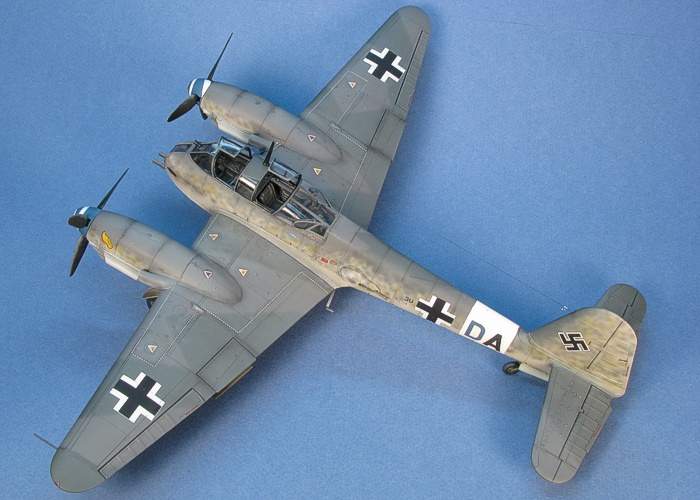
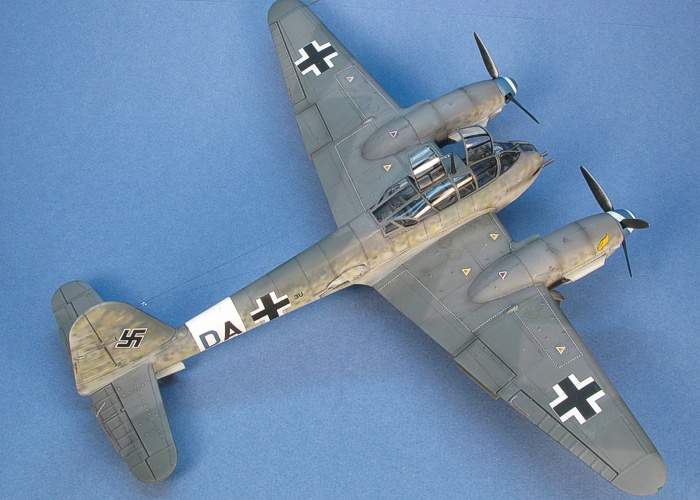
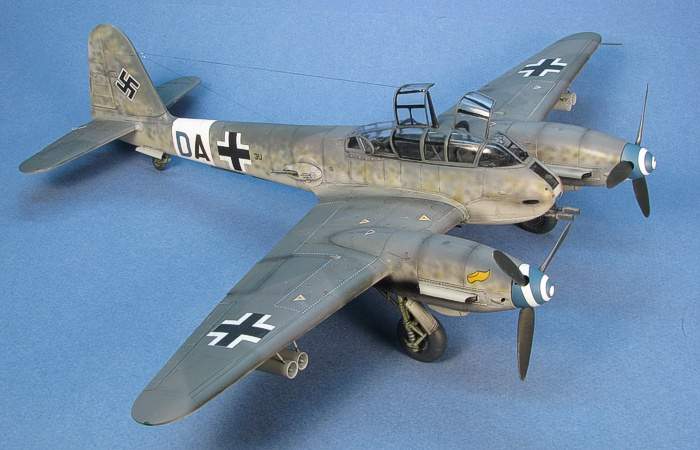
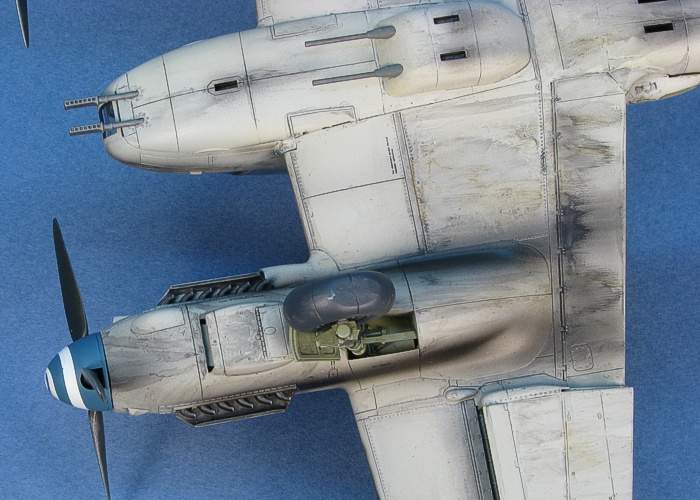
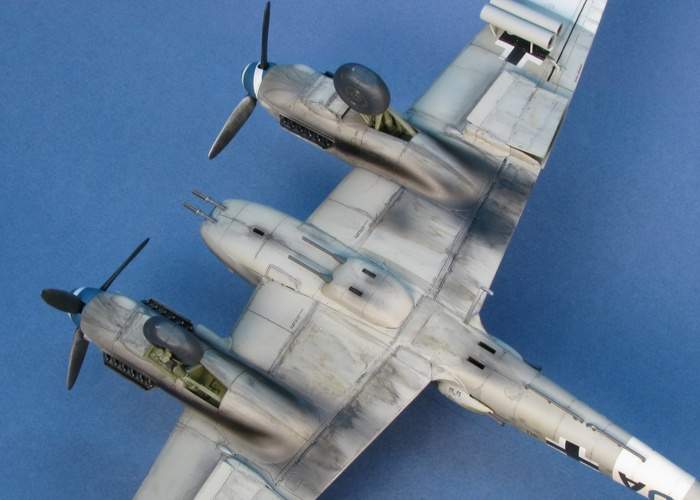
I originally was planning to build a night intruder aircraft with a Black-Gray (RLM 66) bottom, but I changed my mind when I learned what changes would be needed to introduce the cylindrical flame dampeners on the engine exhausts. The supercharger intake on the left side of each engine nacelle is inappropriately shaped and would need to be cut off and rebuilt correctly to make room for the flame dampeners to fit over the exhaust stacks. As I wanted to build an easy out-of-the-box model, I elected to stick to a daytime paint scheme. Hence, the camouflage is the "standard" scheme for day missions with a Gray-Green (RLM 74) and Gray-Violet (RLM 75) splinter pattern over a Light Blue (RLM 76) bottom. The mottling on the sides is in Gray-Green and Gray-Violet with some RLM Gray (RLM 02) thrown in for good measure.
The mottling came out nicely, although it was not what I wanted when I started. I wanted larger, more feathery splotches in the mottling. But, my air brush had different ideas. After plaguing myself for about an hour trying to do it my way, I finally gave in and painted over the mottling with a new coat of Light Blue (RLM 76). Then I re-applied the mottling the way the brush wanted it, in little dots that I could build up to create the mottle pattern.
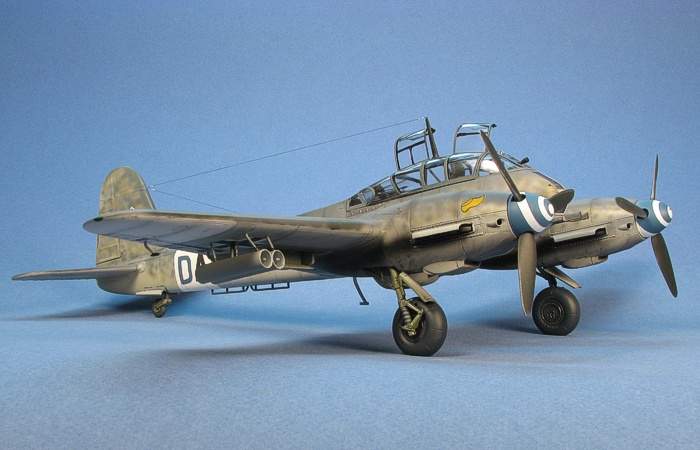
After applying all the camouflage and mottling, I found the model looked too "rich". I decided to fade all the colors by overspraying the whole upper surface with a very dilute Light Blue (RLM 76). This faded the colors and gave the effect I was hoping for. Many images in the Squadron In Action book make the aircraft look like it is almost all one gray on top. By fading the colors like this, I got that look with the Gray-Green (RLM 74) and Gray-Violet (RLM 75) having much less contrast with each other.
After a quick gloss coat with Floquil Crystal Coat, I was ready for decals.
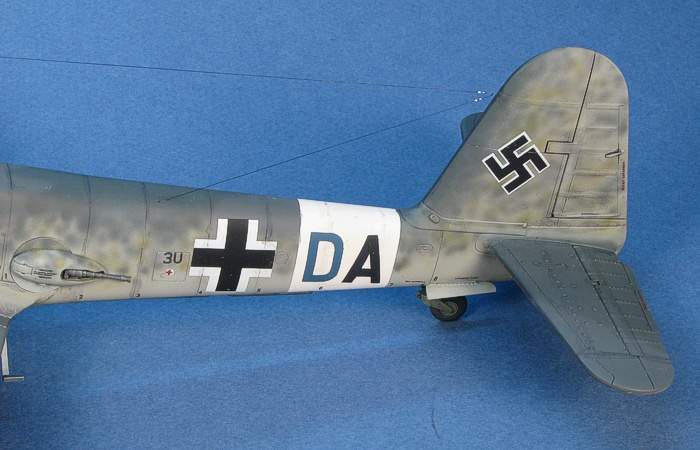
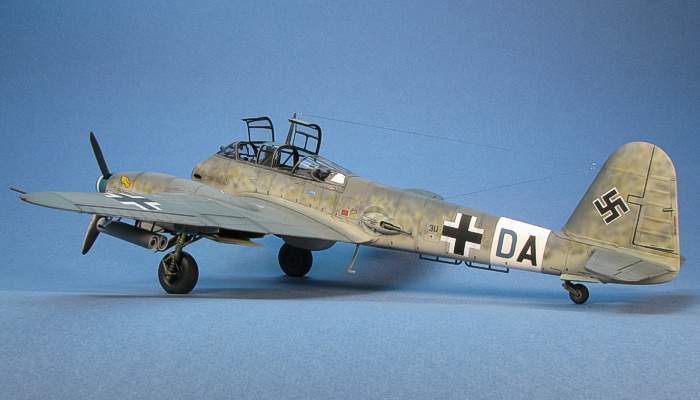
The decals come mostly from the kit. I did not like any of the ProModeler decal options, so I went out looking for other options. I found AeroMaster had multiple decal sheets available for the Me 410, but only the night intruder aircraft sparked my interest on these. I ended up deciding on a fictitious aircraft. I followed standard camouflage and markings practices for the time period. I did want a bit more of color, though, and decided on painting the spinners blue with a white spiral. Then I painted the colored letter in the aircraft codes in the same blue color.
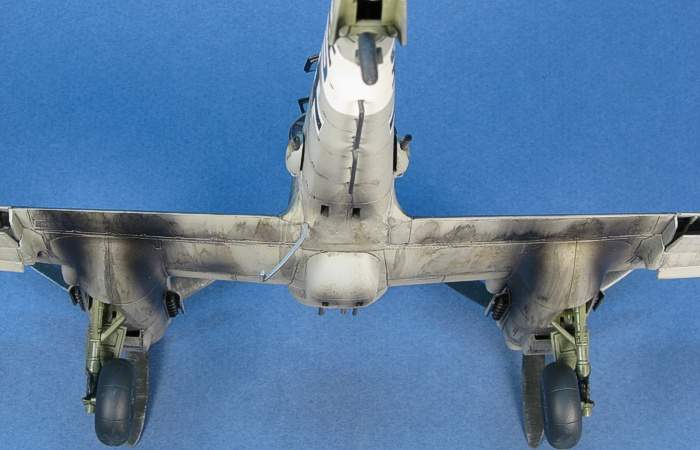
For weathering, I used my typical style of thinned down enamel paint washes and air brush shading. I based the engine exhaust staining under the wings on the art work on the cover of the Squadron In Action book. I liked the feel of how that art work showed the stains. I finished the weathering with some dry brushing to pop out the surface details.
For a more complete discussion of what I do to weather my models, see my posting on "Weathering Aircraft".
Finishing Touches
With the heavy duty camouflage painting and weathering behind me, I turned my attention back to the little details -- landing gear, weapons, etc... I had been painting these at the same time as the rest of the model, so now it was just an adventure in attaching the pieces where they belonged.
The landing gear was first. This way the model was up off its belly so that it would not damage the camouflage painting. The pieces plug securely into their locating holes without any issue. The main wheel well doors were fiddly with not much to mount them on due to the actuator arms being tiny, but I got them to stay in place after some careful work.
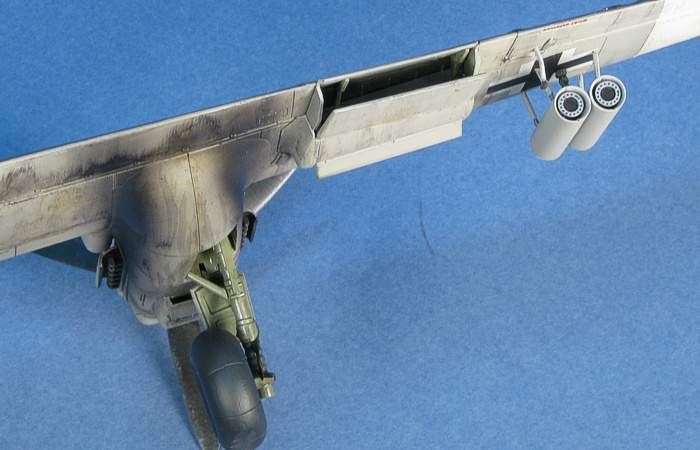
I had needed to mount the nose cannons in place when I was building the kit. Fortunately, I did not break them off while building (or in the intervening nine years on my "Shelf of Doom"). I painted them in an appropriate metal color, also painting the barrels for the belly mounted gun-pack.
With the belly gun-pack being mounted on the aircraft, I should not have used the wing rocket pods, but I liked the look of these and decided to use them anyway. After all, it is a fictitious aircraft -- who cares if it was too heavy to get off the ground? I painted the rocket pods in Light Blue (RLM 76) to match the bottom of the aircraft. I painted the rockets, themselves, in steel metalizer. An image I have in the Squadron In Action book makes the rockets look much darker than steel, but I was unsure what else to use. The kit says to use steel. Fully painted and assembled, I attached the rocket pods under the wings.
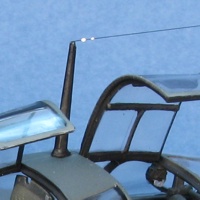
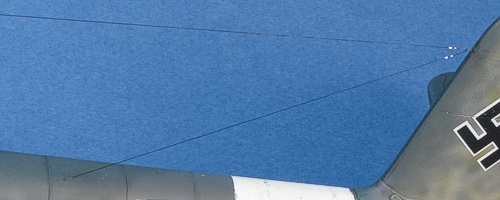
Next came the line antennae for the radios. I gave up on using fragile stretched sprue to do these antennae many years ago. Instead, I use my wife's hair. I collected a few strands from her hair brush in the bathroom and brought them to my work room. They are flexible, strong, and very petite. The process to attach the antennae spans days because I have run into issues with the hair pulling free while I work to attach the other end.
Allowing overnight for the glue to fully cure on each step eliminates these issues.
First, I drilled holes in the leading edge of the tail and the mid-fuselage attachment points with a #80 drill bit. I glued (with super glue) the end of one hair into the tail location and another hair into the mid-fuselage point. I let both of these dry overnight.
The next night, first I colored the hair using a black Sharpie marker (my wife has golden red/blond hair). I find it easier to do the coloring after the hair is solidly attached on one end. The Sharpie does not glob up like paint does if you use a fine paint brush and black paint. I then used a new X-acto #11 blade to make a shallow split in the top of the antenna mast. I laid the hair into place and used a clamp to pull the hair tight while I glued that location. I let this dry again over night.
The next night, I took the mid-fusleage hair and wrapped it once around the tail line right at the tail and use a clamp to pull that one tight. A small amount of super glue on the contact point secured it. I left this for another night to dry.
On the last night, I took that same new X-acto blade and carefully removed the excess hair from the two pulled attachment points. I then allowed some super glue to thicken on my work desk and used small droplets of the thickened glue to form the insulator beads. After the glue cured, I painted the beads white. The end result is what you see in the pictures.
The propellers were painted as I did the rest of the aircraft. I pressed them into place without glue. I left them unglued so they would be less likely to be broken if bumped.
Attaching the open cockpit hatches finished the project. I considered adding the hatch bracing to the cockpit hatches (which would break out-of-the-box rules), but I felt the added support would not be required to keep the hatches in place on the model while it lives on my display shelves in the living room.
From "Shelf of Doom" to living room display shelves only took a little over a month of work. It is a shame how some silly little tasks can make you wait so long to finish a project. I am glad to have the space back on the "Shelf of Doom". Now I have room to start (and not finish) something else ... :)
Project Statistics
Completion Date: |
13 Decmber, 2008 |
Total Building Time: |
29.9 |
Research: |
1.6 |
Construction: |
8.7 |
Painting: |
14.9 |
Decals / Markings: |
4.0 |
Extra Detailing / Conversion: |
0.7 |
Model,
Text Copyright © 2008 by David W. Aungst
Page Created 1 January, 2009
Last Updated 1 January, 2009
Back to HyperScale
Main Page |
 Home
| What's New |
Features |
Gallery |
Reviews |
Reference |
Forum |
Search
Home
| What's New |
Features |
Gallery |
Reviews |
Reference |
Forum |
Search