Tamiya's 1/48 scale F-14A Tomcat
Aardvark Tomcat
by David W. Aungst

Tamiya's 1/48 scale F-14A Tomcat is available online from Squadron for only $91.99!
Every so often, a kit is released that I must acquire and build IMMEDIATELY. This is one of them.
Hasegawa released their 1/48th scale Tomcat kits a very long time ago. They are well detailed and accurate, but they are a real challenge to build so I have not built many (only one to this date, actually).
Tamiya excited all the jet-modeling geeks like myself earlier in 2016 when they announced they were doing a 1/48th scale Tomcat kit. The fever pitch grew as they released pictures of the test shots, then allowed select modelers to build the test shots. Everyone was pronouncing this the "kit of the century". Of course, I had to order a couple as soon as they hit the model sellers on the Internet.
I got my kit from Squadron online, and it was my "current project" as soon as the package arrived at my house.
The Kit
 The kit is deserving of every accolade bestowed upon it. I have not bought every new kit to come out in the last few years, but this is easily one of the finest model kits I have ever built and feel "kit of the century" may not be an exaggeration. What particularly amazes me in the kit is all the places that the Hasegawa kits are "challenging". Tamiya has engineered the kit to eliminate all these pain points found in the Hasegawa kit. The engine intakes, the wheel wells, the cockpit - all are engineered to simplify construction without really losing any detailing. I was amazed and excited by each place I had struggled so on the Hasegawa kit that I built. The kit is deserving of every accolade bestowed upon it. I have not bought every new kit to come out in the last few years, but this is easily one of the finest model kits I have ever built and feel "kit of the century" may not be an exaggeration. What particularly amazes me in the kit is all the places that the Hasegawa kits are "challenging". Tamiya has engineered the kit to eliminate all these pain points found in the Hasegawa kit. The engine intakes, the wheel wells, the cockpit - all are engineered to simplify construction without really losing any detailing. I was amazed and excited by each place I had struggled so on the Hasegawa kit that I built.
I am not going to go into a big review of the kit, here. There are multiple reviews out on the Internet for anyone wanting the basic kit description. What I do want to mention are some points and details about the kit that are not presented in the kit reviews that I have seen.
The kit builds into a middle block F-14A. For those familiar with the Tomcat anatomy, the kit builds a late block 75 airframe up through about a block 100 airframe. These blocks amount to the heyday of the early Tomcat years where everything was in high-visibility colors. Modifications are needed to make the kit an early F-14A (needs a different "Beaver Tail"). Other modifications are needed to make a late F-14A (NACA intakes over the gun and assorted ECM blisters). None of these are difficult to do, but earmarks of the kit show Tamiya is planning to release these in time (so, be patient).
The kit has weapons in the box - Sparrow, Sidewinder, and Phoenix missiles. Options of the weapons allude to the earmarks I mentioned before. The weapons can be build early weapons from the 1970 and 1980s, or later weapons from the 1990s up to the Tomcat's retirement. The differences are just alternate pieces to use when building the weapons.
Subtle details in the kit indicate further growth of the kit into other versions, but none of the extra parts for later Tomcats are present in the kit, so modelers need to be patient. Earmarks are present to indicate late F-14As as well as F-14Bs and F-14Ds will be eventually released. I am hoping for an early F-14A, but the parts breakdown does not seem to indicate that, but time will tell as I do not know what Tamiya has up their sleeve.
Construction Begins
I will not re-tell the tale told by so many on the Internet, already. The kit builds like a dream - period.
What I do want to relate her are a few of the "gotcha points" I found as I built the kit. Some of these I found before I ran into the issue, while some I found after.
Engine Exhausts
Tamiya, for all their amazing engineering, has an issue many jet kits have. They mold the engine afterburners as single, 1.5-inch-deep, thimble pieces. This is good for not having a seam inside the afterburner. But, how the heck do you paint 1.5-inch-deep thimbles on the INSIDE??? Physics say that air brushing into that little hole has as much air (and paint) coming back out as what goes it. Paint never even reaches the deepest portion of the thimble (the flame holder at the bottom).
And, my references show the afterburner interiors are more than just “white” as the instructions say. The "white" is a ceramic coating on the inner surfaces. But, the deepest portion of the afterburner interior, near the flame holder, is some "dark metallic" color. If that area started "white" on new aircraft, it quickly was burned off to "not white". Also, Tomcat engines have very characteristic exhaust staining they streaks the white areas. Adding this inside a 1.5-inch-deep thimble is problematic at best.
How to fix all this? Glad you asked ...
Some quick measuring showed the white area to extend about 1 inch into the afterburner thimbles. So, I took a Sharpie marker and marked the outside for the 1 inch distance. Then, I sawed the thimbles at the Sharpie line. This solved a couple issues. The "white" now was being painted into a tube, that’s easy. The "dark metal" was now being painted into a smaller half-inch thimble – that is do-able.
This modification took about 5 minutes to measure and cut. Reassembling the pieces will be a no-brainer. The access for painting that this provides is sorely needed. Tamiya would have done good to mold the pieces this way to start with.
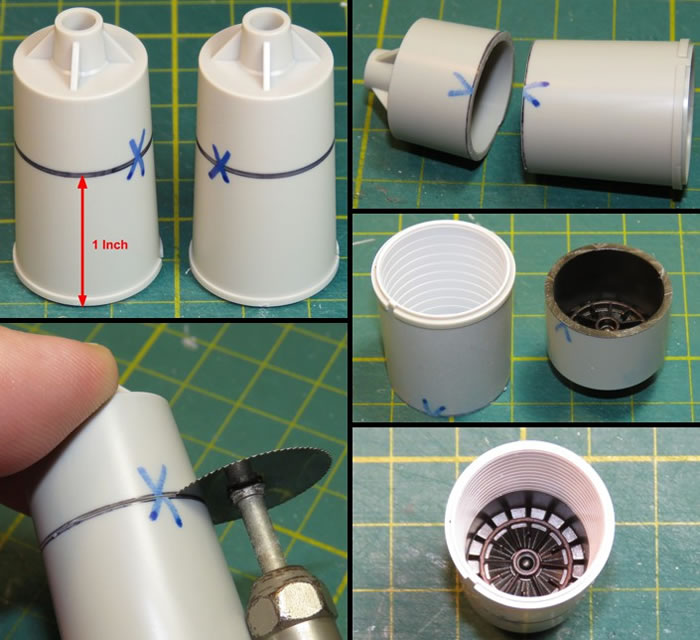
The Steps in Pictures
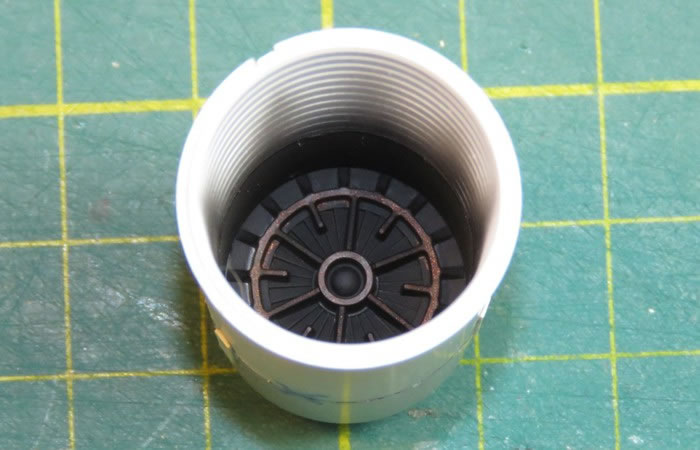
Finished Interior with Exhaust Stains
I used medium gray decal strip to make the alternating color inside the engine exhaust cones. I could have likely done it as easily with a small paint brush and about the same amount of time, oh well. I used my air brush to dust the interiors with black, then clipped the parts and assembled the exhausts. The outsides are painted in various Alclad II metalizer colors.
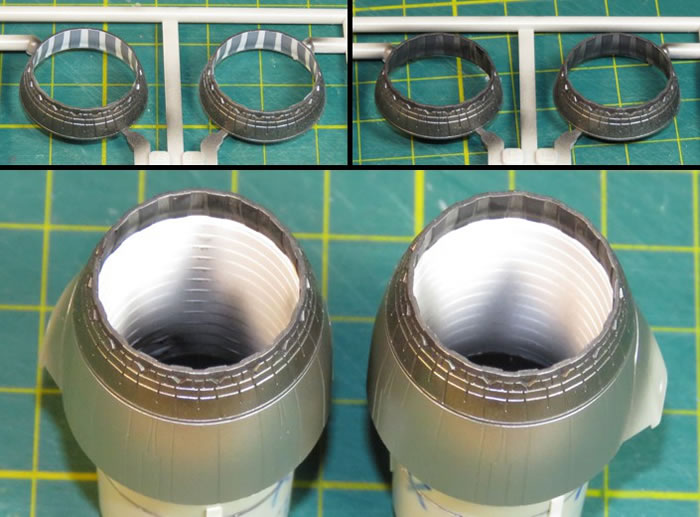
Finished Exhausts
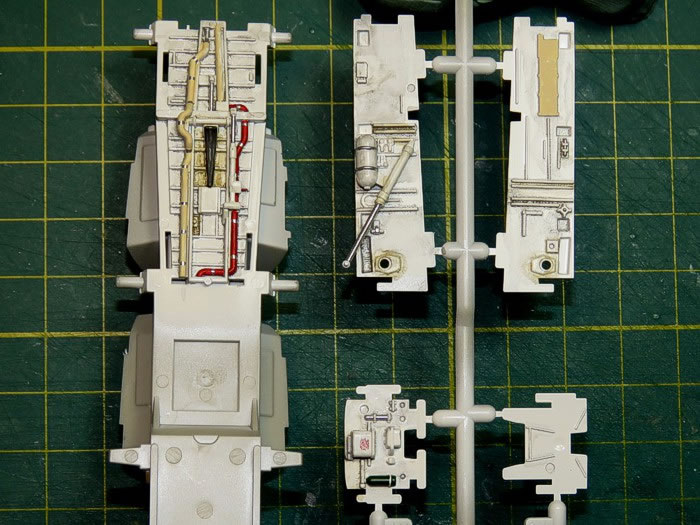
The Cockpit
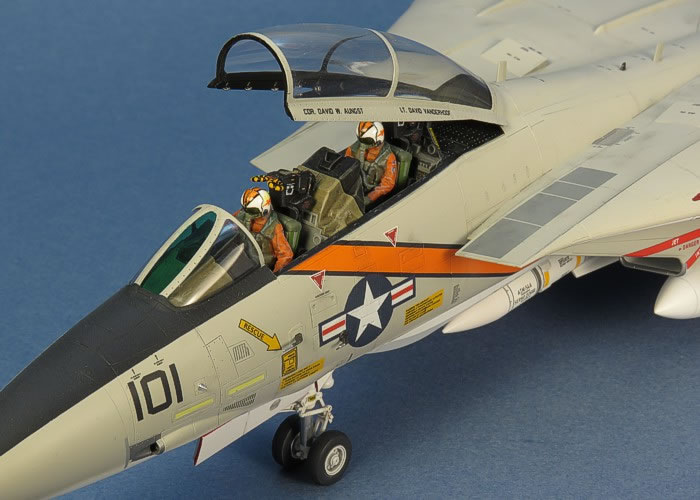
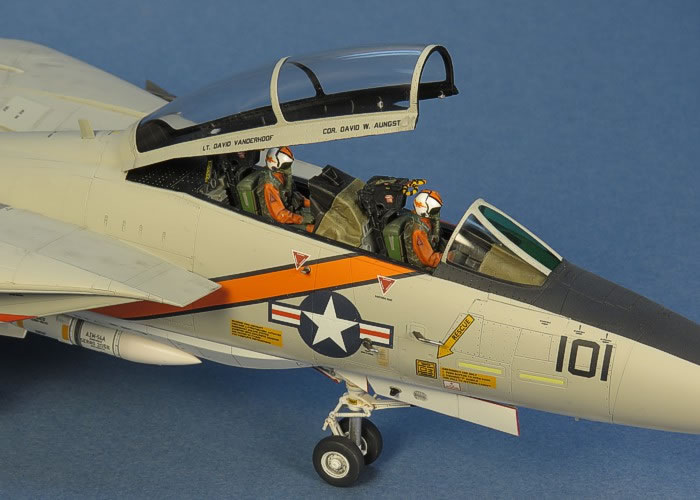
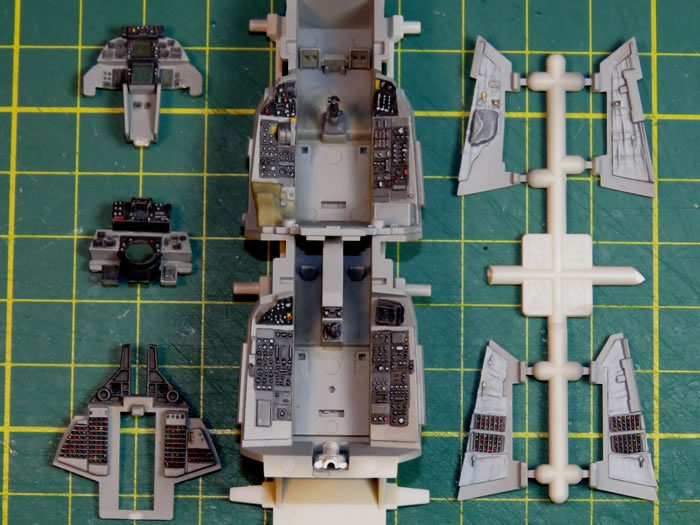
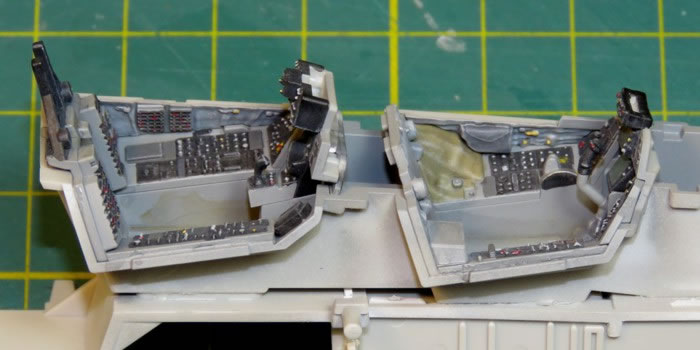
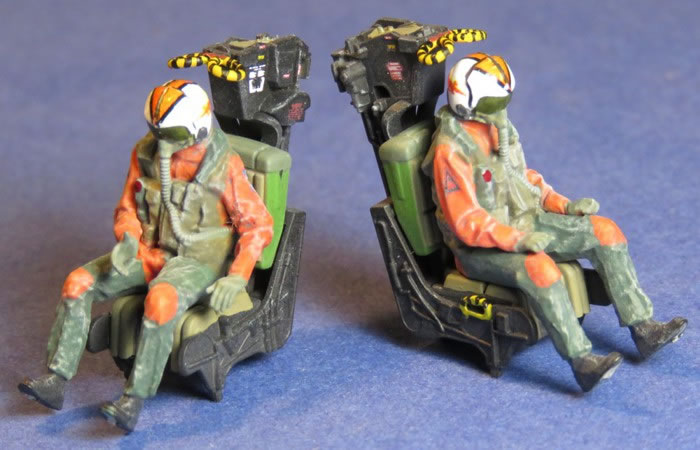
There are no "gotchas" in the cockpit, just build it as the instructions say. This is the finest injection plastic cockpit I have yet to work on. There is no resin needed for this kit, except possibly for the ejection seats. But, even the seats are nice. The place resin will help the seats is to make better looking seat harnesses. If you plan to use the pilot figures (as I was planning), then the seats in the kit are quite nice on their own.
I built the cockpit in sub-assemblies as seen here. I finished painting the cockpit before locking the cockpit into the fuselage. After painting the major colors, it took about two hours of studying pictures of real Tomcat cockpits and detail painting to get to this point. As seen in these pictures, I still needed to do a little silver dry brush on the floor. And, since I had decided to have the pilots in the cockpit, I decided to add the Tamiya CRT decals that make them look lit up. I also still needed to add a drop of gloss to each CRT and instrument to represent the glass.
Some of these colors I used are exaggerated, I know, especially the circuit breaker panels, which don't have that much red or yellow on them. But, I needed to make things look "busier" to satisfy my own mind's eye.
Finished Cockpit Painting
Finished Cockpit with Sidewalls
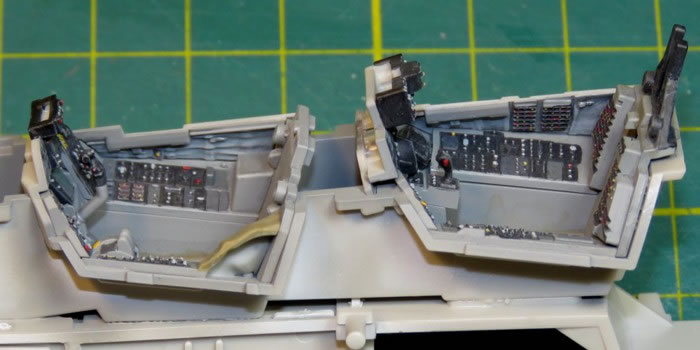
Finished Cockpit with Sidewalls
The forward sections of both instrument hoods are canvas on the real Tomcat. Tamiya molds these rather smooth, like they were a formed plastic cover or something similar. To rough them up, I first painted them a khaki color. When this dried, I liberally applied a black wash with Xylene. This etched into the base paint and even into the plastic. After this all dried, I came back and dry-brushed the area in a lighter contrasting colors to pick off details and make the areas be not all one color. I liked the effect, and it was simple to do.
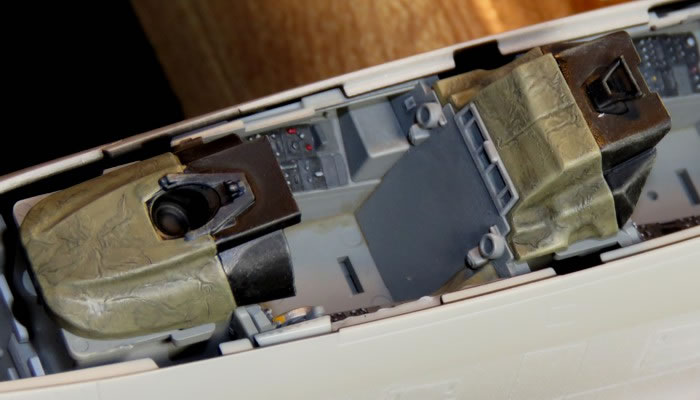
Finished Instrument Hoods
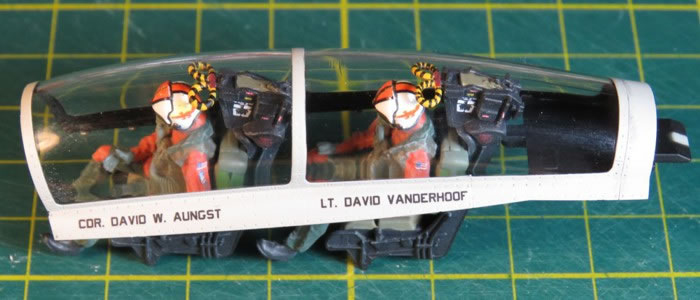
These are the cockpits on the completed model. Using the Tamiya decals for the CRT screens make them look like they are powered. This works since I was going to put the pilots in the cockpits. I am basically modeling a Tomcat that is powered and ready to taxi out for takeoff.
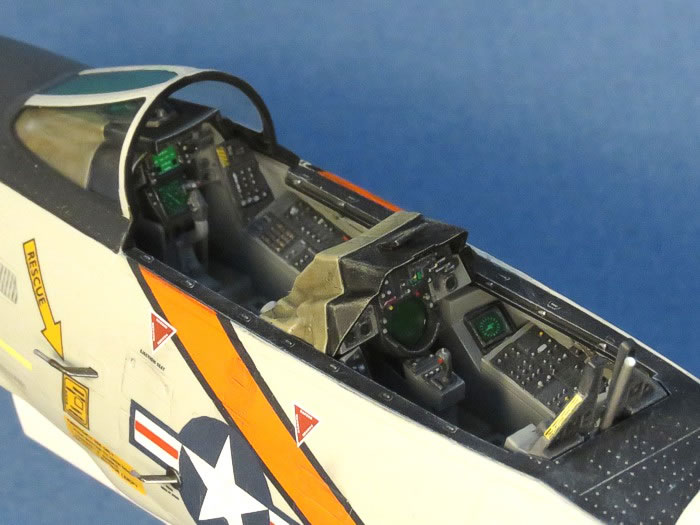
Completed Cockpits
Other Details
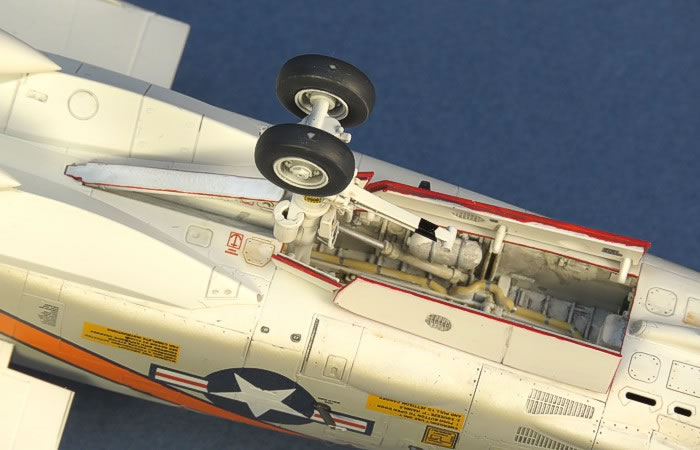
This is the nose wheel well. This is simple out-of-the-box construction with some careful detail painting. The "gotcha" to watch out for here is the nose landing gear upper strut. It is easy to assemble the nose wheel well without paying attention to the fact that the upper strut needs to be sandwiched into the wheel well as you assemble it (voice of experience). I caught and fixed my "miss" before the glue set up, but it was a close call.
Nose Wheel Well Painting
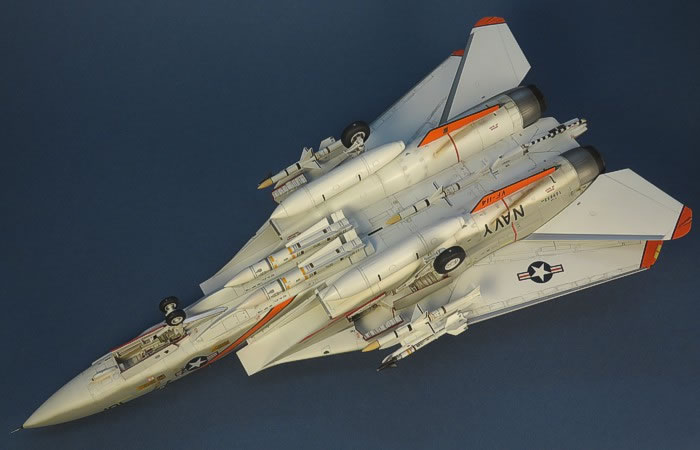
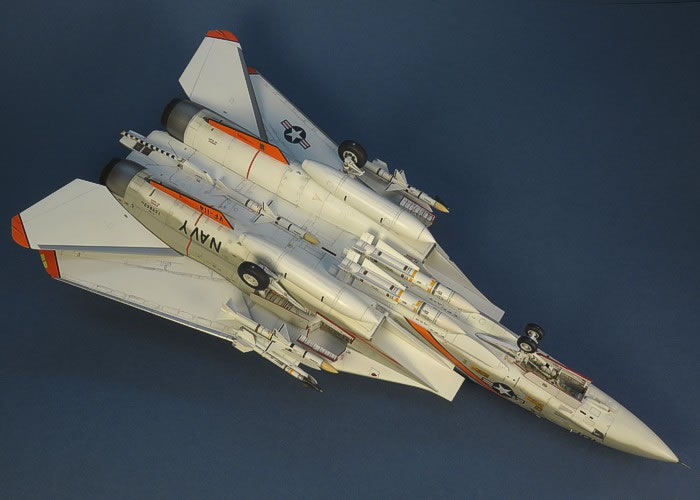
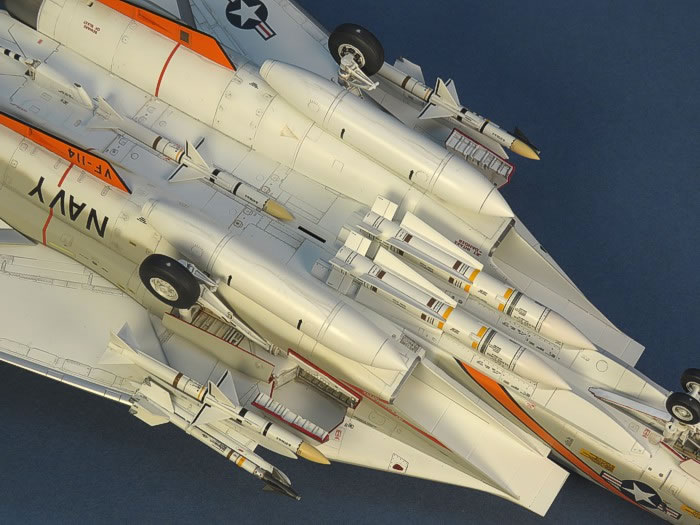
I like detailed weapons, and Tamiya provides very nice ones. The "gotcha" here is to watch out for the parts used on the weapons. Tamiya provides pieces for early and late versions of all the missiles. Take note of this and get the right pieces for the missiles you need. The parts called out in the instructions build AIM-45A Phoenix missiles, AIM-7E Sparrows, and AIM-9G/H Sidewinders. These are the appropriate missiles for the early Tomcat years.
The alternate missile pieces (ignored in the kit instructions) build AIM-54C Phoenix missiles, AIM-7F/M Sparrows, and AIM-9L/M Sidewinders. These are appropriate for the later Tomcat years. Consult your reference materials to find out what missiles are correct for whatever Tomcat you decide to build from this kit. Overall, without making airframe modifications to update the Tomcat to a later version, you will want to stay with the earlier weapons.
Tamiya provides a lot of data markings for the weapons. I was not happy with the shades of yellow or brown they used on the stripes, so I went off and used after-market decals on my missiles. Weapons typically are covered in stencils and stripes, making them very "busy" when completed. Here are the completed missiles with all the decals in place. You are looking at:
These decal counts are a bit inflated. I was forced to cut up and individually position some markings that did not correctly fit the missile bodies. Thus, in some cases, what would have been one wrap-around decal turned into five or six individual decals for each missile.

Trust the Engineering
With everything fitting so well, it gets easy to fully paint and finish the sub-assemblies before bringing things together on the completed kit. I started painting and finishing all the control surfaces. Besides, I was dying to see the unit markings getting applied.
Painted Sub-Assemblies
This is one I learned too late, though -- The forward fuselage is a tight and sturdy fit into the rear fuselage with next to no seams to clean up. My mistake was to attach these together before I started painting. It cost me a few days of masking and painting to get the camouflage applied correctly in the area between the forward fuselage and the intakes. My next kit will have these sub-assemblies painted before I attach them together.
Finishing the Building Phase
In no time, I was ready for paint and decals across the main fuselage.
Since the kit represents an earlier block Tomcat, it opened the door to almost all the earlier gray and white schemes. Most all of these come with lots of color for the unit markings. I was mandated by a friend that I had to do a gray and white aircraft. This was no big deal since I have a ton of aircraft in this color scheme that I want to build. The difficult part was narrowing it down to only one.
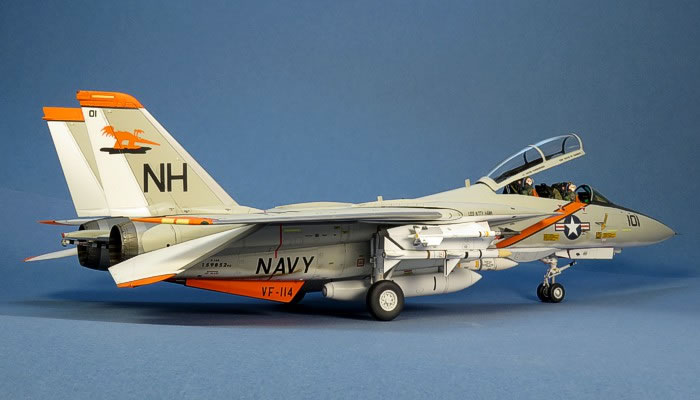
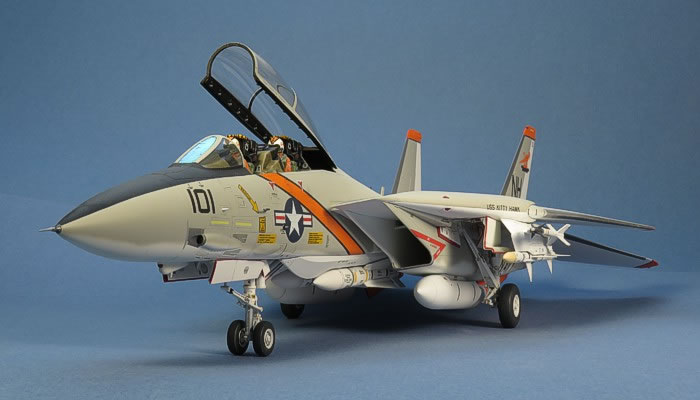
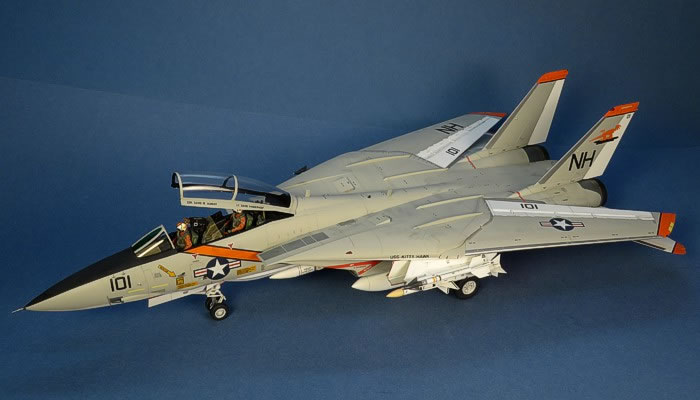
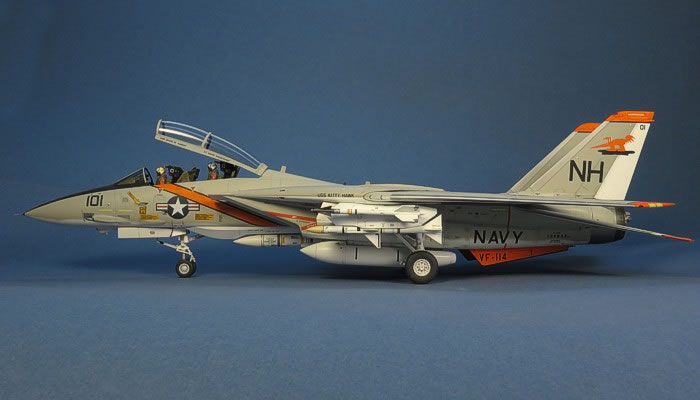
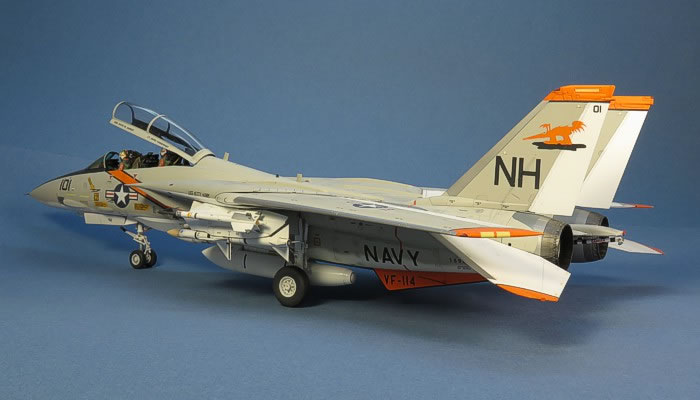
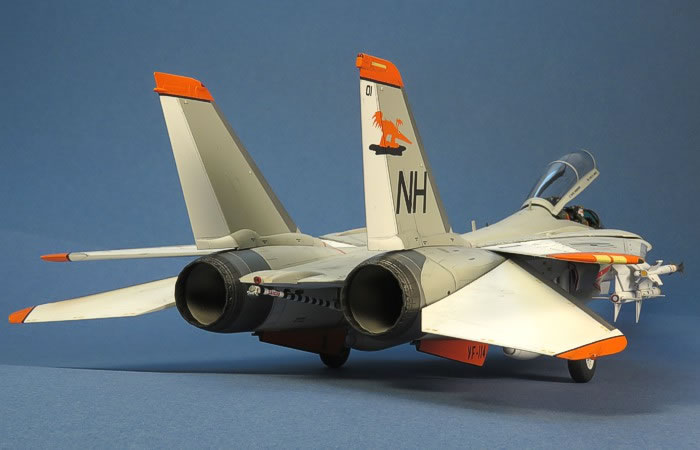
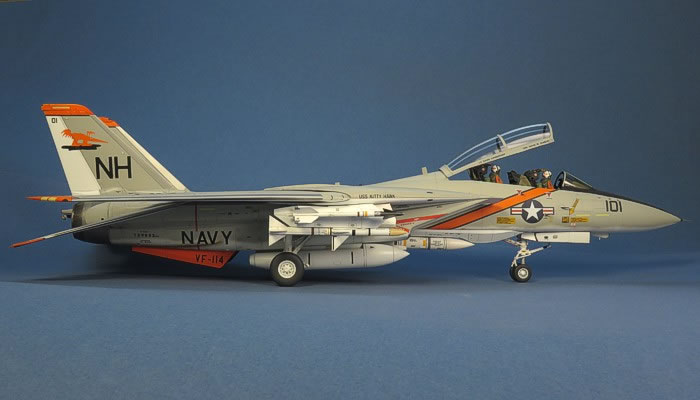
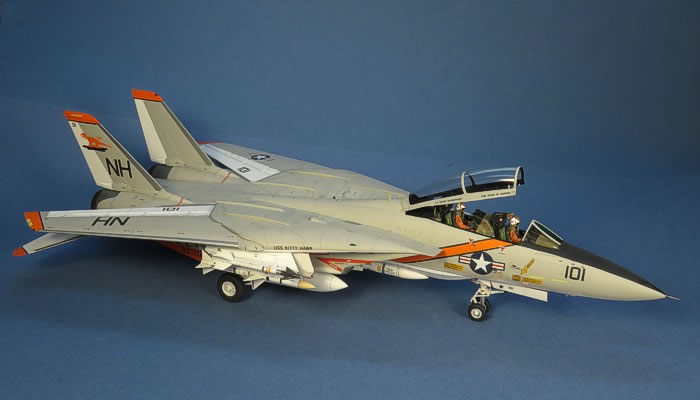
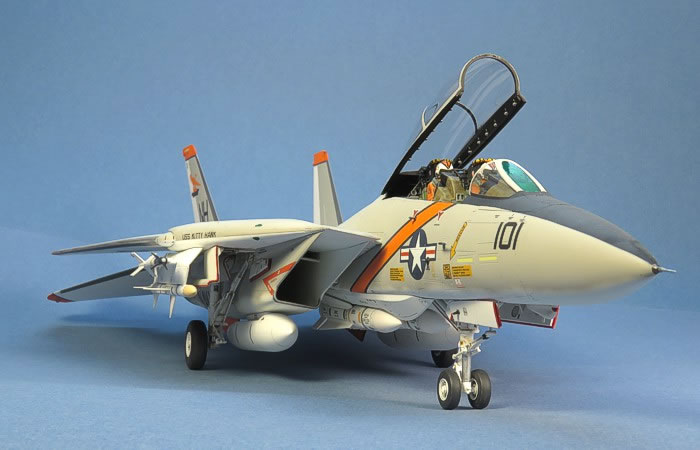
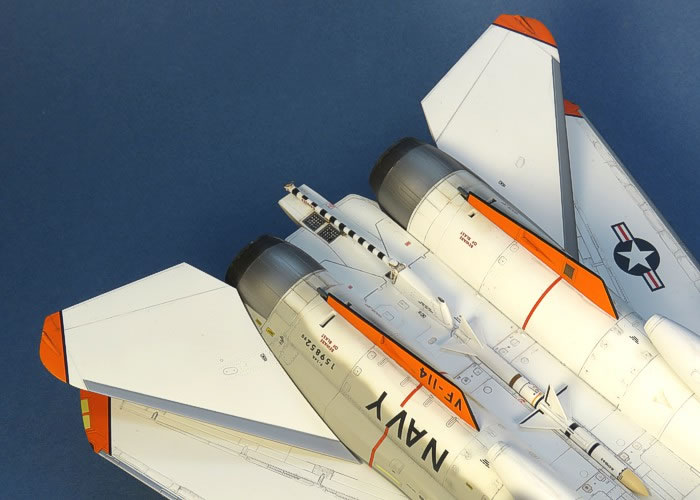
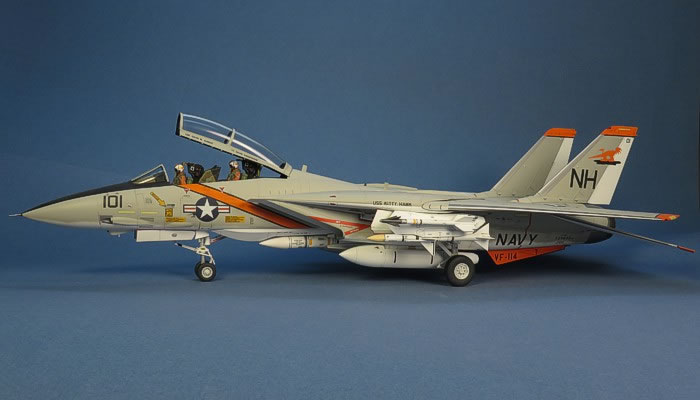
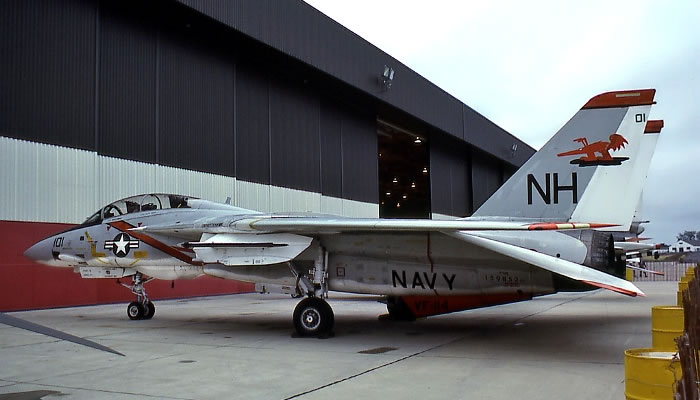
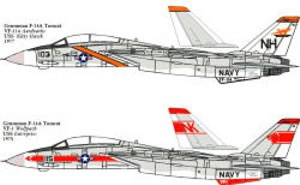
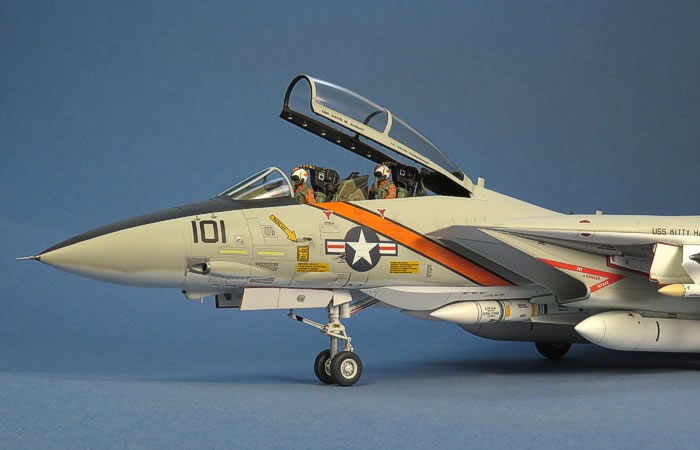
After some collaboration with the friend that mandated the gray and white scheme, and considering what decals I already had in hand, we settled on a VF-114 "Aardvarks" Tomcat. The factors making this one win were that orange color (no other Tomcat unit has orange as a unit color) and that the nose is camouflaged (not tan and white like many early Tomcats had).
Painting
I used mainly Testors Model Master enamel paints to build this model. Any paints I discuss here that do not specifically mention their manufacture are Model Master enamels.
My standard "white" for Naval aircraft for years has been Insignia White (F.S.17875). However, I recently learned the true "white" color for US Naval aircraft should be F.S.17925. I learned this too late to do anything about it on this model, so the bottom is Insignia White. The topside gray color is L.Gull Gray (F.S.16440). Both are gloss colors, so I had to pause for 24 hours after each color to allow the paint to dry before moving on to the next steps.
I free-hand painted the camouflage on the model using my Badger 150-IL air brush. I started with the white bottom color, then applied the gray topside color. I paint with fairly thin paints and keep the pressure down to about 12 or 13 PSI. That pretty well controls most of the paint overspray. However, I still did need to do a quick second pass through both colors to clean up some minor overspray.
Since I chose to use gloss colors for the base paint, I did not need to make a gloss coating with Floquil Crystal Coat to ready the model for decals.
Decals - Unit Markings
CAM Decals
My Custom Decals
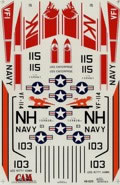
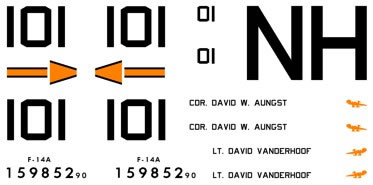
I had the CAM decal sheet that provides both VF-1 and VF-114 (48-029). The sheet and its instructions are not without issues, though.
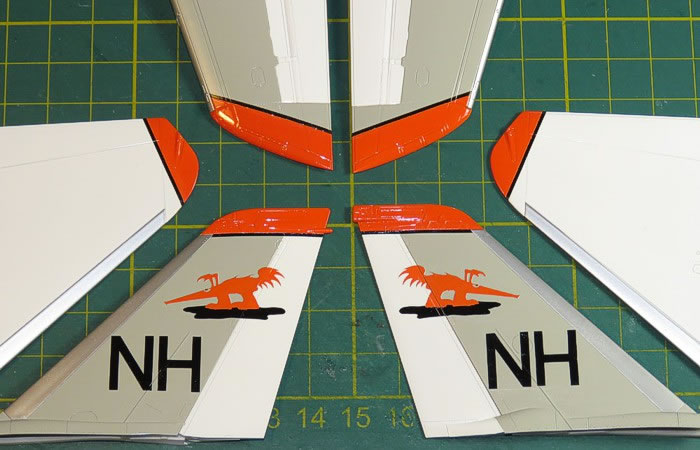
In the actual decals, the national insignia are printed about 20% too small. I had to replace these with national insignia sourced from an AeroMaster Tomcat Data decal sheet (148-023). The NAVY titles are also about 20% too small. I used the Tamiya kit decals to replace these. Also, CAM omits providing a third NH tail code for the right wing top. Being simple black text, the easiest solution for this was to make my own tail code and print it on my laser printer.
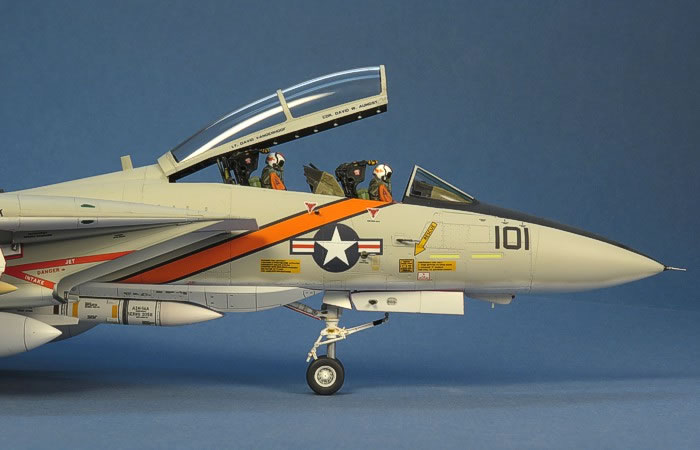
Since I was printing my own markings to get the wing-top tail code, I chose to also include in the custom artwork a new 101 Modex and BuNo (159852). This will help make my model different from anyone else doing a VF-114 bird. Also, all the pictures I have of VF-114 aircraft show that they carried the pilot names on the canopy rails. None are readable, though, so I went off and exercised my artistic license and made myself and my friend the pilot and RIO.
The instructions are off a bit, too. They draw the aircraft with a tan and white nose, which none of the VF-114 ever carried in the pictures I have seen. They also fail to mention that the ventral fins are painted orange to match the rest of the airframe details. With a little research, I found the orange is both inside and outside on the ventral fins. The decals provide only enough black edging for the ventral fins to do the outsides of the fins. These decals would be sized for Hasegawa, which arguably should still work, but I chose to mask and paint the black edging on both sides since I was going to have to paint it on the insides, already, anyway.
None of these are really big issues so long as we modelers are paying attention to our documentation and have stashes of excess Tomcat decals to cover for the sizing "misses".
Decals - Airframe Data Markings
When people view models, many times the thing that makes one model stand out over another is the small details. All the airframe data markings are high on the list of small details that can add great interest into a model. So, I never neglect to add as many as I can when I build a model. This love of doing all this data is what got me assigned from one of my friends the call-sign of "Data" (and that I work in Data Processing / Computers).
I have wanted for a long time to do an early Tomcat peppered in NO STEP markings. I finally got to do one. But it is more than just the NO STEP markings. Early Tomcats are covered in lots of small data markings.
I used multiple decal sheets to come up with all the data for this model. When the same marking was provided on multiple sheets, I reviewed all the different versions of the marking and choose the one I liked best. There were other markings that were only present on one of the sheets, simplifying my choices. The airframe data decal sheets that contributed to this model were as follows (yes, I had quite a few of them).
-
First, the Tamiya kit decals provide lots and lots of airframe data. About half the data I applied to the model came from the Tamiya kit decals.
-
The next biggest contributor was AeroMaster Tomcat Data (148-023). This sheet had nicer renditions of most of the markings provided by both this sheet and the Tamiya kit decal sheet. This sheet also had a few markings not provided on the Tamiya sheet, allowing me to have more data on the model.
-
Many, many years ago, SuperScale (actually was MicroScale, back that long ago) produced a Tomcat data sheet (48-058). I have a few of these sheets in my decal stash. Due to age (over 30 years), I treat them with SuperFilm before using them. This was the source of the yellow NO STEP markings. Although, the 1/48th scale markings seemed too large, so I opted to use the 1/72nd scale Tomcat data (72-248) for all the NO STEP markings. These almost perfectly matched the size of the black NO STEP markings on the other data sheets.
-
And, yes, early Tomcats in the gray/white scheme used yellow NO STEP markings on the white painted areas of the airframe. Over time, re-paints of the airframe had these markings change to black, but from the factory, they were yellow on the white painted areas.
-
FighterTown decals has made two Tomcat airframe data sheets over the last few years. I have them both - FTD48-DATA was their earlier release and 48-082 is the more recent release. The earlier sheet is smaller and caters more to late Tomcats (F-14B and F-14D). The later sheet is huge and provides greatly expanded options on the markings, but still is aimed at later Tomcats as seen in the 1990s and later. Both sheets are mostly similar, but there are some items provided on the older FTD48-DATA sheet that are not found on the later 48-082. Also, while both sheets are aimed at later Tomcats, there are items on each that are relevant for early Tomcats. It was just a matter of picking and choosing the right markings.
-
Furball decals has released a Tomcat data sheet, but it is really more for Bombcat Weapons, not the Tomcat airframe. I used this sheet for most of the markings on my Phoenix missiles.
-
Lastly for this model, TwoBobs created some Weapons Data decals a few years back. I used the AIM-7E Sparrow and AIM-9G/H Sidewinder decals from their weapons data sheet (48-086).
Of the decal time I spent on the model, about 95% of it was spent on the data markings. Judging from the laundry list of Tomcat Data decal sheets I mention here, you can see why the data markings took so long. For the record, the total decal count on the model is 525, which breaks down as follows:
-
33 on the VF-114 squadron markings
-
235 on the external airframe data markings
-
158 on the weapons
-
18 on the fuel tanks
-
22 on the weapons pylons/pallets
-
41 in the cockpit (pilots, ejection seats, radar scopes)
-
18 in/on the wheel wells, wheel well doors, and landing gear
There are 36 more that were used inside the engine exhausts to make the alternating eyelid color pattern, but I am not counting these as they could just as easily have been painted. I just used the decals to cheat and not do a bunch of masking.
I always finish the decal stage with a gloss coating with Floquil Crystal Coat. This seals the decals and prepares the surfaces to receive some washes for weathering.
Weathering
For weathering, I used my typical style of thinned down enamel paint washes and air brush shading. I finished the weathering with some dry brushing of specific areas to pop out the surface details. For a more complete discussion of what I do to weather my models, see my posting on "Weathering Aircraft".
I kept the weathering somewhat light. The model represents the aircraft in 1978. At that time, this was a very new Tomcat, recently delivered from the factory. I did not want it to look too beat up. I did a light panel line wash in Gunship Gray (36118). On the lower surfaces, I also added a few oil stains using Military Brown (30117). After a flat coat, I added a few boot scuffs on the upper surfaces with some dry brushing of black.
Excitement mounts when I go into the "home stretch" with any project. I am working on all the various detail parts at the same time as the main airframe, so by this time, the project is mostly an excursion in attaching the detail parts.
In fact, I got so excited, I forgot to take the picture of all the loose parts waiting for assembly. What you see here is the pieces that were still not glued onto the model at the end of the construction. As a testament to Tamiya's engineering, these parts need no glue to hold them in place.
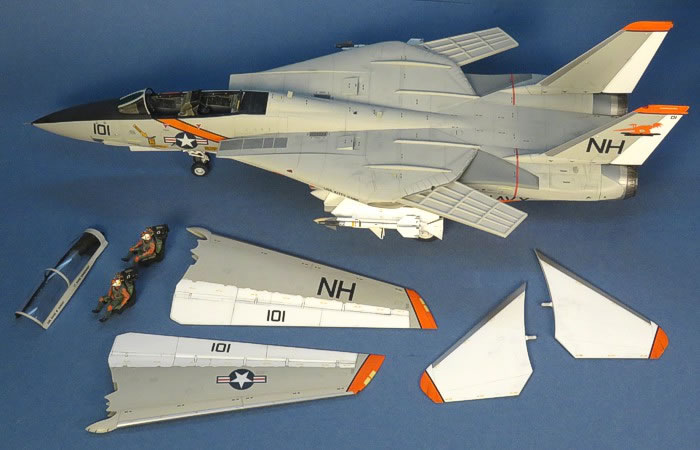 Ready for Final Assembly, Sort-Of Ready for Final Assembly, Sort-Of
Had I not been so excited, you would have seen the steps where I start with the landing gear, first. By this point in most projects, I have a sizable investment in the painting on the main airframe, so I want to get the model up off its belly and sitting on the landing gear. That protects the painting on the bottom of the model from damage.
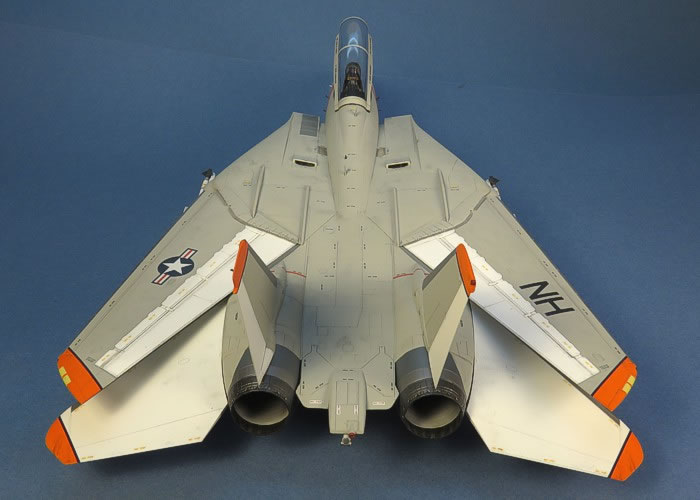
Of note on the wheel well doors - Tamiya engineering again amazed me. Most aircraft models have very difficult to mount wheel well doors. They generally have a joint that is usually the thin edge of the wheel well door getting glued to the edge corner of the wheel well. This is like gluing a piece of paper on its edge to make it stand up - not easy.
Tamiya molded all the doors with the appropriate hinges and then had the hinges attached to small squares that fit into recesses of the wheel well walls. The fit in all cases was flawless, and joint with only a little super glue was quite strong. Down to the very last day of this project, Tamiya engineering was still amazing.
I had popped off the canopy during the decaling phase to get it out of the way for the large orange sash decals. Tamiya provides the cockpit sill as a separate piece. This made it easy to paint the sill in Testors Interior Black and not slop paint anywhere else. I attached the cockpit sill piece after painting it and did some dry-brushing to pop out the details. I finished up by unmasking all the clear sections of the cockpit glass, which I had masked using ParafilM-M in a technique I discuss in this posting.
A ton of details followed this. The blade antennae on the spine, the pitots and temperature sensors on the forward fuselage side and tip of the nose, and the arresting hook under the rear section - all were finished and added to the model. I managed to crush the nose tip pitot into the edge of my modeling desk (don't ask). It bent into a "U" shape, then snapped. I needed to straighten it out, then drill and pin it back on. It is not as good looking as the original piece, nor as strong, but it passes.
The weapons came next. I had done a flat coat on them after applying the final decals to the Sparrows and Sidewinders. The Furball weapons data sheet provided the rocket motor caps for the rears of the missiles. It is a nice touch to have something to place on this part of the missiles.
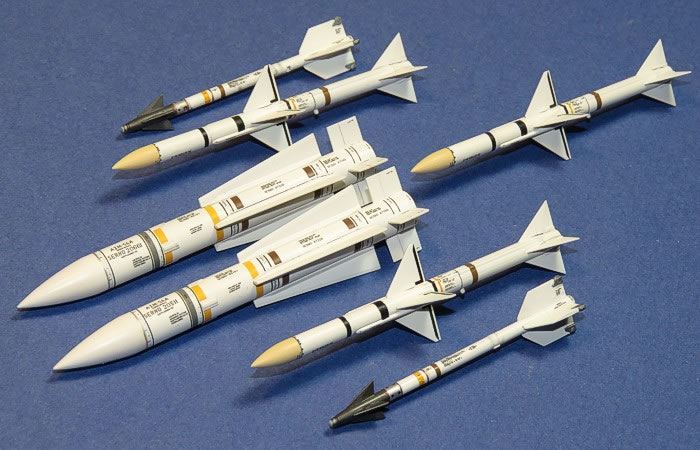
A point to make note of here - I originally painted the missiles per the Tamiya directions with the two big Phoenix missiles having colored noses (radomes). On looking through reference pictures, it was much more common that the Phoenix missiles had white noses to match the rest of their bodies. After this picture was taken, I carefully masked over the decals with Parafilm-M and painted the noses white. The noses still are a slight yellow-ish tint different from the missile bodies, but I like that.
Sparrow missiles, on the other hand, frequently did have colored noses, so I left the three of them as I had originally painted them.
The pilots and the ejection seats came last. I had been painting and decaling these as I did the rest of the airframe. It was time to glue the pilots to the seats.
I could not help making a quick joke on-line with my FaceBook friends. I posted the image below and said, "DONE! I eliminated some of the kit parts to make the build go faster. Here is my Tamiya Tomcat!"
After posting the joke, I completed the model by added the pilots and canopy to the cockpit. I did not glue the seats into the cockpits or the canopy over the cockpits. As with other parts of the kit, the fit was tight enough that I can invert the model and the seats and canopy stay in place.
I have waited a very long time to have an easy-to-build model of the F-14 Tomcat. The Tomcat is second only to the F-4 Phantom as being my favorite aircraft. Armed with an easy-to-build and very accurate kit of the Tomcat, I can see my shelves will soon start filling with Tomcat models (finally!).
This Tamiya kit has all the earmarks that they intend to release the whole Tomcat family. The kit built in this post is the earliest airframe version it appears they will release. There are a few earlier airframes I must convert to get, but the rest of the family (late F-14A, F-14B, and F-14D) will be "in the bag". I just need patience until they get to releasing them.
| Completion Date: |
22 December, 2016 |
| Total Building Time: |
84.3 Hrs |
|
| Research: |
6.5 Hrs |
|
| Construction: |
14.6 Hrs |
|
| Painting: |
29.5 Hrs |
|
| Decals / Markings: |
33.3 Hrs |
Includes Creating and Printing Custom Decals |
| Extra Detailing / Conversion: |
0.4 Hrs |
|
Model, Images and Text
Copyright ©
2016 by David W. Aungst
Page Created 31 January, 2017
Last Updated
1 February, 2017
Back to HyperScale Main Page
|
 Home
| What's New | Features | Gallery | Reviews | Reference | Resource Guides | Forum |
Home
| What's New | Features | Gallery | Reviews | Reference | Resource Guides | Forum |