Eduard's 1/48 scale
Messerschmitt Bf 109 G-6
by John Miller
S
u m m a r y : |
Description and Item No.: |
Eduard Kit No. 82111 - Messerschmitt Bf 109 G-6 |
Price and Availability: |
£29.40 EU Price (£24.50 Export Price) plus shipping available online from Hannants
and hobby retailers online and worldwide |
Scale: |
1/48 |
Review Type: |
Full Build |
Advantages: |
The kit provides an amazing level of detail right out of the box. In particular, the surface details and recessed surface textures are beautifully rendered. To my eyes the Eduard Gustav builds into the most accurate -109G in this sale. |
Disadvantages: |
The fit of some parts is finicky. |

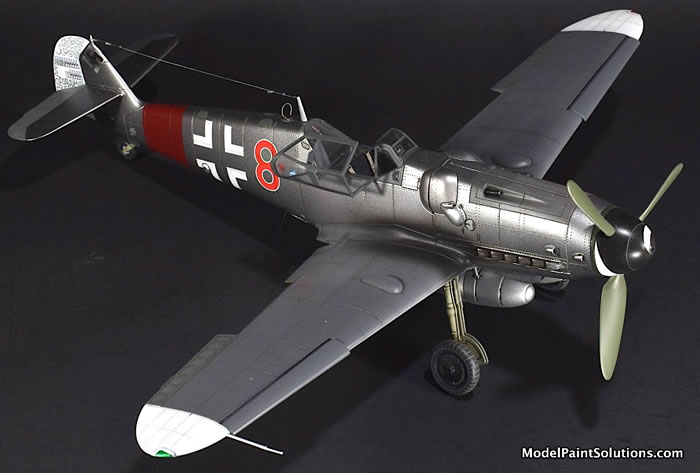
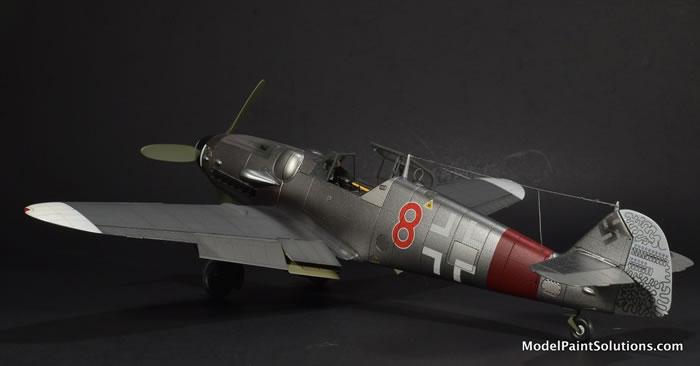
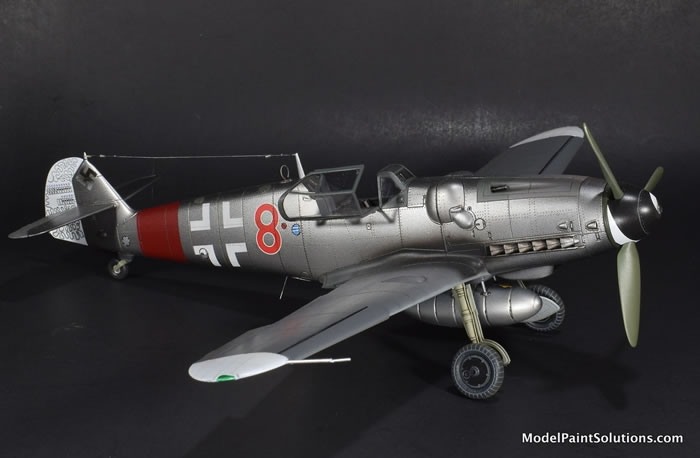
Having built a run of challenging models earlier in the year, I decided that a right-from-the-box-build is what I needed to break the limited-production, work-intensive cycle. Now, building and finishing “Red 8" flown by Kurt Gabler of 8./JG300 has long been a goal and the Profipack boxing by Eduard featuring that very aircraft sealed the deal. This is a very distinctive scheme for a Gustav. A small number of 109’s were sanded down/stripped of paint in an attempt to increase the plane’s speed by lightening the airframe. The increased speed was desired in an attempt to catch the speedy RAF Mosquitos. Kurt Gabler, a Wilde Sau ace, had achieved 17 victories as indicated by the kill tally on his plane’s rudder. Gabler was removed from the war in September of 1944 when, as a Staffelkapitän with 11./JG300, he was gravely wounded.
A word on the scheme……
As many of you Me-109 Extperten know there has been much discussion on the actual finish worn by “Red 8.” That the aircraft was lightened by removal of paint from the airframe has been established. The degree to which this was done (down to primer or metal?) and the method(s) used (paint stripper, sand paper, or ?) are all a matter of conjecture. After reviewing the available pictures and text pertaining to “Red 8” I’ve become convinced the finish was much rougher than is suggested in the Eduard instructions, which depict a clean aluminum fuselage with painted wings. With the current build I followed the painting instructions and was rewarded with a very detailed and nice-looking model. If I tackle this finish again, the result will be a rougher more un-even finish which I suspect, would be closer to what the 1/1 “Red 8” looked like.
The sprues were first soaked in a 1:1 mix of denatured alcohol and Windex (w/ ammonia) for a few hours to remove grease and mold release. Most parts were removed from their sprues with a pair of Godhand nippers and prepped with a blade, files, and Profile 600-grit synthetic sand paper. Tamiya Thin Cement was used to assemble the larger pieces while thick CA glue (Bob Smith Industries) was used to affix smaller parts. The kit was built straight from the box with no major problems and only one deviation from the instructions (more on that later). Other than the challenge of gluing the canopy in the open position, the kit proved to be an enjoyable build. I will definitely be building another Eduard -109; beautiful kit.
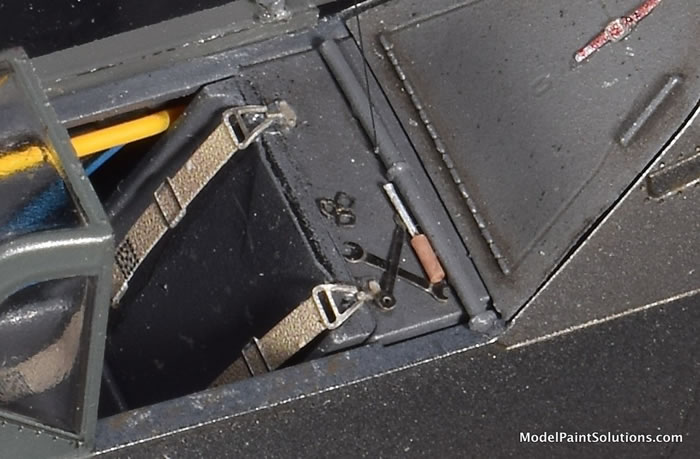
The cockpit seat/floorboard and fuselage sides were painted with Mission RLM-66 that was lightened ~5 with Mission White. This was diluted to 40% paint with CP30 (30% Mission Clear Primer in Mission Thinner).
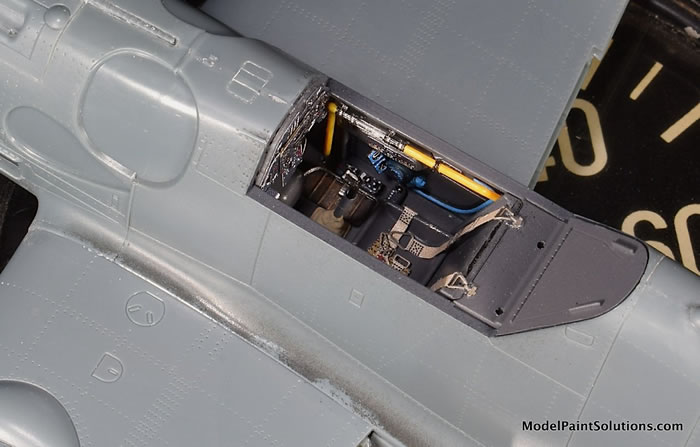
The color PE harness, instrument panel, and assorted cockpit gear look simply awesome when assembled. The completed cockpit was trapped between the fuselage halves and at this point I deviated from the instructions and didn’t insert and glue either the exhausts or part H67 (a circular piece that plugs the nose).
This allowed the exterior of the nose cowls to be primed and painted without the exhaust stacks being in the way. The exhausts were primed/painted separately and then inserted through the open nose after the major exterior painting was done. Once the exhausts were in place, the fuselage was closed up by the addition of part H67 (see below).
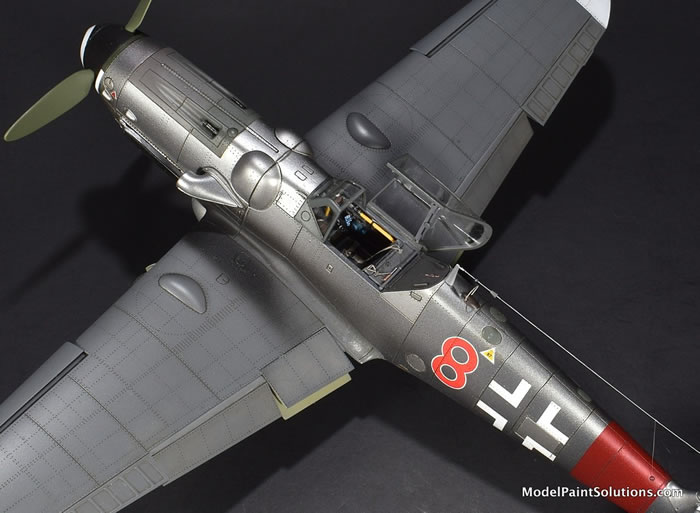
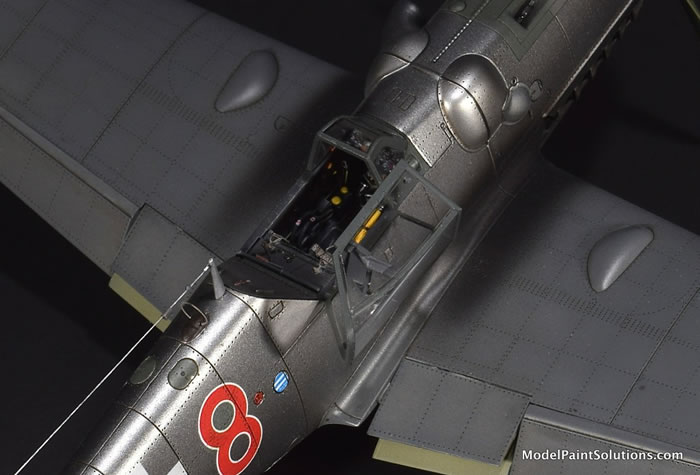
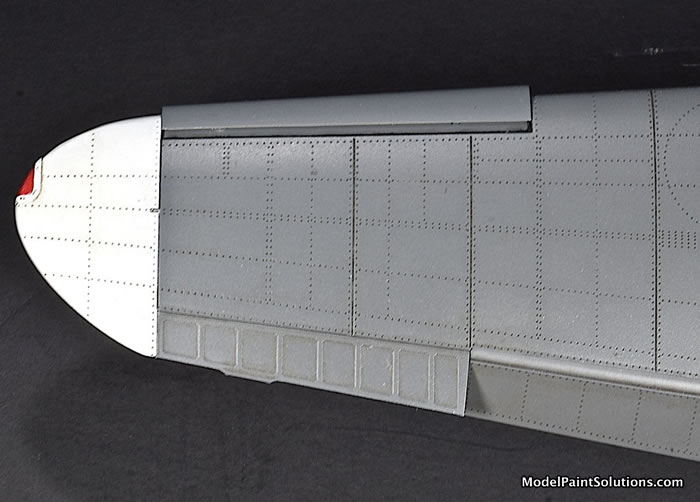
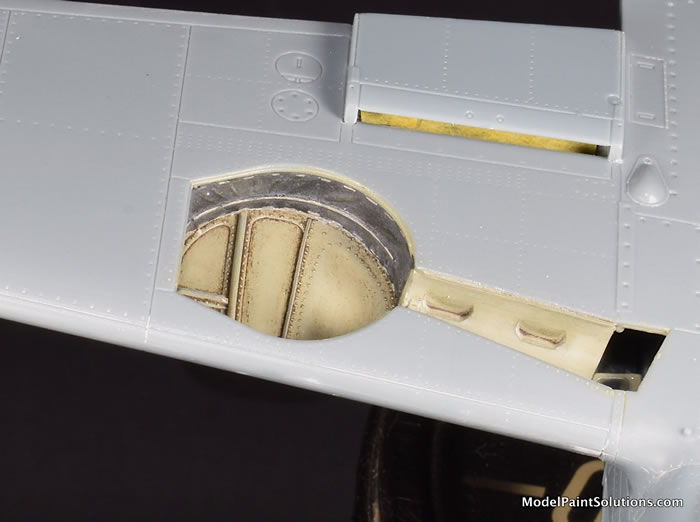
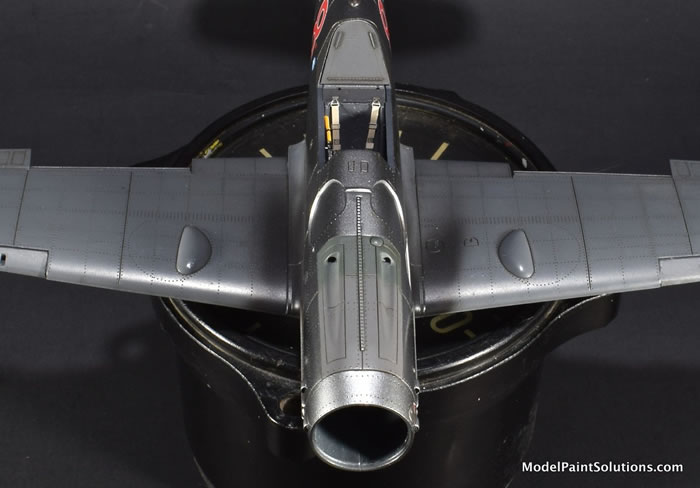
After the empennage and upper cowl assembles were added, the beautifully molded wings were up next. I really like the approach Eduard took with regards to the inscribed surface details on the wings: awesome. Moreover, I think the rendering of the underwing radiators is probably the best in this scale. Similarly, the wheel wells (painted Mission RLM-02) are beautifully detailed and responded well to detail painting and a wash.
Once the cockpit and wheel wells were masked off, it was time for paint; my favorite part:)
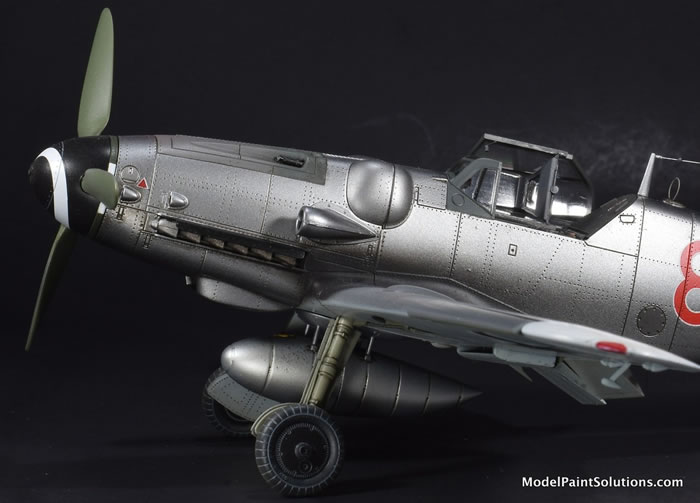
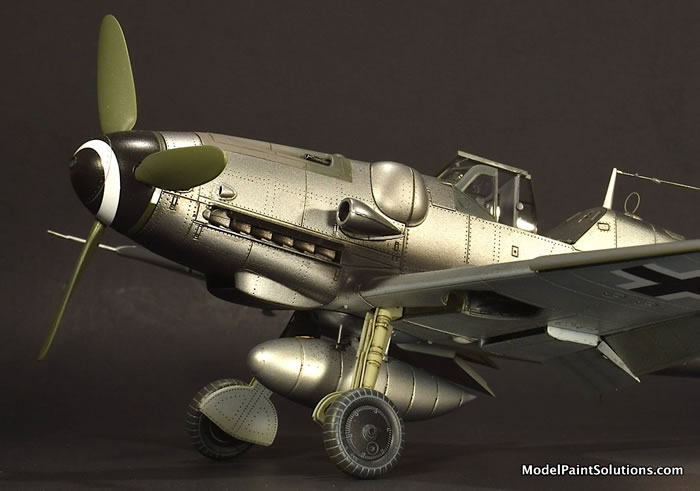
After the model was wiped down with a tissue moistened with denatured alcohol, it was dried and buffed with lint-free Kimwipe. The model was then shot AK Matt Aluminum diluted to 70% paint with AK Xtreme Thinner. This was applied as a light, misty dry coat followed by a light wet coat with an H-S Evolution fitted with a 0.40mm tip. The paint was sprayed at 15psi and the result was a beautiful aluminum sheen with a hardy finish.
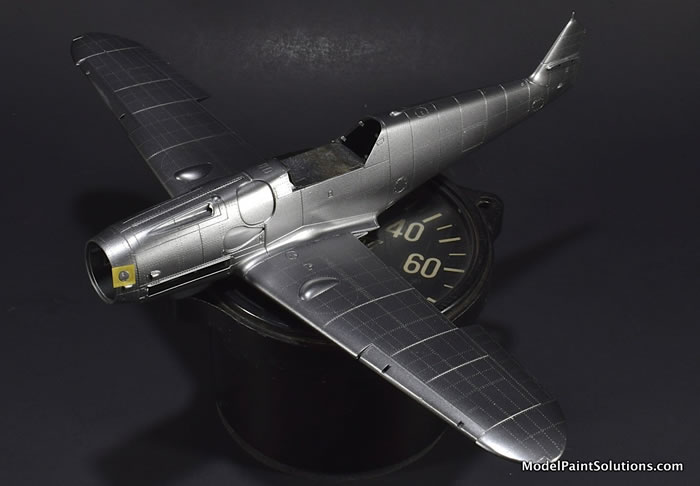
Assorted fuselage panels were masked so they would appear to be made of a lighter-colored metal, after the fuselage was over shot with a mix of AK Matt Aluminum darkened with ~25% AK Dark Aluminum. The mix was diluted and sprayed as described above.
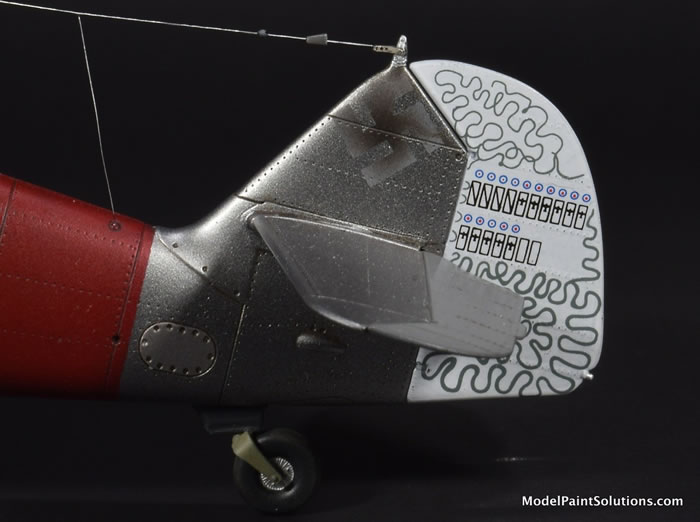
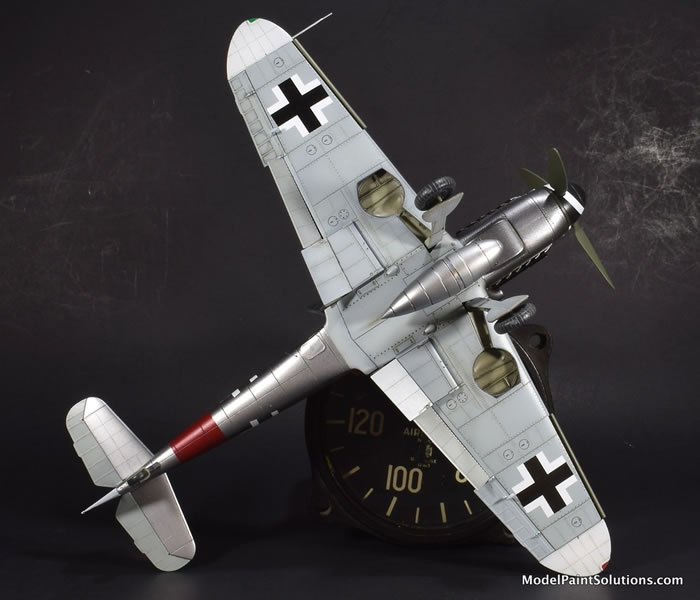
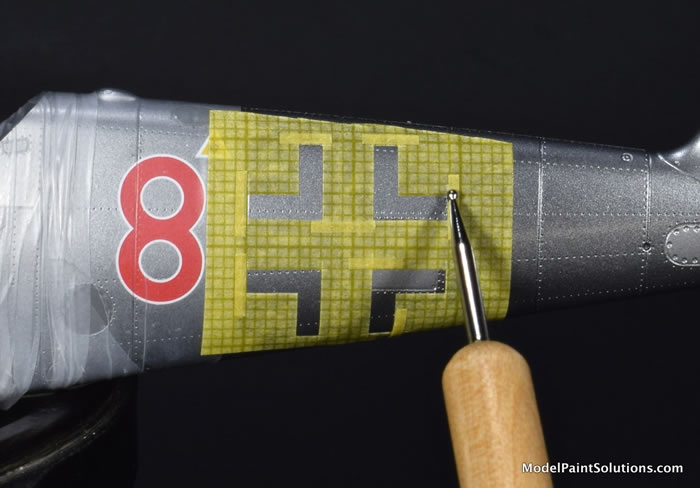
Once the darkened Matt Aluminum was dry, the areas around the swastika or hakenkreuz were masked off with various widths of Aizu tape. Photographs of “Red 8” show the hakenkreuz on each side of the vertical stabilizer had been partially removed or were in the process of being removed when the pictures were taken.
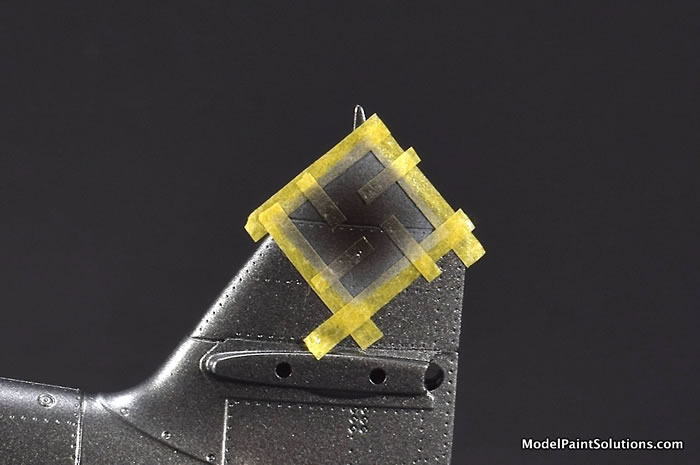
To simulate the worn or partially removed hakenkreuz, the entire area was first lightly sprayed Mission White. When this was dry, the centers of each were carefully sprayed Mission Black.
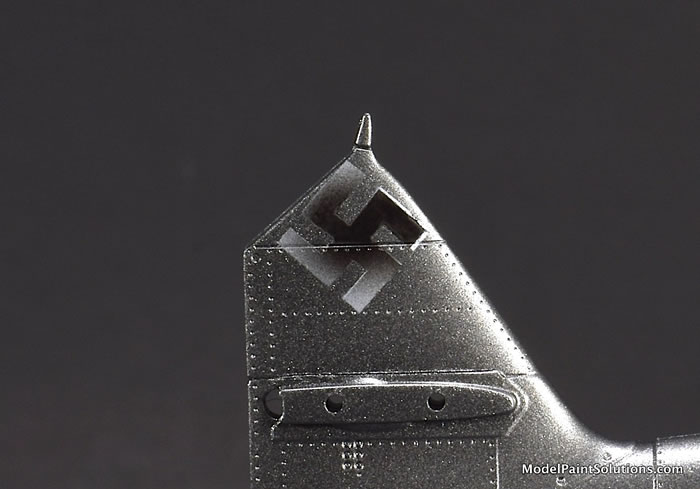
To add a little variation and to suggest the scheme was a work in progress, the upper portion of the starboard hakenkreuz was masked with 0.40mm Aizu tape prior to over painting with black.
Once the fuselage was allowed to dry 48 hours, it was masked and the wings were pre-shaded with AK Real Colors Black diluted for fine-line spraying (25% Paint:75% AK High Compatibility Thinner). The pre-shading was applied at ~10 psi with an H-S Infinity fitted with a 0.15mm tip.
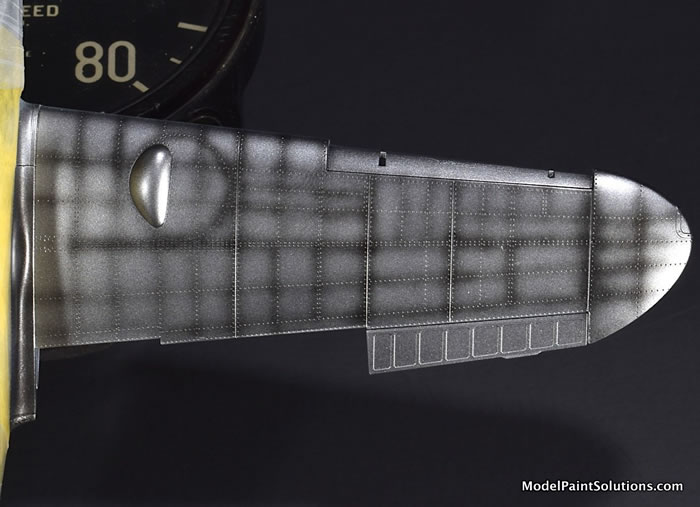
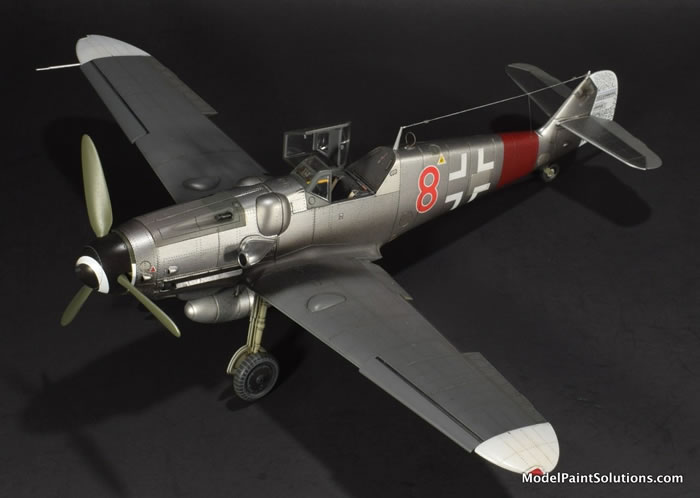
Twenty-four hours later, the uppers of the wings and horizontal stabilizers and the upper cowl were sprayed Mission RLM-75 lightened ~10% with Mission White and diluted with CP30 as described above. When this was dry, the lowers of the wings and horizontal stabilizers were sprayed Mission RLM-76 lightened ~10% with Mission White. Both the RLM-75 and -76 were applied at ~12psi with an H-S Evolution fitted with a 0.20mm tip.
The wings were finished off by masking the tips and spraying them Mission White muted by the addition of 10% Mission Elfenbein. The rudder was sprayed the same muted white.
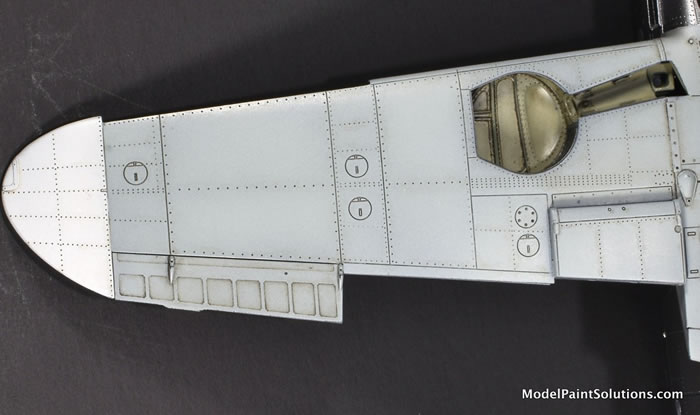
The surface details were then highlighted with Tamiya Dark Brown Enamel Panel Liner that was wiped clean with a Kimwipe moistened with Mona Lisa odorless thinner.
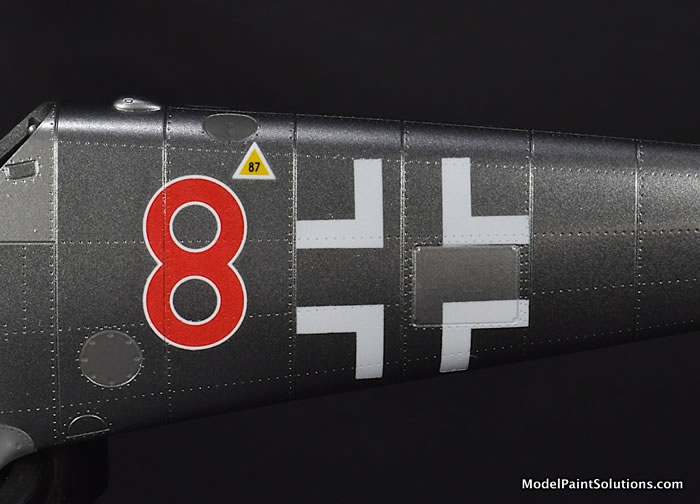
The red “8” decal was applied using conventional techniques and Micro-Set and -Sol. The decals, by Eduard, responded beautifully. Not wanting to deal with the possibility of decal carrier film showing around the balkenkreuz, I opted to airbrush the markings using stencils made the old-fashioned way; a glass light box, a sheet of Tamiya ruled masking sheet, and a fresh X-Acto blade.
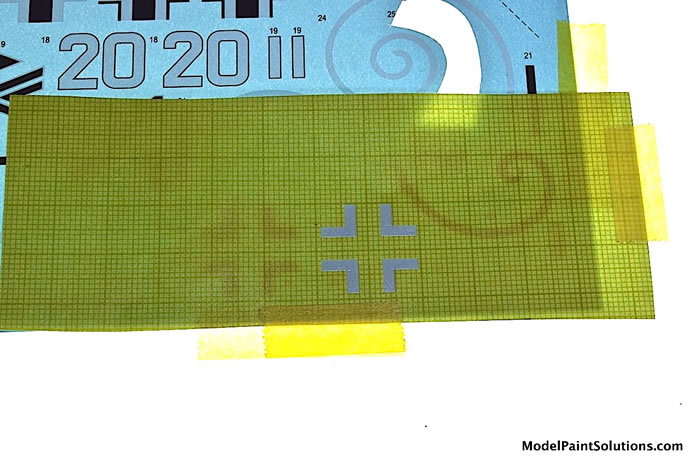
Once the masks were placed on the model, nicks that could allow paint to wick under the tapes, were covered with small strips of Aizu tape and burnished down with a metal stylus. This step is key to ensuring a crisp line with no blurring or bleed-under.
The balkenkreuz were shot Mission White that was applied with an Infinity fitted with a 0.15mm tip. The white was carefully applied as light, over-lapping dry coats to avoid the chance of bleed-through from a too-wet coat of paint.
Once the balkenkreuz were dry, the rear fuselage band was masked off for spraying. To make aligning the tapes with the panel lines easier, 0.70mm-wide Aizu masking tape was used to first delineate the band. Once these were burnished in place with a stylus, wider pieces of masking tape were added preparatory to spraying the red. Vallejo Model Air RLM-23 was used with no lightening with white. This was diluted to ~70% paint with Vallejo Thinner to which Liquitex Flow Aid had been added to 5% by volume.
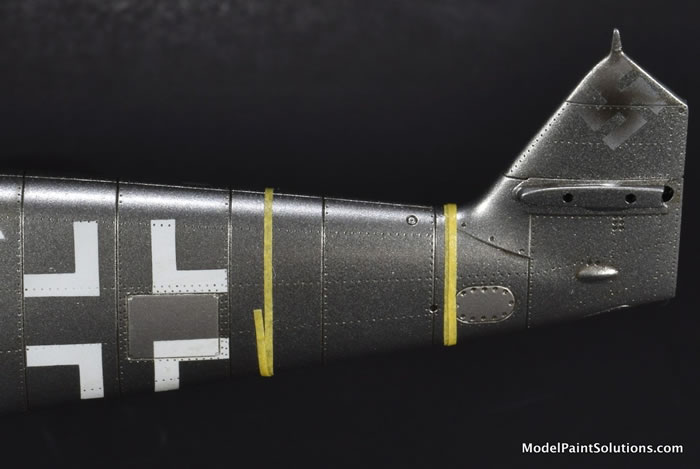
The diluted RLM-23 was applied at ~12psi with an H-S Evolution fitted with a 0.20mm tip. As with the balkenkreuz above, the RLM-23 was shot as multiple dry coats to avoid the wicking of a too-wet coat of paint under the tapes.
Mission Clear Primer as a Metallic Sealer Coat:
With the waist band shot, the fuselage was sprayed with CP30 (30% Mission Clear Primer in Mission Thinner). This is essentially the same CP30 previously used to dilute all the Mission paints used in the build. However, when used as a clear coat, I add both Liquitex Flow Aid and Liquitex Paint Retarder (each to 10%) prior to spraying. The formula is therefore; 30% Mission Clear Primer: 50% Mission Thinner: 10% Flow Aid: 10% Retarder or 30:70:10:10. This was applied at ~15psi as a dry followed by a wet (fill) coat with an H-S Evolution fitted with a 0.40mm tip. When dry, the CP30 provided a barrier for the use of enamel-based panel liners without grossly affecting the sheen of the underlying AK Xtreme metal finish. To that end, both Black and Dark Brown Tamiya Panel Liners were used to accentuate the inscribed fuselage details. Excess liner was removed with Kimwipe moistened with Mona Lisa Odorless Thinner. Additional decals were now applied with Micro-Set and -Sol.
Spraying the Exhaust Stains:
The inspiration for the asymmetrical exhaust staining can be found in the Haynes Messerschmitt Bf109 “Owner’s Workshop Manual” (ISBN 978 184425 6426). Provided on page 7 of this very nice publication is an in-flight picture of Me-109G-2 “Black 6” taken from above and showing the exhaust staining on the port wing deflected farther outboard and not as far back as on the starboard wing. This was replicated with a dilute mix of Mission “Dirty” Black (Black with a few drops of Brown and green) applied at 10psi with an H-S Infinity fitted with a 0.15mm tip.
Once the exhaust stains were shot, the exhausts (previously sprayed with a mix of AK Steel and Dark Aluminum) were placed into position through the open nose. and affixed with dabs of CA. The nose was then closed by the addition of part H67. The staining on the exhausts was then blended in with the previously airbrushed stains with carefully applied black weathering powder.
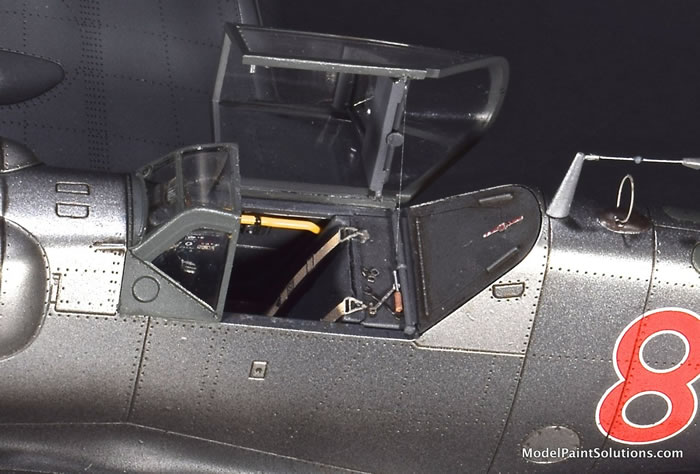
The canopy, always an important consideration when posed open in this scale, was first buffed with a dry Kimwipe, dipped in Future, and allowed to dry for 48 hours. It was then shot Mission RLM-66 diluted with CP30 as described above. The die-cut Eduard masks worked perfectly. Since the canopy was to be posed open, the inner framing of the rear canopy was masked and sprayed as well.
The windscreen fit with no issues as did the rear portion of the canopy as long as it was posed in the closed position. No provision is made for gluing the canopy in the open position. Moreover, the mating surface between the canopy and fuselage with the rear section in the open position is slim to say the least. For lack of a better fix, I installed a small piece if strip plastic ~0.5mm wide along the sill to provide a better footing for the rear canopy; not ideal. Fortunately, this isn’t seen unless looking from under the model. In future builds of the kit, this area will receive more attention earlier in the assembly sequence.
Finishing Up:
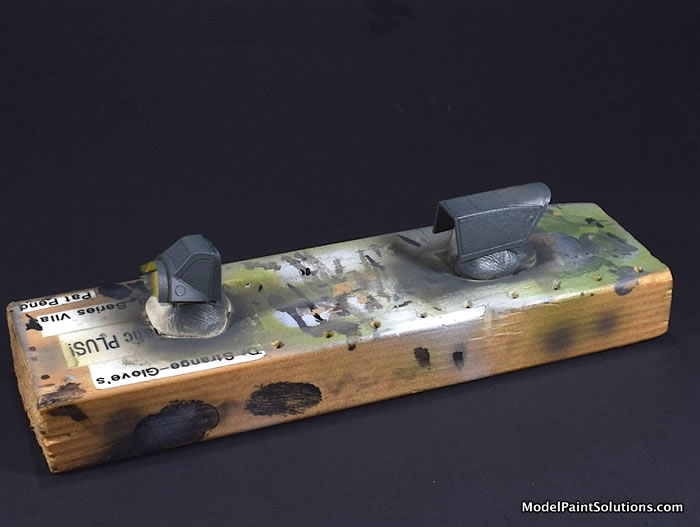
To add variety to the scheme, the breech covers were shot with varying mixes of AK Aluminum, White Aluminum and Dark Aluminum and affixed with CA glue.
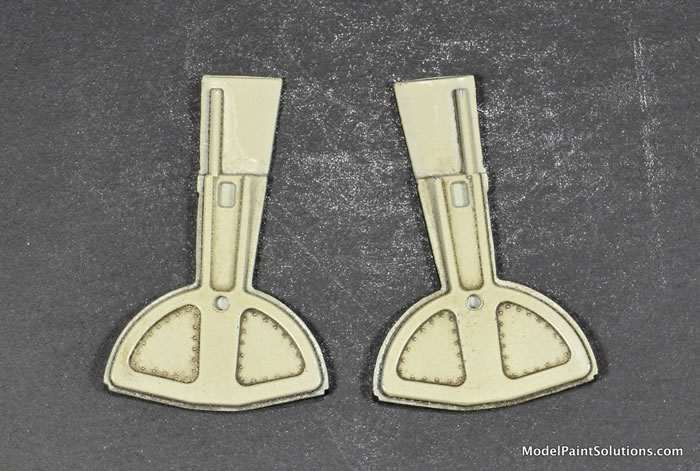
The gear legs and inner faces of the gear doors were shot Mission RLM-02 lightened ~5% with Mission White. After a protective coat of CP30, the details on the gear legs and doors were accentuated with Tamiya Dark Brown Panel Liner.
To facilitate installing the break lines on the main gear legs, the legs were first glued in place with CA and thus immobilized, the break lines were easily added from lengths of fine solder.
The propeller hub was painted Mission Black lightened with a few drops of Mission White. I decided to make the blades look relatively new so they were first shot with Mission Black Primer and buffed out with a dry Kimwipe. They were then overshot with Mission RLM-70 diluted with CP30 with ~10% lightening. When dry, the blades were buffed with a dry Kimwipe producing a nice, new-looking sheen.
In a deviation from the painting instructions, I opted to paint the belly tank AK White Aluminum versus the suggested RLM-76. Given the multiple steps taken by the ground crew to decrease airframe weight, having a stripped belly tank at some time seemed a reasonable assumption.
The beautifully molded main wheels/ties were first sprayed with Mission Black Primer. With the wheel hubs masked, the tires were sprayed with a mix of Mission Worn Tire and Mission Black. Details on both the hubs and tires were accentuated with a wash of Tamiya Grey Enamel Panel Liner.
Once the model was assembled, the aerial and ground wires were fashioned from Uschi line (Medium and Fine respectively) that was lightened with a silver gel pen. I’m not entirely happy with this result as I think the aerials appear to light to my eye; live and learn:)
Man, that was a blast:) I’ve long wanted “Red 8” in my cabinet and the Eduard offering gives you everything needed right in the box for a beautiful model. This kit is a joy to build and brimming with detail. Although it’s finicky at some points, it’s worth the extra work. As mentioned previously, the scheme as described in the kit’s painting instructions represents a very clean interpretation of the scheme likely worn by “Red 8.” I suspect the finish was more rough and uneven with areas of both primer and bare metal showing. Such a finish would be a great subject for a large scale (1/32) build and something I might try my hand at down the road :)
Until then, I’ve gotta go paint something!
--John
For more on this build visit Modelpaintsolutions.com
Kit eagerly purchased by the builder.
Text and Images Copyright © 2020 by Model Paint Solutions
Page Created 11 June, 2021
Last updated
11 June, 2021
Back to HyperScale Main Page
Back to Reviews Page

|
 Home
| What's New |
Features |
Gallery |
Reviews |
Reference |
Forum |
Search
Home
| What's New |
Features |
Gallery |
Reviews |
Reference |
Forum |
Search