Hobby Boss 1/48 scale
Grumman F8F-1 Bearcat
by Jon Bryon
|
Grumman F8F-1 Bearcat
CASU-5, US Navy, USA 1946
|

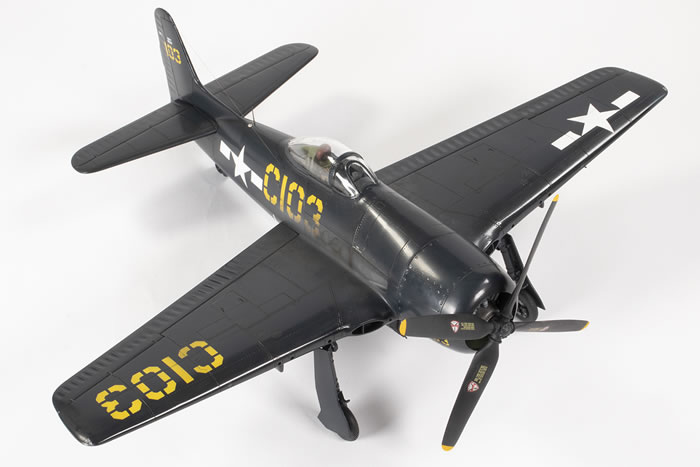
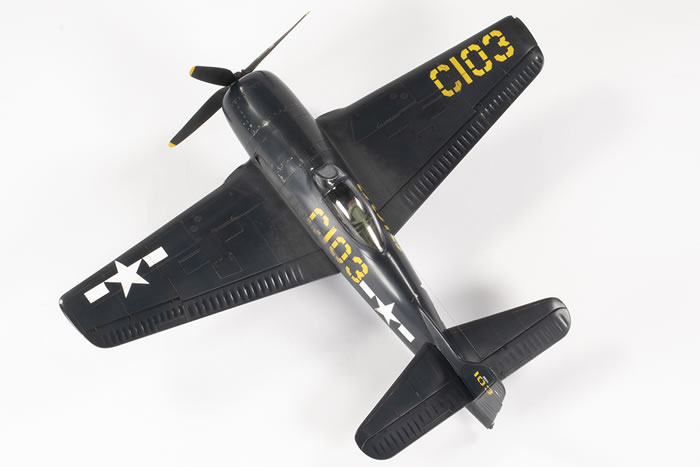
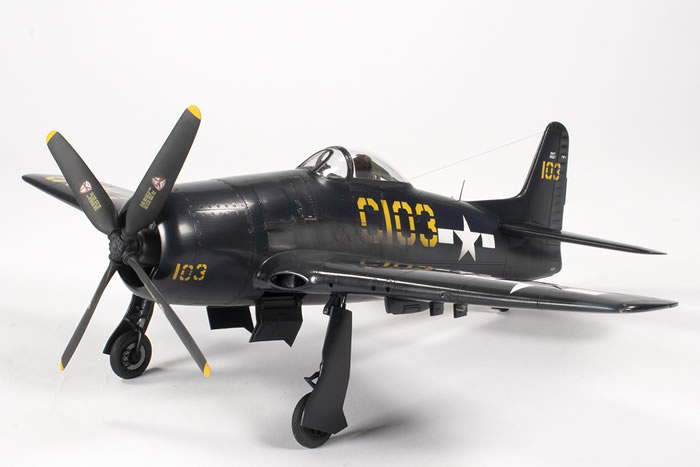
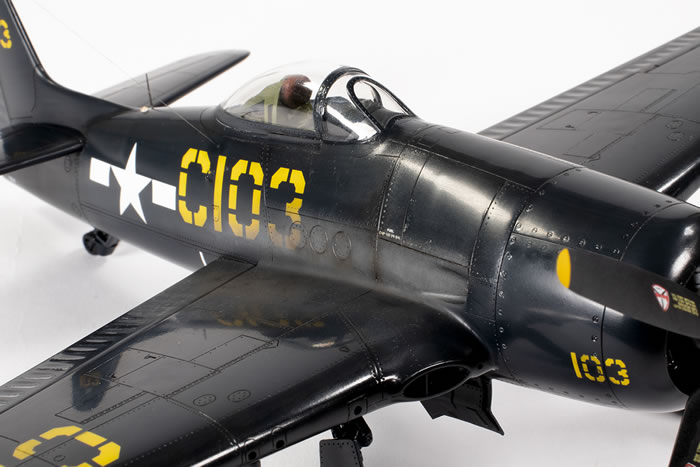
HobbyBoss 1/48 Grumman F8F-1 Bearcat
with BarracudaCast resin wheels and Superscale decals
CASU-5, US Navy, USA 1946
The Grumman F8F Bearcat is cursed in 1/48 scale. For many years I watched from the sidelines on places like rec.models.scale as people lamented the lack of a decent rendition of this aircraft and debated the merits of various correction parts available for the Hawk and Hobbycraft kits, mostly related (as far as I could tell) to issues with the shape of the cowling. Hopes were dashed again in 2011 when HobbyBoss released their attempt, and still fell short.
Jon Kunac-Tabinor did a detailed assessment of the HobbyBoss kit over on Britmodeller, and was suitably unimpressed. From memory, issues ranged from the location of the engine intakes, landing gear, various shape issues, and so forth. I therefore never really intended to get the kit, but in early 2013 I found myself showing my dad around my LHS in China. He really wanted to buy me a kit, and this was the only thing they had at the time that I was interested in, plus it was really, really cheap. So it came into my possession, and provides me with a very fond memory of him.
In order to avoid being too depressed by errors in the kit, I avoided re-reading any of the commentary on it and just decided to build it. This is the F8F-1B boxing of the kit that came with French and Thai markings.

The first thing I needed were some US Navy markings. There’s not a lot available for the -1B model, but I eventually sourced Superscale’s sheet 48-1082, containing markings for an F8F-1, F8F-1B and an F8F-2. It was clearly not the most popular sheet in the world – it appears I’m the only person who owns it on Scalemates.
And to be frank, after some research, it doesn’t deserve to be a popular sheet. Forgive me while I digress into the merits, or otherwise, of this decal sheet; scroll on by if you just want to read about the model…
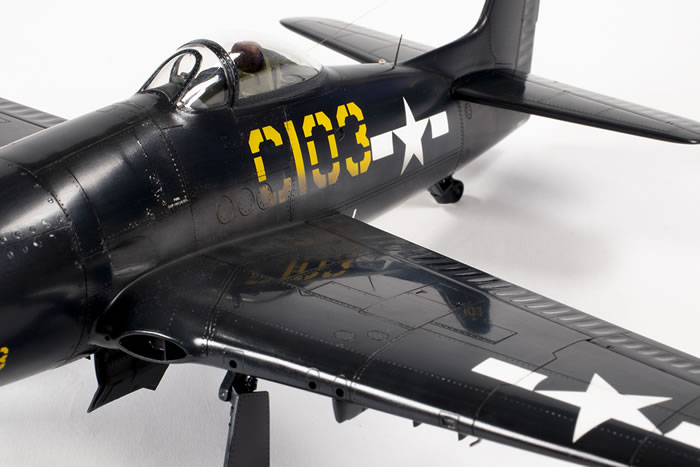
The Superscale sheet contains two references for the F8F-1B I wanted to build, coded ‘C103’ in yellow and with stars and bars without the red stripe; this would be the first model in my collection with such US markings. The first reference was from Navy Air Colours 1945-1985 by Doll, Jackson and Riley. This only contains a colour profile with no photographic reference, so was not a valid reference. The second was from USN Aircraft Carrier Units Vol.1 by Duane Kasulka. This has a fairly blurry black and white photo of C103 and identifies it as an F8F-1B from VF-17 in 1946.
Except it clearly isn’t. There are no gun barrels and no bulges on the wings. It’s an F8F-1. The BuNo that Superscale provide, 95127, is also for an F8F-1, although I can’t see how they know this number is correct and suspect it is a guess.
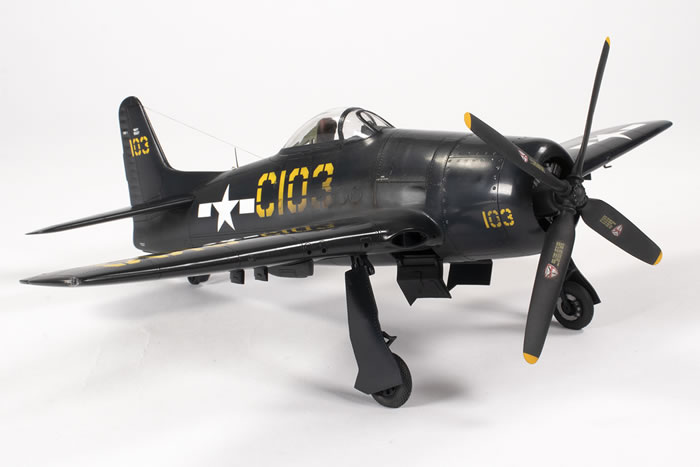
Neither do I think C103 belonged to VF-17. I’m on less certain ground here, but the excellent Ginter book on the Bearcat shows no VF-17 F8Fs that are marked up remotely like this airframe, nor any other fleet squadrons. What the Ginter book does have, however, are a couple of photos of airframes C99, 100, C101 and C57, all very similar to C103 and also from late 1945 and 1946. (Although these codes are not segmented, they clearly were at one point). These all belonged to Carrier Air Service Unit 5, which makes far more sense of the non-fleet style markings they are carrying. I therefore concluded I was making an F8F-1 from CASU-5, not an F8F-1B from VF-17. Further errors in the decals will be highlighted later on…
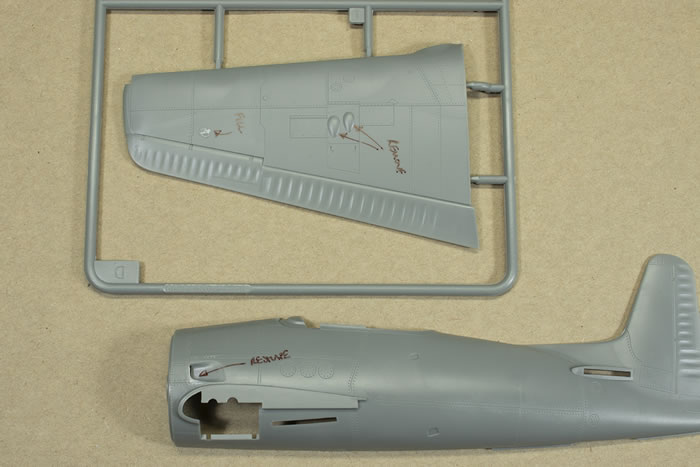
My first step, then, was to modify the kit back to the F8F-1. Fortunately, this was relatively simple and just involved removing the wing bulges and leaving off the gun barrels.
Another potential modification was the exhaust stacks. I understood that F8F-1s had five exhausts per stack, compared to three for the F8F-2, and since the HB kit had the latter, I bought some Quickboost resin exhausts. This, it turned out, was unnecessary. The excellent Tailspin blog, by Tommy Thomason (http://tailspintopics.blogspot.com/), is a treasure trove of information, including on the Bearcat. As he so elegantly shows, only the first 23 Bearcats had the five exhaust stacks, which means I needed to use the kit exhausts. Tommy also gives lots of nice detail on how the fairing around the exhaust changed with time, and I made a cursory effort to reshape this area of the kit with CA mixed with VMS powder.
Which may seem strange, given the number of other more significant errors I chose to be blind to, but at the end of the day I make the changes I can be bothered to make, and ignore those I can’t.
The HB kit is nicely moulded, but the surface has a fine texture that needs to be polished out for a decent gloss finish. I decided to leave this until after priming.
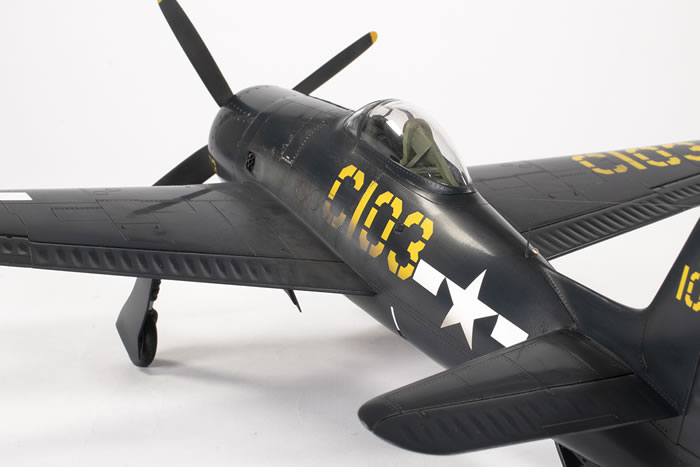
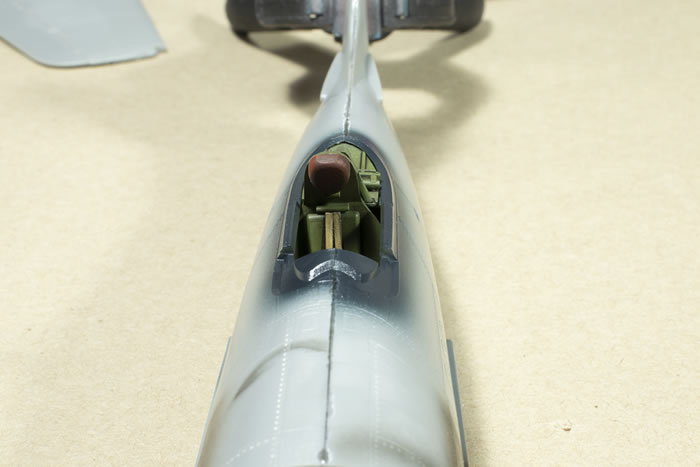
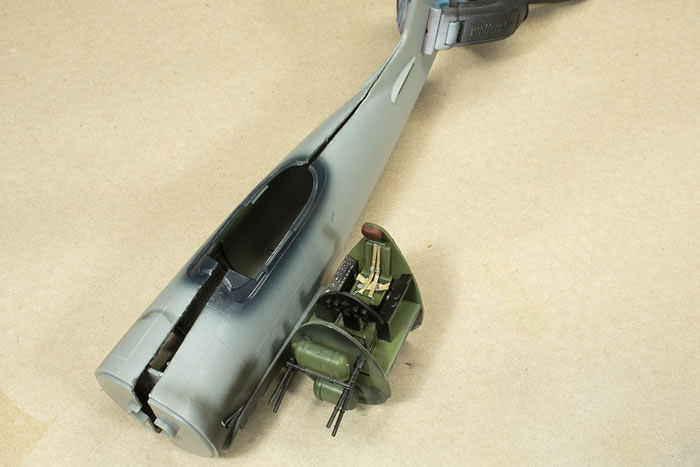
The cockpit is basic, but pretty invisible even through the bubble canopy, since the clear plastic is very, very thick. I built it straight from the box, just adding some US Navy etched seatbelts by Eduard, and guessed at the colours, since no one seems to exactly know how they were painted. In assembling the cockpit it quickly became apparent that HobbyBoss got the shape of the armour plate behind the seat significantly wrong. I left it.
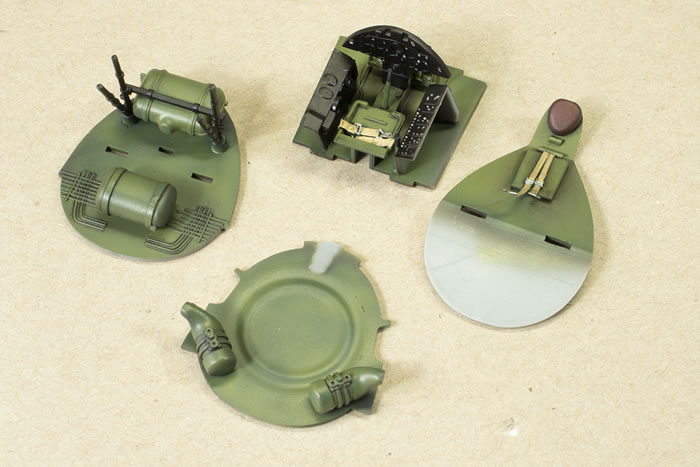
Kit cockpit parts with Eduard seat belts.
This was all very basic since it’s pretty much invisible through the canopy.
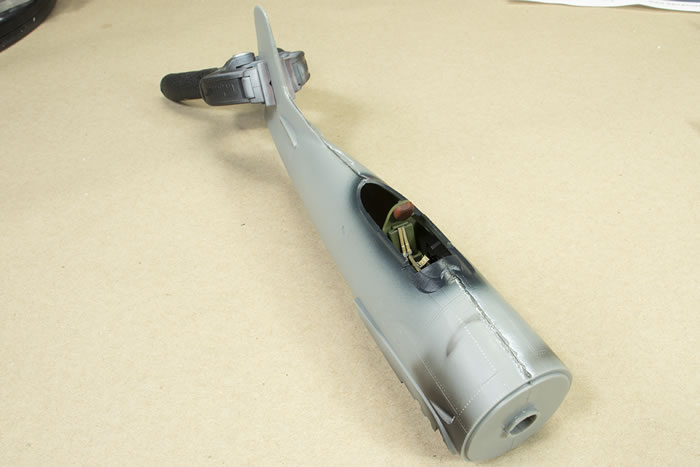
The overall fit of the kit is good. I had no trouble gluing the fuselage halves together with superglue. However, when I revisited the model a few hours later, I noticed it looked like this:
What a wonky cockpit!
This is not good. So a few minutes later, after some application of brute force, I had this:
Let's try again...
After inserting the cockpit so it was square, I glued everything back up together again with CA:
Round Two
Construction proceeded apace, the fuselage being followed by the wings. Of note is that the wing roots were too thin and so plenty of CA mixed with the VMS powder was needed to get a smooth transition from the wing to the fuselage. This was the worst area of the model and not fun to deal with as the area is quite tight to work in.
In addition to removing the bulges, looking at images of the wing also showed that I needed some more pylons. These were not in the kit, and in the pictures looked sufficiently similar to the little pylons Hasegawa provide in their late F4U Corsair models that I was able to use them. I also had a go at improving the vanes on the air intakes, especially as there should only be one in each intake, and not two (as HobbyBoss provide). My rendition is not very accurate, but I think it looks better than what came with the kit.
Through Tommy Thomason’s blog, I became aware that the kit-provided gunsight was inaccurate (it’s good for an F8F-2) and that the windscreen was correspondingly too big, being more gently sloped than was correct for an F8F-1/B. The kit’s windscreen is correct for the F8F-2. Correcting this would obviously be impossible for me, so I left it well alone.
My only concession to aftermarket (aside from the seatbelts and the decals), were some BarracudaCast resin wheels. These were very nice, surprisingly complicated, and very well moulded.
Before long I had an airframe ready for paint. This is when I started paying more attention to the single reference photo I had. I should have paid more attention to it earlier. It became apparent that the roll bar behind the pilot was not present on this airframe. Of course, I had attached it and well and truly stuck the canopy on with Tamiya Extra Thin. Oh well.
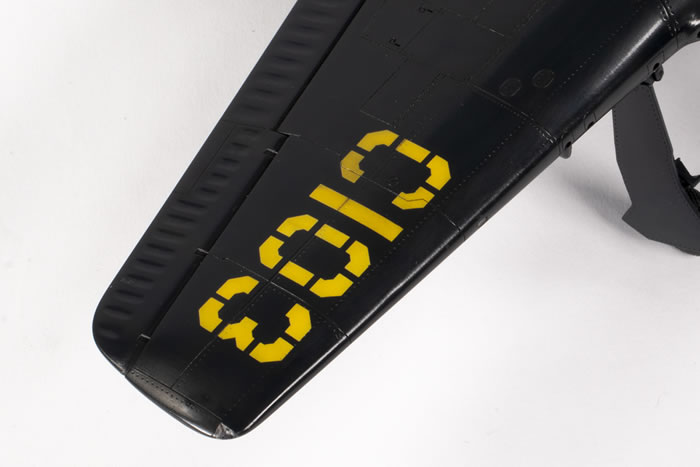
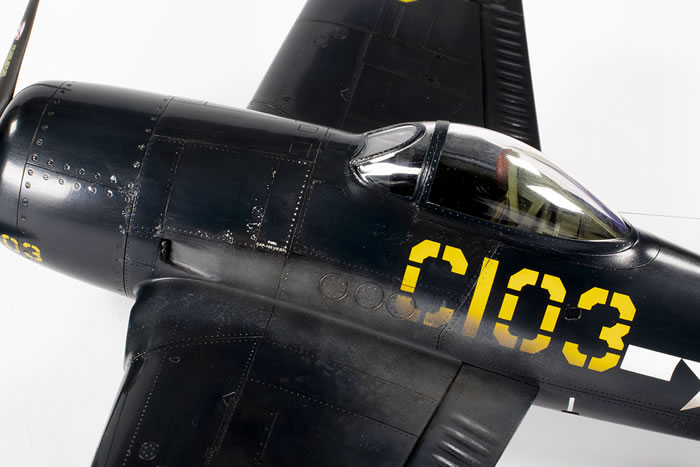
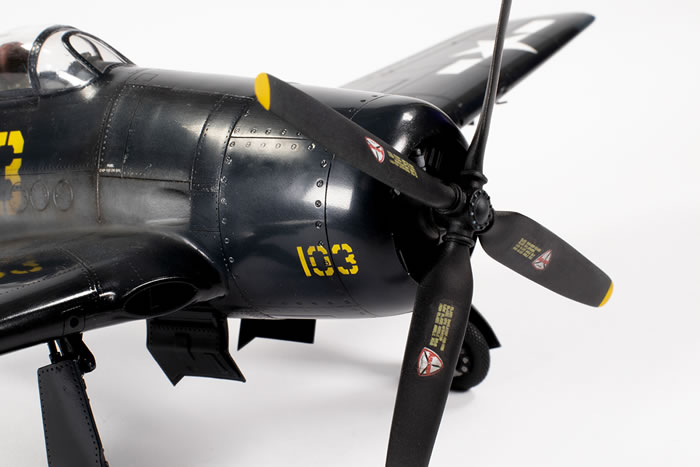
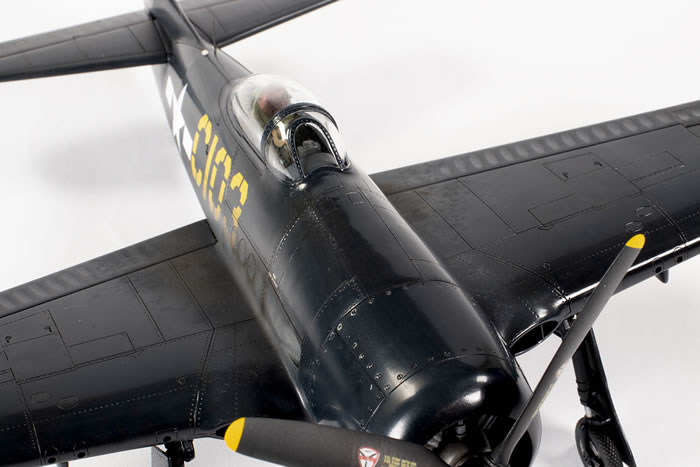
That disappointment out of the way, I continued to look more closely. I noted the aerial wire from the tail to the starboard fuselage, and the whip antenna just ahead of the tail fillet. These would be added at the end. I noted the pitot tube under the port wing, not provided in the kit. I noted the patchy finish of the ‘C103’ markings, and the misaligned ‘103’ on the port nose cowling, with the ‘3’ higher than the ’10’. I decided, then, to paint as many of the markings as possible rather than use the decals.
To that end, I airbrushed the areas where the national insignia were to go in Mr White Finishing Surfacer 1500. Using Inkscape, I drew around the decals I had scanned into my computer, and cut them on my Silhouette Portrait 2 cutter. The masks for the white areas went down fine, and I sprayed around them with Tamiya XF-1 Flat Black. I use Tamiya paint over masks because I find I get a finer separation when the mask is removed.
Over that I primed the model using Mr Black Finishing Surfacer 1500, heavily thinned with Mr Leveling Thinner. This was polished out using Infini 2500 sanding sponges, to try and reduce the gritty plastic surface texture. Once, done, I applied an overall coat of Mr Color 365 Gross (sic) Sea Blue, which is a beautiful paint to spray.
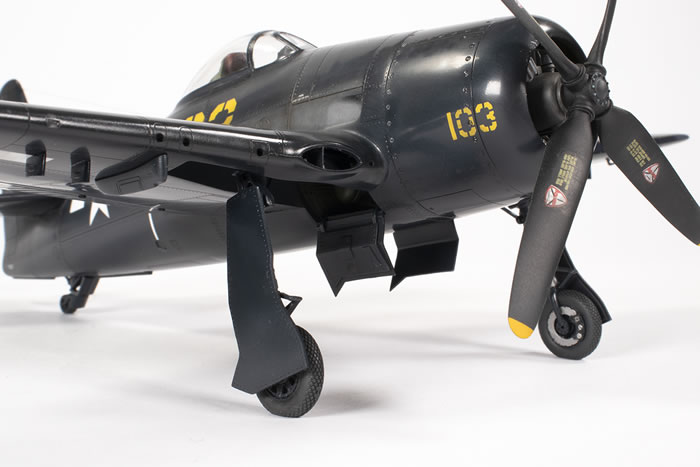
This looked rather boring, and so I pondered how to make it more interesting. I mixed some of the C365 with Mr Color 137 Tire Black and 29 Hull Red, and airbrushed it through various mottling stencils around some of the panel detail, like at the wing folds. I mottled the airframe with some heavily thinned Mr Color 14 Navy Blue and 71 Midnight Blue to build in some very subtle variation. I liked this.
Next were the numeral markings. I wanted these to be quite patchy, so had always planned to paint them over the dark blue. I came to attach the masks and then realised Superscale had made another mistake: the ‘C’ on the decals was segmented incorrectly. How they got this wrong, I’ll never know; it’s crystal clear on the photo. I redrew my masks and applied the correct style.
The first coat over the masks was some Tamiya XF-2 Flat White, and then I followed up with some XF-3 Flat Yellow. Unfortunately I was a little heavier with the white than I should have been, and the numerals came out less patchy that I was aiming for.
I did have quite a long discussion with myself as to whether the ‘C103’ was present on the wings, as Superscale show. In the end, I loaded a scanned version the reference image into Photoshop and used the contrast tools to play around with it; this can reveal things not visible to my naked eye. To me it did suggest the codes were present at least on the upper wing, so I proceeded on that basis, but it may well be incorrect. From other images in the Ginter book, I did conclude that the ‘103’ was not present on the undercarriage doors, nor the stencilling, contra Superscale’s instructions.
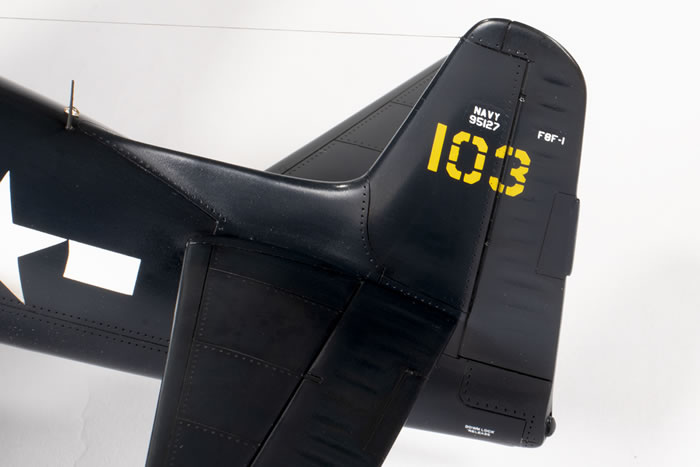
The masks worked pretty well and did not require any touch ups. I doctored the Superscale tail decals to read ‘F8F-1’ and applied those, along with a couple of stencils from the HobbyBoss sheet that seemed to be present on C103. After the markings were done, there were a total of ten very small decals on the model, plus the prop markings from the HB sheet (which were unfortunately out of register). Only four decals were actually used from the Superscale sheet…
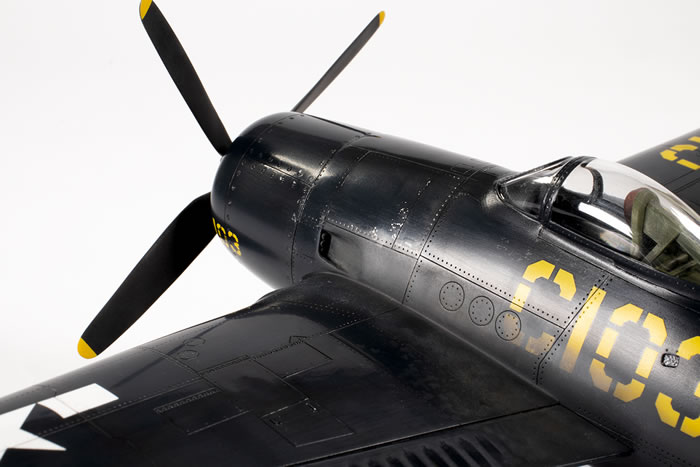
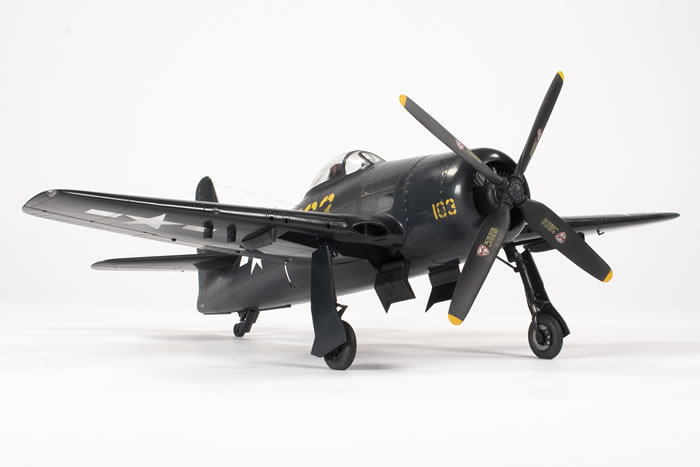
The prop blades had been airbrushed with Mr Color 137 Tire Black, and then mottled with black oil paint. Bearcat prop bosses could vary a lot in colour, but I left this one blue in the absence of any other information.
My thoughts now turned to the final finish. The real thing was clearly very glossy, going from the reflections visible on the upper wing. This needed to be combined with some heavy exhaust staining, which seemed to characterise most Bearcats, even those flown by the Blue Angels. My plan of attack was to apply some heavy wet coats on Mr Color GX100 Clear Gloss. This obliterated all of my lovely tonal variation in the paint work. After a day or so to dry, I rubbed the airframe down with Infini 2500 grit elastic sanding film and sponge to flatten out the gloss coat, followed by a good polish with 4000 grit sanding sponges. I like this finish as it’s very smooth and quite glossy, but in a subdued manner, not like a car finish.
The disadvantage of this method is that all the surface detail gets clogged up with white sanding residue which is extremely difficult to shift and shows up very starkly against the dark blue paint. After spraying the panel lines with water at high pressure (50 PSI), there was still plenty of white residue, and I reverted to a black oil panel line wash, which eliminated the white.
Now I needed to tackle the exhaust stain. The base layer is very highly diluted Liquitex inks (variously mixed from black, white, raw umber, burnt umber and raw sienna) thinned with Tamiya X-20A. These were airbrushed along the length of the fuselage from the exhausts and a little at the wing roots. Once I was happy enough, I locked these in place with some Mr Color GX113 Clear Matt, which I also mottled around the wing roots to try and represent areas worn to a flatter finish and affected by the exhaust, as seen on C57 in the Ginter book. I got a little carried away here and the matt area is a bit wider than I would have liked.
The final layer was some Abteilung 502 Cream Brown oil paint mixed with Dust and Snow White, and some further additions from Abteilung 502 Smoke and some burnt umber oil paint. These were all stippled on and blended in with various brushes.
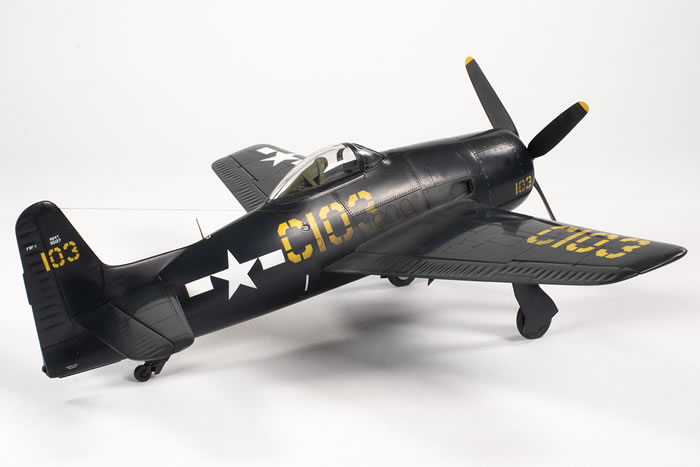
The final stretch was the addition of the landing gear, which fits very positively, but slightly too splayed out for my liking, the underwing pitot (an A-4 part from the spares box), aerial wire (Uschi van der Rosten rigging thread), whip antenna (stretched sprue) and the little light just by the tail fillet (smash moulded in clear styrene through the teardrop-shaped hole Eduard provide on some of their etched frets). I lacked any decent reference for the latter item, so it’s a bit of an educated guess.
I do find the final result quite striking. It was intended as a quick built (just under four weeks) and my goals were to get a subdued gloss finish mixed with the matt areas around the exhausts, and to do the main markings in paint. This all worked quite well. There are the weak points – the unnecessary roll bar, a few bumps in the paint and some areas where I missed removing the wash – and no doubt people who know what they are talking about will be quick to point out the kit’s inaccuracies to which I am blind, but I do love the gloss sea blue scheme and the model has real presence.
To see more articles like this, and more images of this Bearcat, please visit my website http://www.jonbryon.com
Text and Images Copyright ©
2021 by Jon Bryon
Page Created 29 September, 2021
Last Updated
29 September, 2021
Back to
HyperScale Main Page
|
 Home
| What's New |
Features |
Gallery |
Reviews |
Reference |
Forum |
Search
Home
| What's New |
Features |
Gallery |
Reviews |
Reference |
Forum |
Search