Arma Hobby's 1/72 scale
P-51B Mustang
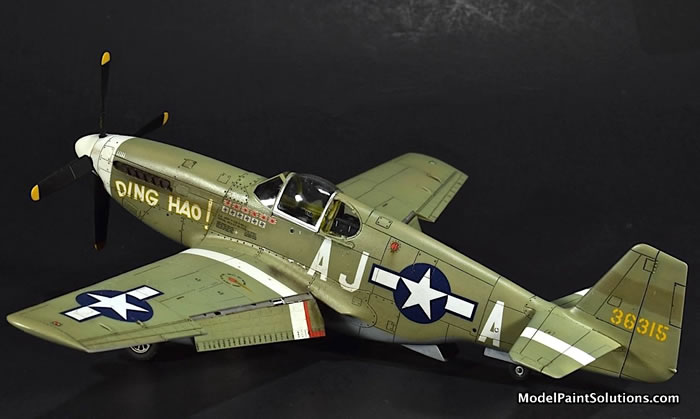
"Ding-Hao"
by John Miller
S
u m m a r y : |
Description and Item No.: |
Arma Kit No. 70038 - North American P-51B “Ding-Hao” |
Scale: |
1/72 |
Review Type: |
Full Build |

Disclaimer:
Let me say upfront, I’m a huge fan of ARMA kits. So much so, some of their more recent kits are available on MPS. Despite being a fan of the manufacturer, I’ve tried to make this an unbiased review that serves to highlight both the strengths and weaknesses of the ARMA P-51B/C; there are a few to which the potential builder should be alerted. Thanks, in advance for reading along.
Background:
A 72nd razor-back ‘Stang with a Malcom hood? Sign me up! The 1/72 modeling community has long needed a new-mold, accurate P-51B/C Razorback. When the Malcom hood is thrown in, it kinda becomes a done deal; for me anyway. I snatched this kit off the shelves of my local model shop the moment I saw it; what a beautiful kit of a truly beautiful airplane. I’m a fan of razor backs in general preferring both variants of the P-51 and P-47 that wore the name so I’ve been waiting for this kit a while. I wasn’t let down. The build was easy, the detail abounds, and the result (with that Malcom hood) is all I wanted. Thanks ARMA!!
As I always do before getting started, the sprues were soaked in a 1:1 solution of Denatured Alcohol (DA) and old-style Windex with ammonia. Note: the DA says “For Cleaning Glass” on the tin, not “For Fuel.” After a 2hr soak, the sprues were rinsed in warm water and set aside to dry.
For the entirety of the build, parts were removed from the sprues with GodHand parts nippers (how did we ever get along without these?), new X-Acto blades, and a photo-etch micro saw where appropriate. Flash was removed and smaller parts refreshed with micro-files, soft files, and folded sheets of Alpha Abrasives synthetic sandpaper grits #400, 600, and 1,000 (Note: I really like the 600 and 1,000 grits for blending seems).
Except where noted, conventional building and painting techniques were used throughout. Large parts (ex. fuselage, wing) were joined using Tamiya Thin Cement. Where possible, all joins were strengthened with Thick CA Glue (Bob Smith Industries), applied to the inner (unseen) faces of joined parts. Smaller parts were affixed with the same Thick CA Glue except clear parts, which were affixed with White glue or Gold Odorless CA Glue (Bob Smith Industries).
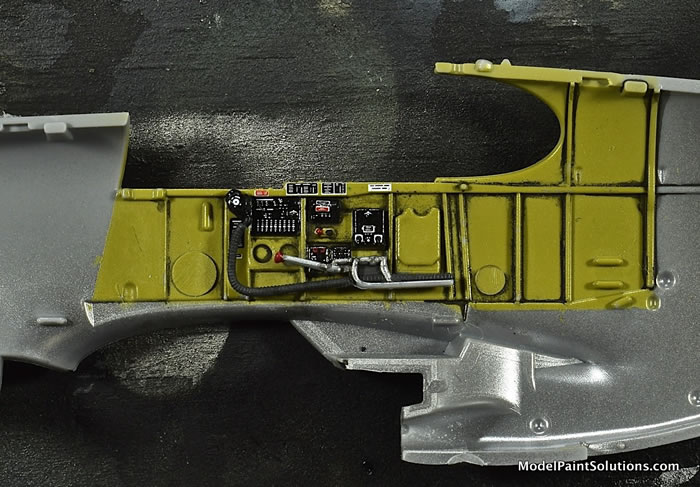
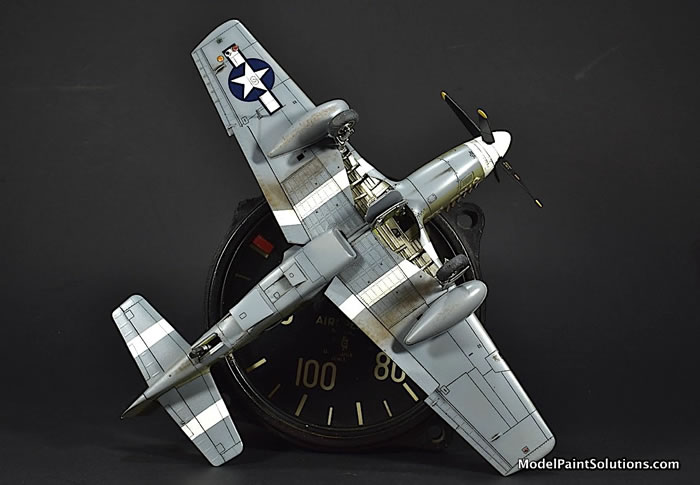
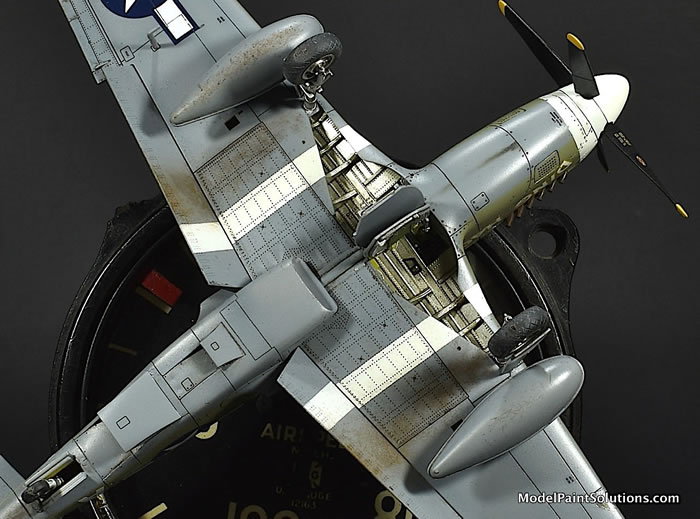
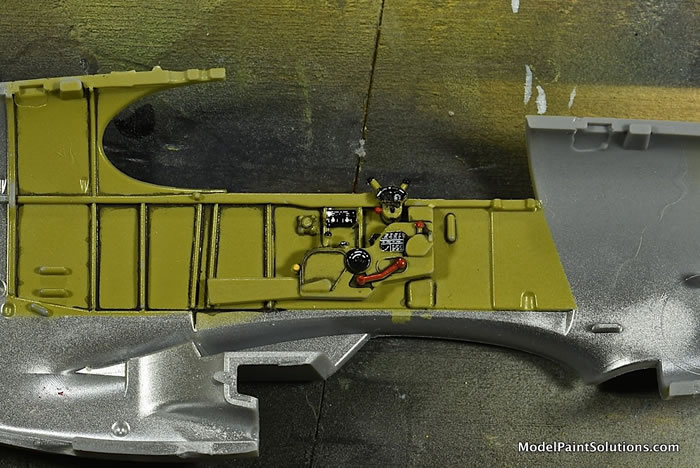
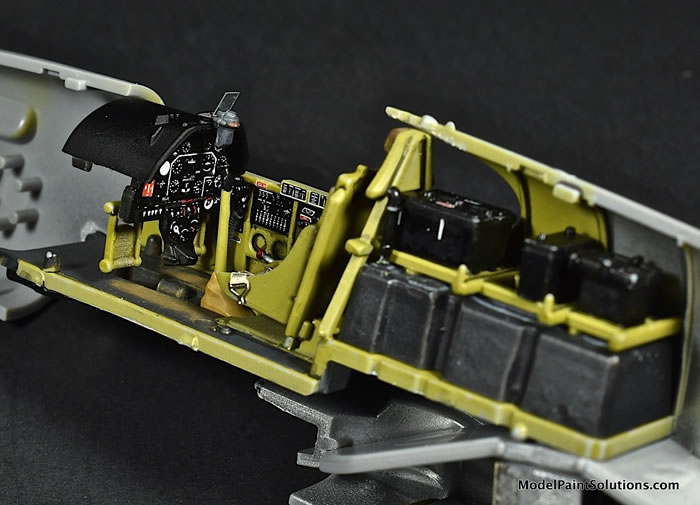
Per the norm, assembly begins with the cockpit and as with their FM-2 and Yak-1, the folks at ARMA managed to stuff a 1/48 scale cockpit into a 1/72 scale model.
These amazing cockpits are one of the reasons I like ARMA kits.
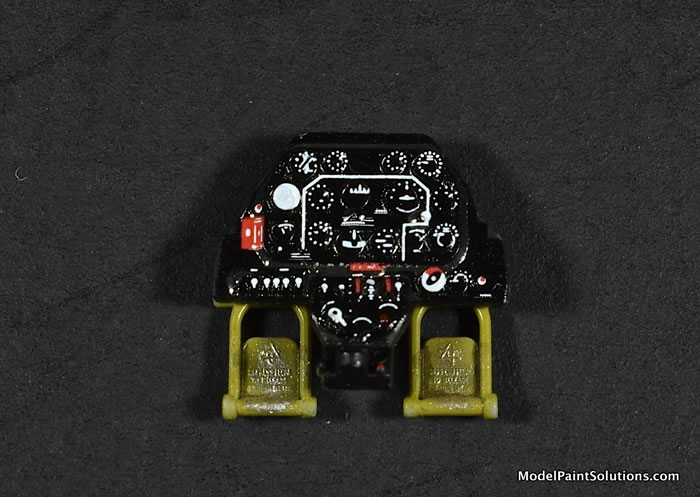
With the P-51B, individual radio, battery, and switching boxes are beautifully replicated along with a multi-piece seat/head armor assembly and an amazing main instrument panel.
For painting, the inner faces of the fuselage halves and internal ducting pieces were primed with AK Aluminum followed by Mission Zinc Chromate Green or Yellow as directed in the kit’s painting instructions. For brush-painting cockpit and other details, Mission Models, Vallejo, and LifeColor acrylics were used.
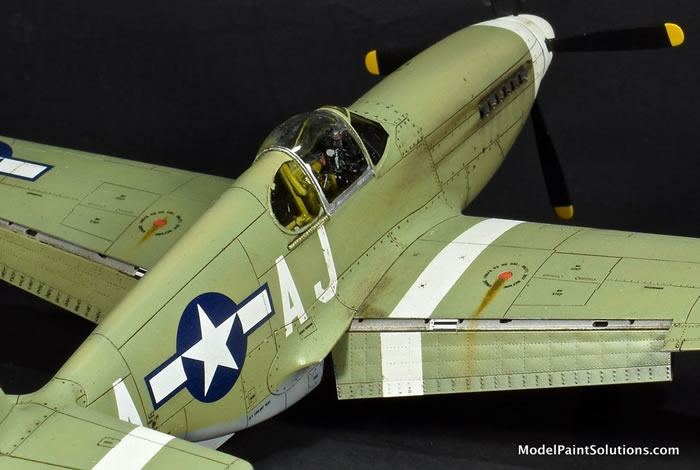
The very detailed cockpit side panels are augmented with multiple decals: 9 for the starboard side and 4 for the throttle quadrant alone. This degree of detail combined with a separate oxygen mask/hose (which gets its own decal) makes for a very detailed cockpit even by 48th scale standards--awesome. The only addition I made to what was provided in the box was colored PE seat harnesses due in large part to my shaky abilities with conventional paint brushes.
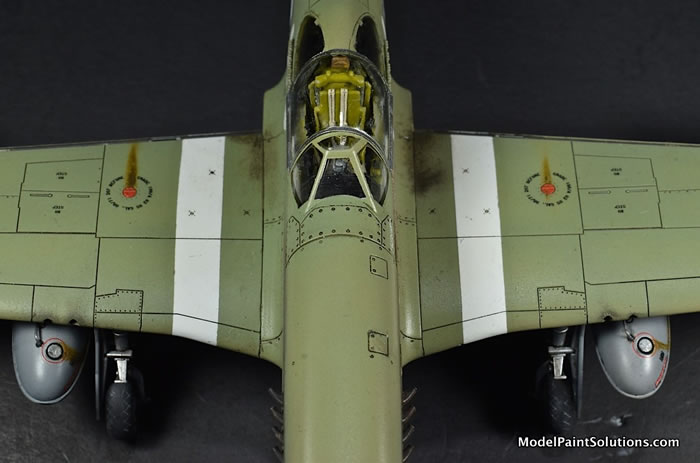
With the cockpit tub trapped between the fuselage halves, I started working on the wheel wells and wing. The level of detail found in the main wheel wells is little daunting, especially if one attempts to paint the thin stringers in the roof of the wells chromate yellow as directed in the painting guide—wow. Although this is a doable job, especially using a small hairy stick (paint brush) and some talent (which I lack), I opted to pass on the stringers and painted the entire well aluminum. All apologies to the Mustang purists out there:)
Once the full-span lower wing was joined to the left and right upper halves, the completed wing was offered up to the fuselage revealing a near perfect join. This was followed by the single piece horizontal stabilizer/elevator assembly and single-piece vertical stab/rudder. Thus, with very little effort, the airframe was largely assembled requiring no putty in the process. That said, close inspection of the model at this stage of completion reveals the only remarkable weakness of the kit; sink marks.
Now “sink marks” (small depressions and distortions in/on the surface of a model) can usually be dealt with by puttying and blending the afflicted area. You should also keep it bandaged and out of direct sunlight (I can’t back up that last part :). Anyhoo, sink marks aren’t usually a big issue unless they are in a prominent position and clearly seen when the model is complete and/or the model is to be painted in a natural metal finish (NMF). Those with a little experience painting NMF’s will probably tell you that any and all surface imperfections seem to be magnified when under an NMF and all but three of the seven schemes covered by the kit decals are natural metal. Now this is not a deal breaker by any means but a little extra effort will be required to fill and blend these sink marks prior to priming if the goal is an all-aluminum finish.
Sink Marks: Good and Not-so Good…
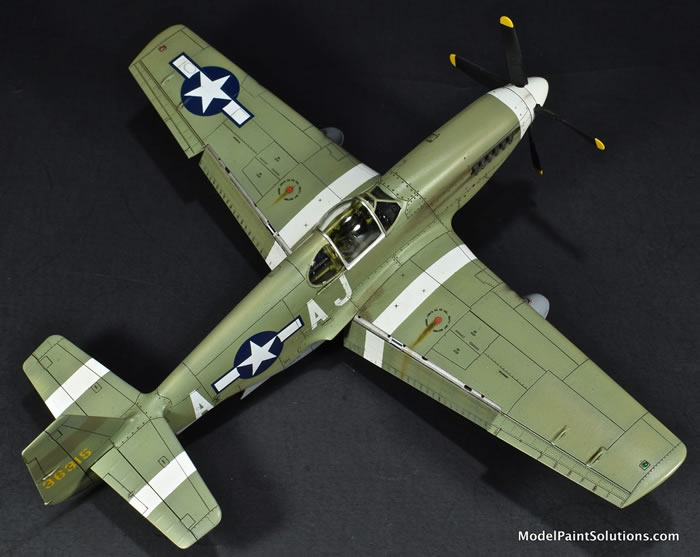
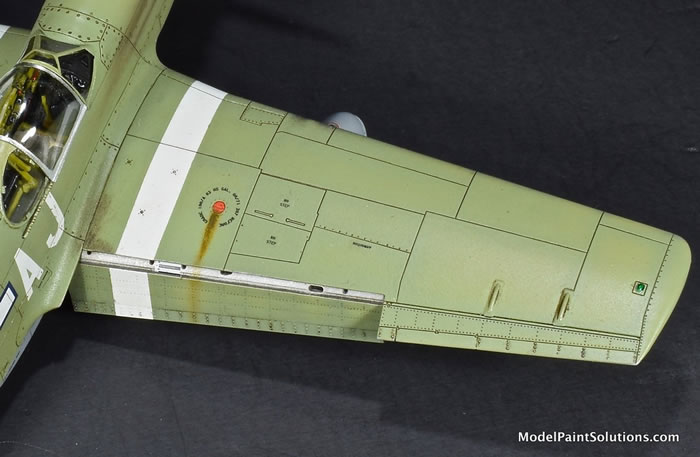
Prior to discussing sink marks that will need addressing, let’s discuss surface details on the model that could be mistaken as sink marks when they are actually some of the best 1/72nd scale surface detailing this builder has seen. As a quick background; sheet metal parts of an airframe that are held together with quilt-like patterns of rivets or fasteners often have small dimples and/or surface imperfections. On the P-51, this can be found in the belly skins covering the wing tanks and on the upper and lower surfaces of the flaps; both areas with pronounced patterns of fasteners. The surface detailing on these ares of the kit replicate that quilted look more accurately than anything this builder has previously seen that’s not on a resin after-market replacement part. Once under a coat of paint, these areas add immensely to the convincing look of the completed model. Bravo, ARMA!
However, as with every model I’ve ever built, all is not skittles and beer or even doughnuts and coffee. Sink marks that will need addressing if your goal is an NMF occur in the following places:
-
Slight pock marks on the upper port wing just inboard of the navigation light.
-
Slight surface distortions aft of each set of the wing leading-edge gun ports, both sides.
-
Small sink marks on main gear doors.
-
Dimples in the starboard fuselage side panel, just below the canopy.
It’s the dimples in the starboard fuselage side panel that are most seen under a coat of aluminum paint. Second to that are the sink marks in the gear doors. Both areas will have to be addressed if a NMF is your goal. I did not address these on my example and they’re not readily evident under O.D. Green paint unless light is played off them at the right angle. For those aiming to do an NMF, have no fear; these dimples occur in the middles of both the fuselage panel and gear doors and are easily accessible to filling and blending. Ditto that for the slight imperfections found on the upper wing surfaces. Filling and blending sink marks such as these is par for the course with many models, especially limited productions kits. Part of the reason for addressing them in this review and when assembling the kit is the preponderance of natural metal schemes covered by the kits decals.
For filling these areas, I would use either Mr. Surfacer 1,000 or Tamiya Liquid Surface Primer (#87096), carefully applied with a small micro brush. When dry, I would start sanding/blending the surfacer with Alpha Abrasives 1,000 grit. This would be followed with Micromesh 3,600 thence 6,000 (Pads or sheets). All abrasives would be used with cold, soapy water. I would finish the blending with a firm buffing using a dry Kimwipe.
And now, back to the build….
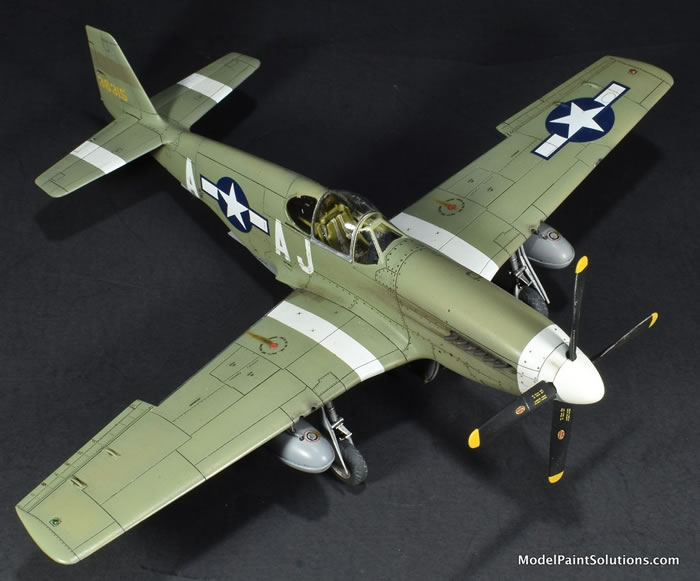
In addition to scheme-specific antenna arrangements, there are different chin intakes and engine exhausts so be sure follow the instructions carefully for the particular airframe you wish to build. The canopy can be built opened or closed and different rear canopy parts are provided for each option. Likewise, the rear canopy rails or runner parts are different for the open Vs closed option. I went for the closed option as the large rear canopy part is quite clear allowing a good view of the amazing detail for those motivated to get sufficiently close.
Underwing stores are provided in the form of two different types of drop tanks and 250 LB bombs. Be sure to check your references for the load out that would have been appropriate for the scheme you’re doing.
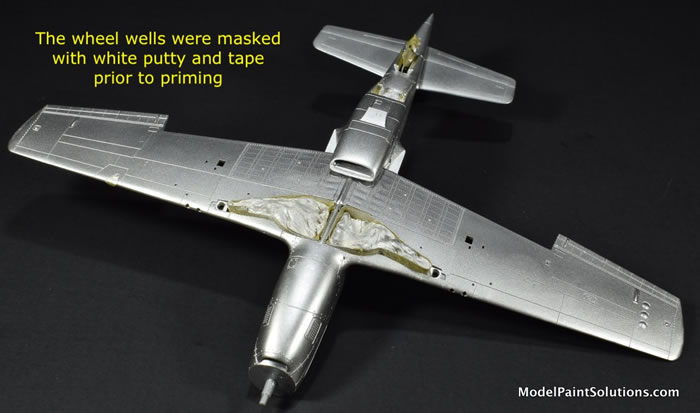
For priming and painting, I left the flaps and canopy un-attached and affixed the wind screen and rear windows with with Gold Odorless CA glue (Bob Smith). Small die-cut circles and Aizu micro masking tape were used to mask the canopy and the kits masks used for the windscreen and rear windows. The kits masks fit well and easily conformed to the curves of the windscreen. After the cockpit and wheel wells were masked with Tamiya tape and white putty, we were off to the paint booth.
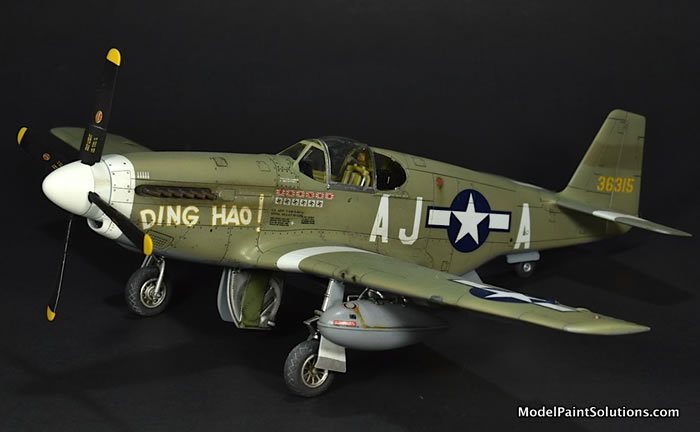
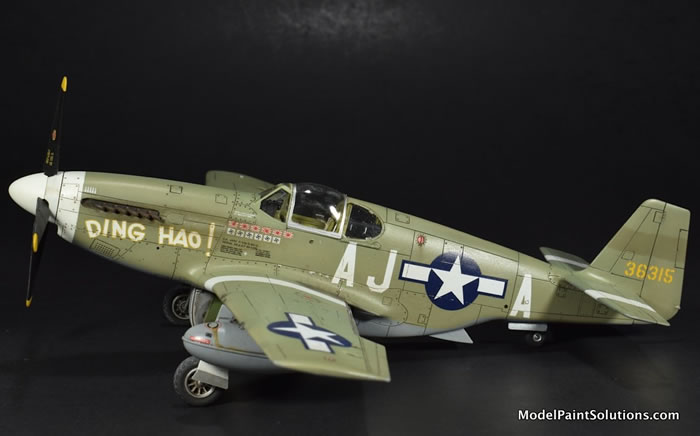
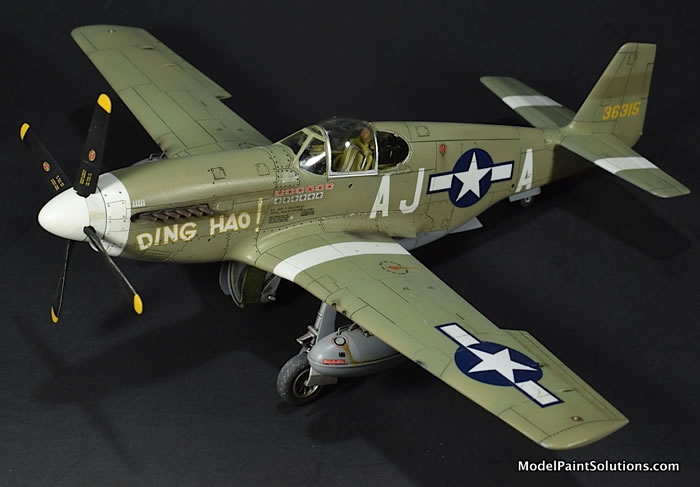
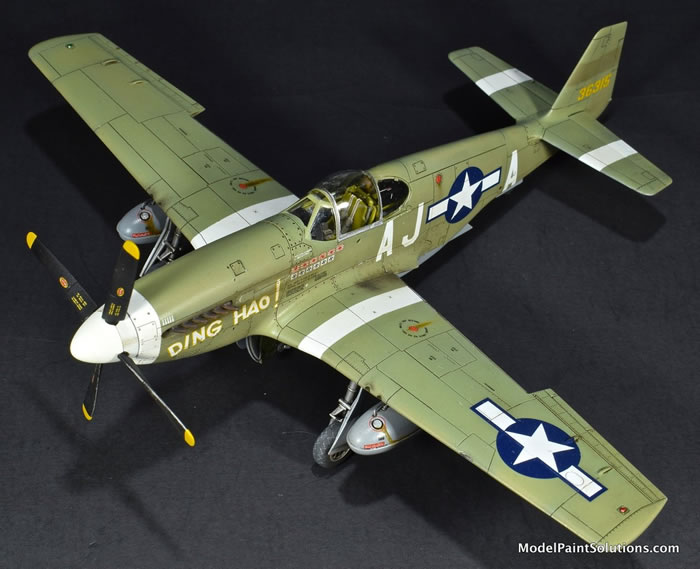
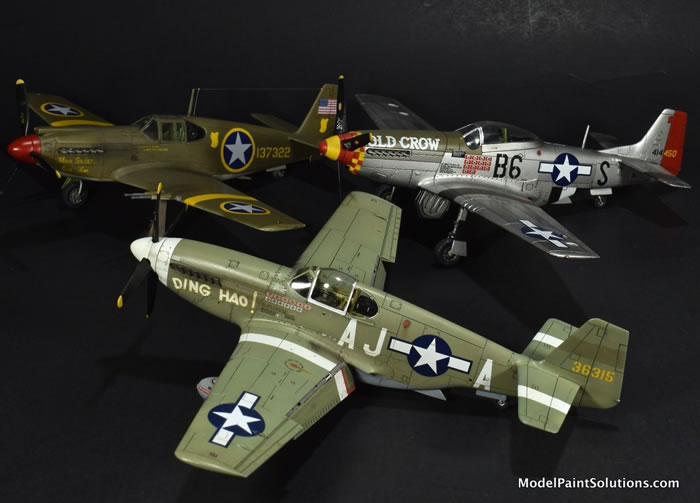
The decals, printed by Techmod, show excellent registration and appropriate color and hue. Markings for seven colorful airframes are provided. I gave serious consideration to multiple options but reading the history of James Howard, the pilot that flew “Ding Hao” made the decision very easy.
text and pictures edited from Wikipedia
James Howell Howard (April 8, 1913—March 18, 1995) was a general in the United States Air Force and the only fighter pilot in the WWII European Theater of Operations to receive the Medal of Honor—the U.S. military's highest decoration. Howard was an ace in two operational theaters during World War II, scoring six kills with the Flying Tigers of the American Volunteer Group (AVG) in the Pacific and six kills over Europe with the U.S. Army Air Force.
After the Flying Tigers were disbanded on July 4, 1942, Howard returned to the U.S. and was commissioned a captain in the Army Air Forces. In 1943, he was promoted to the rank of major and given command of the 356th Fighter Squadron in the 354th Fighter Group, based in the United Kingdom.
On January 11, 1944, Howard flew his P-51 unaccompanied into some 30 Luftwaffe fighters that were attacking a formation of American B-17 Flying Fortress bombers over Oschersleben, Germany. For more than a half-hour, Howard defended the heavy bombers of the 401st Bomb Group against the swarm of Luftwaffe fighters, repeatedly attacking the enemy and shooting down as many as six. Even after Howard's P-51 ran out of ammunition, he continued to dive on enemy airplanes. The leader of the bomber formation later reported, "For sheer determination and guts, it was the greatest exhibition I've ever seen. It was a case of one lone American against what seemed to be the entire Luftwaffe. He was all over the wing, across and around it. They can't give that boy a big enough award.”
The following week, the Army Air Forces held a press conference in London at which Major Howard described the attack to reporters, including CBS reporter Walter Cronkite, and Andy Rooney, then a reporter for Stars and Stripes. The story was a media sensation, prompting articles such as "Mustang Whip" in the Saturday Evening Post, "Fighting at 425 Miles Per Hour" in Popular Science, and "One Man Air Force" in True magazine. "An attack by a single fighter on four or five times his own number wasn't uncommon," wrote a fellow WWII fighter pilot in his postwar memoirs of Howard's performance, "but a deliberate attack by a single fighter against thirty-plus enemy fighters without tactical advantage of height or surprise is rare almost to the point of extinction.” The following month, Howard was promoted to lieutenant colonel and in June 1944, he was presented the Medal of Honor by General Carl Spaatz for his January 11 valor. That same month, Howard helped direct fighter plane cover for the Allies' Normandy landings on D-Day.
Alrighty! Enough said, Major Howards’ “Ding Hao” it is!
Primer:
A trick I started using with the Eduard Me-109G I did in a natural metal finish is priming with AK XTreme Aluminum. To that end, the model was given a primer coat of XTreme Aluminum diluted to 70% paint with XTreme Thinner. This was applied at ~15 psi as a dry-coat followed by a wet-coat using an AK9000 airbrush fitted with a 0.30mm tip, which is a good size for applying metallics, primers, and clear coats to models of 1/72 to 1/35 scale.
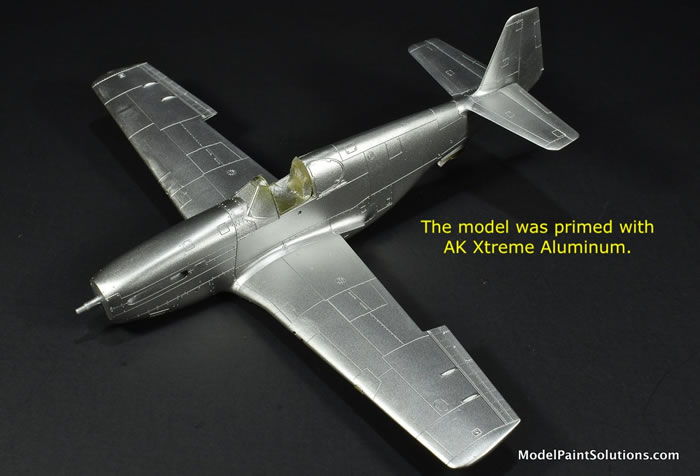
At the same time the model was being primed, the Malcom canopy, previously masked and sprayed AK RAF Interior Green, was also sprayed aluminum.
Once the aluminum was dry (24 hrs), panel lines were pre-shaded with AK Black diluted to ~20% paint with Hight Compatibility Thinner to which Liquitex Flow Aid had been added to 5% by volume. This was shot at ~10psi with an H-S Infinity fitted with a 0.15mm tip and In-Line Air Valve.
Time for Some Color:
As called out in the painting instructions, the belly was shot Neutral Grey (FS36270). I used Mission Models MMP-118 Medium Grey to which Mission White was added to ~10% by volume; looked pretty good to my eye. This was diluted 1:1 (50:50) with CP30. CP30 stands for Clear Primer-30%. It’s simply 30% Mission Clear Primer plus 65% Mission Thinner plus 5% Liquitex Flow Aid. I make this up in bulk ahead of time and use it as both a diluent for all Mission paints and as an awesome Semi-Gloss Clear Coat. This was applied at ~12psi as a dry- followed by a wet-coat with an H-S Evolution fitted with a 0.20mm tip.
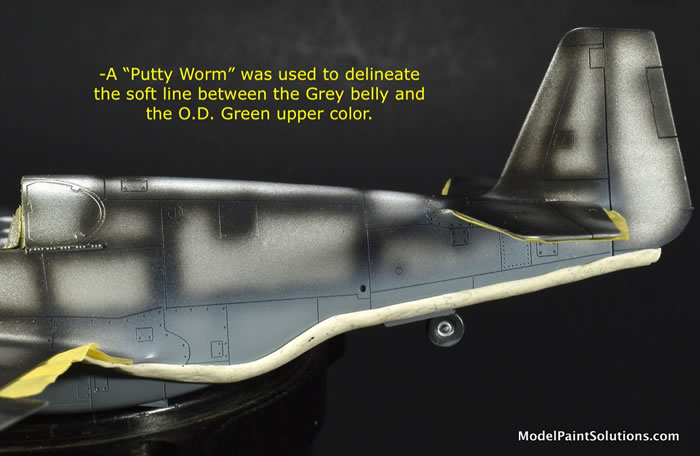
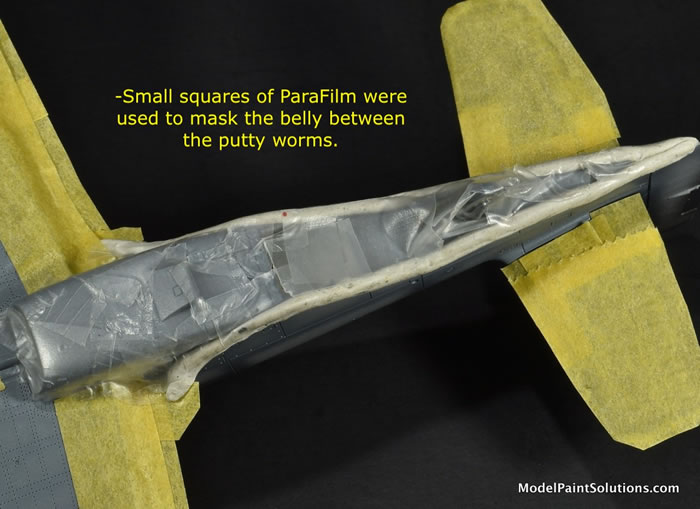
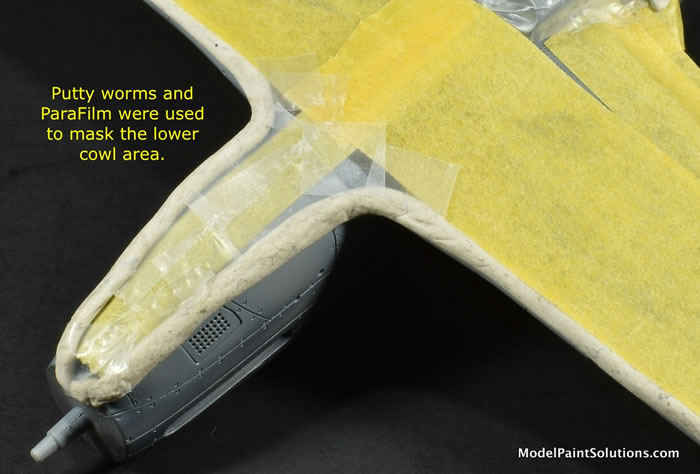
After 24hrs of drying time, the soft line between the grey on the belly and the soon-to-be-sprayed O.D. Green uppers was delineated using putty worms made from Scotch 860 White Adhesive Putty. by rolling a length between two cutting boards until the desired diameter is obtained. Worms are then cut and carefully placed on the model while the remaining exposed areas were quickly covered with a few small squares of stretched ParaFilm. Using the same technique, the lower cowl was also masked in preparation for painting.
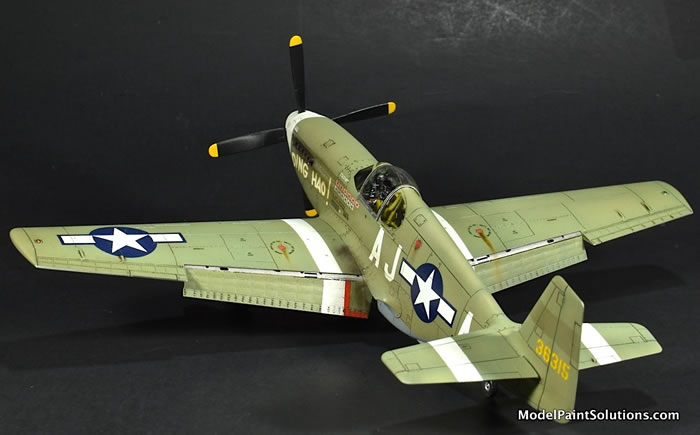
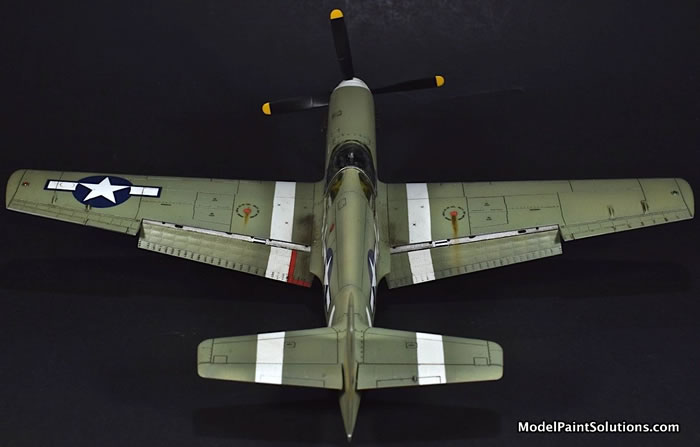
The O.D. Green upper color was a custom mix of 80% U.S. Faded Army Olive Drab, 10% U.S. Army Olive Drab, and 10% Mission White. This was diluted to ~20% paint with CP30 (see “Time for Some Color” above) and applied as light over-lapping coats at ~12psi with an H-S Evolution fitted with a 0.20mm tip. The use of a lower concentration of paint (20%) requires more passes of the airbrush for coverage but it lessens the chance of applying too much paint and losing the underlying pre-shading.
Note that care was taken to maintain a 90-degree angle between the airbrush cone of spray and the putty worms when over-spraying them. This ensures a soft line versus a hard line when the worms are removed.
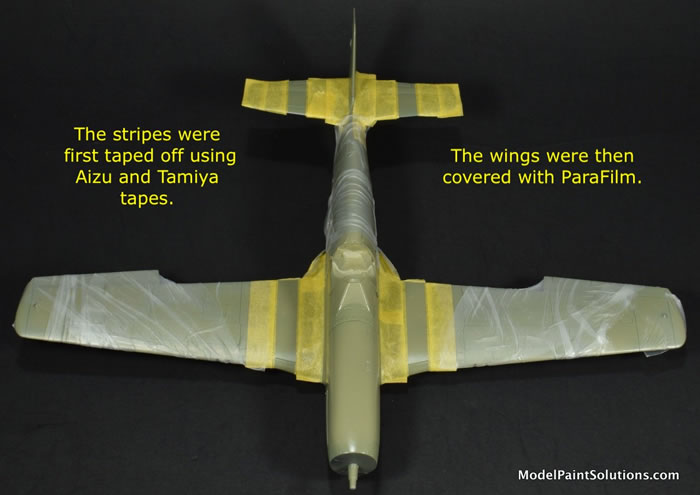
After 48hrs of drying time, the white stripes on the wings and horizontal stabilizers were first outlined with 0.70mm Aizu Micro Tape, which was then covered over with wider lengths of Tamiya tape. The layers of tape were firmly pressed together using a burnishing tool. In reparation for painting the large areas on the wings were covered with a piece of stretched ParaFilm while Tamiya tape was used on the horizontal stabs.
As with the wing stripes, the white band around the nose cowl was outlined with Aizu Micro Tape (0.40mm), which was then covered over with wider lengths of Tamiya tape pressed together with an embosser. Uncovered areas of the upper cowl were masked with ParaFilm in preparation for painting.
The stripes were sprayed with AK Real Colors White diluted to ~30% in High Compatibility Thinner with 5% Liquitex Flow-Aid by volume. The stripes were shot at ~10psi with an H-S Infinity fitted with a 0.15mm tip.
The two-piece propeller hub was shot at the same time as the stripes but a few drops of AK Off-White were added to the paint cup while spraying thereby producing a slight difference in color and hue between the hub parts and stripes.
The version of Maj. Howard’s P-51 covered by the kits decals had a white stripe on the vertical stab/rudder over-painted with a newer/darker shade of O.D. Green. To replicate this look, the appropriate area on the vertical stab was masked off with putty worms; the edges of which were pressed with a toothpick to get an irregular line.
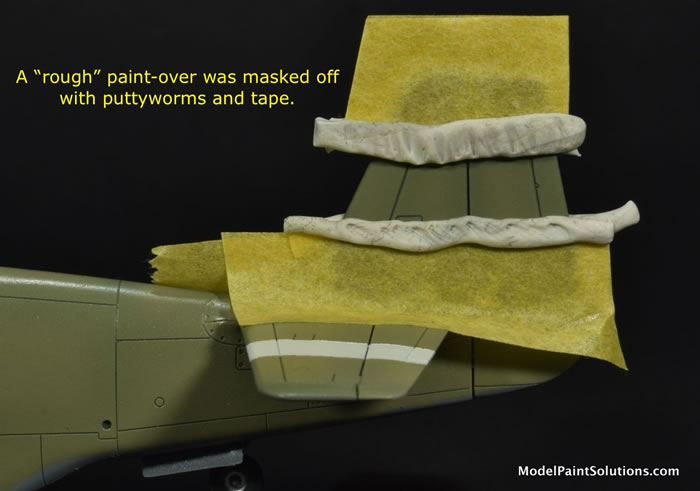
This area was then shot with Mission USAAF O.D. #41 diluted 1:1 with CP30 and applied at ~10psi with an H-S Infinity fitted with a 0.15mm tip.
Decals:
In preparation for decals, the model was given a coat of CP30 applied at ~15psi with an H-S Evolution fitted with a 0.40mm tip as a dry- followed by a wet-coat. This was allowed to dry 48 hours before decalling began.
Experiments with different decal solvents showed the kits decals to be responsive to the most commonly used solvents (Micro-Set and -Sol, Solvaset) so I opted to use Mr. Setter and Mr. Softer. The decals went down with no issues responding very well to Mr. Setter and after 24 hours of drying time, all were sealed with a coat of CP30 in preparation for a little weathering.
Weathering:
Weathering was kept to a minimum. The engine exhaust stains were made with a mix of MiG and AK weathering pigments (Ash White, Grey, Burnt Sienna, Black, and Brown). In short, the lighter stain (Ash White/Grey) was applied first and gently blended with a small brush. The darker, outer stain was applied the same way using a mix of blended black and brown pigments.
Additional dirt stains were applied to the undersides of the wing directly behind the main gear, on the belly behind the tail wheel, and on both left and right wing-walk areas. Black stains were applied around and inside the gun ports and chips were added using a small brush and silver ink from a stamp pad.
Rendered oils (Black, Van Dyke Brown, and White) were prepared, mixed, and used to replicate a few streaking stains on the centerline of the chin cowl, as well as the drop tanks.
Tids and Bits:
Propeller: The propeller tips were shot AK Maze Yellow (RC-008), which was allowed to dry 24 hours and then masked off in preparation for a coat of AK Flat Black diluted to ~30% in High Compatibility Thinner with 5% Liquitex Flow-Aid by volume. This was applied at ~12psi with an H-S Infinity fitted with a 0.15mm tip. When dry, the propellor was sealed with AK Gloss (30% in Gunze Leveling Thinner) in preparation for decals. Following decals, another coat of AK Gloss/Gunze sealed the deal. This was muted later with a few passes of Clear Flat (see below).
Landing Gear: The gear legs and wheel hubs were sprayed AK Aluminum at the same time the model was primed. Details were accentuated with a pin-wash of Tamiya Extra-Dark Brown enamel panel liner. The tires were sprayed a custom mix of Mission Tire (MMP-040) and Mission Slate Grey (MMP-045). The treads were highlighted with a pin-wash of Tamiya Grey enamel panel liner and a quick dusting of Ash White and Grey weathering pigments.
Engine Exhaust Stacks: These were shot AK Burnt Metal (AK484) diluted to 70% paint with XTreme Thinner. Additional weathering with pigments was done at the same time the engine exhaust stains were applied (see above).
Drop Tanks: Both were painted grey along with the belly (see above) however, a few drops of Mission Black was added to the paint cup when shooting the tanks thereby producing a slight difference in color versus the belly. In addition, scuffs and scrapes were added to the bottoms of the tanks with “Black” and “Chip Color” AK Weathering Pencils. I really like these pencils and learn a new trick every time I use them. Once the tanks were affixed with CA glue, the tank piping was replicated using fine solder placed into holes previously drilled in both the tank and wing. For a guide I used a reproduction of the Mustang maintenance manual provided on page 49 of “Warbird Tech Series, Volume 5: North American P-51 Mustang” by Frederick A. Johnsen (ISBN 0-933424-68-X).
The Surprising Final Flat Coat:
I benefit greatly from the input of multiple experienced modelers that I see weekly during our Tuesday morning meetings. One, Mike “The Weatherman” Millette has often mentioned the virtues of good ole Testors Dull Coat; used by many-a-modeler at some point and alas, no longer produced. I have a couple of old (old) bottles of this stuff in my paint stash and, well, one thing led to another and before you know it, I had prepared a 20% solution of Testors Dull Coat in AK Nitro Thinner. This was passed through a paint filter and the filtered goodness was captured and stored for use. Interestingly, an amazing amount of tan-colored schmutz (paint technical term) was captured by the paint filter. The resulting solution was surprisingly clear and amber-white.
Test shots with this filtered, Nitro Thinner-Dull Coat mixture (heretofore referred to as Nitro-Flat because it sounds really cool) revealed an amazing ability to knock down shine while imparting very little of the frosty or glazed look so common to strong satins or flats. The Nitro-Flat was applied with a 0.15mm tip (yup, you read that right) as very small, over-lapping dry or dusty coats. Using this technique, more Nitro-Flat was specifically applied to specific areas (exhaust stains) as well as to larger areas on the wings and fuselage that were too shiny. Specific structures such as engine exhaust stubs, landing gear, and tires/wheels were easily flatted out without delivering too much clear flat to the surround areas and risking the dreaded frosted look.
Finishing Up:
The navigation lights on the upper and lower wing tips were first painted Vallejo Chrome using my smallest hairy stick (trim brush) and a fair amount of adult modelers fluid to steady my hand. Once dry, Mission Clear Red and Clear Green were used to over-paint the chrome. The three formation lights under the starboard wing tip were similarly hand-painted with Vallejo Chrome followed Mission Clear Red, Green, and Orange.
And finally, the painted Malcom hood was carefully affixed with thick white glue and I sat back for a moment to appreciate the folks at ARMA for putting together such a wonderful kit of a long underserved variant of the ‘Stang stable; Thanks very much, ARMA!
Well, the boys at ARMA have done it again; what a gem of a kit. As I’ve come to expect from this manufacturer, the inscribed surface details are scale-appropriate and crisp. The level of detail, both inside and out, are top-notch; some of the best this builder has seen. As usual with ARMA kits, the amazing level of detail provided for the cockpit right out of the box puts this kit in it’s own category. Moreover, despite being overly detailed, I didn’t find the kit as fiddly as previous ARMA offerings. Of note however, is the presence of sink marks that will have to be filled and blended if the scheme of choice has a natural metal finish. This is a beautiful kit that builds into an amazingly detailed model.
Highly Recommended!
John
Kit willingly purchased by reviewer (yeah, I bought this one:)
For more on this review visit Modelpaintsolutions.com.
Text and Images Copyright © 2022 by John Miller / Model Paint Solutions
Page Created 3 June, 2022
Last updated
3 June, 2022
Back to HyperScale Main Page
Back to Reviews Page

|
 Home
| What's New |
Features |
Gallery |
Reviews |
Reference |
Forum |
Search
Home
| What's New |
Features |
Gallery |
Reviews |
Reference |
Forum |
Search