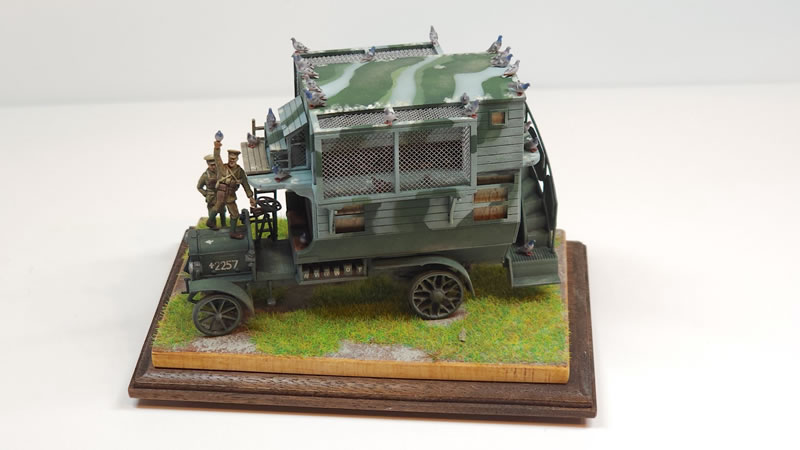
Modeling for the Birds
Roden 1/72 B-Type World War I Pigeon Loft
Model, Text & Photos by Tim Nelson
The modeler formally known as Tim “Too Tall” Nelson is back!

Long before satellites, walkie-talkies, or even bulky portable radios, there was still a need for timely battlefield communication. World War I was in many ways the first mechanized major war, but above and behind the trenches of the Western Front, a long-time solution was adopted for the problem of sending and receiving critical tactical information – the carrier / homing pigeon.
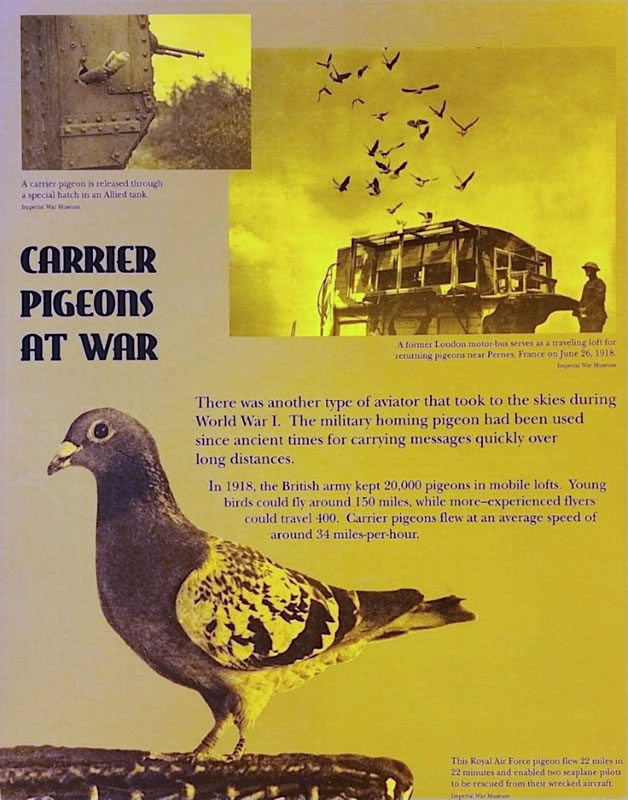
Exhibit Sign, The Museum of Flight, Seattle
The skill of certain pigeons to find their way “home” in a wide variety of circumstances was discovered in antiquity. As with all things useful, this was quickly adapted to military use.
Even in the 20th Century, pigeons were used extensively in WW I (and also WW II), and some of them were downright heroic, including a French bird known as “Cher Ami” (“Dear Friend”), who was actually awarded the Croix de Guerre in 1918.
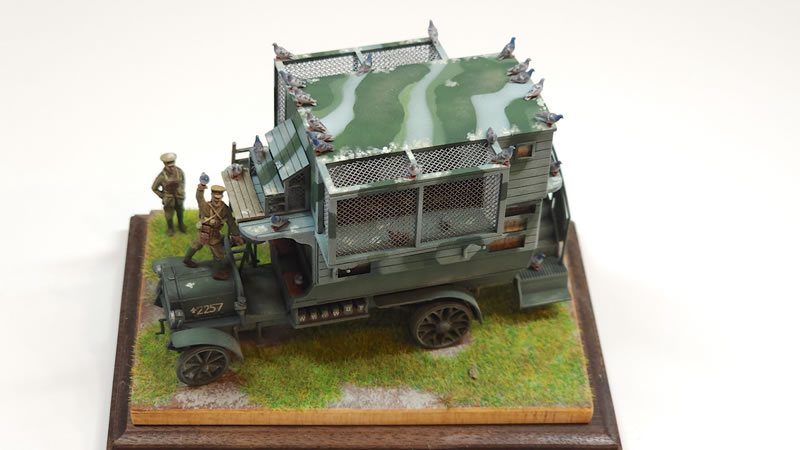
Although the buildup to WW I had been happening for years, none of the combatants seemed quite prepared in 1914 for the massive scale and logistical challenges of the conflict. One of the areas lacking for the British Army was transport vehicles for supplies and personnel, and a partial solution was found in the double-decker B-Type Motor Buses that plied their trade on the streets of London and other cities in the United Kingdom. The B-Type was built and operated by the London General Omnibus Company (LGOC). Approximately 900 were converted to troop transports, but they also served as ambulances, radio platforms, and – you guessed it – pigeon lofts. The Imperial War Museum at Duxford, England contains a fine example of a B-Type which served in WW I, nicknamed “Ole Bill,” in its civil guise. See References for more background on pigeons, the B-Type bus, and the loft version in particular.
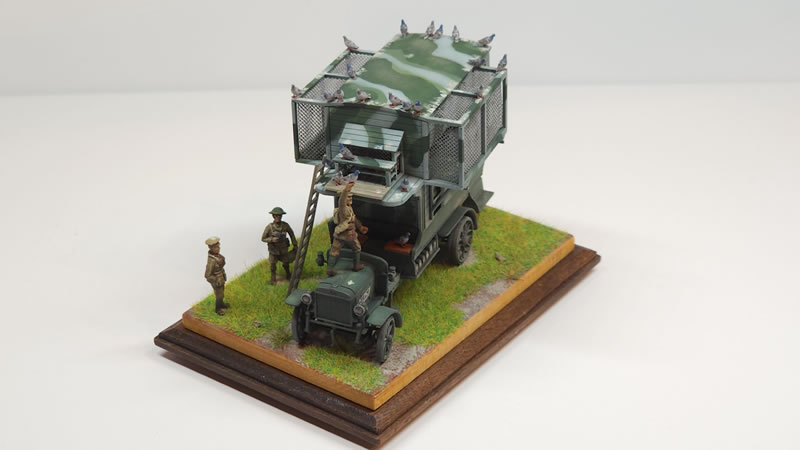
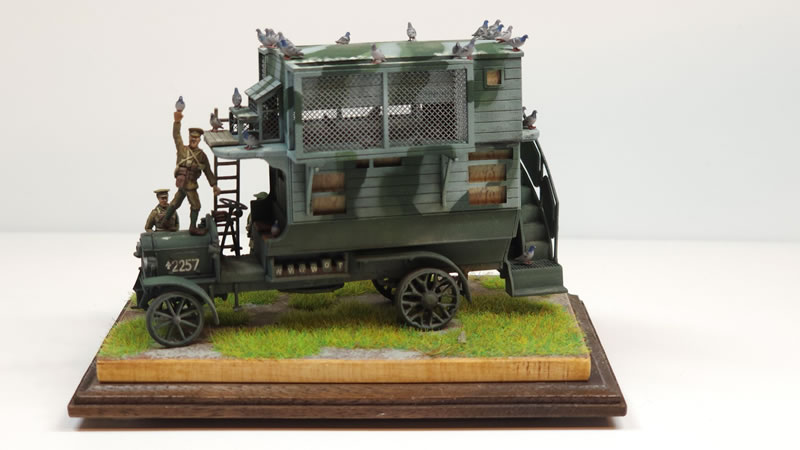
The B-Type Pigeon Loft is one of those “what the ----,” double-take subjects that is fascinating in its anachronistic, ungainly, yet utterly pragmatic appearance.
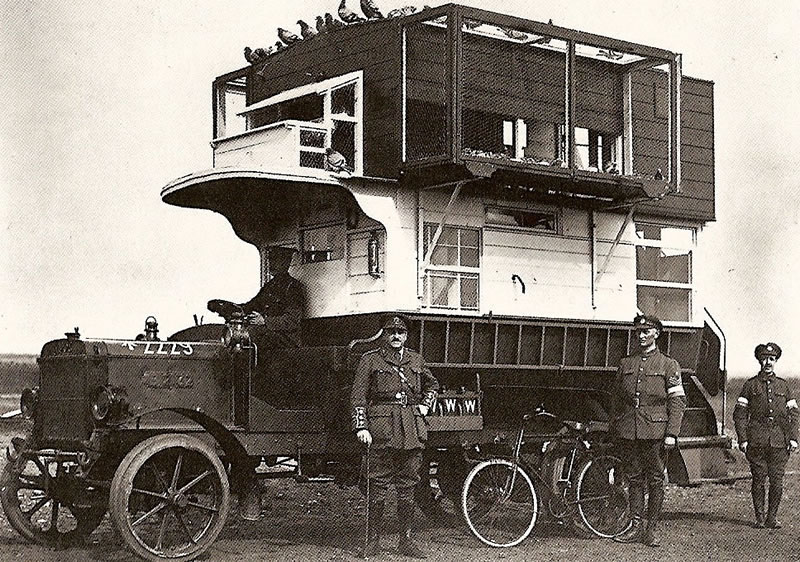
Unknown author - Niva (Russian magazine), 1916, Public Domain,
https://commons.wikimedia.org/w/index.php?curid=1765558]
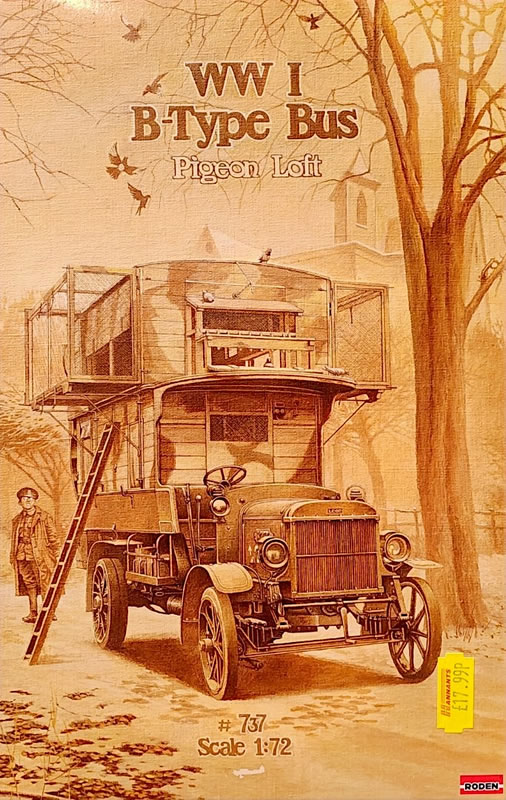
On an epic Scale Model World (Telford) and museum trip to England in November 2024 with good friend Will Perry, one of our obligatory stops was the Hannants model shop, close by the RAF Museum London at Hendon. Among the thousands of delightful kits on the shelves there, my eye fell upon Roden kit #737, a WW I B-Type Pigeon Loft.
This was one of those cherished moments when you discover something you didn’t know you couldn’t live without. Despite trying to travel super light and already burdened with some Telford goodies, I immediately knew my travel backpack would have to shoehorn in one more item.
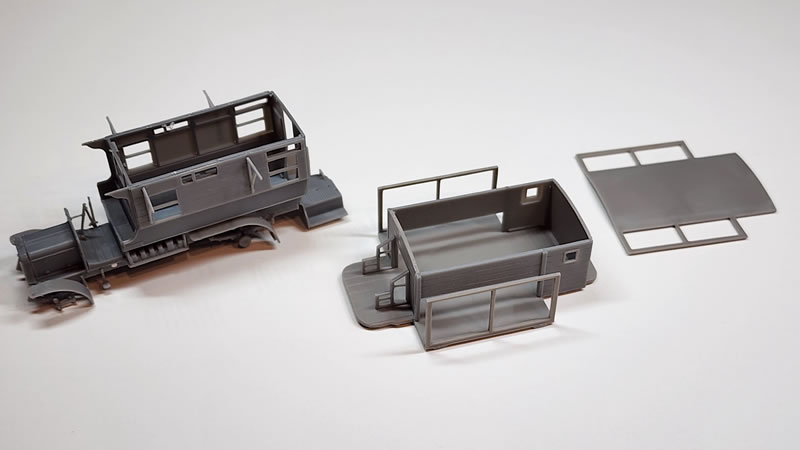
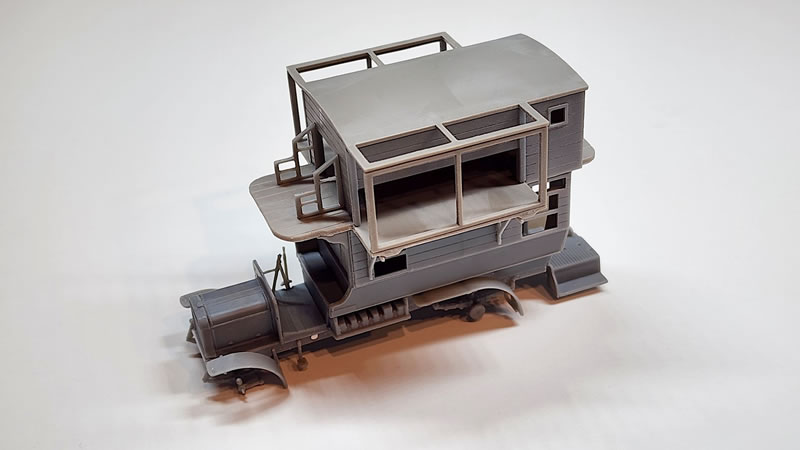
My occasional forays into armo(u)r modeling are quick, “palette cleanser” activities in between other ambitious projects (usually but not always aircraft). I stick with my longtime aircraft scale of 1/72 for compatibility with the aircraft collection, and for the sake of cheapness and expeditious build time. The Roden B-Type fit right in. (Note that Roden has kitted a family of B-Type versions in 1/72, including the civil London bus and the military troop transport. I believe MiniArt makes a B-Type in 1/35 scale, but you’ll have to do a lot of work to turn it into a pigeon loft – the internet shows it has been done!) The box art is quite evocative to me, as many Roden boxes are – the kind of inspiring art that moves a kit dramatically upward in the build queue. The kit consists of six sprues of that slightly brittle styrene we have come to anticipate. The sprues contain parts for multiple B-Type configurations not used in this build, but the instructions generally make clear which parts are applicable here.
Be advised that the instructions do contain some part callout errors which caused some head-scratching:
- Step 5, part 8B should be 8A
- Step 12, part 1D should be 3E, and part 11D should be 8E
- Step 16, part 11E should be 11D
As I’ve seen from Roden in the past, part detail is quite fine throughout, but you’ll have to contend with somewhat thick sprue attachments, minor flash, and extensive mold seam lines. These issues get a little tedious with all the suspension parts, tiny bits, as well as the wheel spokes, but you do what you have to do. The relatively new DSPIAE Rotary Grinding Tool/Bit Set, which I’m still learning how to use to best effect, was a significant help here.
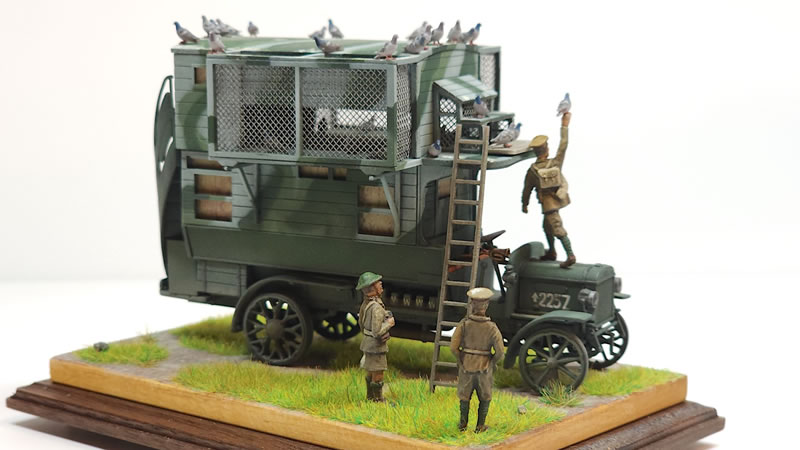
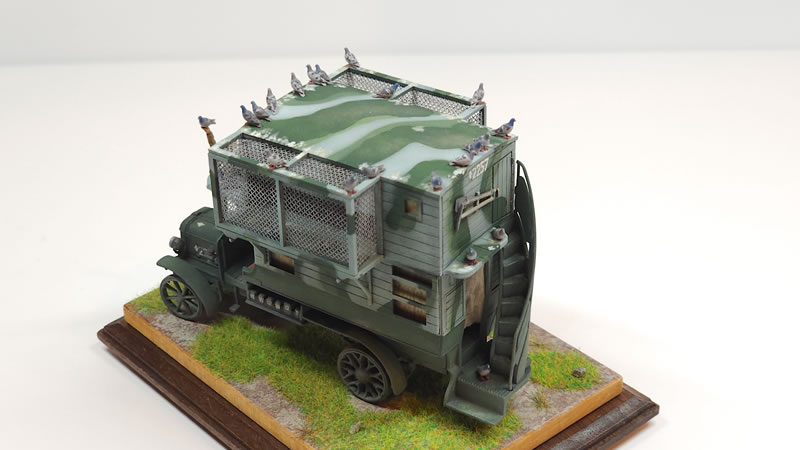
Time invested in parts cleanup will be rewarded with well-fitting sub-assemblies and major assemblies. The base bus chassis and lower body are common to all B-Types, then we have the modular loft section above that, the base of operations for the pigeons. That section is topped with a bespoke roof.
I strongly desired as close to an out of the box build as possible, but there would be a couple of enhancements, discussed below. I always begin a project by subjecting all the sprues to my usual bath process of warm water and Dawn soap. After parts separation and preparation, just before priming, I then swab the major parts with denatured alcohol to remove recently deposited finger oils. Better safe than sorry.
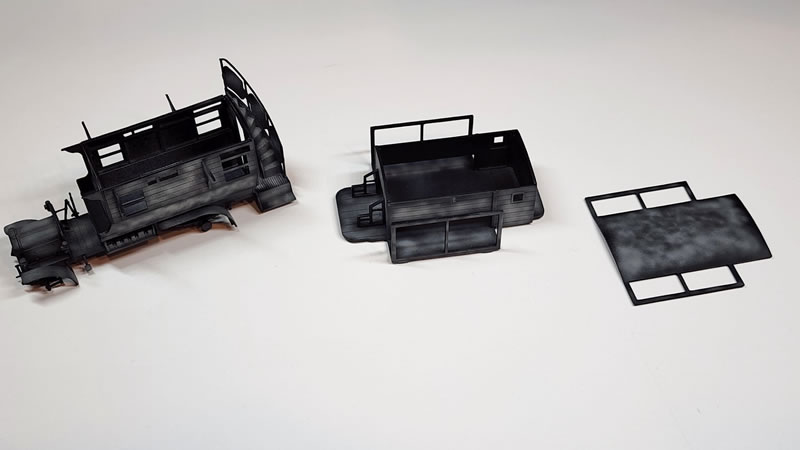
P a i n t i n g a n d F i n i s h i n g |
Painting got underway with Mr. Finishing Surfacer 1500 Black Primer straight out of the can. Great stuff, and well suited to armor and other subjects where you don’t have to worry about flooding canopy masks with too much paint. This was followed by a mottled pre-shade of Tamiya XF-57 Buff, mixed 25% paint to 75% Vallejo thinner with a dab of Liquitex Flow-Aid and Slow-Dry. All paints were applied with an H-S Evolution-2024 fitted with either a 0.28mm tip (color coats) or 0.40mm tip (clear coats).
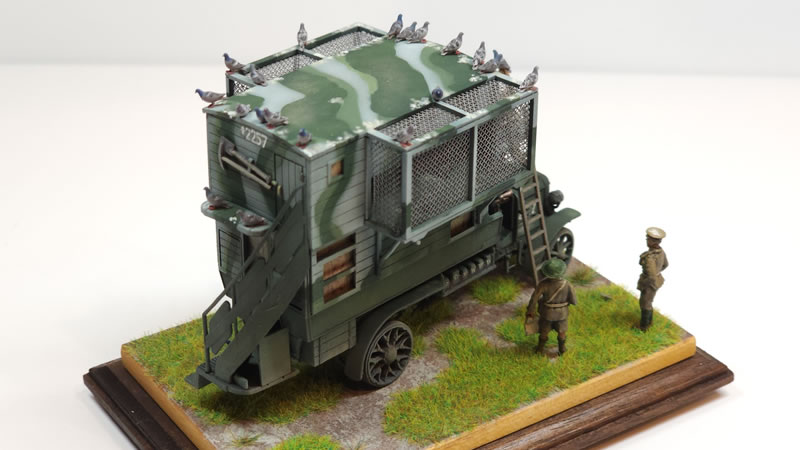
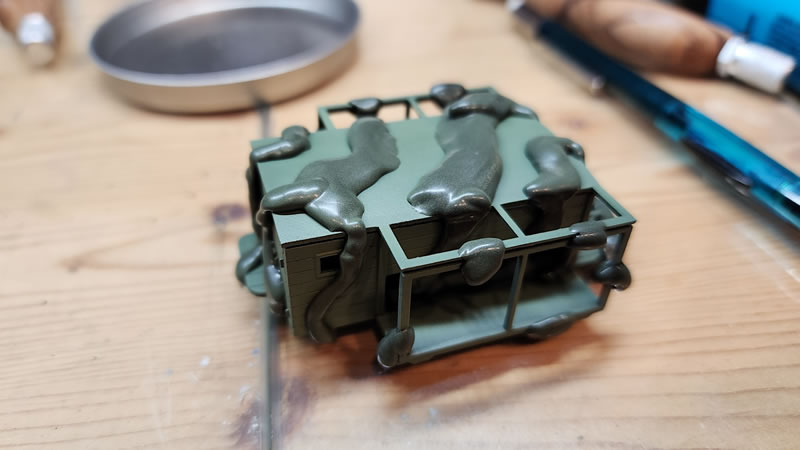
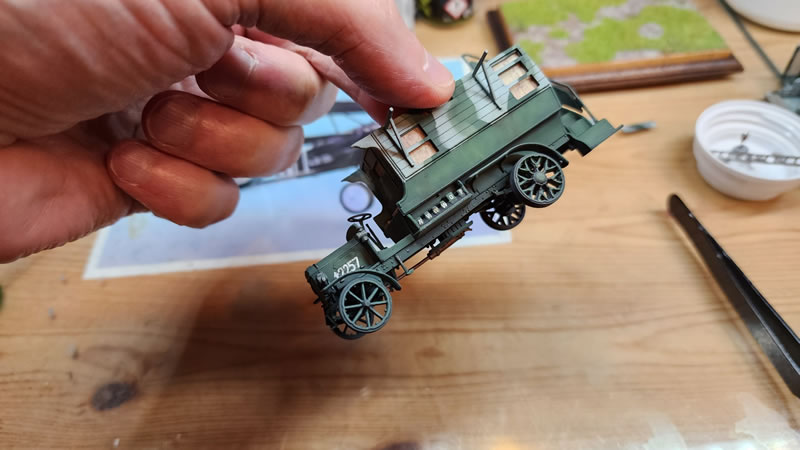
Next came the fun part, the various phases of camouflage. As a small scale subject, I was concerned about the Roden recommended colors appearing too dark on the completed model. I thus elected to go with 2 lighter shades of green: my “dark green” was Tamiya XF-58 Olive Green and my “light green” was actually Tamiya XF-71 Cockpit Green. These were selected based on a combination of artistic whim, by guess and by golly, and “Kentucky Windage.” Each shade was thinned about 33% paint to 67% Vallejo thinner, again with the Liquitex elixirs. The last step was a whitish shade, in this case AK Real Colors RC004 Flat White, thinned about 33% to 67% High Compatibility thinner, again with Liquitex additives. I used AK Camouflage Elastic Putty for masking during this process, certainly an aid to following the many irregular contours of this machine.
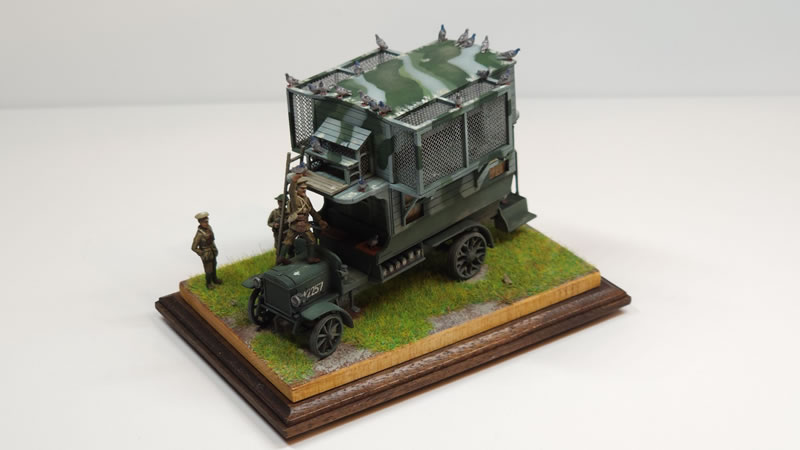
World War I Western Front photos show these pigeon loft vehicles with the normal wear, tear, and dirt of field duty, but nothing extreme. The weathering would thus be restrained, beginning with a protective coat of Alclad Aqua Gloss. I then applied an overall wash of Abteilung 502 Starship Filth oil, thinned with Mona Lisa thinner. This was followed with a dusting coat of the lower regions, using Tamiya XF-57 Buff thinned about 25% paint to 75% Vallejo thinner – this time without the additives since leveling is no longer critical when moving toward a flat coat.
That final flat coat was laid down with VMS Matt clear, sprayed “neat” out of the bottle. This provided a suitable surface for final pigment effects (MiG European Earth and Rusts), and some AK (and regular) Pencil shading (used similar to a dry brush technique, for some lighter highlight shading and worn paint).
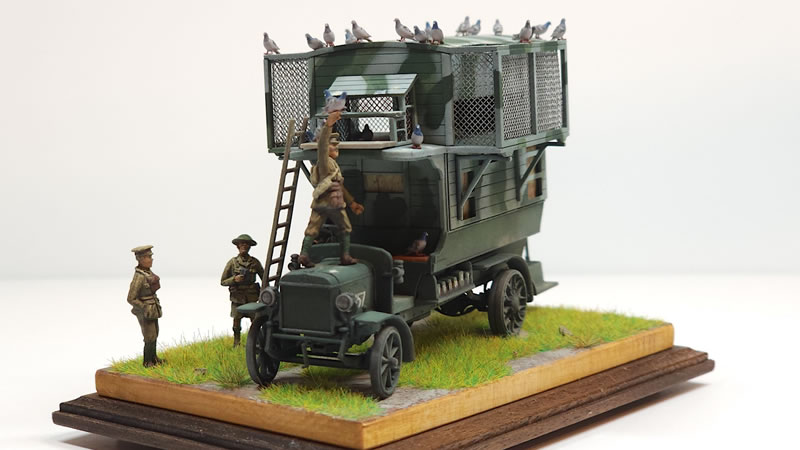
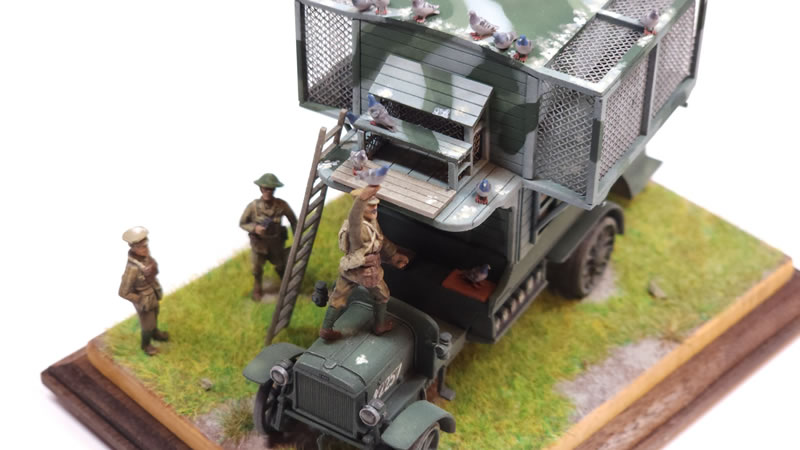
I decided to pursue two significant deviations from an out of the box build. The first was the need to blank the lower level windows with “plywood,” as seen on the actual vehicles. Although not combat vehicles, it was sensible to replace the glass windows of city buses with simple wood covering. I prepared 0.010” plastic card inserts of the appropriate dimensions for all of the openings, and painted them with Mission MMS-006 Tan Primer, thinned about 50/50 with Createx 4011 thinner (“reducer”) and the usual additives. This was later sprayed with Aqua Gloss, to be followed with the very cool Uschi van der Rosten translucent wood grain decals. The effects are probably a bit exaggerated in 1/72 scale, which is OK with me – it’s a cool effect. To ensure I wouldn’t have to spend a minute on the lower bus interior, I augmented the plywood with a simple curtain over the rear opening (the kit does not provide a door) - Kleenex soaked in diluted Elmer’s glue and stained with Tamiya XF-57 Buff.
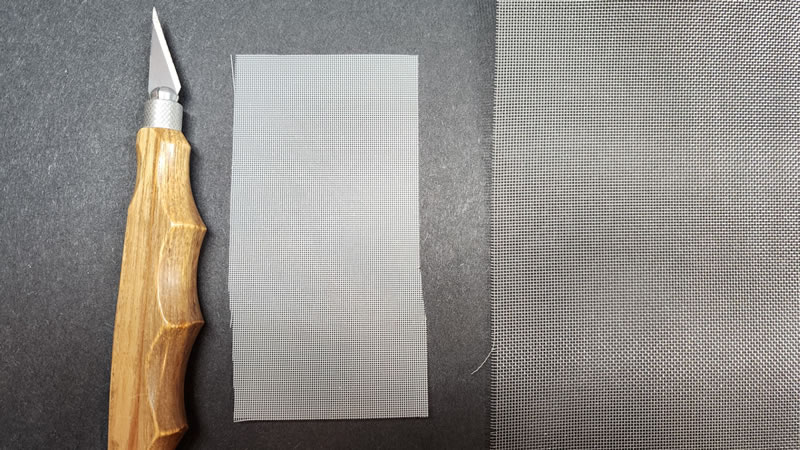
The second major issue was the “chain link fence” material for the pigeon enclosure. The kit comes with a swatch of white mesh material, but it is dramatically overscale. Further, Roden would have you apply this material to the //outside// of the loft frames, which would result in a very heavy-handed look and not at all “prototypical.” I went scouring the interwebs for something more suitable, eventually landing on 316 Stainless Steel Mesh (5017196) offered by Component Supply Company. This company makes a wide array of products geared to manufacturers and labs, the only catch being they are a “business-to-business” operation that does not want to sell products to individuals. (I got around that limitation with an old but still current business license I have for a mostly dormant photography enterprise I started in the 1990s.) This mesh is really still overscale for 1/72, but looks much better, and at least allows the loft occupants to be seen. To tone down the stainless steel, I hit it with a quick pass of Mr. Surfacer 1000 primer, followed with some intentionally irregular hand touchups with thinned Mission MMS-003 Grey primer. The steel mesh allowed for carefully bending to shape and a “drop-in” installation for the main enclosure, complicated slightly by the mesh grid being “on point” rather than parallel to the ground.
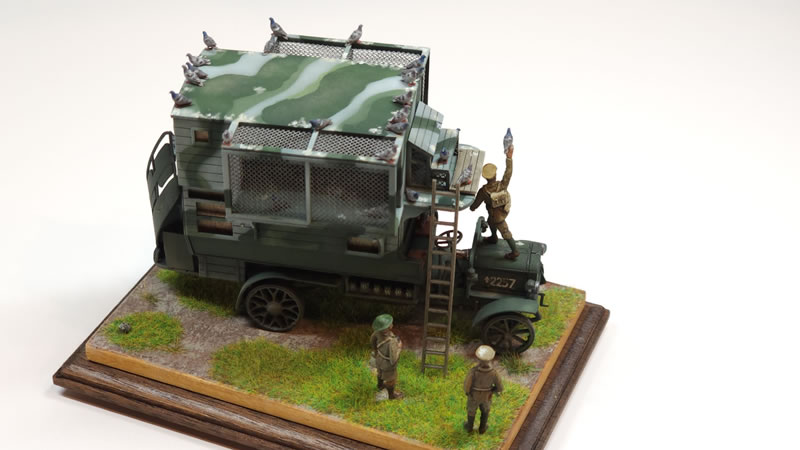
A critical aspect of any pigeon loft project is, well, the pigeons. Photos of these vehicles (see References) show them absolutely swarming with pigeons, so they need to be prominent and plentiful. Roden gives you a set of pigeonish shapes on Sprue D (you can make them out in the top middle area of the sprue image). These suffered from flash and left/right half offsets, so I immediately started looking for alternatives. I found an answer at Scale 3D, a U.K. based company producing a wide range of 3D printed accessories of all kinds, including animals. Their pigeons were darn impressive looking, so I ordered a batch.
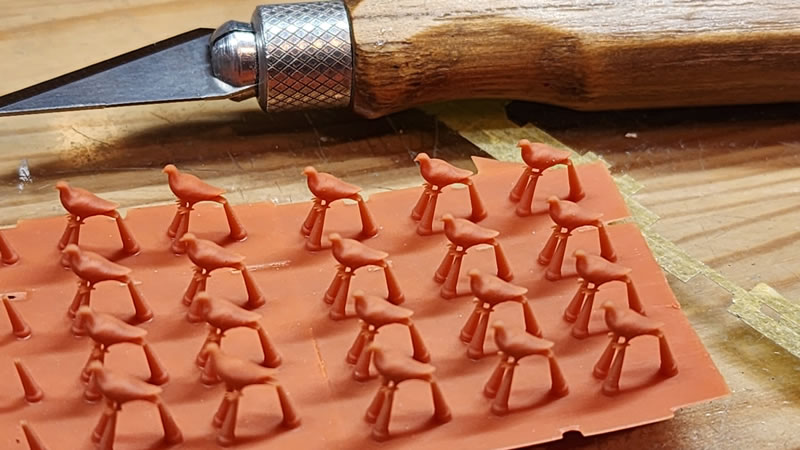
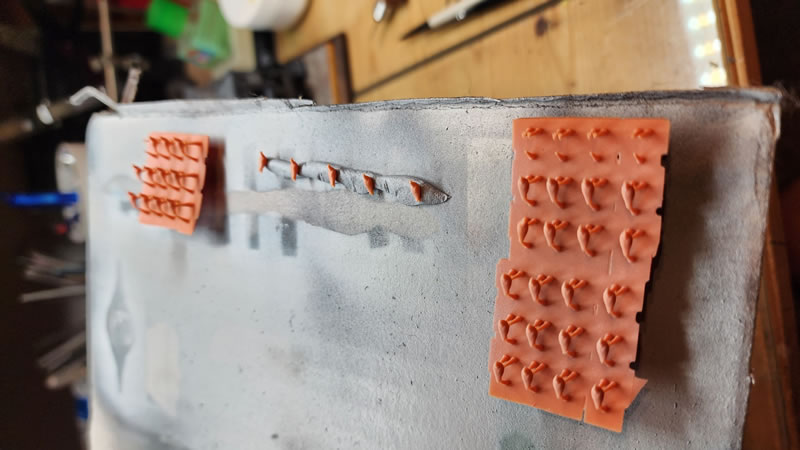
The Scale 3D pigeons arrived on their 3D printed build plate, with incredibly delicate feet. I wanted to do all of the painting of the birds while they were still mounted here. A few had broken off during shipment, and these were mounted with Blue Tack. Pigeons, like people, come in a variety of colors and looks. I decided to go for 2 major variations (gray and bluish heads) and a series of shades for those of the bluish persuasion. All were primed with Mission MMS-003 Grey primer, thinned as noted above, some followed with a top-only shading of Mission MMP-089 RLM 66 (thinned with 50/50 with a “CP30” mix of 30% Mission MMS-007 Clear primer and 70% Createx 4011 thinner, with additives). RLM-66 is a very nice “pigeonish” violet-gray!
This base was followed by hand painting of the heads and wing tops with multiple (unrecorded) grays mixed with a touch of blue for variety. The beaks were treated to light gray, and in a moment of inspiration, I elected to use Mission MMP-111 Anti-Fouling Red as a match for typical pigeon feet. Some light gray, mottled dry brushing on the wings finished the process, and I do say they came out about as well as I could hope for. I skipped rendering the eyes or the tiny message containers on the feet – the point of diminishing returns.
There is one more sensitive pigeon matter to address. I’d like to talk to you about… droppings. I’ve seen no photos of the tops of these vehicles, but you can only imagine the horror resulting from long-term, continuous pigeon operations. I decided that restraint was again in order and installed representative “droppings” in what appeared to be high traffic areas. This was simply a matter of paint applied with a small stub brush in stippling fashion, using three shades: Tamiya XF-55 Deck Tan, Mission MMP-104 Insignia White, and MMP-116 Light Grey. (I joked with several friends that I used an “AK Pigeon Sh!t Effects” weathering set, and at least one of them thought I was serious!)
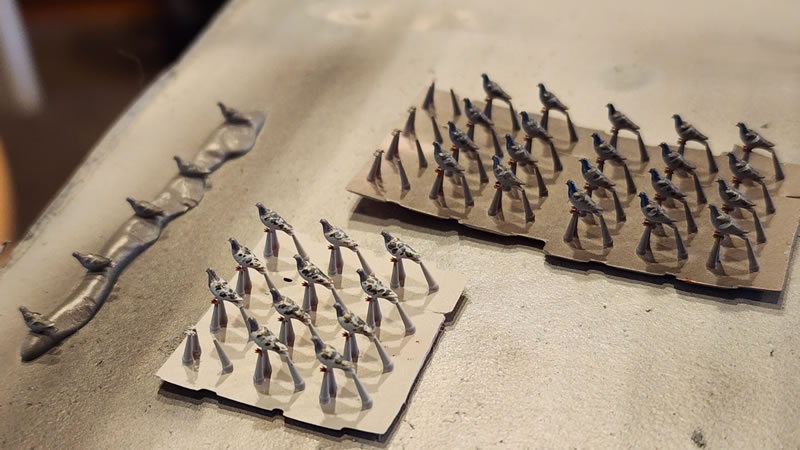
With the pigeons prepped and the droppings down, it was time to install the little buggers. This process was a little harrowing, since the legs were so delicate. To free the birds from the build plate, I gently nipped the feet first, then the tail support. Unfortunately, several birds suffered leg attrition, and these are the ones seen squatting around the loft – but real pigeons squat too. Each pigeon was positioned with tweezers on a small dot of Vallejo Satin - not a glue but with more than enough “stick” to keep these tiny feathered friends in place.
I knew this vehicle would require a human crew to accompany the avians. Good World War I figures in 1/72 scale are as rare as hens’ teeth (another bird reference), but there are some decent ones in the Emhar EM 7201 British WW I Infantry set. I modified one of them to look in a more upward direction, and another (who is intended to be exhorting poor Tommies “over the top” to their doom) to be launching a bird. The figures were primed black, with a zenithal treatment of white from above, then various colors applied by hand in thin layers (“glazes,” in figure parlance). Some dark wash, and highlights treated with AK Pencils, and they were good to go. I was generally seeking a whimsical, light-hearted feel to the whole thing, with maybe a little “fly, you bugger!” frustration. There are a couple of “Easter Eggs” thrown in to reward close-up viewers.
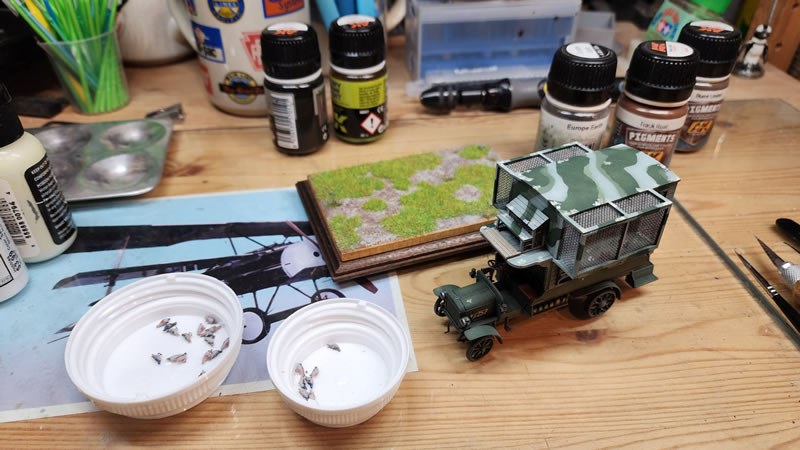
Knowing I never wanted to handle this thing directly again, all was mounted on a simple but attractive plinth picked up from Bases by Bill at a recent IPMS/USA Nationals, with my own groundwork (paint effects and static grass) added.

This project was a fun exercise, and a nice addition to my small but growing 1/72 armor collection. The modeling gods smiled on it with a First Place in Soft-Skinned Small Scale Vehicles at the recent IPMS/USA Nationals in Hampton, VA.
Cheers!
Tim
References
Roden Kit 737, WW I B-Type Bus Pigeon Loft
Homing Pigeons
LGOC B-Type Bus, Wikipedia
“Vintage Photos of Type B Bus “Pigeon Loft” During World War I,” Vintage Everyday Blog, November 24, 2021
For more on this review visit ModelPaintSolutions.com
Text and Images Copyright © 2025 by Tim Nelson
Page Created 14 November, 2025
Last updated
15 November, 2025
Back to HyperScale Main Page
Back to Reviews Page

|
 Home
| What's New |
Features |
Gallery |
Reviews |
Reference |
Forum |
Search
Home
| What's New |
Features |
Gallery |
Reviews |
Reference |
Forum |
Search