|
Arado
Ar 240
by Kyle Williams
|
Arado
Ar 240 |
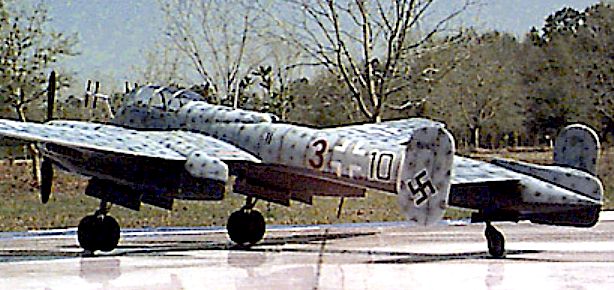
| The Ar-240 was designed to address the
Luftwaffe's requirement for a high speed, high altitude multipurpose fighter. This
aircraft incorporated many revolutionary features including a pressurized cabin,
high-speed safety control system and remotely aimed turrets. As with many of the
innovative designs generated throughout the war, this powerful aircraft failed to find an
optimum role and was canceled late in 1942. A few of the completed aircraft were utilized
as nightfighters equipped with airborne radar and a ventral cannon fit. |
 |
| R
e v e l l ' s 1 / 7 2 S c a l e M o d e l |
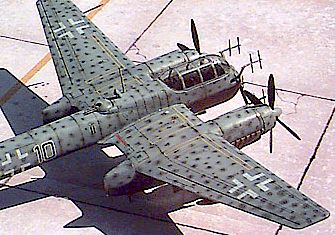 |
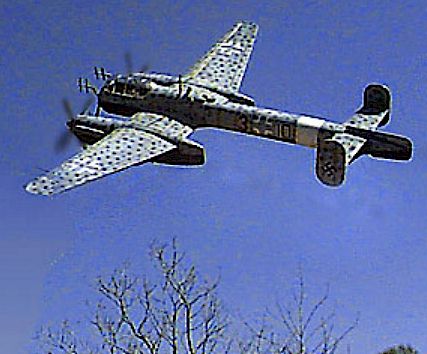
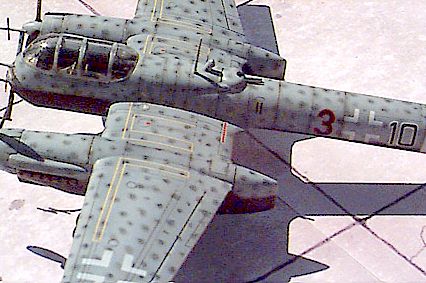
Revell's 1/72 scale kit is molded in light grey
plastic with recessed panel lines. The kit's strengths are in the cockpit detail
(although the seats looked a little small), landing gear and wheel wells, as well as a
crystal clear canopy.
Detailers can have a field day in that cockpit!
The fit was good and the only disappointment was the decal sheet. They are awfully
thick and a little yellowed. To make matters worse, my decals refused to settle to the
surface, leaving frosted marking that looked bad. I ended up using some of the contents of
my spares box. |
| P
a i n t i n g , D e c a l s a n d W e a t h e r i n g |
 Not being any kind
of Luftwaffe aficionado, I stuck pretty close to the instructions and the box art for
painting. Not being any kind
of Luftwaffe aficionado, I stuck pretty close to the instructions and the box art for
painting.
I sprayed Gunship Grey on the undersurfaces first, then built up a black finish with
repeated layers of black lightened with a drop of white. I use Polly-S acrylics, so they
dry fast and I can move forward.
I used pastels for the mottling, applied with a micro-brush to ensure accurate
placement. I never could get my airbrush to spray consistently enough for this sort of
detail work - with pastels, if I screwed up, I could just wipe it off!
I wore surgical gloves to keep my oily paws from leaving fingerprints and sealed the
paintjob with first a dusting, then a liberal coat, of Future floor wax.
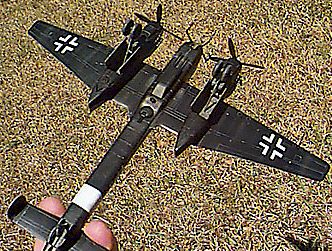
After decals and another coat of Future I ran thinned grey acrylic paint into the panel
lines, and light grey for the underside panel lines. Following a coat of (well-mixed)
Polly-S flat, I went back and accented the panel lines with the chalks to weather the
aircraft more heavily.
 I also took black
chalk and scrubbed along the demarcation line between the RLM76 and the black undersides.
This softened the line (just a little) and looks more realistic. The final touch was to
load my airbrush with some thinned Polly-S flat with a drop of white and CAREFULLY dust
the markings along the fuselage and tail. This knocks the decals back a bit and for 1/72nd
scale looks really awesome. Even some sad old decals look authentically painted on and
weathered! I also took black
chalk and scrubbed along the demarcation line between the RLM76 and the black undersides.
This softened the line (just a little) and looks more realistic. The final touch was to
load my airbrush with some thinned Polly-S flat with a drop of white and CAREFULLY dust
the markings along the fuselage and tail. This knocks the decals back a bit and for 1/72nd
scale looks really awesome. Even some sad old decals look authentically painted on and
weathered!
I finally used the mixture to simulate exhaust stains along the engine nacelles and
cannon shell ejector chutes. Light colored pastels disappear once you spray a clear coat
back over them. A few touches of light grey along leading edges and panel lines to
simulate chipped paint and the project was complete.
Model, Images and Article
Copyright © 1999 by Kyle Williams
Page Created 07 August 1999
Last updated 26 July 2007
Back to HyperScale Main Page
Back to Features Page
|  Home
| What's New |
Features |
Gallery |
Reviews |
Reference |
Forum |
Search
Home
| What's New |
Features |
Gallery |
Reviews |
Reference |
Forum |
Search