Home
| What's New |
Features |
Gallery |
Reviews |
Reference |
Forum |
Search
Home
| What's New |
Features |
Gallery |
Reviews |
Reference |
Forum |
Search
|
|
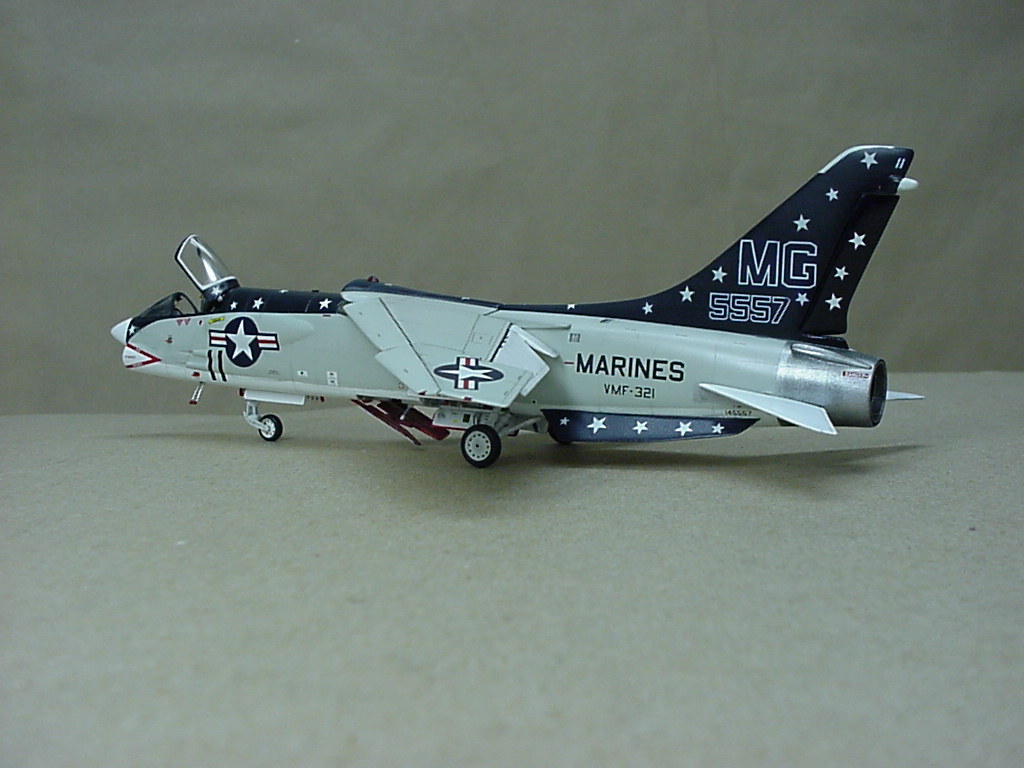
Chance Vought F-8K Crusader by Paul Osborne
After an 18 year absence from building models, I decided to take the plunge and re-enter the hobby. The first priority would be to complete the Heller 1/72nd Crusader that I never finished in 1982. Unfortunately, the years had been very unkind to the Crusader as she had yellowed badly and was covered with dust.
After deciding that a total restoration of the model was necessary, I contacted Brett Green and inquired if he would be interested in a ‘Before & After’ feature for ‘HyperScale’. Once his approval was received, the mission began.
The kit used in this feature is the old 1/72 scale Heller F-8J/F-8E(FN) version that was released during the late 1970’s. Before selecting the Heller kit, I conducted an
extensive review of all the 72nd scale Crusader kits available in
1982. Those examined included
offerings from Fujimi, Revell, the relatively new Hasegawa release and of course
the Heller kit. The Fujimi kit is
absolutely awful but the box art is quite impressive. The Revell release has to many inaccuracies in the outline
department and the Hasegawa kit is just a huge disappointment.
When the Hasegawa kit was initially released, I assumed it would turn out
to be the most accurate available. When
compared with 72nd scale plans, the fuselage is undersized, the rear
hinge line on the upper wing is located Ľ” to far aft, the undercarriage and
wheels are badly undersized, there is no separate speed brake, you can see the
cockpit tub when you look down the intake and the rear canopy as far to wide. During the course of writing this, I received a copy
of the old ESCI/ERTL/AMT 72nd F-8 kit. I was most anxious to acquire one for comparison purposes as
I had never actually seen this model. What
a mistake! This kit appears to be a
copy of the Hasegawa offering. It
does however come with recessed panel lines ( to wide in my judgment ) and
separate flap/aileron sections but the canopy doesn’t contain the rear tabs
.The remainder of the kit is a major disappointment . The Heller kit has stood the test of time.
Here we are in the year 2000 and it is still the most accurate 72nd
F-8 kit ever produced. It provides
an excellent reproduction of the intake and intake shaft, a separate speed brake
( no other kit offers this ), a nose wheel well, separate nose wheel and nose
gear assembly, correct sized main undercarriage legs and wheels, two different
sized tail planes ( normal and larger style for ‘J’ & French models only
) and the leading edge droops on the wing contain the hinge line to simulate the
double hinge that is unique to the wing found on the ‘J’ and ‘FN’
versions. In my estimation, the
model only contains three flaws. All
of these are easily corrected. 1.
The rivet detail is grossly excessive and should be removed
2.
The ventral fins are to wide and need to be trimmed 3.
The canopy and windscreen are to thick.
This is not a major problem but if you have a vacuform machine ( I
don’t ), thinner is better.
Paint
Stripping The first step in the restoration was to remove all
the clear coat, paint and decals. Because
the kit had originally been painted and sealed with Floquil lacquers, this step
required many hours of sanding and soaking in ‘Easy Off ‘ oven cleaner.
Eventually, the oven cleaner removed most of the
paint and also some of the green putty used
to fill seams. After washing
the model several times to remove any traces of the oven cleaner, the fuselage
and wing were allowed to air dry for several days. This also allowed any
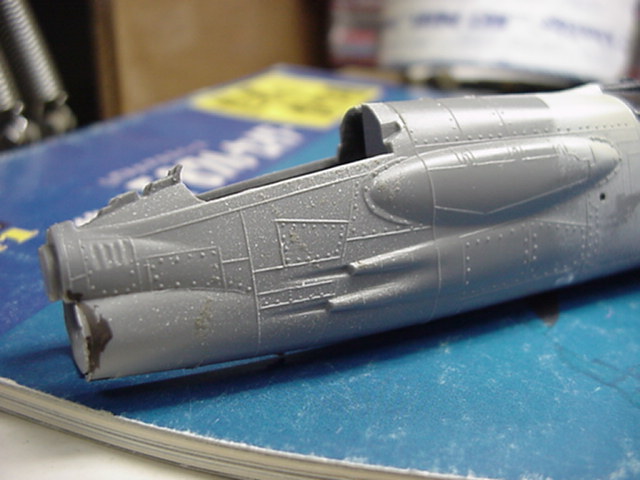
softened putty plenty of time to re-harden. Panel
Lines Since the strip & sand operation had removed all
traces of the raised panel lines and rivet detail, I decided to re-scribe all
the lines. This was rather
difficult as it’s far easier to address this problem while the fuselage halves
are separate. Armed with a new
‘Bare Metal’ panel scriber and a roll of Dymo Label Tape, I began this long
tedious step. The wing was
relatively simple since you’re scribing a flat surface but the fuselage had
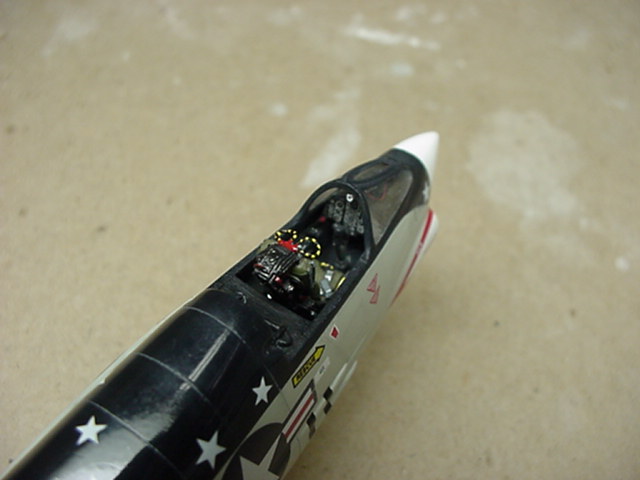
some complex curves that required a very delicate touch. Cockpit The cockpit had already been installed in 1982 and I
decided against improving it any further. To
do so would have required breaking the fuselage sections in half and this was a
risk I wasn’t willing to take. Corrections
and additions already made to the kit cockpit area were as follows: 1.
Top of instrument panel combing was built up to the correct shape using
pieces of plastic card.
Gunsight added from clear acetate 2. New
instrument panel cut from plastic card. Decals applied to this and side consoles
3. Added rudder pedals, back up compass to inside of windscreen, throttle & undercarriage levers to left console. 4. Area behind ejection seat was built up with plastic card and canopy actuating mechanism was added to rear deck of cockpit. 5.
The ejection seat used in the original build was the Heller supplied seat
which was extensively modified. With
a little bit of work, you’ll end up with a nice reproduction of the MB. Mk
F5/F7. The modified kit seat is
visible in the photos showing the F-8 during the paint removal phase. Unfortunately, the Heller seat was accidentally
stepped on during the restoration so I decided to substitute a resin TRUE
DETAILS version of the Martin Baker MB.7.
Even though not 100% accurate, it does not detract from the finished
product. The ejection seat used in Crusaders was unique to
this particular aircraft. Other
than the really early versions that were equipped with Vought seats, all F-8’s
were eventually fitted with the Martin Baker Mk.F5 ejection seat.
Starting in 1968, this seat was replaced by the rocket equipped Mk. F7.
Externally, these seats are identical and it’s almost impossible to
distinguish them since the new rocket pack was located in the bottom of the
seat. Although both these seats were similar in appearance to other M.B seats,
their most unique characteristic was the safety pin/water bottle pouch located
on the upper left side of the frame. To
the best of my knowledge, no after market resin seat of the Mk.F5/F.7 is
currently available in 72nd scale.
Kendall Model Company (KMC) did include a beautiful rendition of the seat
in their 72nd scale update set which was designed to fit both the
Heller and Hasegawa kits. Unfortunately,
this fine KMC product is no longer available and is extremely difficult to
locate. I was fortunate to obtain a
copy of this kit from the KMC
distributor in Belgium but decided to save all the components for my next Heller
F-8 project. I had hoped to use the
Kendall seat in this project but the Heller cockpit tub is to narrow to
accommodate the seat. Even after
sanding the sides of the seat, it still wouldn’t fit into the Heller tub.
If I had continued to sand
the sides, the seat would of been ruined. Therefore,
I opted to use the already completed TRUE DETAILS MB.7 and save the KMC seat for
use with the KMC cockpit tub at a later date.
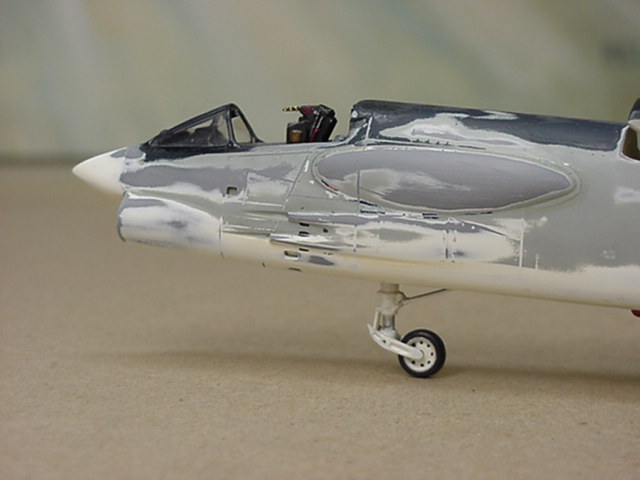
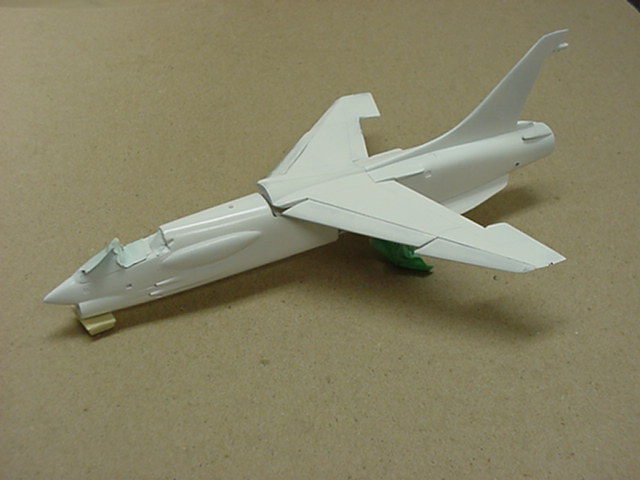
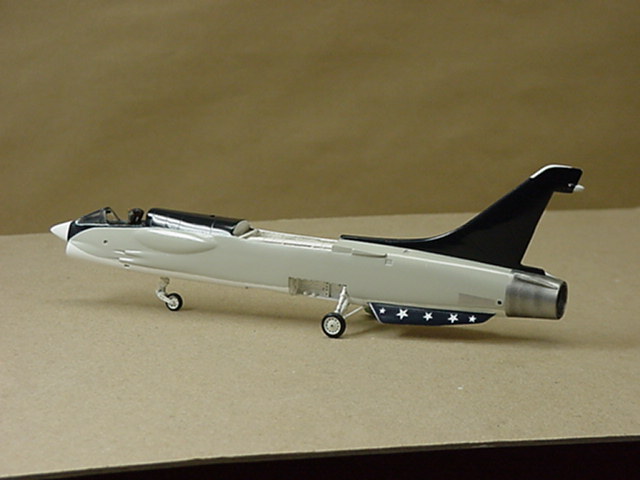
Fuselage To make an F-8K version from the Heller F-8J/E(FN),
the nose and wing need to be converted back to the earlier profile.
The kit nose must be sanded down to the correct pointed profile and it
should have an oval shape when viewed from the front.
To accomplish this, the fuselage bulges directly below the windshield
need to be sanded down until these areas and the sides of the nose were flat.
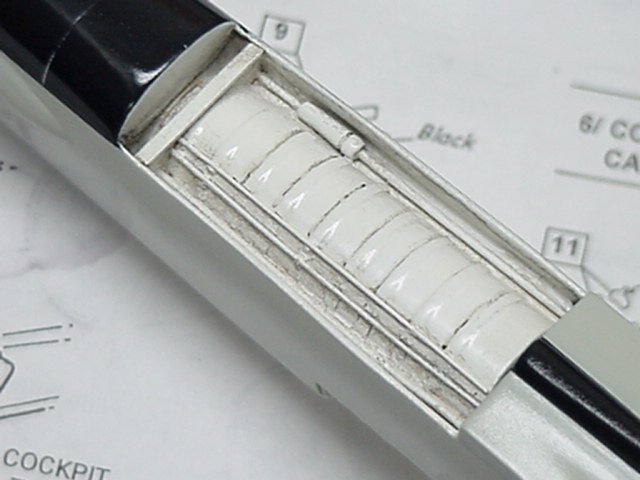
The rest of the fuselage steps were as follows, 1. The area in the top of the fuselage directly below the center of the wing contains the top portion of the engine intake shaft. This area was fashioned from a section of an F-104 wing tank and plastic card. The raised strips over the shaft came from thin strips of masking tape and the pipes came from thin wire and stretched sprue.
(Click
Thumbnails below to view images at full size)
2.
Three square openings were cut out on the left side of the nose area
where the foot steps are located. The
lower opening is for the boarding step that slides downward.
This step was fashioned from two pieces of thin wire and plastic card.
3. Drilled out the for 20mm cannon openings. 4. Cut out the rudder and added hinge to its starboard side. 5.
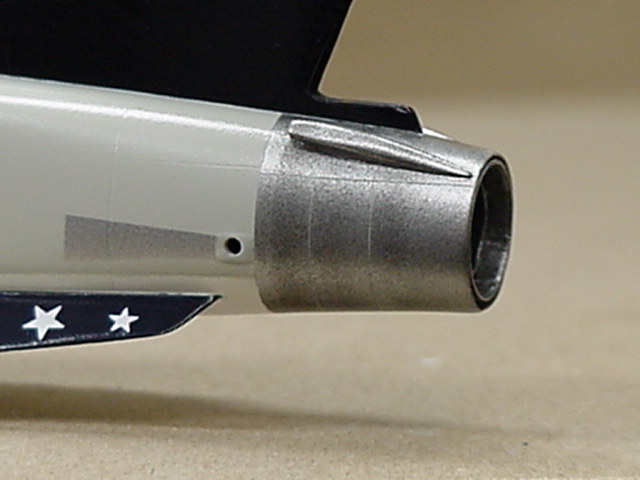
Replaced kit afterburner with the more accurate Hasegawa piece.
6. Rear facing (RHAW) antenna added to top of the fin. 7. Heat exchanger and refrigeration turbine door on the starboard side was cut out and replacement from plastic card added in open position.
8.
Red Anti-Collision beacon added to lower fuselage using red coloured
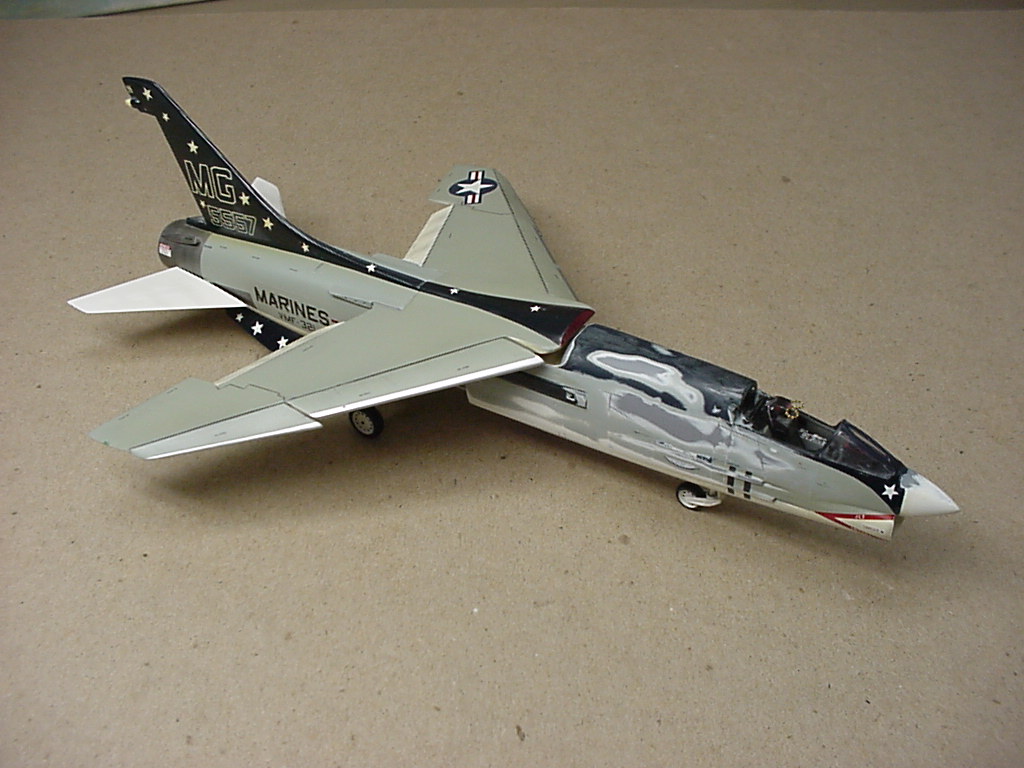
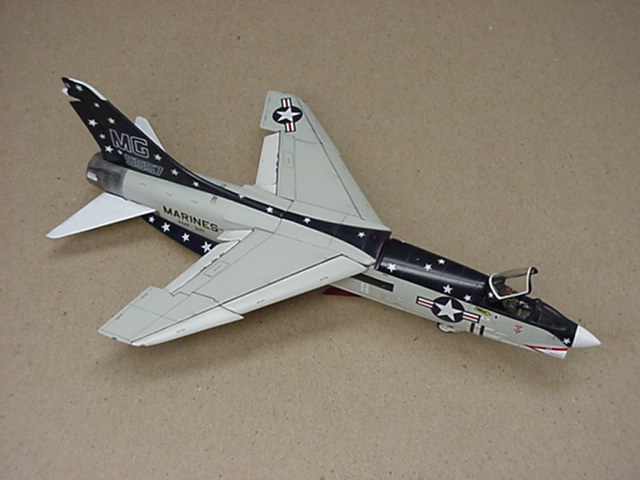
sprue. Wing The kit wing has two areas that must be addressed if
you want to accurately portray the
earlier configuration of the F-8 wing. First,
the raised avionics hump in the center of the wing must be removed along with
the forward portion of the hump which is located on the top of the fuselage.
After the hump has been removed from the wing, you’ll have to fill the
hole with plastic card and putty and sand this area to the correct shape.
Since the kit wing is accurate for the F-8J and the French (FN) only, you
need to fill in the hinge line in the middle of the double hinged leading edge
droops as the early wing was equipped with single hinged droops only.
The remainder of the wing improvements were as follows, 1. Leading edge droops, ailerons and flaps were all cut out and repositioned at the correct angles of deflection. 2. Wing tip navigation lights were added using red and green sprue. Red Anti Collision Beacon added to top of center wing section. 3.
T-bar shaped strengthening strips from plastic card were added below the
raised wing center section. Wing fold mechanism bulges added below the outer
wing fold joints.
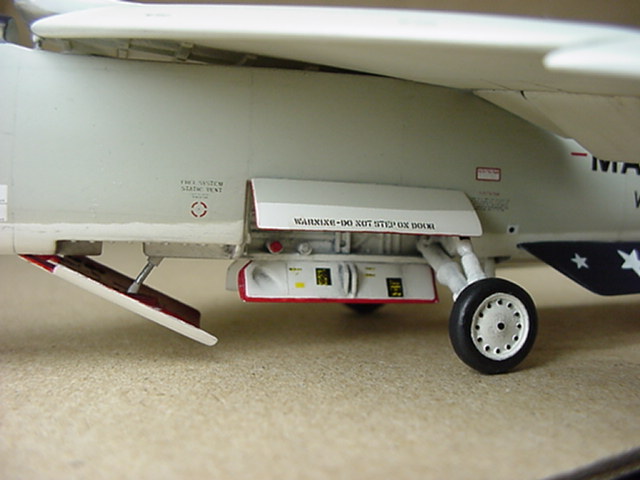
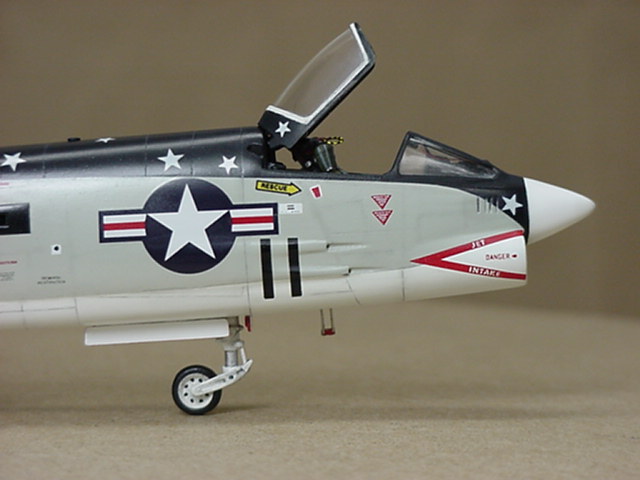
Undercarriage To improve the appearance of the nose wheel assembly,
I decided to show it in a partially extended configuration.
This was a common sight on parked F-8’s.
The first step was to separate the molded axle beam from the nose strut.
A piece of round sprue was then glued to the bottom of the nose
undercarriage leg strut to simulate the extended oleo.
I then drilled a hole through both axle beams and the oleo.
A piece of wire was passed through the holes that allowed the beams to
pivot. Once the wheel was
painted and attached between the beams, the axle beams were glued at the correct
angle. The main undercarriage legs are very nice so no
improvements were made but I did slightly reduce the width of the main wheels
with careful use of wet sandpaper. I
detailed the main wheel bays with plastic card, wire and stretched sprue and the
single point refueling station was added to the left bay.
Also, the small nose wheel door had the three approach lights drilled out
and these were filled with red, amber and green tinted Future.
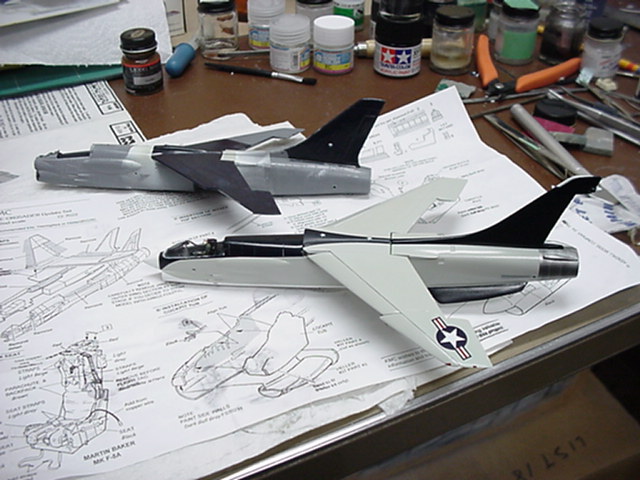
Primer
/ Paint As the final scheme was going to reflect a
‘HI-VIZ’ grey/white bird, I decided to use Testors MM Gloss Insignia White
to prime the entire model. This was
mixed 50/50 with lacquer reducer and was applied in several light coats.
The final coat was applied just to those areas that would remain white.
This was a ‘WET COAT’ where the mix was reduced to 70/30 lacquer
thinner/paint. I turned the
compressor down to around 12-15PSI and held the airbrush head relatively close
to the surface while constantly moving the airbrush.
This resulted in a superb gloss finish.
I then set the model aside for a week to allow the paint to completely
harden.. Once the white was good and hard, I used my LMG Polishing Kit to
prepare the upper surfaces for the Lt. Gull Grey.
This kit comes with eight 4”
x 3” abrasive cloths that range from 1800 to 12000 grit.
The manufacturer recommends that you use all the sheets in your sanding
operation but I only used the 6,8 and 12000 grit cloths during the entire
painting process. I highly
recommend the use of these cloths if your goal is to obtain a super smooth
finish.
Once the gloss white primer was dry and some of the
panel lines were given a light re-scribing , it was time to apply the Lt. Gull
Grey. Because the Model Master 36440 Flat Gull Grey appears to dark for a
72nd scale kit, I mixed my own formula of 50% 36440 M.M Flat Gull
Grey with 50% M.M 17875 Gloss Insignia White.
This mixture was then cut 70/30 paint/lacquer thinner before being
airbrushed. The lower white area
was masked off with Tamiya tape with the edges curled up slightly to give a semi
soft edge. Three thin coats of the
Grey were applied. Between each
coat, a light buffing was given using the 8000 grit cloth.
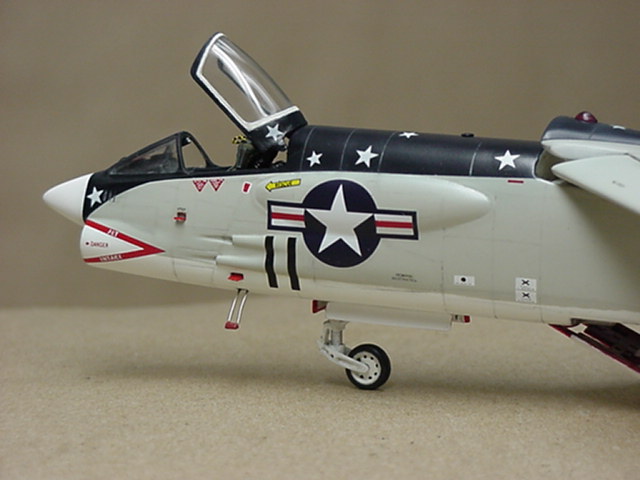
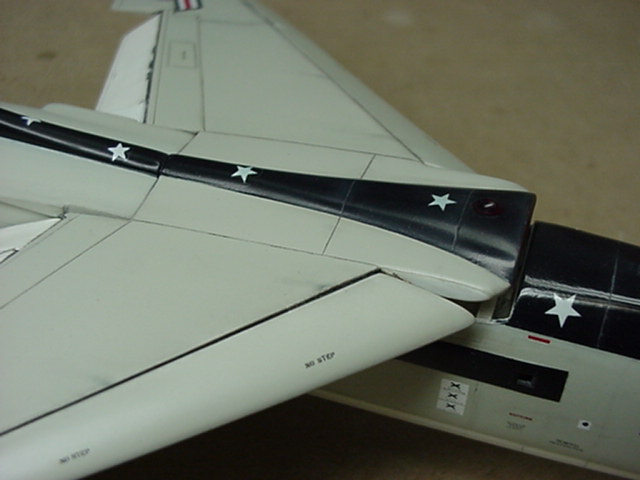
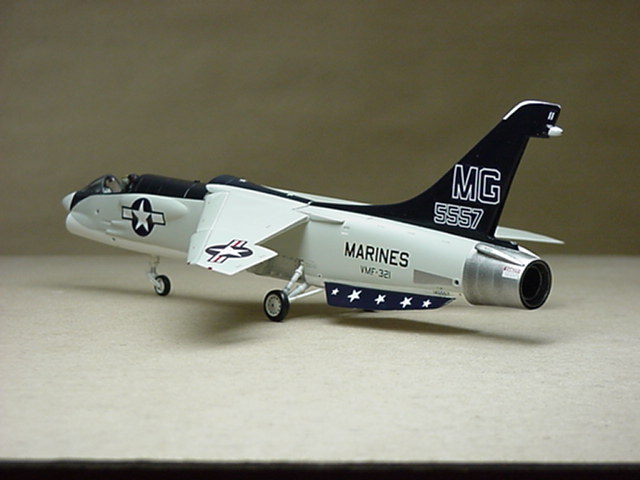
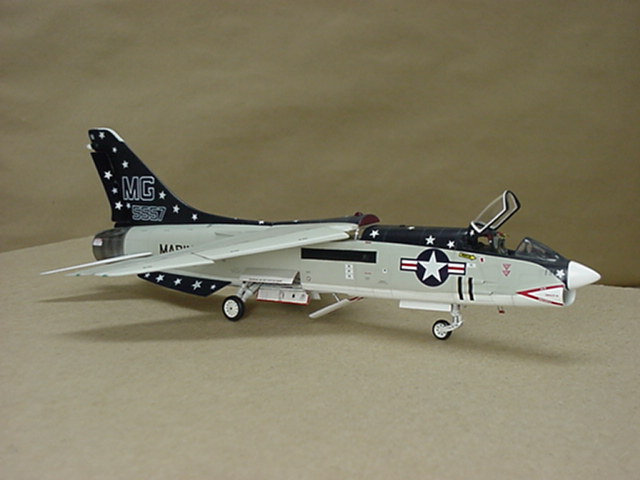
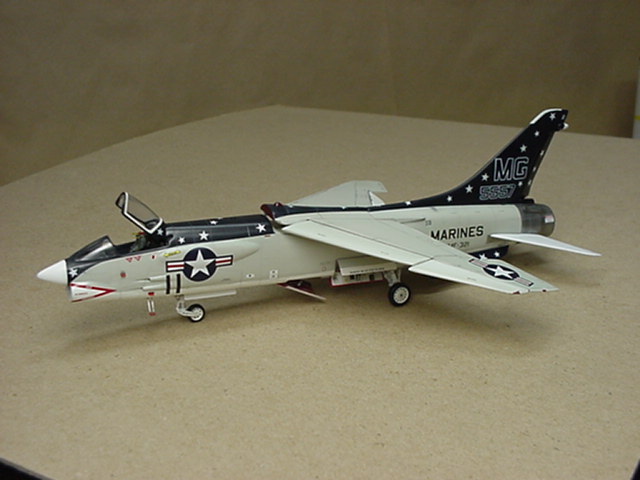
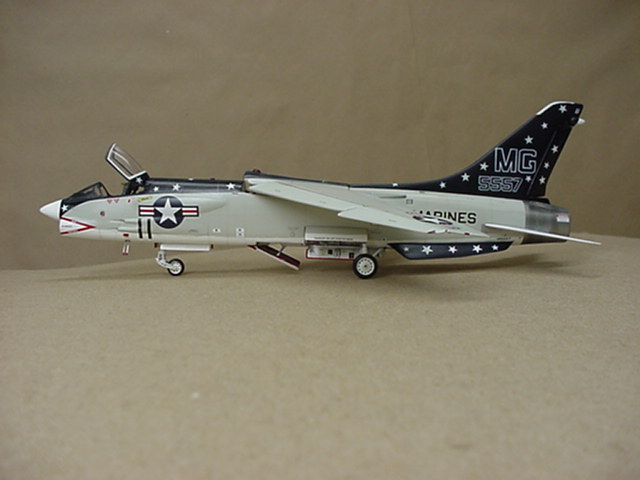
Just remember to use plenty of water and only sand in one direction. The final colour is the dark blue used on the nose,
spine and tail. There is a great
deal of controversy surrounding
this color. Because of the
reorganization of the Marine Air Reserves in late 1971, VMF-321 changed their
tail codes on their F-8K Crusaders from ‘5A’ to ‘MG’.
They also changed their squadron name from ‘Hells Angels’ to ‘Black
Barons’ in response to their new black/blue scheme which was covered with
white stars. Some sources claim
that the spine and tail were painted black and this sounds logical considering
the squadron name at the time was ‘ Black Barons’. However, some
publications have indicated the colour was FS15050 dark blue and the old
Microscale decal sheet claims the color to be Insignia Blue.
After checking the slides in
my collection and comparing them with the color centerfold in an old Koku-Fan
special on the Crusader, I’m convinced the color was a very dark blue and
could very well be FS15050. I decided to mix this color using Model Master
Insignia Blue mixed with M.M Gloss Black. I
don’t remember the exact mix percentage but 90/10 blue/black seems correct.
This colour was applied to a test Crusader and when dry, a coat of Future was
brushed on. The clear coat makes
the blue appear darker and also gives the color depth.
Once I was satisfied with the shade of blue, the areas to be painted were
masked off with thin strips of 3M Invisible tape cut on a piece of glass.
The paint was thinned 70/30 paint/lacquer thinner and only two coats were
required to achieve a good coverage. The tailpipe area was masked off and sprayed Tamiya Chrome Silver mixed with a little Tamiya White. I used this shade because it was the only silver color available to me at the time. The dark rings around the tail pipe were airbrushed on using a 50/50 mix of Tamiya Chrome Silver and Gunmetal cut 50/50 with isopropyl alcohol. The windshield and the anti glare section were masked off and sprayed Tamiya Flat Black. This color dries to a realistic dark grey shade. After letting the model dry for at least a week, all the painted surfaces were wet sanded using the 8-12000grit cloths. It was then sprayed with two light coats of Gunze Clear Gloss Acrylic mixed 50/50 with isopropyl alcohol. When dry, I again wet sanded the entire model with the 12000 grit cloth in preparation for decal application. (Click
Thumbnails below to view images at full size)
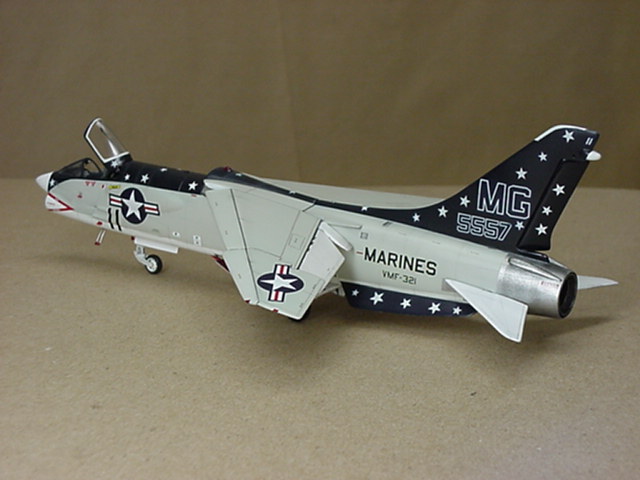
Decals
and Clear Coat The decals used on this kit came from several sheets. The old Microscale sheet 72-204, contains all the individual decals for all the blue areas that include the white stars. However, since the blue ink used on the decals is not accurate in my judgment, I decided to apply all 36 white stars individually to the dark blue painted areas. I did however use the ventral fin decals since I was unable to locate a source for large white stars. The only areas of the tail decals that are required are the ‘MG’ tail codes, the ‘5557’ serial number and the small white ‘11’ modex number located at the top of the fin. These were cut out using a new #11 blade and then applied to each side of the tail. The different sized stars were obtained from two Microscale 48-86 USMC F-4 sheets and one 72-174 USN F-4 sheet. The national insignia came from the Eagle Designs 72-005 Crusader sheet with the rest of the markings and stencils coming from the 72-204 Microscale offering. The entire decal application process took three evenings to complete (Click
Thumbnails below to view images at full size).
After washing the model in warm water to remove any decal setting solution, the model was blown dry with an airbrush. Several light coats of Gunze Clear Gloss (mixed 50/50 with isopropyl alcohol) were then sprayed on the tail and upper surface areas where the stars had been applied. The purpose of this was to build up the clear coat so when it’s sanded down, the ridge around the star decals and tail codes would blend together and eventually become invisible. This was a long, frustrating and tedious step and requires a great deal of patience. On several occasions I had to replace stars due to
over aggressive wet sanding using the 6000 grit cloths.
However, I was extremely happy with the final results. Weathering As for the weathering, a subtle use of thinned oils and pastels would produce the desired effect I was hoping to attain. Since the model had been sealed using Gunze Clear Gloss Acrylic, I applied a grey oil paint (Winsor & Newton) thinned with turpenoid to the recessed panel lines on the top of the wing and horizontal stabs using a 000 brush. The gaps between the wing and control surfaces were also treated in the same manner. Any excess was cleaned up with a Q-tip soaked in turpenoid. The approach used for the panel lines on the fuselage was different. Here, I mixed together grey chalk pastel powder, a few drops of water and a drop of dishwashing soap. I then took a medium blending tortillon( rolled paper pointed at one end ) and rubbed the mixture along certain panel lines while using photographs of the aircraft as a reference. If the effect was to dark, I used the 12000 grit cloth with water and gently rubbed the panel line in the direction of the airflow. The undersides of the fuselage and wing were given a wash of grey oil and burnt sienna was also used under the wings to represent hydraulic fluid streaks. The final area to be weathered was the blue upper
surfaces of the fuselage and wing. Since
these areas were constantly exposed to sunlight, they had to appear lighter than
the blue tail surfaces. Step one
was to fill the panel lines with a thinned mix of a medium grey oil thinned with
turpenoid. After letting this dry
and wiping away any excess, a medium grey chalk pastel was applied to the
trailing edges of each panel line. Finally,
a coat of Gunze Flat Clear Acrylic (mixed 50/50 with isopropyl alcohol) was
airbrushed over the entire model. Once
dry, I used the 12000 grit cloth to produce an overall semi gloss sheen that is
very realistic.
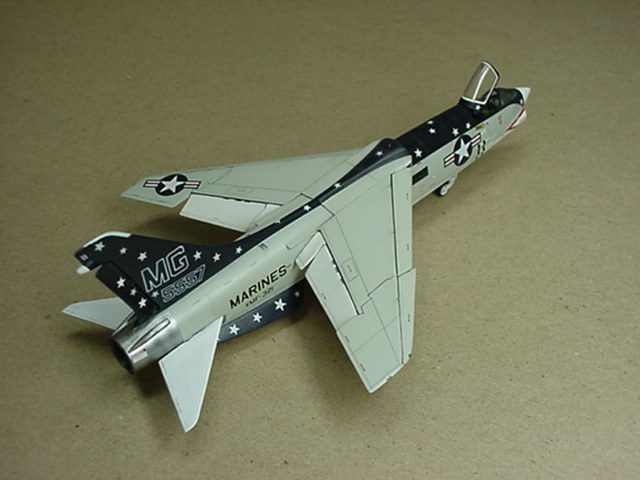
Considering this was the first model I had worked on
since 1982, I was extremely pleased
with the final results. The cut out
control surfaces and added details greatly enhance the character of the finished
model. The Heller kit is without a
doubt the most accurate looking 72nd scale Crusader available. I
spent twice the amount of time on this restoration compared with the original
construction eighteen years ago. A
great deal of that time was taken up by the paint stripping and panel scribing
stages and if I had to do it again, I would start a new kit. Lets just hope that
the new F-8 kit announced from Academy will be from a new mold and not a rehash
of an earlier example I’ll be building at least one more 72nd Heller
F-8 so I can utilize the beautiful KMC update set I acquired during this
project. Once that is finished,
I’ll be concentrating exclusively on 48th scale kits.
My eyes just aren’t what they used to be.
Lets just hope it doesn’t take me another 18 years to finish a model. I would like to take this opportunity to thank Brett
Green of HyperScale for providing the incentive needed to return to this great
hobby. Also, a very special
Thank-You must go to Dan Salamone. Many
of you have seen Dan’s beautiful WWII Japanese models here on HyperScale and
on the Japanese Aircraft Modeling website.
Even though I’ve never met him, he didn’t hesitate to answer all my
questions and he always responded in an enthusiastic way and offered many words
of encouragement. A class act
indeed. Thank you gentlemen.
Click Thumbnails below to view images at full size.
Model, Text and Images Copyright © 2000 by Paul
Osborne
|