|
Mustang Mk. IV |
Mustangs Under the Southern Cross - Part Two
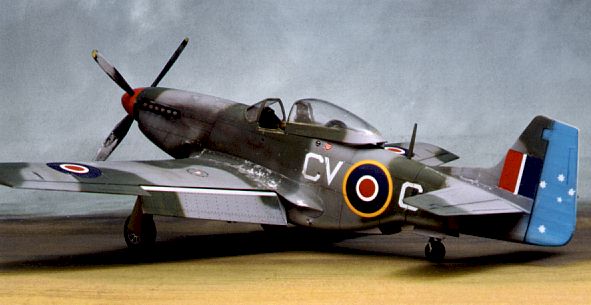
3 Squadron RAAF Mustang IVs in Italy
by Brett Green
|
Mustang Mk. IV |
Mustangs Under the Southern Cross is a four part series examining Australia's use of this thoroughbred fighter/bomber. Part One explores the RAAF's use of the Mustang III in Italy and Yugoslavia, and also describes an Australian Mustang modelling project.
Part Two continues the story of 3 Squadron RAAF, concentrating on Australia's use of the Mustang IV. Part Two also includes a construction feature on the Tamiya P-51 kit using the True Details cockpit.
Part Three will discuss Australian manufacture of the Mustang and operations in both Japan and Korea, while Part Four will provide a "walkaround" photo essay of a preserved aircraft.
| R A A F M u s t a n g I V |
"Mustang IV" was the RAF designation for the North American P-51D and P-51K
variants. The Mustang IVs operated by 3 Squadron RAAF in the Adriatic area were P-51Ks.
The combination of a Rolls Royce Merlin engine with the innovative airframe and laminar flow wing design of the A-35/P-51A resulted in one of the best fighter aircraft of World War Two. However, the P-51B/C series (Mustang III) was somewhat hampered by poor visibility through its heavily framed canopy. It was also difficult to bail out in an emergency due to the multi part canopy. The "Malcolm Hood" was a sliding, one-piece canopy designed by the British to be fitted to the Mustang III to address the bailout problem. However, this was a stopgap measure.
The airframe was therefore redesigned with a cut-down rear fuselage and a large, bubble-topped sliding canopy. This would become the P-51D - the definitive version of the Mustang. A total of 7,956 P-51Ds were produced.
North American’s Inglewood factory could not keep up with the pressing demand for this high-performance fighter, so production was also undertaken at Dallas. There was also a shortage of Hamilton Standard propellers. The "P-51K" designation was applied to a further 1,500 machines built at this Dallas facility. The P-51K was almost identical to the P-51D except for the propeller.
The P-51K was equipped with a four-bladed Aeroproducts propeller assembly. This could be distinguished from the Hamilton Standard prop on the P-51D by the lack of the characteristic "cuffs" at the root of each propeller blade and a narrower chord.
Aeroproducts propeller was not an improvement over the proven Hamilton Standard item. The P-51K suffered from serious vibration problems that were related to this alternate propeller unit. Most P-51Ks were allocated to the RAF and other Commonwealth Air Forces.
| R A A F M u s t a n g I V O p e r a t i o n s |
The Mustang IV entered service with 3 Squadron RAAF during late 1944. Despite its superior performance as an interceptor and dog-fighter, 3 Squadron used the Mustang IV primarily for ground attack duties. The Squadron also undertook occasional escort duties.
These aircraft operated in Northern Italy and Yugoslavia. The bubble top Mustangs fought alongside Mustang IIIs (P-51B and C) of 3 Squadron until the German surrender in the Adriatic region became effective on 2 May 1945.
P-51Ds and P-51Ks also operated in Australia with 84 Squadron and 86 Squadron RAAF. Hostilities in the South-West Pacific Area were over before these Squadrons saw front-line service. Australia’s post-war Mustang operations in Japan and Korea, plus details of local Mustang production, will be covered in Part Three of "Mustangs Under the Southern Cross".
| B u i l d i n g a n R A A F M u s t a n g I V i n 1 / 4 8 S c a l e |
There are a number of P-51D kits in 1/48 scale on the market today. These include
Arii/Otaki, Fujimi, Monogram, Hasegawa and Tamiya. The Hasegawa and Tamiya kits are by far
the best of this selection. Hasegawa also offers a P-51K kit in 1/48 scale. This version
even features markings for an overall silver aircraft of 3 Squadron RAAF.
The Tamiya kit, however, takes the prize as the simplest of all available Mustang kits to build. Although it would require some minor conversion, I decided to produce my Mustang IV from Tamiya’s F-51D kit.
"F-51D" is simply a post war redesignation for the P-51D Mustang. Tamiya’s reboxing includes some additional underwing stores and new Korean War decals. This version is otherwise identical to Tamiya’s earlier releases. Much has been written about the basic features and construction of Tamiya’s P/F-51D kits including a couple of articles on HyperScale.
I will focus my description on customising and detailing Tamiya’s basic kit.
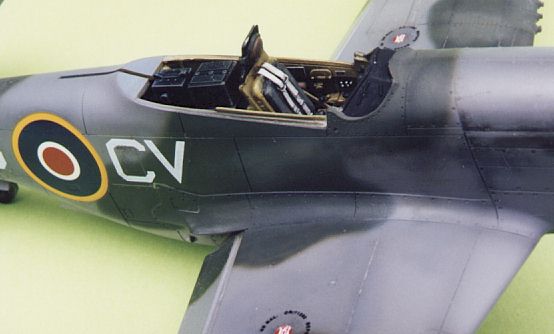
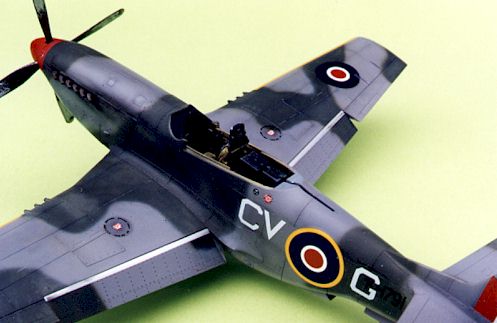
Cockpit
Tamiya’s cockpit is pretty good. A set of harnesses would spruce the interior up quite nicely - but that really would be too easy! There are not many aircraft with a more visible cockpit than the P-51D. The wide opening and clear bubble canopy almost demand superdetailing. I therefore decided to install True Details resin replacement cockpit.
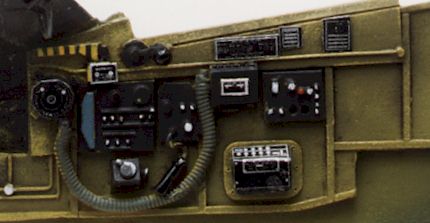
True Details straightforward set comprises of only six resin pieces. These include new cockpit sidewalls, floorboard with integral radio gear, instrument panel, gunsight and pilot’s seat with moulded-on harness. This simple breakdown does not compromise detail.
Moulding is flawless, with no pinholes or warpage on my example.
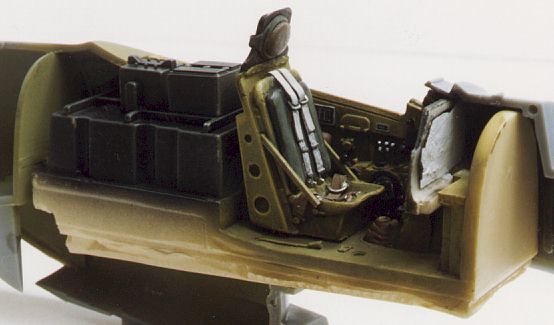
The cockpit floorboard is cast on a long, large, rather alarming looking plug. However, after test fitting, the plug on my floor did not interfere with the fit in the kit fuselage. This plug was therefore left in place. The casting plug is likely to vary in size though, so don’t forget to test fit yours!
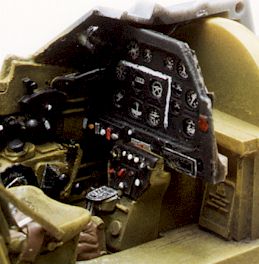 I commenced construction with the instrument panel. I wanted to take
advantage of the three-dimensional qualities of the resin, but decided to combine a
brass/acetate instrument panel to achieve the sharpest possible detail on individual
dials. The first step was to thin the rear of the resin instrument panel then cut out the
centre of the panel (which mounts the instrument dials and switches). The Eduard P-51D
instrument panel was used to replace this centre section. The brass part was first glued
to the back of the resin panel surround. The front face of this sub-assembly was sprayed
black, with details picked out using white, yellow and red paint. Finally, the rear of the
acetate instruments were painted white and secured with white glue to the back of the
panel.
I commenced construction with the instrument panel. I wanted to take
advantage of the three-dimensional qualities of the resin, but decided to combine a
brass/acetate instrument panel to achieve the sharpest possible detail on individual
dials. The first step was to thin the rear of the resin instrument panel then cut out the
centre of the panel (which mounts the instrument dials and switches). The Eduard P-51D
instrument panel was used to replace this centre section. The brass part was first glued
to the back of the resin panel surround. The front face of this sub-assembly was sprayed
black, with details picked out using white, yellow and red paint. Finally, the rear of the
acetate instruments were painted white and secured with white glue to the back of the
panel.
Next, all the moulded sidewall detail was removed from the interior of the Tamiya fuselage halves. Be careful not to remove the locating positions for the front and back bulkheads of kit part A17 - you will need these later to correctly position the resin floorboard.
 Completion of the other components was very straightforward. I
secured the cockpit sidewalls then painted all cockpit components. Before finally
assembling the fuselage I applied a number of Waldron cockpit placards in appropriate
positions. These placards are printed on a very thin metal foil, ensuring a very authentic
result.
Completion of the other components was very straightforward. I
secured the cockpit sidewalls then painted all cockpit components. Before finally
assembling the fuselage I applied a number of Waldron cockpit placards in appropriate
positions. These placards are printed on a very thin metal foil, ensuring a very authentic
result.
When all the cockpit components were completed, each received a wash of thinned black acrylic paint.
When this wash was dry, the fuselage halves were joined.
Exterior Modifications
As mentioned earlier, Australian Mustang IVs were P-51K models. The only external difference between the P-51D and the P-51K was the propeller. I "borrowed" a set of the thin-bladed Aeroproducts propeller blades from Hasegawa’s P-51D/K kit, and adapted them to Tamiya’s spinner. This style of propeller blade is also available in resin from True Details.
The Tamiya kit is so good that very few additional details are necessary. However, I did improve a few areas:
The only other area requiring special care is the canopy. The clear part of the canopy is moulded separate from the painted frame, and is attached to the sprue in a very visible position. Despite careful treatment of the clear part, I had to sand and polish the part to remove the obvious blemish left after the part was cut off.
| C a m o u f l a g e a n d M a r k i n g s |
Camouflage and markings for the first Mustang IVs delivered to 3 Squadron was similar to
the Mustang IIIs already in service. The bubble-top Mustangs initially retained their
British camouflage. RAAF field personnel added the attractive tail markings, while the
spinner colour indicated the Flight. White identity stripes were not applied to RAAF
Mustang IVs
Mustang IVs later flew in an overall silver finish. Camouflage was redundant, as aerial resistance had been almost eliminated at this late stage. The characteristic Southern Cross on a blue rudder was retained on these aircraft. Squadron codes were also in blue.
 Tamiya acrylics were used to reproduce the markings of an aircraft based at
Fano in Italy during the winter of 1945. The camouflage was sprayed freehand using a
Testors/Aztek airbrush. Different shades of the green and grey were applied randomly to
acheive a patchy, weathered appearance.
Tamiya acrylics were used to reproduce the markings of an aircraft based at
Fano in Italy during the winter of 1945. The camouflage was sprayed freehand using a
Testors/Aztek airbrush. Different shades of the green and grey were applied randomly to
acheive a patchy, weathered appearance.
Markings were sourced from Aussie Decals sheet no. 48003. This sheet covers six subjects - four camouflaged Mustang IIIs, one camouflaged Mustang IV and one natural metal Mustang IV. These decals are extremely thin and require the utmost care in application. They tend to curl, and once a decal is stuck to itself it is ruined! Use lots of water (or wetting agent) when applying these decals. The result is worth the effort. The decals are quite opaque and display virtually no carrier.
Exhaust stains were added after the decals were dry. Thinned black acrylic paint was flowed into panel lines. Silver paint was applied to the leading edges, the spinner and the fuselage. This paint represents chipping consistent with the arduous ground attack role undertaken by these thoroughbreds. The model was completed with a coat of Gunze Clear Flat Acrylic.
| C o n c l u s i o n s |
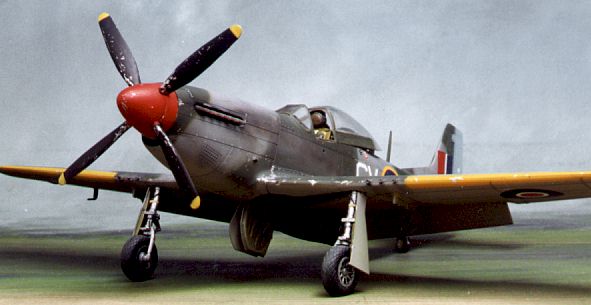
Tamiya’s kit is excellent in terms of fit, detail and authenticity straight out of the box. The addition of the True Details cockpit added an extra detailing edge.
This was an enjoyable project that was not overly complex and did not break the bank. True Details offer a range of simple resin cockpits, which may be applied to similar projects. I can thoroughly recommend this shortcut approach to superdetailing!
| R e s o u r c e S u m m a r y |
Description |
Item No. |
|
| Basic Kit | Tamiya F-51D Mustang - Korean War | 61044, |
| Cockpit | True Details P-51D Mustang | 48453 |
| Cockpit Accessories | Waldron P-51 Cockpit Placards | 30 |
| Other Accessories | Eduard P-51D Instrument Panel Prop blades from Hasegawa P-51K |
09131 |
| Decals | Aussie Decals Australian Mustangs | A48003 |
| R e f e r e n c e s |
The Modeller's Guide to the RAAF Mustang by Gary Byk, Red Roo Models Publications,
Melbourne, 1996
ISBN Unknown - limited publication of 500 copies still available
from the Publisher
The Spitfire, Mustang and Kittyhawk in
Australian Service by Stewart Wilson, Aerospace Publications Pty Limited, Sydney, 1988
ISBN 0 9587978 11
Mustangs of the RAAF and RNZAF by Peter
Anderson, AH and AW Reed Pty Ltd., Sydney, 1975
ISBN 0 589 07130 0
IPMS News and Views (IPMS NSW Magazine) 3/1988 "Fighter Squadrons of the RAAF in WWII Part 6 - 3 Squadron P40Ns and P51s" by Steve McKenzie, Sydney, 1988
P-51 Mustang in Action by Larry Davis,
Squadron Signal Publications, Carrollton, Texas, 1981
Go to Part One of Mustangs Under the Southern Cross - "3 Squadron RAAF" (Mustang III)
Back to HyperScale Main Page
Back to Features Page