![]()
Panther
Ausf. G
Building and Detailing
Tamiya’s Panther G (early)
by Chris Leeman
|
Tamiya's Panther Ausf. G (early) |
| I n t r o d u c t i o n |
Tamiya’s Panther G was released about five years ago and caused quite a stir among German armor fans. It showed what can now be done with state of the art mold making technology. The level of detail was fantastic and when compared to Gunze Sangyo Panther G kits its price was good as well. A very good model can easily be made straight from the box. But like most models there is room for improvement and I plan to outline what can be done to do improve this model.
| B u i l d i n g t h e K i t |
I used a couple of after market sets to help me on my way. The main one was a set of photo-etched from Aber (35 A24). For those who haven’t either used or heard of this brand, do yourself a favor and get some. I can’t speak highly enough at the quality of these sets. I would have no problems in rating Aber sets better than Eduard and Show Modeling. They have an ever-expanding range of full detail sets and accessory sets for all sorts of armor, both modern and WW 2.
 These sets are
available from NKR Models in Ballarat. Earl from NKR will be happy to help you with any
inquiries and you won’t be disappointed with the services. The second set I used was
the Panther G detail set from Verlinden (1266). In hindsight I could have done without the
Verlinden set as I didn’t used that much of it.
These sets are
available from NKR Models in Ballarat. Earl from NKR will be happy to help you with any
inquiries and you won’t be disappointed with the services. The second set I used was
the Panther G detail set from Verlinden (1266). In hindsight I could have done without the
Verlinden set as I didn’t used that much of it.
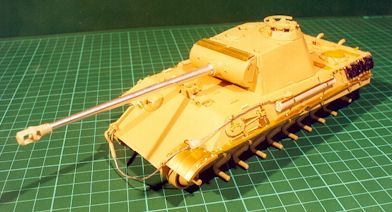
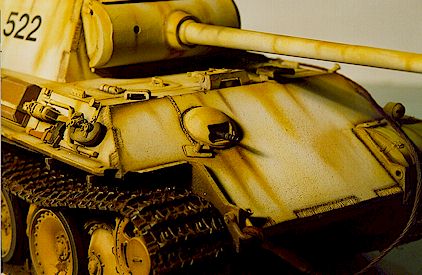
I won’t go into a blow by blow description of what Aber stuff was used. Instead I will let the photos show the extent of etched stuff added. All weld seams and edges of the armor plates were detailed with a pyrogravure. For those who don’t know, a pyrogravure is like a variable heat soldering iron that can be used to melt plastic. The gun barrel was replaced with a turned aluminum one from Hot Barrels(No 08). This is a Russian company that does a range of barrels of very good quality at a very reasonable price. Most sets come with a resin mantlet and muzzle breaks as well. These items are also available from NKR Models.
 I added resin
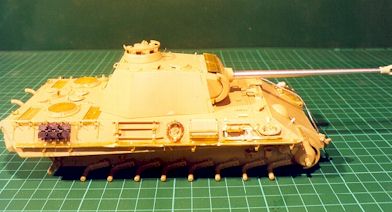
vision blocks to the commanders’ cupola from the Verlinden set. The Aber set also
includes vision blocks as well as details for the inside of the cupola. The gun cleaning
rod canister on the side was replaced with the resin ones and detailed with the Aber
latches. I rebuilt the jack block from balsa wood and detailed it with straps and handles
from the Aber set. I replaced the Notek light with the resin one from the Verlinden set
and used copper wire for the power lead. I used brass picture hanging wire to make the tow
cables and the kit ends. The jack was replaced with the Verlinden resin one and detailed
with parts from the Aber set and wire handles. The Aber set gives you nearly all the
necessary components to completely re-build the jack but I haven’t been able to bring
myself to go that far yet.
I added resin
vision blocks to the commanders’ cupola from the Verlinden set. The Aber set also
includes vision blocks as well as details for the inside of the cupola. The gun cleaning
rod canister on the side was replaced with the resin ones and detailed with the Aber
latches. I rebuilt the jack block from balsa wood and detailed it with straps and handles
from the Aber set. I replaced the Notek light with the resin one from the Verlinden set
and used copper wire for the power lead. I used brass picture hanging wire to make the tow
cables and the kit ends. The jack was replaced with the Verlinden resin one and detailed
with parts from the Aber set and wire handles. The Aber set gives you nearly all the
necessary components to completely re-build the jack but I haven’t been able to bring
myself to go that far yet.
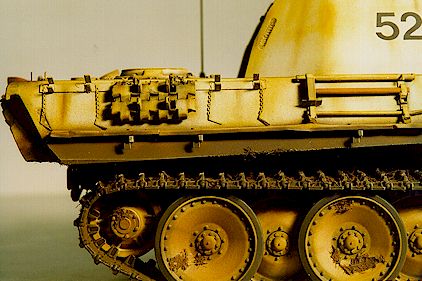
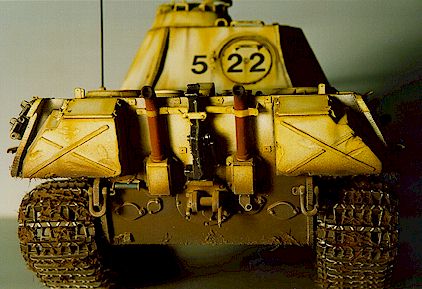
The spare tracks were detailed by drilling holes and adding trackpins from brass wire. Small bolts were added on the ends using a punch and die set. The rear stowage boxes were banged up a bit using a lino-cutting tool. Gouges were taken out of the plastic then sanded smooth. I have since purchased a motor tool and the same result can be created with that. The strengthening ribs were replaced with thin strips of lead foil and braces were added to the under sides of the bins with lead foil and bolts from the punch and die set. The exhausts were drilled out and wire was added across the openings of both the exhausts.
That about covers the main improvements to the model.
| P a i n t i n g a n d W e a t h e r i n g |
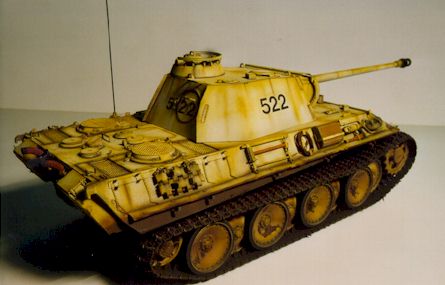
From the very beginning I was determined to do this model in a winter finish. Doing a white wash finish has whole range of different problems as to doing a normal colored vehicle and I will outline the way I go about it.
 The first thing I
did was to spray the model Tamiya Dark Yellow. (XF-60). After that was dry I went around
and sprayed a very dark brown color into all the nooks and crannies of the tank. I then
over sprayed the whole model with Tamiya Flat white (XF-2). I made sure that I left areas
were the base color could show through. Once all this was dry I then washed the whole
model with Vandyke brown artists’ gouache. When this was dry I then wiped away all
the excess leaving the dark color in all the recess. The next step was to heavily dry
brush the entire vehicle with a mix of Yellow Ochre and White oil paints, concentrating on
edges and areas of wear and tear. I then left this dry for about three days.
The first thing I
did was to spray the model Tamiya Dark Yellow. (XF-60). After that was dry I went around
and sprayed a very dark brown color into all the nooks and crannies of the tank. I then
over sprayed the whole model with Tamiya Flat white (XF-2). I made sure that I left areas
were the base color could show through. Once all this was dry I then washed the whole
model with Vandyke brown artists’ gouache. When this was dry I then wiped away all
the excess leaving the dark color in all the recess. The next step was to heavily dry
brush the entire vehicle with a mix of Yellow Ochre and White oil paints, concentrating on
edges and areas of wear and tear. I then left this dry for about three days.
I then added the markings to the turret using dry rub transfers. The ones I use come
from K-mart. The only cost about $1.50 a sheet and come in wide range of styles. The next
step was the use of artist pastel chalks. Using various shades of black, browns, ochre and
white I started blending it all together. Chalks are great for getting subtle effects and
streaking. There is no real formula I can give you for this; it’s a matter of
experimenting until your happy with the final result. The next thing I did was 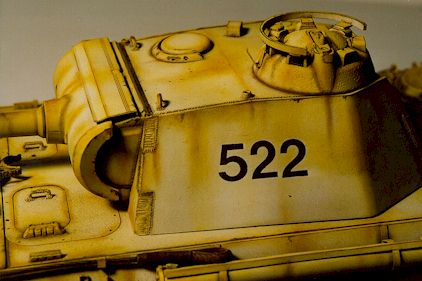 to add mud to the wheels
and the running gear. For this I use Polyfiller with static grass and Vandyke brown gauche
added. I then stipple this around the wheels and the lower hull. When its dry I then
oversprayed the lower hull, wheels and tracks with a color that I mixed up using red
brown, black and flat earth. When this has dried, I then dry brushed the lower hull and
wheels with a mix of Humbrol matt ochre (No 83) and white oil paint. The tracks were dry
brushed with Tamiya metallic grey (XF-56) and then put on the model. Once the tracks were
on I used the mud mixture on the tracks and then gave them a light misting with my lower
hull color. After this was dry I then flat coated the whole model with Gunze flat and it
was done.
to add mud to the wheels
and the running gear. For this I use Polyfiller with static grass and Vandyke brown gauche
added. I then stipple this around the wheels and the lower hull. When its dry I then
oversprayed the lower hull, wheels and tracks with a color that I mixed up using red
brown, black and flat earth. When this has dried, I then dry brushed the lower hull and
wheels with a mix of Humbrol matt ochre (No 83) and white oil paint. The tracks were dry
brushed with Tamiya metallic grey (XF-56) and then put on the model. Once the tracks were
on I used the mud mixture on the tracks and then gave them a light misting with my lower
hull color. After this was dry I then flat coated the whole model with Gunze flat and it
was done.
Well there you have it. One white washed Panther. It’s certainly stands out amongst the green, brown and grey vehicles on my shelf. Don’t be afraid to have a go at it, it makes for a real interesting model.

| R e f e r e n c e s |
 Achtung Panzer No 4 (The
Bible): Dai Nippon
Achtung Panzer No 4 (The
Bible): Dai Nippon
The Panther Family by Horst Scheibert: Schiffer Military
Panther in Action by Bruce Culver: Squadron Signal
Panther by Thomas Anderson & Vincent Wai : Concord Publications
Back to HyperScale Main Page
Back to Feature Articles Index
