 Home
| What's New |
Features |
Gallery |
Reviews |
Reference |
Forum |
Search
Home
| What's New |
Features |
Gallery |
Reviews |
Reference |
Forum |
Search
|
|
|
PB4Y-1 Liberator by Larry Goodell
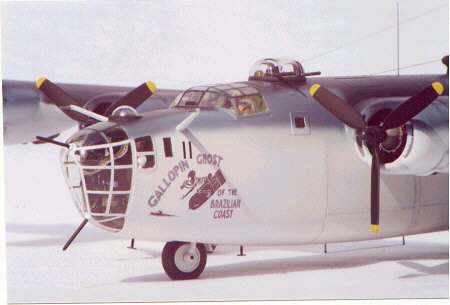
The model represents "The Gallopin Ghost of the Brazilian Coast" in which my father, Billie Goodell, was the flight engineer and gunners mate. VPB107 flew barrier sweeps with the PB4Y-1s from Natal, Brazil and the Ascension Islands from 1943 to late 1944.
This is 107-B-11, "The Ghost", as she appeared in the summer of 1943. The real aircraft crashed on take off, leaving Natal for the Ascensions ferrying another crew to the island. There were no injuries, but PB4Y-1 Bu. No. 32052 was written off.
The instrument panel is the kit photoetched part with Monogram instrument decals from their German set.
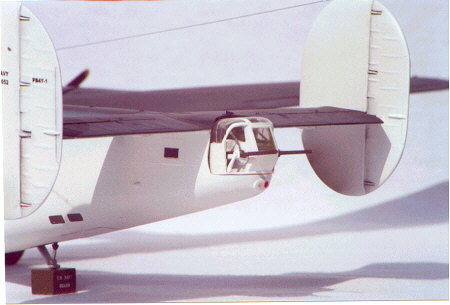
My new gear struts were enhanced with brake lines and True Details gorgeous wheels. The Martin dorsal turret has been completely rebuilt with seat, ammo canisters, ammo belts, sights and wind deflectors over the breaches. All framing on Martin turrets were internal and of plexiglass, so all I had to do is dip the bubble in Future as were all clear parts. A Squadron vacformed canopy and green house nose were used and framing was applied with painted decal strip. The nose-mounted .50 cal machine guns had their barrels removed and superglued into ball sockets made from tiny sections of aluminium tube. Ammo belts in the breaches bent upwards so they would look like they were hanging from the overhead before the green house was epoxied on. This a procedure that required considerable planning throughout the assembly of the model. After installing the nose glass I glued the gun barrels into the socket. I even installed a plugged socket in the port side nose position window as on the original. All guns received Metal Tech rolled brass cooling jackets. The trick here is to figure out the desired width you need to cut (the material comes in a one inch square sheet) then take the temper out by holding over a flame with tweezers til it discolors. This takes less than a second. Roll the metal around the appropriate size drill shank on a piece of hard rubber. Sand or shave down the kit gun barrels and slide on the jackets - presto chango. The kit bomb bay doors just didn't have what it took, so I glued them in, filled the seams and overlayed panels of white self- adhesive vinyl that is used in making stick on letters and signs. I sealed the edges with Gloss-Cote to prevent peeling back with age and also to enable the vinyl to take paint. After bringing all the sub components together, I now had a big hunk of plastic that finally looked like a B-24.
I initially wanted to sand and rescribe panel lines but after all the other work I decided to simply sand them down then enhance with pastels after painting. The fuselage and undersides were sprayed with Boyd's Gloss White, while the upper surface received Model Master Dark Sea Blue and Intermediate Blue.
There are details I can't remember, right down to the azimuth information pointer atop the rear fuselage for the tail gunner. I entered this model at the IPMS Nationals in Olando, FL along with my 1/48 Catalina. The "Ghost" suffered a fracture of the topside fuselage seam durng transit and the PBY5-A took 2nd place in their category. I have since fixed the seam and repainted the dark blue using shading techniques picked up on HyperScale. This repaint toned down the starkness of the original dark blue and adds a more realistic appearance of fading. New photos in progress. The real "Gallopin Ghost" was named after football great "Red" Grange ( who? ) and was written of after crash landing on Oct. 1, 1943. There were no injuries, only a grossly bent up, once graceful aircraft.
Model, Text and Images Copyright © 2000 by Larry
Goodell
|
 The
model is Monogram's re-release of their 1/48 B-24-D as a Pro-Modeller with
photoetched parts. When I opened the box I knew it was going to be quite a
project making it into a accurate representation of a Navy
Liberator.
The
model is Monogram's re-release of their 1/48 B-24-D as a Pro-Modeller with
photoetched parts. When I opened the box I knew it was going to be quite a
project making it into a accurate representation of a Navy
Liberator.
 Figures
in the cockpit, nose and at the waist positions are from Scale Model Accessories
PBY set.
Figures
in the cockpit, nose and at the waist positions are from Scale Model Accessories
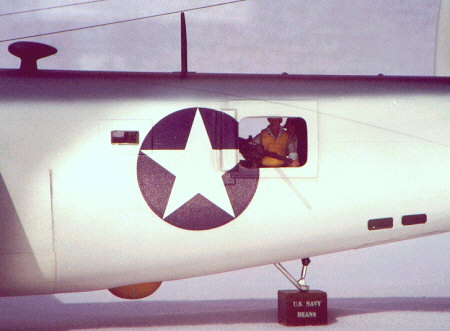
PBY set. 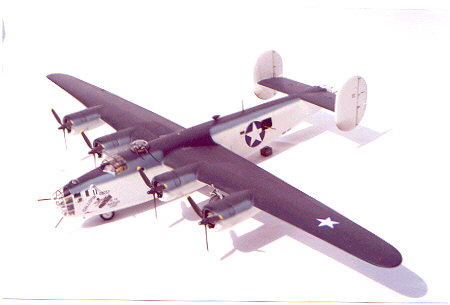 National
insignia were taken from an Aero Master sheet for Liberators over Europe. Yes
the the waist doors are hinged up with the other piece of the fuselage insignia
on them! The nose art was scaled down from a photo and printed on decal paper on
an Alps printer by a friend, along with the Bu.no. and other lettering on the
fins. Testor's Dull Cote was then applied.
National
insignia were taken from an Aero Master sheet for Liberators over Europe. Yes
the the waist doors are hinged up with the other piece of the fuselage insignia
on them! The nose art was scaled down from a photo and printed on decal paper on
an Alps printer by a friend, along with the Bu.no. and other lettering on the
fins. Testor's Dull Cote was then applied.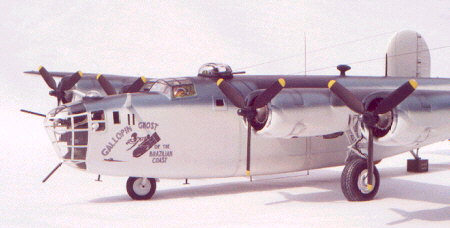 My
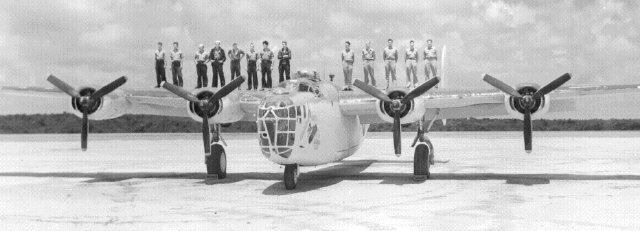
dad, Billie Goodell and the Squadron Historian, Richard Wilson
My
dad, Billie Goodell and the Squadron Historian, Richard Wilson