Home
| What's New |
Features |
Gallery |
Reviews |
Reference |
Forum |
Search
Home
| What's New |
Features |
Gallery |
Reviews |
Reference |
Forum |
Search
|
|
|
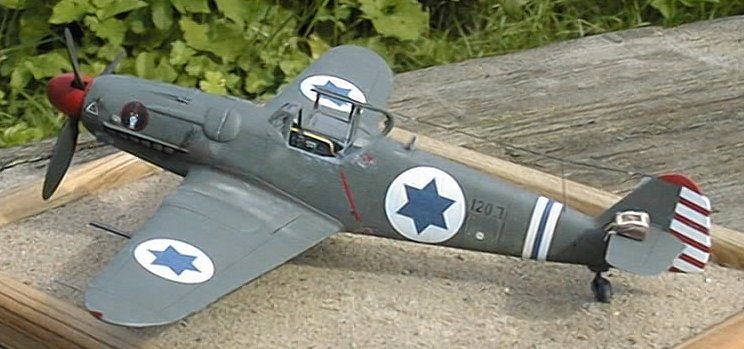
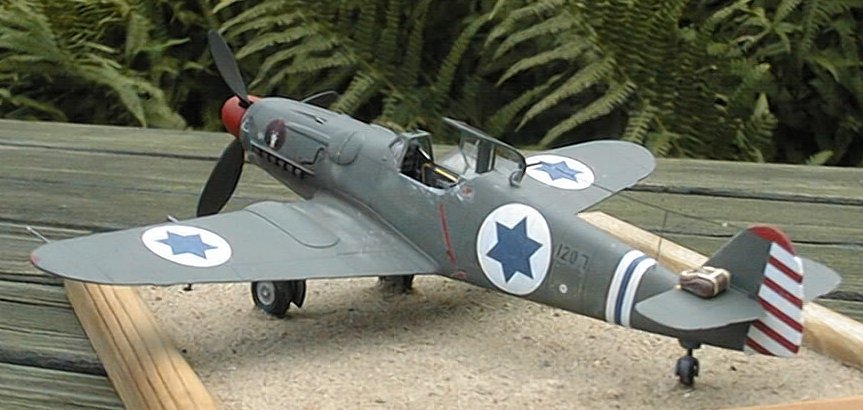
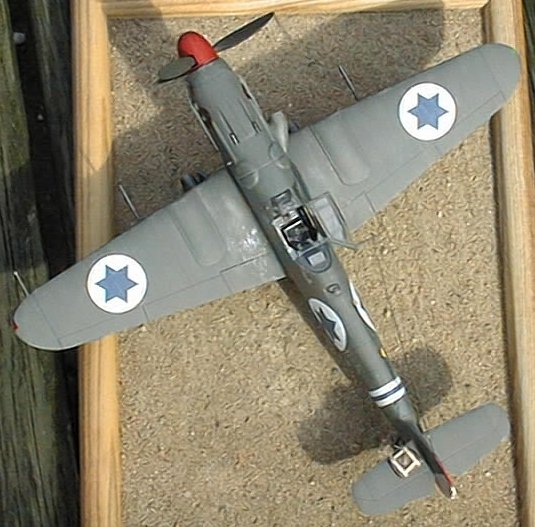
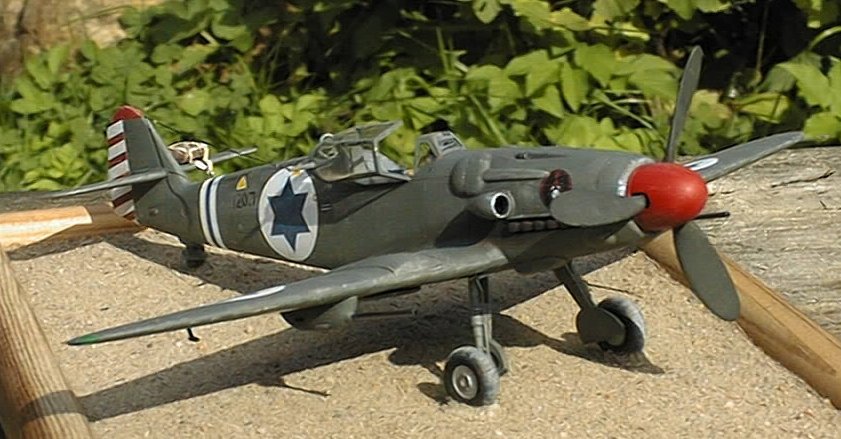
Avia S-199 by Ingemar Caisander
The S.199 was the first fighter to serve with the Israeli Air Force. 25 machines were bought from former Czechoslovakia in April 1948 for a total of $1.8 million and the "Knife", as the fighter was officially dubbed, made history immediately. On May 29 the first four Israeli S.199s took off from Tel Nof AFB to attack an Egyptian armored column progressing on Tel Aviv. Soon afterwards the fighters descended on the surprised Egyptians and began to bomb and strafe them. Although one valuable fighter crashed and the attack only inflicted minimal damage with few casualties it had great psychological effect, which halted the enemy's advance and allowed IDF ground forces to organize and go on the offensive. The appearance of an Israeli fighter arm was a complete surprise to Arab commanders and a few days later, on June 3, the newly born Israeli Air Force got its first fighter "ace". Two Egyptian C-47 bombers had just dropped their bomb loads over Tel Aviv and began making their way home when they were attacked by a lone S.199. It was "D-120" piloted by Modi Alon, Israel's first fighter squadron leader. Both bombers were shot down, signaling an end to Arab domination of the air. The IAF used the few aircraft they possessed very wisely and during the next couple of days the fighters had participated in attacks on all fronts during the 1948 War of Independence. Thereby the Israeli commanders managed both to create the illusion of an extensive number of machines in service and, equally important, boosting the morale of the local population.
Nearly all of the Israeli pilots who had to fly the S.199 highly disliked it, though, mostly due to its vicious and very unforgiving flight characteristics. The S.199 was based on the Bf 109G-14 airframe. During 1944 the Germans had sent 15 completed G-14 fighters to Czechoslovakia and plans were made for license production of this fighter by the Avia factory at Prague-Cakovice. As it turned out, though, production did not begin until after the war had ended. Due to lack of the original DB605A engines the Czechoslovak engineers adapted the G-14 airframe to the only other engine available in quantity, the 1350 hp Jumo 211F. However, the Jumo 211 was designed as a bomber engine (intended for the Heinkel 111); i.e. having a large torque at a rather low rpm and as such was not very well suited for a fighter. Coupling this powerplant with a modified VS-11 paddle-bladed propeller gave the fighter some very unpleasant characteristics, particularly a tendency to turn over the left wing during take-off at full throttle. Due to the weight of the wing mounted autocannons and the heavy engine it was also quite slow in response and not particularly fast, top speed was 590 kph and the ceiling a mere 9500 m. This led to the pilots soon nicknaming the plane Mezek, meaning "Mule". Still, it was the only fighter available to the IAF at the time and it certainly was better than nothing. By the end of 1948 twelve Israeli S.199 fighters had been lost (both due to accidents and enemy action) and only six were fully operational (the other seven were in different stages of repair). In May 1949 all remaining Mezeks were withdrawn from service. In Czechoslovakia the National Security Guard continued to fly the type (and the CS-199, the two-seat training variant) until 1957.
This is my fourth aircraft model in 1/48th scale and it was a fun project, although plagued by a couple of horrible disasters. Read on…
I have never built any models by HobbyCraft earlier but this one was a very pleasant surprise. The kit is molded in a very light grey plastic with the sprues common to the Bf 109G/K kits, so there are a lot of optional parts and quite a few flashed over mounting holes on the main parts. This is an economical way of using the molds for several different kits that doesn't affect any of the models produced negatively. Panel lines are recessed and the general detailing of the model is quite good. Fit is also good. A little putty was needed here and there but generally everything went together nicely.
The decal sheet is great with a lot of optional/extra markings. In fact, I think it would be possible to depict close to every individual S.199 in service with the IAF with this decal sheet since nearly all reported variations of the markings are included (red and black stenciling, different sized national insignias etc). The construction sheet include marking schemes for five aircraft; Modi Alon's "D-112" and his red nosed "D-120", Lionel Bloch's "D-107", Eddie Cohen's "D-110" and the camouflaged "1904". The general impression of the kit is that it is quite thoroughly researched and well manufactured.
The kit instrument panel was used but I scratch built a new Revi gun sight since I found the original one to be a bit clumsy in appearance. Trim wheels, rudder pedals and other small details completed the "tub". Moving on toward the front of the fuselage, the small oil cooling air intakes either side of the nose were opened. The exhausts were also opened and the small shrouds just above them thinned down to almost paper thickness by scraping with a knife. The fuselage halves were then cemented together; both were slightly warped but this was fixed by having rubber bands holding them firmly together until the glue had set. The top engine cover (with gun troughs) is a separate piece and it required some putty to get a smooth join. The machinegun muzzles were left off for now. The wings, consisting of the usual single lower and two upper parts, were cemented together without problems after the mounting holes for the underwing cannon pods and aileron mass balances had been opened. The spent shell ejection chutes for the 13-mm machineguns were also cut open and then blanked off from the inside with sheet styrene.
Finally, the completed wing assembly was attached to the fuselage. During test fitting I noticed that the innermost part of the wings were thinner than the molded wing roots of the fuselage, making for an ugly join. I fixed this with small pieces of sprues cemented in the upright position inside the inner part of the wings, pushing the upper and lower surfaces slightly apart. Some putty was also needed around the forward lower wing-fuselage join. The bulges for the MG131 machineguns were cemented in place as were the wide wheel humps on the upper wings. Note that the MG131 bulges need the small upper strake to be removed, this is appropriately pointed out in the instruction sheet. I have found no photographic evidence of Israeli S.199s having these small strakes. I also cut the bulges apart along the center vertical panel line in order to make the panel line a bit "rougher". On real Mezeks these panels were a rather poor fit, clearly showing in photographs. You get the choice of two different oil coolers, a conventional external (resembling the one on the Bf 109) and an internal unit. I used the latter ("D-112", which is currently on display at an Israeli museum, has the internal one and I would guess "D-120" to be similar). The landing gear is a very simple affair with each side consisting of only three parts including the wheel. You get both the standard Bf 109 wheels as well as a wider type; since the Israeli S.199s operated from desert strips I would guess they used the wider ones (to minimize ground pressure and hence the risk of bogging down in the sand). Note that according to the instruction sheet the wheels are to be cemented in an upright position (that is, 90 degrees from the horizontal) and not slightly inclined as on the Bf 109. I don't know if this is correct or not but I mounted the wheels according to the instructions anyway. A piece of copper wire was added to each gear leg imitating a hydraulic brake line. The underwing MG151/20E cannon pods went together nicely. The only modification I made was to open the spent shell ejection chute on the side. In hindsight, I think I should have replaced the gun barrels with metal or plastic tubing. This would have looked more realistic. I used the short tail wheel option and chose not to attach the 300-liter drop tank or its mounting rack. The pitot tube of the kit was replaced by a piece of copper wire.
The entire cockpit was painted Schwarzgrau 66 and then heavily dry brushed with light grey in order to give it a faded look. The trim wheels were painted red and white and the fuel line flat yellow, most other details were picked out in light grey, black or silver. The seatbelts made from paper were left in their natural color while the gauges on the instrument panel were painted flat black, each then receiving a drop of clear varnish to imitate the glass. Israeli S.199s were painted in a very simple camouflage scheme - over-all RLM 02 Grau. In photos however, some aircraft are clearly finished in a much lighter color than this rather dark greenish-grey. Most likely this would be a result of the intense desert sun fading the original color. In order to get the model as realistic looking as possible I first painted the entire plane in RLM 02 and then heavily dry brushed it with crème white / very light grey. IMHO the result look very close to the color photos I have seen of Israeli S.199s.
I used Humbrol 111 to represent RLM 02 while the dry brushing/fading was done with Humbrol 121. After preparing the model with a layer of gloss varnish it was time for the decals. These were really great to work with; nicely printed, rather thin and with good color density. As I mentioned earlier you get a lot of decal options, for instance the fuselage side and wing stenciling in both solid and segmented black and red as well as several different blue "Chayil Ha'vir" stars. When all decals had been attached I sealed them with a protective layer of gloss varnish. Weathering was next. Since the Israeli Mezeks had a rather short service life I kept weathering to a minimum. The area behind the exhausts got the usual treatment with brown, grey and black, simulating exhaust staining from the large Jumo engine, and behind all shell ejection chutes I added subtle streaks of black, simulating soot. The lower part of the fuel and oil filler caps also got streaks of brown and black, simulating slight discoloration from spilled fuel. Finally the entire aircraft was sprayed with flat varnish to seal everything. This is when disaster struck… I wanted to test a new brand of flat varnish, it was a rather cheap type but it seemed like relatively high-quality stuff never the less. It wasn't…. L The solvent of the flat varnish was very strong, too strong for the Humbrol colors I had used when painting and weather the model. At first everything was ok, but when the flat spray varnish began to dry it "cracked" the gloss varnish underneath; at some areas (particularly around the wing edges) it also lifted the underlying paint so that it could be peeled off, revealing the plastic underneath. A quick rescue operation with an electrical hair dryer to speed up the drying process prevented too much further damage. But by now the Mezek was really a mess. After actually considering trashing the model I came to my senses and began sanding down and repaint the damaged areas, replacing the destroyed decals with spares and/or having them painted on instead. A couple of nights (and many curses…) later the model somewhat started to resemble its former shape and appearance. This time, to seal everything, I used the good old trusty Humbrol flat varnish; no more of this other cheap no-good spray stuff on my models! Rather happy with the final result I placed the model standing on its tail at the end of my workbench to allow for the newly cemented propeller assembly to cure in the correct position, and went on preparing the base plate. I wanted to depict the aircraft standing parked ready for the next mission on a desert air base, i.e. on a simple sand ground with canopy open, starter crank attached and a parachute laying on the tail plane. The base was made from a wooden picture frame painted in sand color and then covered by white glue and having ordinary sand sprinkled onto it. After the white glue had cured the excess sand was removed, the surface slightly dry brushed in very light grey and then the aircraft model was to be positioned and cemented to the base. About now I realized the second disaster had struck! When I dry brushed the sand surface in light gray the aircraft was still standing on its tail at the end of my workbench. The result was that the entire upper surface of the model had gotten tiny light grey dots all over… Oh no… Well, not much else to do but carefully over paint each and every dot with RLM 02 and then blend them in with another light grey dry brush of the entire model. By now the camouflage looked really faded! I finally managed to complete the model without any further mishaps, the last addition being a few small silver streaks, simulating chipped paint, at the left rear wing root, around the canopy area and at the edges of some of the removable engine cowling panels. The radio antenna was made from pieces of stretched sprue with resistors being blobs of white glue.
This is a rather nice model of a rather unusual Bf 109 variant. Despite the unfortunate mishaps at the end of the project I had a lot of fun building this "bird". The accuracy and detailing of the kit, not to mention the background research done by HobbyCraft, certainly make the model well worth the money. Definitely not the last HobbyCraft model I'll build!
Model, Description and Images Copyright ©
2000 by Ingemar Caisander
|

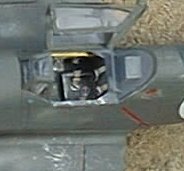 As usual I
began with the cockpit. This is well detailed but I found the right side wall to
be incorrect. This really didn't matter since I had planned on having the canopy
open and thereby the need to super-detail the cockpit arose anyway. I sanded the
entire right wall smooth and then scratch built a new detailed panel, complete
with fuel line and switchboard. The pilot's seat got harnesses made from thin
paper strips and small pieces of copper wire. The attachment rod for the canopy
retaining wire was also made from a piece of copper wire.
As usual I
began with the cockpit. This is well detailed but I found the right side wall to
be incorrect. This really didn't matter since I had planned on having the canopy
open and thereby the need to super-detail the cockpit arose anyway. I sanded the
entire right wall smooth and then scratch built a new detailed panel, complete
with fuel line and switchboard. The pilot's seat got harnesses made from thin
paper strips and small pieces of copper wire. The attachment rod for the canopy
retaining wire was also made from a piece of copper wire.