|
Canberra B.6
by
Jon
Freeman
 |
|
English Electric Canberra B.6 |

HyperScale is proudly sponsored by Squadron.com
Aeroclub's long awaited 1/48 scale Canberra B.6 is the first of what will be
a long family including (I presume) the PR3, T4, B(I)8, PR9, T17 and the myriad
of trial radar nosed variants.
The way John Adams of Aeroclub will achieve this is suggested the moulding
techniques he has employed. The cockpit cabin area is moulded in short run
injection plastic, thus allowing Aeroclub to just re-mould the nose area for
each mark change (excluding the different PR.Mk.9 wing).
|
Aeroclub's Canberra
B.6 In The Box |
Aeroclub's 1/48 scale Canberra B.6 is a genuine multi-media offering.
The rear fuselage and wings are all formed from good quality vac form sheets
with only the tailplanes, some internal rear cockpit parts, crew access door
undercarriage interiors /doors, cannon pack, wing tip tanks and two rudder
halves being injection plastic items.
A decent stash of resin is provided, including the nicely cast engine intakes
and exhaust areas along with the main wheel tyres.
A heavy bag of white metal parts include the two wheel hub options (early and
late), three 2CA1 ejector seats (7 parts each!), cockpit intrument panels,
throttle quadrants, nose wheels, wheel well interior parts, engine compressor
blades/ fans, weapons pylons and wheel gear actuators plus plenty of other parts
to be added to the cockpit .
There are enough duplicate parts supplied for the cockpit interior that a T.4
could be easily made for the impatient modellers out there!
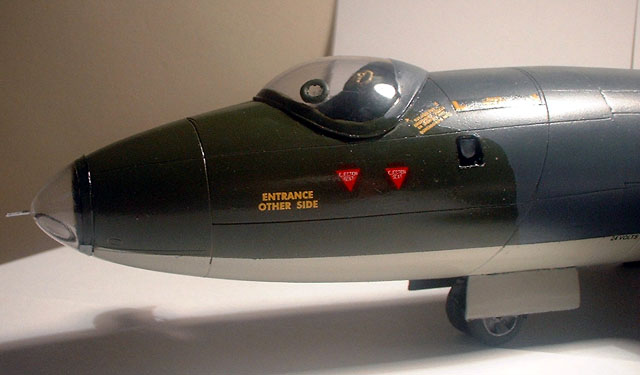
Two vac formed clear 'fish bowl' canopies are provided along with two bomber
nose glazings and two plain nose glazings.
Some thin plastic card strips and a length of plastic rod was also supplied.
All the panel lines are nicely engraved but in my opinion a few will need to be
re-scribed.
Construction and markings are called out over three A3 guide pamphlets. One A5
decal sheet completes the package.
Main Component Construction
Construction is straightforward but requires the modeller to have some degree
of experience with vac-form kits. It helps dramatically if you aquire an
Aeroclub Tee-Al sanding block and a Flexi-File to help minimise those boring
hours sanding whilst the missus is watching the early evening soaps on TV!
Once sanded down the parts fitted excellently but do add strengthening strips
along the fuselage interior across the internal mating edges. I thought that the
wing and fuselage components felt a little flimsy at first but using this
technique created a strong kit not unlike an injection moulded one!
The resin engine intake and exhaust parts mated up to the wings beautifully with
only a small amount of Squadron filler being required. Alas I happened to attach
the intakes upside down but by the time I realised it was too late, so my
apologies to all... DOH!!
Next up was the undercarriage interior.
This is made up of nine white metal parts for each wing. Although this assembly
does not portray the actual curved structural members inside a real Canberra, it
does look acceptable (with scope for the superdetailers I think).
The parts are engineered really well and provides plenty of strength to the
undercarriage legs. A rectangular hole needs to be cut out of the fuselage
halves for the main wing spar to pass through. The two sets of undercarriage bay
parts attach securely to this spar.
The completed wings can now be slid onto the box structure and superglued to the
fuselage. I had to use a touch of filler to fair in the wing root join.
The tail area sees us cementing the two tailplane halves together for each side
and doing likewise for the separate rudder. The rudder can offset but you will
need to add thin plasticard to fill the gaps at the top and bottom of the rudder
post. Once again a main spar was passed through pre-cut slots onto which the
tailplanes were slid. Filler was required here at the root too.
Cockpit Construction
It seems such a shame that the real Canberra cockpits were black inside as there
are approximately fisty white metal parts to be added, not
counting the duplicate T.4 parts!
All were nicely cast with only a minute degree of flash but it is advised to
prime all the parts first. The cockpit looks VERY full once built and will
really look "the biz" with the addition of pipework and wiring.
The ejector seats have the seatbelts moulded on but the only thing I personally
added was a modified firing handle loop from a defunct F-4 Phantom. I
disregarded one of the ejector seats as it would be unseen and I found that the
navigators' table just got in the way so I did likewise. Once airbrushed Satin
Black everything needed a drybrushing of Dark Grey (RLM 66) to accentuate the
detail.
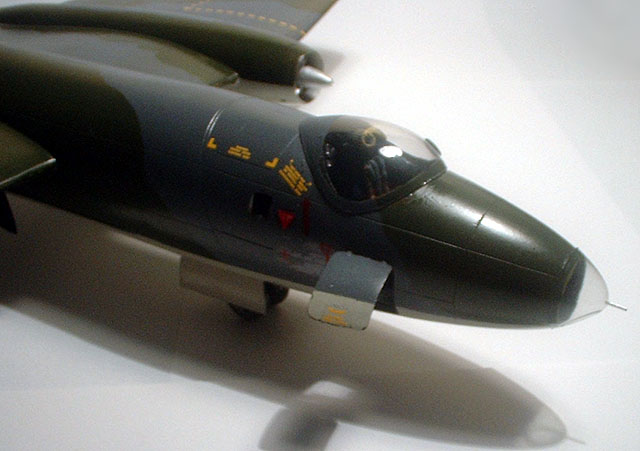
The front nose gear bay was attached in place and utilises the back of the
pressure bulkhead for stability. A whole nose wheel well box has to be
constructed which was made up of four parts along with the white metal
retraction gear. CA glue secured everything in place nicely and the Canberra was
coming on nicely!
The forward fuselage halves can now be cemented together and later the component
was superglued (CA) into the rear fuselage. Luckily Aeroclub have pre-chamfered
the cockpit module and the fit into the vac-formed fuselage was excellent!
Minor Component Construction
The resin main tyres were cleaned up and after priming were painted Tyre Black
along with the nose tyres. The nose tyres have the characteristic mudguards
moulded onto them so care will be needed in painting them Black later.
The engine intakes were painted dirty Silver as were the exhaust fan blades and
engine intake shock cones. I built up the wing tip tanks but on offering them up
to the wing tips the fit wasn't too good so I duly left them off. Perhaps the
fit would be improved with plenty of filler!
The wheel hubs were left unpainted in their white metal state but seeing as I
was modelling the later mark I utilised the 'holed' hubs (if you can call them
that). The last thing I added were the wing pylons once again with CA glue.
Onto the best part...
The kit comes supplied with two markings for the B.Mk.6 Canberra these are
printed by Fantasy Printshop UK and the clarity and opacity is very good.
.
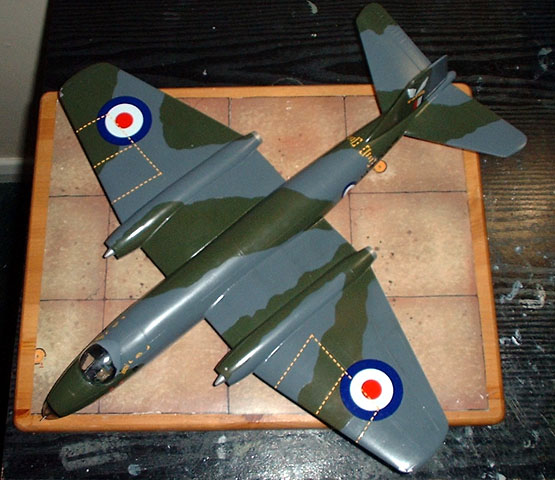
Option 1 is an early B.Mk.6 WT369 of 139 Sqn RAF which has an overall Silver
finish with a diagonal Red triangle flash on the fin with Black serials along
with the post war national markings (Red White and Blue) in four positions 84"
dia on wings and 36" dia on fuselage sides. On the undersurfaces of the wings
the serials are 48" high and the fuselage serials are 24" high.
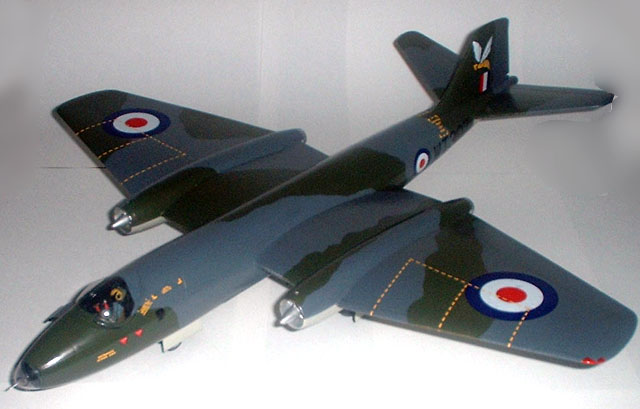
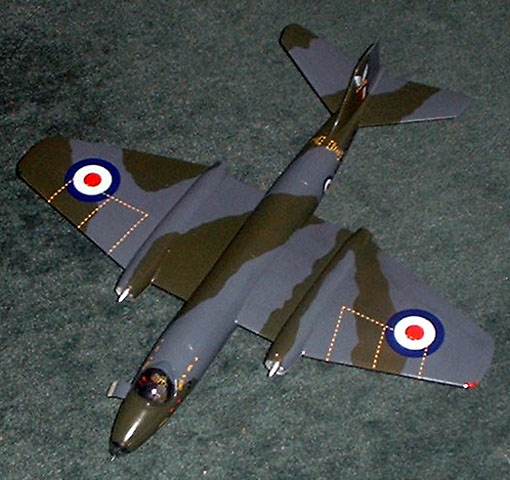
Option 2 can be either an early or late marking B.I.Mk.6 WT307 of 213 Sqn RAF
which has the uppersurface camouflage scheme of Dark Green/ Dark Sea Grey over
Silver (early) or Light Aircraft Grey (late) undersides. The fin has a large
wasp emblem on the fin with Black serials along with the post war national
markings (Red White and Blue) in four positions 84" dia on wings and 36" dia on
fuselage sides. On the undersurfaces of the wings the serials are 48" high and
the fuselage serials are 24" high.
I personally chose a late scheme B.I.Mk.6 and applied first of all a primer base
coat to check for blemishes faults etc.
Once dry I airbrushed the whole kit in Xtracolour Light Aircraft Grey and
later followed it up (after careful masking of wheel wells/cockpits etc) with
the Dark Green and Dark Sea Grey from the same manufacturer, but do note that
the camouflage schemes on the Canberras had mostly if not all hard edged
demarcation lines.
Seeing as Xtracolour enamels are 'decal ready' I could proceed onto the
decalling stage after a week of drying time.
All the decals conformed nicely to the kit but I advise not to use any decal
softener as they are very thin. (not as bad as Propagteam!!) Stencils are also
provided.
Once the masking was removed and little errors tidied up the whole kit was
varnished with Polly Scale Satin Varnish which helped seal in the decals.
All the wheel wells were airbrushed (after careful masking) Satin Black to
depict the original 'Eggshell Black' along with the undercarriage legs and
interiors of the wheel gear doors.
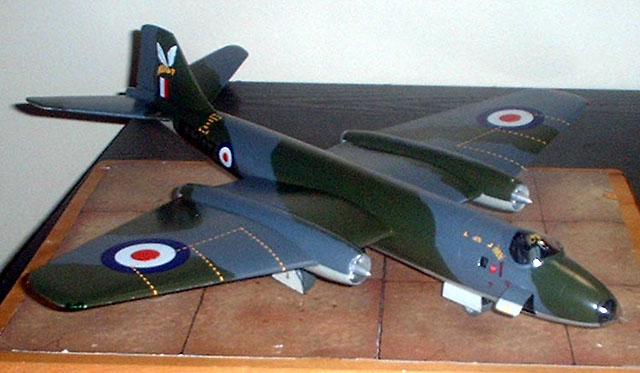
"On Finals"
The last items to add were the completed wheels, wheel well doors, canopies and
engine compressor fan parts. Don't forget to add the pitot to the front glazing
and the white metal direct vision panel. Paint the exhaust areas Aluminium and
the tail bumber Black and hey presto, the first truly buildable 1/48 Canberra
(sorry Falcon but your kit is hard work!!)
Would I buy another?....of course yes. A T.17 or a PR.Mk.9 would be grand but
where do you store them?
This kit was a joy to build and to say that I have been anxiously waiting a
good five years for a buildable quarter scale Canberra would be an
understatement. For the Ł47.00 or so I paid for it it was well worth it and I
can heartily recommend it to all. Well done John Adams for making this
particular modeller very happy and sorry about the earlier problems!
Jon Freeman C/O Scale Aircraft Modelling UK
P.S Wouldn't a B-57 look nice too!
-
English Electric Canberra by Ken Delve, Peter Green
and John Clemons (the bible!)
-
Scale Aircraft Modelling Vol 13 No.1 Oct 1990 by
Terence Marriot (walkaround)
Click the thumbnails below to view
larger images:
Model, Images and
Article Copyright © 2001 by Jon
Freeman
Page Created 17 December 2001
Last updated 04 June 2007
Back to HyperScale Main Page
Back to Features Page |
 Home
| What's New |
Features |
Gallery |
Reviews |
Reference |
Forum |
Search
Home
| What's New |
Features |
Gallery |
Reviews |
Reference |
Forum |
Search