|
Republic P-47D Thunderbolt
by
Roy Long
|
|
|
Republic P-47D
Thunderbolt |

Hasegawa's
1/48 scale P-47D Razorback is
available
online at Squadron.com
Every now and then I tend to get frustrated
and or bored with a kit or a "must build" kit comes along and I stop
working on one and start up the next. This leaves an unfinished kit to
languish in the back of the closet waiting to come back to the
workbench. Often, I start again on these kits with just as much
enthusiasm as I started and complete them.
Hasegawa’s 1/48 scale P-47D Thunderbolt did not fall into this category.
I started this kit in the spring of 1997. It had been recently released
and was to be my first build following a year-long deployment to Bosnia.
I had acquired all the necessary items via mail order while I was gone
and they were all waiting for me when I returned. I jumped in head-first
and started cutting and gluing. Then, the AM Sturmoviks came along and
into the closet it went. It returned to the workbench several times,
went through a move and my dog chewed on the cowl. Each time it was put
on the bench, I did a little more until one time I realized, to my
surprise, it was ready for a paint job.
I won't go into the construction too much,
as there are parts I don't remember. I used the KMC cockpit, KMC Curtis
paddle-blade propeller, Cutting Edge brass main gear legs, Hi-Tech 500lb
bombs, flaps and rudder from the Verlinden set and the flap actuators
from the Fotocut photoetch set.
Of the construction points I remember most,
because it was the one that made it so easy to set aside was the
addition of the Verlinden flaps and rudder. They were basically
horrible, the outline of the flaps' trailing edge is completely wrong,
about half of the surface detail from the kit original is in the resin
copy and the flap actuators are overly simple bits of metal.
The rudder suffered from both hinge points
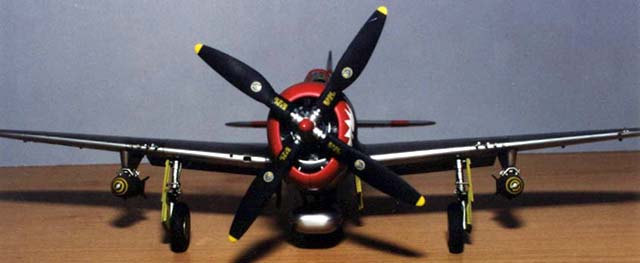
being misaligned. I used the blades and the tip of the propeller hub
from the KMC set mounted to the kit hub, as the KMC hub looked a little
"out of whack".
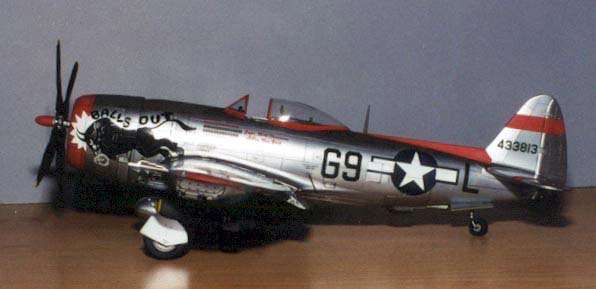
I couldn't have asked for more in the
painting and finishing of this model. I had planned at the beginning to
do a 56th FG plane but over the years found other potential schemes.
However, these schemes were all Natural Metal Finished A/C. I had been
only marginally pleased with previous attempts at NMFs using SNJ and
Testor's Metalizers and had been keeping my eye open for new methods for
a "good" NMF. I then heard about AlClad II, after getting a couple of
bottles and spraying a few test shots on some scrap model parts (a
Monogram Ju 87G ), all the NMF planes I had wanted to do were suddenly
possible with far less difficulty.
I looked through the 15 or so sets of decals for the P-47 I had
accumulated and, with the help of my 2 year old, picked the gaudiest I
could find. Which is actually difficult if you are familiar with the
405th FG sets from Aeromaster because almost all of them are gaudy.
Except for a slip or two of the knife during masking I don't think I
harmed the metallic finish at all. In fact, a near disaster struck when
I noticed that I had not sanded my primer coat out well enough in many
places. I tried to remove the AlClad and the primer and found that Polly
Scale "Easy Lift Off" was far less effective than on any other paint I
had tried to strip in the past. I ended up sanding much of the primer
and AlClad off. I found that the AlClad II took well to masking, I was
able to mask with Parafilm, Post It Notes and 3M Drafting Tape.
After the primer disaster the model was polished out again and I sprayed
a coat of AlClad "Duraluminum (B)". Then various panels and were masked
and sprayed with "Aluminum (A)" or "Dark Aluminum" (C) and "Magnesium
(K)". Alclad II dries so fast, the entire NMF was completed in about
five hours, and the most time was consumed by masking. I then masked the
areas that would be painted OD and red and did some light "reverse
shading" with flat black along the panel lines. After the OD and red was
sprayed and had dried I left the masking in place and airbrushed a light
coat of future to prepare for decals. When the Future had dried, I
removed the masking and started decaling the model. The decals went down
nicely with Solvaset and other than the bull being a hair over size
there was no problems with them. When the decals were dry again I
re-masked the OD and Red parts and sprayed a light coat of Testor's
Dullcote. I also sprayed a light coat of Dullcote on some of the decals
to take some of the shine off and to protect them. Weathering was done
with pastels and artists inks.
I am really glad to have finally finished
this one. Even though there are some scratches in the plastic and a few
other flaws that show well due to the NMF, I'm very pleased with the
look of the NMF.

There are also other errors that the P-47
buff will pick up on, the D-30-RA had compressibility flaps and the
under wing light was in a different position. But, it's DONE. Now,
where's that P-51 I started last year?
Model, Text and Images Copyright © 2001 by
Roy Long
Page Created 15 September, 2001
Last Updated 04 June, 2007
Back to HyperScale
Main Page
Back to Features Index |
 Home
| What's New |
Features |
Gallery |
Reviews |
Reference |
Forum |
Search
Home
| What's New |
Features |
Gallery |
Reviews |
Reference |
Forum |
Search