|
AV-8B+ Harrier II
by
Piero De Santis
|

|
|
AV-8B+ Harrier II |

Revell-Monogram's
pre-painted 1/48 scale AV-8B Harrier is available online from
Squadron.com
This is my AV-8B+ "Harrier II" or "Super Harrier"
in 1/48th scale.
The McDonald Douglas/Boeing AV-8B "Harrier II" was a big-step forward
compared to the first-generation Harriers, with improved/doubled
performances in all aircraft areas. It can be considered as a brand-new
type and not as a simple new variant/mark.
The "Plus" version should be the last upgrade of the Harrier II for the
USMC/Spanish Navy/Italian Navy. I say "should" because it will be
replaced by the F-35 in 2015!
Talking only about the "Plus" version, I try to highlight the upgrades
compared to the "basic" AV-8B:
-
An APG-65 radar system
-
Rolls-Royce Pegasus
F402-RR-408 engine
-
Big LERX (100%)
-
FLIR sensor
-
Improved/added chaff &
flare capability
-
2 Multi Functional
Display
Many others modifications are involved as
consequence of the others above, as the extended tail-fin air intake or
the extra air scoops over the engine access doors.
The "Plus" aircraft may be either newly produced or converted AV-8B's.

The "Plus" version is currently used by USMC, Spanish Navy and Italian
Navy.
The combat debut for the "Plus" with the US Marines took place during
Operation "Enduring Freedom" operations over Afghanistan.
The Italian Navy also used the "Plus" in Somalia for air-patrol and
during Operation "Allied Force" over Kosovo" for attack missions.
The Harrier II
in Styrene
|
The "Harrier II" is one of the most well covered
subject by books, magazines and websites if you're looking for
information or pictures.
Unfortunately, epecially for the "Harrier II", it was not the same for
the model market scenario. Recently Hasegawa made a big contribution for
modellers who are interested in building a "Harrier II" in 1/72 scale
with a new mould kit covering the AV-8B, AV-8B "Night Attack", AV-8B
"Plus", Harrier GR.5 and Harrier GR.7 (packaged by Revell and as
Hasegawa next end-of-year) versions. Aftermarket and decal producers
supply a good amount of sets and sheets… unlike for Spanish and Italian
Navies for the last.
Harrier II in 1/48 Scale
In 1/48 scale, there is only one kit: Monogram's
AV-8B. This kit was re-issued by Revell and Hasegawa (limited edition
for Japanese market), but the mould is same.
Please note that Revell has also produced a "snap" kit of the "Night
Attack" version using the Monogram's mould… this is a horrible
downgraded kit that has lost all the benefits of Monogram's original
AV-8B! Recently it again made available as a "pre-finished" kit. My
suggestion is to avoid it.
But now lets get back to the Monogram/Revell "basic" AV-8B. This kit is
good for overall shape and size, with a nicely detailed cockpit and
undercarriage. However, in line with Monogram’s tradition, the model has
raised panel lines which are sometimes inaccurate in shape and/or
position.
There were some basic resin conversion sets for the “Plus” version
produced by "Bronto Models" and "P.D. Models". Those sets included a
"radar/FLIR" nose and a seat (but why?) or chaff & flare boxes.
Unfortunately the shapes were not very accurate and, most of all, they
didn't included all the features.
Another resin conversion set came from "E.P. Original Models". It
included all the parts required for a "Plus", but this time the shape
and size were not correct.
All those sets are out-of-production now, but recently, "Italian Kits"
has re-issued the "E.P. Original Models" conversion set.
Amraam Line Harrier II Conversion
A recent resin conversion set produced by "Amraam
Line" has already been available for two years. This time the conversion
set looks good for shape and size; and all the necessary parts are
included.
The release of this set encouraged the well-know "Twobobs" decal company
to issue a decal sheet for the USMC "Harrier II" versions, including
"standard", "Night Attack" and "Plus" versions. This set has been
released in 1/48 and 1/72 scale.

Another good set, this time for detailing, comes from "Black Box". This
set supplies a complete cockpit to replace the one of the kit.
My AV-8B's etched details were produced by "Eduard”. Unfortunately, this
is now out-of-production.
Before commencing any assembly I rescribed the all
the kit parts. I used "Aeroguide" N°16 together with "World Air Power
Journal" N°32 for references. Many "walk-around" photo sections on the
web helps to complete the research stage.
A sharp needle, "Verlinden" templates and "Dymo" tapes are required for
scribing. Oops… I forgot patience!
After that, I cut the plastic from the kit that needs to be replaced by
the resin parts for the conversion. These include:
-
nose
-
front wing section
-
tail-fin air intake
The "Amraam Line" set included detail parts too, as
the enlarged retractable LID and the outriggers wheels: those were cut
off from the kit parts too.
I followed the instruction guide included in the set. These instructions
are quite clear… but I found a "mistake" where is indicated the point to
cut the tail-fin air intake. It is indicated too far back! I conveyed
this to Amraam Line and they corrected the indication on the sheet. For
me was too late, so I used slices of plastic sheet to fill up the gap.
I replaced the cockpit with the resin set from "Black Box" except for
the instrument panel that came from the "Amraam Line" set because it is
much more correct in size.

Some "precision" cutting is required to the front undercarriage bay to
fit the cockpit tub.
The whole cockpit is coloured in medium grey 36231 (Humbrol 140), with
black instrument dials/screen and white/light grey switches. The
ejection seat is black with olive drab cushion and brownish headrest.
Straps are grey and emergency handles are yellow-black stripped.
Drybrush here is a must.
The main problems building this kit are:
-
fitting the wing to the
fuselage
-
fitting the speed
airbrake vane
-
fitting the main engine
air intakes
A lot of test-fitting and epoxy putty are required
to obtain a good result.
I removed the RWR bulges on the wings and on the tail cone and replaced
them with new items made from plastic rods.
The "slime light" frames were added from the Eduard photo-etched set.
I used the extended in-flight-refuelling-probe (IFRP) form the "Amraam
Line" set.
The other parts that came from the "Amraam Line" set can be placed
without any more cutting of the kit. These include the chaff & flare
boxes over the rear fuselage and the rear under tail spine. Four extra
air scoops have to be placed over the engine doors, between the large
LERX.
I made the blow-in doors for the main air intakes using plasticard
sheet. The inside of the main air intakes is white.
As for all the Harriers, when the canopy is open (as on my model) the
inboard ladder is "down": I scratch built it and placed it under the
right main air intake.
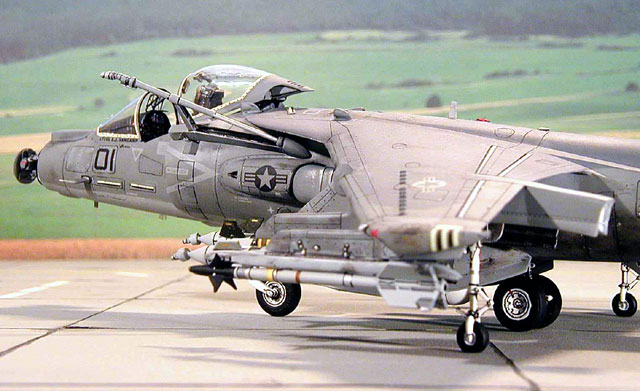
Ordnance and Final Details
I opted to load the "Plus" with a "heavy" CAS
configuration. I have some pictures of a "Plus" carrying the new
"Lightning" laser pod and a GBU-16 laser guided bomb. I modified a "Lantirn"
pod by shortening it to depict this feature.
The GBU-16 with the
"ablative" cote is from "Eagle Designs". Two GBU-12 laser bombs were
from another "Amraam Line" armament set (48-001). The AIM-9Ls are from
Hasegawa weapon set. The ECM pod under the aircraft belly is included
into the "Amraam Line" conversion set.

The final "esoteric" addition is the open-radar nose: I had a "surplus"
APG-65 radar from the "Verlinden" F/A-18's detail set so I
"resized" the antenna, shorted the radar trail, and with the help of a
friend of mine, made a new hollow nose cone.
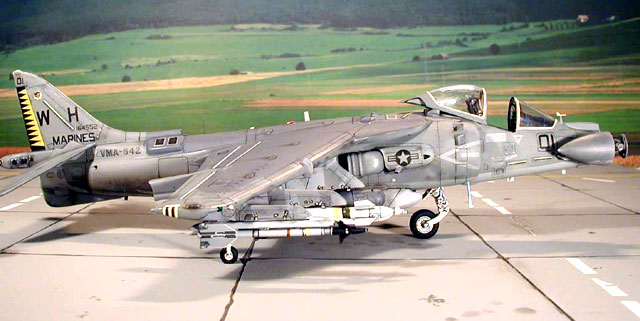
When the main kit parts were assembled, I started
the painting duty. First was an overall coat of Light Ghost Grey 36375 (Humbrol
127), then I oversprayed the panel lines with black (Humbrol 33). Ghost
Grey 36320 (Humbrol 128) was sprayed on the under surfaces.
I masked off the ghost grey and sprayed the Medium Grey 36231 (Humbrol
140) for side and upper surfaces. Last, I masked off the medium grey and
I sprayed the Dark Ghost Grey 36118 (Humbrol 125) over the top of the
wings.
Black ink was used to pick up the panel lines and rivets.

Slightly different shades of grey were applied, using airbrush and hand
brushes, on individual panels to simulate weathering.
The same process was applied to the pylons. The undercarriage legs are
white (Humbrol 130).
A coat of "Future" was applied to prepare the model for decaling.
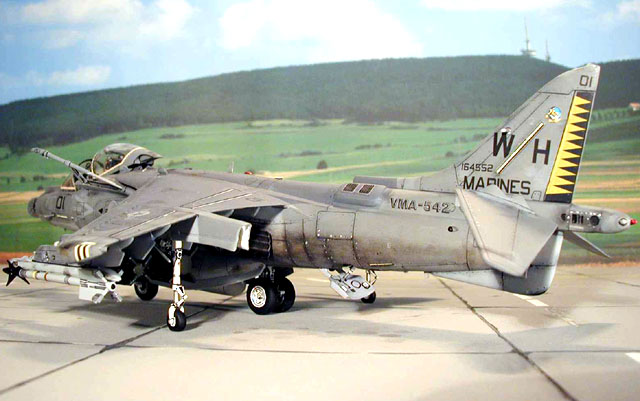
I chose the command aircraft of USMC "VMA-542" "TIGERS" squadron, based
at Cherry Point, North Carolina. This aircraft has black numbers and
star insignia (on the fuselage). "Microscale" Set/Sol were used to apply
decals. Another coat of "Future" and then a matt cote "Humbrol" finished
the paint job.
CIAO!
Piero
Click on the thumbnails
below to view larger images:
Model, Images and Text Copyright © 2002 by
Piero De Santis
Page Created 14 October, 2002
Last Updated 04 June, 2007
Back to HyperScale
Main Page
Back to
Features Index
|
 Home
| What's New |
Features |
Gallery |
Reviews |
Reference |
Forum |
Search
Home
| What's New |
Features |
Gallery |
Reviews |
Reference |
Forum |
Search