|
Mustang Mk.I
by Colin Ford
|
|
|
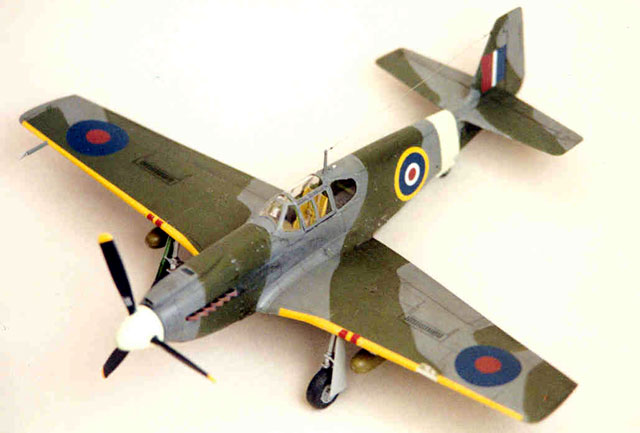
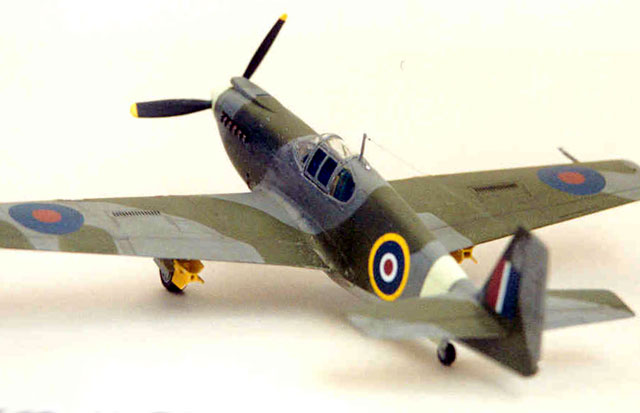
North American Mustang Mk.I
(Dive Bomber) |

Accurate
Miniatures' 1/48 scale A-36 Apache is still available online from
Squadron.com
Background
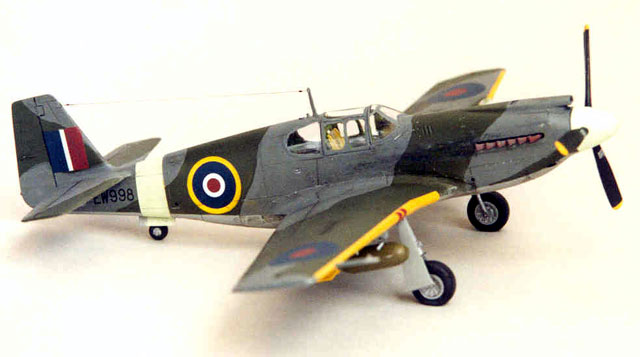
The 26th North American NA-97 Apache built, serial number 42-83685
was delivered to the Royal Air Force for evaluation in March 1943.
The A-36A provided to the RAF was given the RAF serial EW998 and
designated as the Mustang Mk.I (Dive Bomber). It was evaluated as a
possible replacement or supplement for the Hawker Typhoon, which at that
time was still suffering from its engine development and reliability
problems plus the other structural issues that were being encountered in
service.
As it turned out, the solutions to the problems plaguing the Typhoon
were in hand, and the RAF’s need for a dive bomber version of the
Mustang was not a priority. As well, the development of the Merlin
engined Mustang was proceeding apace, and the RAF already had its eye on
the production capacity that would be required to produce the Merlin
engined Mustang fighter, rather than another ground attack aircraft.
The Kit
The kit used is the Accurate Miniatures 1/48th scale model of the NAA
A-36-A Apache (AM #3401). This kit is a fine example of the model makers
art and accurately portrays the look and dimensions of the actual
aircraft, and has received many favourable reviews by modellers. The
detail differences between the A-36A Apache and other members of the
Allison engined Mustang family were correctly captured by Accurate
Miniatures, including the wing mounted dive brakes, underwing
hard-points, revised aircraft armament (two x .50in calibre Browning
HMGs in each wing plus two in the nose synchronised to fire through the
propeller arc), revised landing light and pitot head fittings, changed
under fuselage radiator air intake shape, and revised carburettor air
intake incorporating a larger air filter arrangement above the aircraft
‘s nose.
The kit is moulded in dark olive green plastic, and features fine
engraved surface detail plus a logical assembly sequence. Most major
join lines are along actual aircraft panel lines, which helps reduce any
potential problems with covering up unrequired seams. However there are
the usual length-wise seams between the two fuselage halves, the front
fuselage halves and the wing upper and lower sections, but the seams
here are easily handled. The kit offers the choice of weighted or
un-weighted tyres, and comes with one decal choice, being an A-36A
operating with the 27th Fighter Bomber Group of the USAAF in Italy
during 1944.
There is one error which Accurate Miniatures have made in their kit
instructions, which a number of others have made as well. This concerns
the inboard main undercarriage doors (kit parts 28L and 28R) being shown
in the down/open position.
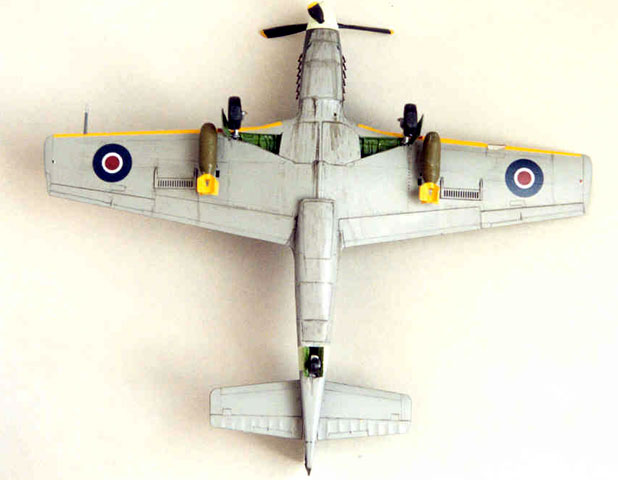
A Common Mustang Modelling Misconception
I’ll make a point about modelling Allison engined Mustangs, and a
common mistake many modellers make when modelling these particular
aircraft. It has been confirmed by a number of sources during my
research (ex-Allison engined Mustang pilots and ground crew included),
plus as is evident in so much of the photography available of Allison
engined Mustangs, that these aircraft should not normally be modelled
with their inboard main undercarriage doors in the down position. The
Allison engined Mustang had a different hydraulic system to that of the
Merlin engined variety, as well as a number of other detail changes.
Whereas the Merlin hydraulic system would “bleed down” allowing the
inboard main undercarriage doors and flaps to droop after the engine had
been shut down, the Allison engined system did not. The inboard main
undercarriage doors also had a different locking system to the later
Merlin engined models as well. So the inboard main undercarriage doors
and flaps normally stayed in the up position on Allison engined
Mustangs.
The kit is basically built following the build sequence set out in
the Accurate Miniatures instructions. I had taken note of a couple of
possible build issues that people had raised with this kit and the other
Accurate Miniatures Mustangs, and therefore before completing some
sub-assemblies I did a test fitting first, or varied slightly from the
AM build sequence.
One example of this is the rear radiator exhaust duct fitting, where I
trimmed the kit part to size, and fitted the duct after the main
fuselage halves were together. I also of course finished the build with
the inboard main undercarriage doors closed, not open, which required
the removal of the two small mounting points on each door before
assembly and I elected to use the weighted tyres provided in the kit.
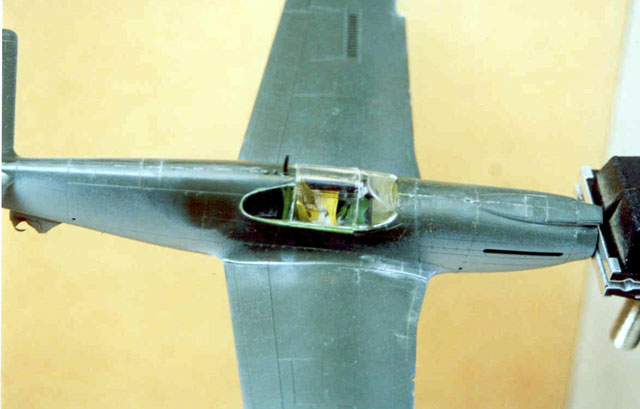
One of the fiddly parts of the build is in getting all the interior
components for the cockpit to line up as you join the two fuselage
halves together, as well as trapping the tail wheel at the same time
(it’s one of those jobs where you need two pairs of hands, and all a
couple of sizes smaller than your own to hold everything together in the
right positions and fit “slot a into tab b” as well as running the glue
into the joining surfaces).
Overall though, there are no major problem areas with building this
model, and a little care and patience as always pays dividends. Minimal
filler was required on any of the major or minor join lines. Two areas
that did require a little bit of filler was on the underside of one wing
for filling in the recognition lights (more on that shortly), and to
blend in the lower fuselage air intake front section to the main body of
the aircraft.
To add a little extra detail to the cockpit I used one of the Ultracast
early P-51 Mustang cast resin seats (Ultracast #48014), and the fine
detail on this casting really helps to add that little something extra
to all the detail already there from Accurate Miniatures. You could make
do with the kit item enhanced with an aftermarket photo-etch harness,
but I like the Ultracast item for its quality and level of in-built
detail.
There is one notable external difference between the sole RAF A-36A and
the USAAF versions, and that is the fact that all the photos I have seen
of EW998 it does not have the three recognition lights under the
starboard/right wingtip. So these were filled in with surfacer and
carefully sanded back to give a flush panel area.
In areas where a light sanding was required, if any panel lines were
removed or reduced, then I rescribed the panel line using a needle point
scriber. Some panel lines on the kit, such as for the flaps and the wing
dive brakes and the moving sections of the underfuselage cooling vents,
I ran the scriber through to make them more prominent, in line with how
they appeared in reference photographs. Most of the other panel lines I
left as they were, as generally panel lines were not prominent on the
early Mustangs due to the high standard of panel fit and surface finish
they had ex the NAA factory.
Painting was primarily with a mix of various enamels, ModelMaster,
Humbrol and Tamiya for the major components, with Tamiya or Gunze
acrylics for washes and weathering.
For the interior colours, I used the photographs in the “In Detail &
Scale P-51 Mustang Part 1” by Bert Kinzey as a guide. This meant the
main colour used for the cockpit interior was ModelMaster Green Zinc
Chromate #1734 for the interior wall and floor, with the pilots seat
being in Humbrol 81 Matt Pale Yellow to represent Yellow Zinc Chromate,
with the side panels and instrument panel being in Humbrol 66 Matt Olive
Drab and Humbrol 33 Matt Black with white, red and silver highlights.
The fabric cuff around the base of the control column was done in
Humbrol 141 Matt Light Sea grey, and the harness on the pilot’s seat was
done in Tamiya XF-57 Matt Buff with Tamiya X-11 Silver for the buckles
and Tamiya XF-64 Red Brown for the leather panel under the main buckle.
The cockpit interior was given a couple of light washes and some
restrained drybrushing to help bring the detail into relief.
The undercarriage wells were also done in Testor's Green Zinc Chromate
#1734, as were the interiors of the undercarriage doors. The centre
panel of the inboard main undercarriage doors was done with Tamiya XF-16
Flat Aluminium (altho you don’t see too much of these as they are closed
on the finished model).
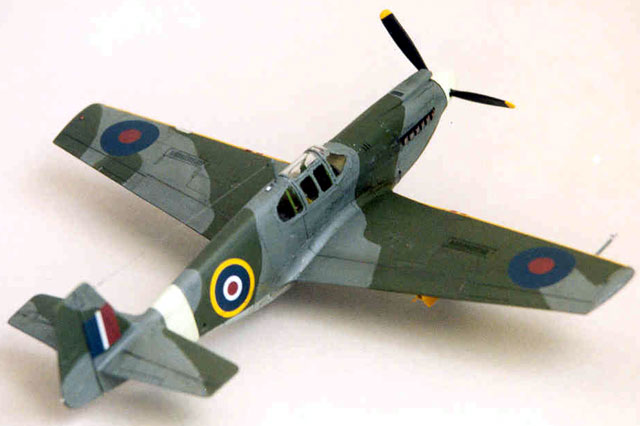
For the under surfaces I used Humbrol 64 Matt Light Grey for the RAF
Medium Sea Grey. The upper surface camouflage scheme was completed in
Humbrol 116 Matt US Dark Green for the RAF Dark Green and Humbrol 106
Matt Ocean Grey for the RAF Ocean Grey, with a semi-hard delineation
between the upper colours.
The camouflage pattern for this aircraft is not a standard scheme, it
bears some resemblance to the standard Mustang pattern of the time, but
there are a number of differences in the delineation of the colours. The
greatest area of difference from the standard Mustang pattern is for the
starboard (right) wing upper surface, where Dark Green is the
predominant colour. If I were to hazard a guess at the scheme used on
this aircraft, it bears all the marks of the spray painter at the
aircraft depot at RAF Speke in the UK where it was assembled after
delivery from the USA being told to, “paint it similar to that one over
there”, and being left to it.
The spinner and rear fuselage band were done in Humbrol 90 Matt Beige
Green – Sky. The propeller blades were done in Humbrol 33 Matt Black
with Humbrol 154 Insignia Yellow tips. Humbrol 154 Insignia Yellow was
also used for the wing leading edge stripe which extends from the wing
root to the wing tip of each wing. The undercarriage was done with a
selection of Tamiya X-11 Silver and XF-16 Flat Aluminium for the metal
parts, with Humbrol 33 Matt Black as the base colour then drybrushed
over with Humbrol 32 Matt Dark Grey for the tyres.
 The
large colour areas were all airbrushed using my ModelMaster Aztek A430
airbrush, using either the medium or fine tips with masking being done
with a combination of Tamiya masking tape and paper post notes cut to
shape. The
large colour areas were all airbrushed using my ModelMaster Aztek A430
airbrush, using either the medium or fine tips with masking being done
with a combination of Tamiya masking tape and paper post notes cut to
shape.
To get the camouflage pattern correct, I had enlarged a line diagram
of the A-36A up to 1/48th scale on a photocopier, then marked the
pattern onto the diagram. This was then used to make the templates for
cutting the masking tape and post notes to shape.
Fine detail work was mainly done with paint brushes of varying sizes.
Click the thumbnails below
to view larger images:
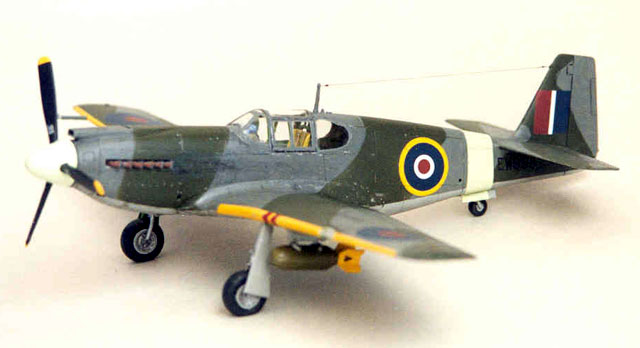
The aircraft in most of the photos I have seen of it, is shown without
the nose mounted machine guns (with the holes in the lower front cowling
showing, not covered over) and carrying a pair of US pattern 500lb
General Purpose bombs (inert most likely as there is no visible fuse in
the nose). The bombs are painted in what appears to be a fairly darkish
colour, and a light coloured tail assembly (Olive drab main body and
yellow ‘practice’ tail fins?) with no colour bands around the nose. The
kit bombs were assembled as per the kit instructions, have had the nose
fuse assembly removed, and sanded back for a smooth finish to the nose
area. They were primed with pale grey primer to assist the coverage of
the yellow paint over the tail fins, again using Humbrol paints for the
body and tail colours. The finished bombs were one of the last items
added to the model on finishing. The nose mounted machine guns were left
off this kit to match the photos I was working to of the aircraft.
After finishing the external paintwork, the aircraft was left to
stand for a week before being “Futured” and then left to stand for a
further two days before the application of decals commenced. Decals came
primarily from spare Accurate Miniatures markings from their Mustang
Mk.IA kit, with the serials from Ventura decals (Ventura Sheet V4851 RAF
Serials Black 8”). The propeller data blocks came from the Accurate
Miniatures decals provided with the kit. The doped gun covers were
reproduced by pieces of decal sheet painted with a 5:1 mix of Tamiya
XF-7 Flat Red and XF-9 Flat Hull Red, then cut to size and placed over
the kit wing machine gun barrels.
I used Mr Mark Decal Softer to assist the decals in conforming to the
shapes of the model. The decals went on well with no real problems,
adhered and conformed well to the surface. After all the decal work was
completed and left to dry overnight, the aircraft was given a light wash
down to remove any residual decal glue or setting solution, and left to
air dry.
The panel lines were brought into relief by a careful wash using
thinned black and burnt umber acrylic watercolour, as well as fine 2B
pencil (using a 0.5mm Pacer pencil). The panel line work I kept fairly
subtle, as looking at the photographs of the actual aircraft, very few
of the panel lines really stood out, with the most visible being the
gaps around the main control surfaces.
The model was left to stand for a few more days before being “Futured”
again with a 7:3 mix of Future and Tamiya Acrylic Flat Base to give a
flat semi-gloss finish. This both sealed in the decals and the panel
highlighting effects.
After a further week to cure, exhaust staining was added with dry
brushed layers of semi gloss black, matt dark grey and matt light grey,
as was a final bit of oil staining on the underside of the aircraft
flowed from the back of the engine panels. This was done using heavily
thinned (using water not Tamiya Acrylic thinner which could react with
the Future) Tamiya Acrylic X-18 semi gloss black mixed with varying
ratios of Tamiya Acrylic XF-1 Flat Black to give the right amount of
shine to the oil stains. (“The Mustang Story” has a number of photos of
this aircraft including a great underside profile photo, and these were
used as the basis for the weathering and oil staining.) A number of the
engine fasteners around the engine cowling were also picked out with a
fine brush loaded with Tamiya XF-16 Flat Aluminium, as were a number of
other panel fasteners, again using photographs of the actual aircraft as
a guide to which ones needed highlighting.
An aerial was added using fine clear polyester sewing thread, between
the antenna mast and the tail, which was touched over by a fine brush
that had been lightly loaded with thinned gunmetal colour paint. The
wingtip formation lights were done using Tamiya Clear Acrylic colours
(red and green) over silver enamel. For the twin landing lights in the
port wing leading edge, during construction I had filled in the void in
the wing leading edge with some filler and shaped this as it was drying.
This was painted in zinc chromate green. The landing lights were
represented by the heads of two shirt pins. These were then covered by
the kit transparency, fixed in place using Humbrol Clear-Fix.
The cockpit canopy had been fixed in place early during construction and
masked on the clear areas. The frames were first painted with interior
green, then overpainted with ocean grey which is the predominant colour
around the cockpit exterior. After all the external painting, top
coating and decaling was completed using a very fine brush the panel
lines on the canopy were also picked out using thinned black water
colour and 2B lead pencil, and after this had dried, again using a very
fine brush, minor wear and tear was represented around the moving
components of the canopy using Tamiya XF-16 Flat Aluminium.
The main undercarriage legs, wheels and outboard doors were added about
this stage, with care taken to get the fit and angles of the completed
undercarriage right. To do this I sat the model into a small cradle and
used a mix of masking tape bands and props made from cut Q-tip sticks,
to hold the undercarriage in place whilst it dried.
The leading edge pitot tube in the starboard (right) wing leading edge
was painted on its end section with Tamiya XF-16 Flat Aluminium and
Humbrol 106 Matt Ocean Grey on the main section, and was about the last
item added to the model.
This was the first of the Accurate Miniatures Allison engined Mustang
kits that I have built and completed. For me it was a chance to refine
my building methods and procedures for building more models of the
Allison engined Mustang using the Accurate Miniatures kits. It
represents an interesting side-line in the history of Allison engined
Mustangs in service with the Royal Air Force in World War II, and a
glimpse at what could have been a more familiar sight in RAF colours had
the problems with the Hawker Typhoon not been fully sorted out. It also
gives a change to the usual USAAF olive drab over neutral grey schemes
that this aircraft type is seen in.
This is the first in a series of Allison engined Mustangs that I am
currently building, spanning the Mustang Mk.I, Mk.IA and Mk.II in RAF
service with one specific RAF Squadron. The model production line for
these would do credit to NAA, and the conversion to RAF specifications
would do the same for RAF Speke.
This is only the second aircraft model I have built in about the last 15
years or so (the first was a rip-off of the Hobbycraft Spitfire Mk.XIVc
built to get back into the swing of things), and makes a change to my
usual model car building.
Photography was done using my Canon EOS camera, using a range of
Canon Ultrasonic lenses. Negatives were scanned to digital form on a HP
flatbed scanner. Backgrounds are either photocard or my modelling
workbench.
-
In Detail & Scale P-51 Mustang Part 1
(D&S Vol.50) by Bert Kinzey, Squadron-Signal Publications.
-
The Mustang Story by Ken Delve, Arms &
Armour Publications.
-
Mustang, the Operational Record by Robert
Jackson, Smithsonian Institution Press.
-
Mustang by Stewart Wilson (Sovereign
Series), Aerospace Publications.
-
Wings of Fame, Volume 1, Aerospace
Publishing.
Click on the thumbnails
below to view larger images:
Model, Images and Text Copyright © 2002 by
Colin Ford
Page Created 23 June, 2002
Last Updated 04 June, 2007
Back to HyperScale
Main Page
Back to
Features Index
|
 Home
| What's New |
Features |
Gallery |
Reviews |
Reference |
Forum |
Search
Home
| What's New |
Features |
Gallery |
Reviews |
Reference |
Forum |
Search