Airfix 1/48 scale
Gloster Meteor F.8
by Roger Hardy
 |
Gloster Meteor F.8 |

Hasegawa's 1/72 scale B-47E Stratojet is available online from Squadron
S
u m m a r y |
| Catalogue Number: |
Airfix Kit No. A09182 – Gloster Meteor F.8 |
| Scale: |
1/48 |
| Contents and Media: |
156 parts in grey injection moulded plastic; 11 parts in clear plastic; markings for two aircraft. |
| Price: |
£32.99 plus shipping from Hannants
and other stockists worldwide |
| Review Type: |
Build Review |
| Advantages: |
Well engineered. Crisp surface detail, high level of detail; many useful options including engine and gun bays on display; separate control surfaces; wing and belly tanks included. Generally good fit.. |
| Disadvantages: |
Nothing worth mentioning. |
| Conclusion: |
An excellent kit from every aspect. Highly Recommended. |
Background
Considering its place in aviation history, the Meteor has not been well served in plastic, especially in 1/48 scale. We had the excellent Tamiya Mk 1 and Mk 3 (though why they chose these variants is beyond me) and Classic Airframe’s various later marks although these were not the easiest models to put together well. Finally, Airfix have stepped up to the line with this latest offering which has been reviewed by Brett Green in-the-box here:
http://www.hyperscale.com/2016/reviews/kits/airfix09182reviewbg_1.htm
and a post-build review here:
http://www.hyperscale.com/2016/galleries/meteorf8airfix48bg_1.htm
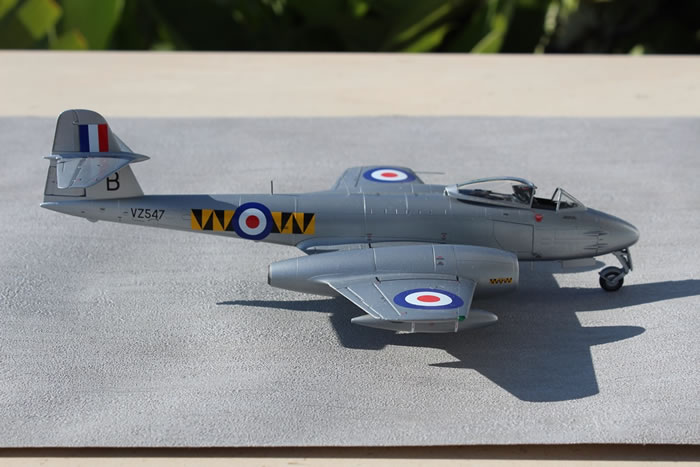
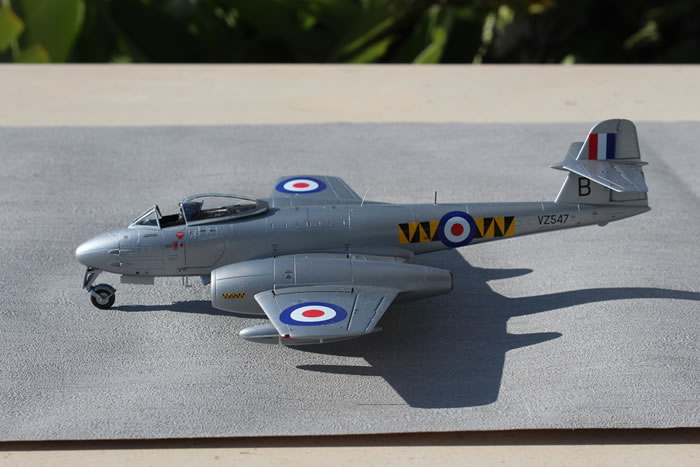
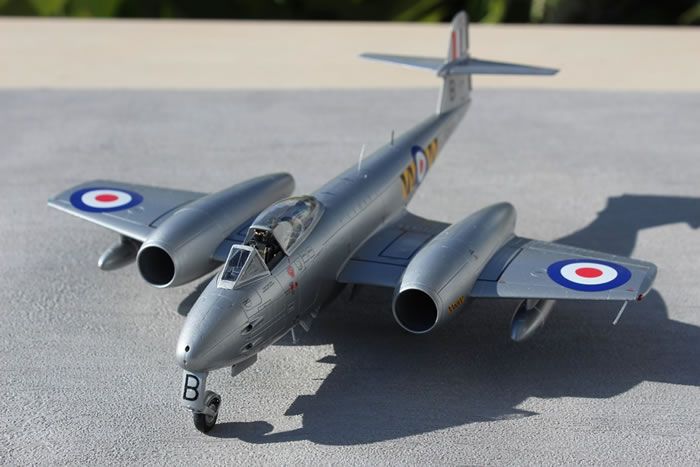
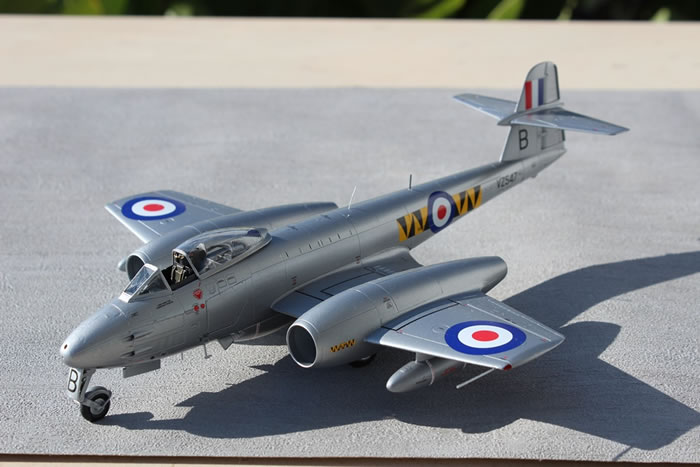
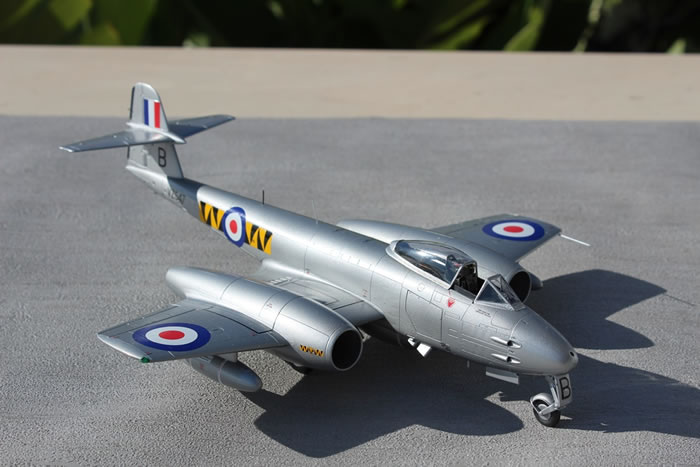
In this review, I wanted to simply highlight things that you might like to be aware of when putting together this great product from New Airfix. I built it straight from the box but used a different decal sheet from Xtradecal: https://www.hannants.co.uk/product/X48043, although Hannants do a number of different sheets for those wanting to ring the changes. I decided to use the 74 squadron marking from their sheet because, although the markings are a little speculative, I like the Tiger Squadron. Having had a rest from modelling for almost a year, I wanted this to be simple and stress-free; a good model with a simple colour scheme. For this reason, I wanted to do a simple all-silver example but was not drawn to the 85 Sqn example on Airfix’s decal sheet; it is a preserved example.
The instructions are comprehensive, clear and unambiguous. Revell, please take note. The cockpit provided is well-detailed, goes together well and looks good when done. The ejection seat offers a choice of moulded-in harnesses or bare so you can add p/e if desired and this is a thoughtful touch. The instrument panel is a decal but the panel itself has prominent raised features so it’s best to cut the decal up a bit. Personally, I’ll use a p/e panel next time but this one is quite acceptable. The ejection seat is suitably busy although a resin replacement might be desired by the purist. The cockpit interior of RAF aircraft of this period was black but I used a very dark grey and highlighted raised and sunken detail with black and dry-brush white. I’m sure someone will produce a full resin set for this kit but I think that what is provided is good enough for me.
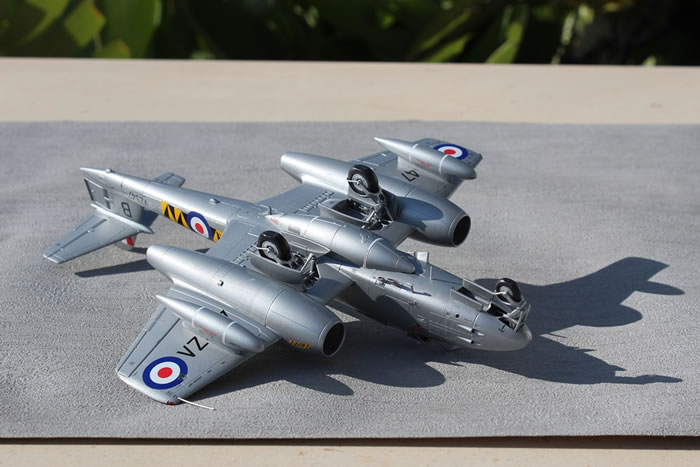
You have the option of showing the guns but I prefer my models to be buttoned up. For those worried about the fit of the removable panels, don’t be concerned; they all fit very well; in fact, under a coat of primer, they look like any other panel lines. Another thing I like is that most of the joints occur along panel lines and there is a good attempt at producing discontinuity between panels and even a little rippling over some, just like the real thing.
You can show the engines if you wish although they could probably do with a little more detail to look right. You can see the engine accessories from the intake but little else so don’t lose too much sleep over the engine compartments. Remember to add a significant amount of weight as the Meteor is a real tail-sitter; Airfix recommend 15gms. Tamiya provided a large weight in their kit but Airfix don’t but the design of the cockpit means that you can stuff fishing weights behind the seat. I am lucky living in Portugal where we can get real lead weights.
The control surfaces (all separate items, except for the flaps) and rear wing roots have rivets moulded in to them and I think they are too prominent so sanded them down such that they can still be seen. All of the control surfaces seat well and look exactly right, unlike the usual engraved lines. You can pose the airbrakes open if you wish but they were usually only deployed on the ground for maintenance. An interesting point is that two different sets of ailerons are provided; one with the earlier single tabs (that extend aft of the trailing edge) and the other set with the later double tabs (these tabs reduced stick forces at high speed – the Meteor had manual controls). The kit instructions ignore the earlier ailerons but if you are modelling an early bird you will probably need them. For example, RAAF Meteors in Korea had the earlier ailerons, metal rear hood and smaller intakes. On reflection, my aircraft. VZ547, may have had earlier ailerons but I’m not changing them now!
Brett Green had a few problems with the fit of the fuselage halves and wing roots but I managed to reduce these by judicious wiggling whilst the liquid poly was drying. There is a gap between the rear wing roots fitted to the fuselage and the wing assembly but this can be minimized by squeezing the fuselage and wings together as the liquid poly is setting. Hold, wait, hope. For those who have painful memories of the Classic Airframes nacelle joints, you need not worry here as the fit of all the parts is otherwise stellar. I used no filler anywhere on my model and just a bit of viscous liquid primer along some joint lines with a little attention with wet micromesh. No re-scribing was necessary anywhere.
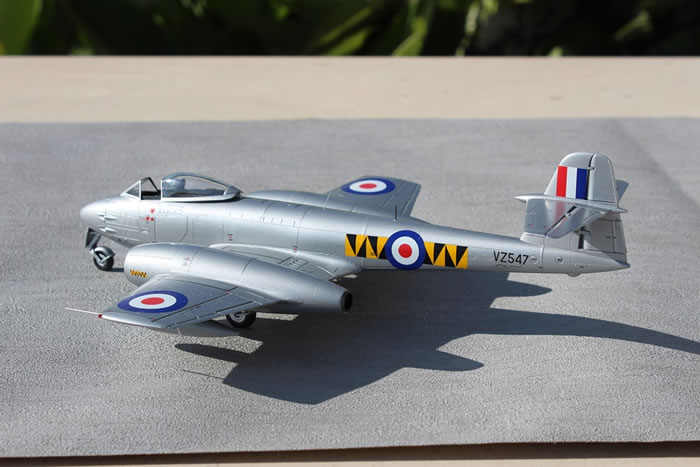
The undercarriage bays are very good and the wheels are weighted. Airfix have taken a leaf out of Tamiya’s book in making the complex undercarriage assembly foolproof. Having said that, I needed to remove a tiny bit from parts D22 and D23 in order for the inner undercarriage door to sit at the right angle. I particularly like the detail that is included in the nose undercarriage compartment, with ballast weights and all the supporting structure. Of course, not that much can be seen but at least I know it’s there. The weighted main wheels do not rotate which is a shame as it makes painting easier when the model is assembled; I prefer to assemble as much as I can then spray the lot; this is OK with a model like this where everything, including the undercarriage bays and legs, is silver.
Airfix provide both the smaller and later ‘deep breather’ intakes and it is always a problem knowing which to use as they were apparently often replaced in service and the differences are not so easy to spot in photographs. As a rule of thumb, if you use the smaller ones with the earlier canopy (with the metal rear section – provided in the kit), you’ll probably be on the right side of the truth. According to the pundits, aircraft in the WK and WL range were definitely fitted with the larger intakes but many earlier aircraft may have been retro-fitted. Mine is VZ so may have had the smaller intakes or they may have been changed in service….who knows? That’s the nice thing about doing a speculative example for which no photo record remains….no one can prove you wrong!
The transparencies are crystal clear and very thin so be careful with breakages! I cracked my windscreen but Messrs Hannants were kind enough to send me a replacement. Thanks, Hannants! I found I had to trim the shoulders of the instrument panel in order for the windscreen to fit properly without rocking. Every example of this kit I have seen built has an obvious joint between the windscreen and nose; in reality this should not be so noticeable but it’s difficult to remedy at the final stage when it all comes together.
I finished the model in Alclad 2 Aluminium and, after decaling, applied a glossy top coat to represent high-speed silver (these aircraft were painted silver and were not natural metal) and Alclad do not do a high-speed silver.
The Airfix decals went on just fine but I seriously recommend cutting up the wing-walk decals as they can be a bit difficult to manage; if you mess one up, you’ve had it. Also, the largest one is meant to sit over a fairing (always a recipe for bubbles and wrinkles) so I cut the clear decal sheet away to allow it to sit around the bump, not over it. These decals are really thin and the carrier film is almost invisible so feel free to cut bits away as long as you can keep the shapes under control but avoid fold-over like the plague. Keep ‘em wet. I used Microset. The Xtradecals provide only the special squadron markings; you need to use the kit decals for everything else; they are good so use them with confidence. I didn’t bother with decal softening solution as it was unnecessary.
A word of warning to those who refer to the instructions as a last resort. Many parts and sub-assemblies of this kit are handed even when you don’t expect it so follow the part numbers scrupulously. The intakes and tailplanes come to mind. My tailplanes are upside down…not that it makes much difference but there are little access panels on one side, not the other. The intakes will fit on the wrong side but very badly. If the fit doesn’t look good, check. Beware!
Finally, you need to research your aerials as these may be different from those supplied with the kit; most earlier aircraft (like mine) had a narrow aerial mast and a whip aerial, for example. As an aside, the model comes with blanked-over holes for rockets under the wings, metal rear canopy, small intakes, early ailerons and RAAF radome, so expect a specific RAAF Korean War version next with lots of rockets. There is no evidence of trainers or night fighters in the offing.
This model with its simple colour scheme took me two days to build; about 18 hours. Overall, I was very pleased with the result and it was a relaxing and easy build; exactly what I wanted. It looks right and sits right. Again, my hat is off to New Airfix for raising the bar, giving us a model that has been long overdue and making such a good job of it.
Model, Images and Text
Copyright ©
2016 by Roger Hardy
Page Created 27 May, 2016
Last Updated
27 May, 2016
Back to HyperScale Main Page
|
 Home
| What's New | Features | Gallery | Reviews | Reference | Resource Guides | Forum |
Home
| What's New | Features | Gallery | Reviews | Reference | Resource Guides | Forum |