|
F4U-1"Birdcage"
Corsair
by Richard Chafer
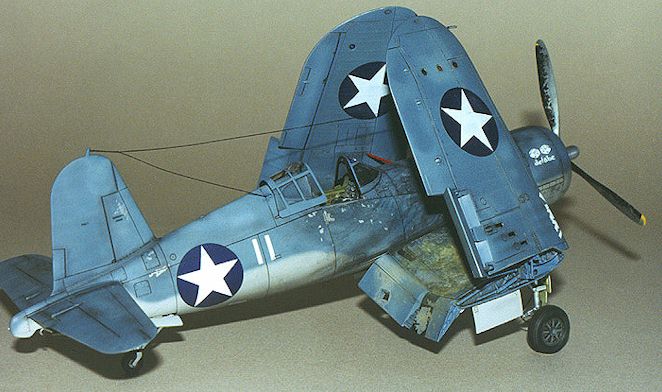 |
F4U-1 "Birdcage" Corsair
Piloted by 1st Lt. George C. Defabio of VMF-213 U.S.M.C., Guadalcanal 1943. |
The F4U-1 "Birdcage" Corsair was the
first in a long line of successful derivatives used in front-line service through to the
Korean War and beyond.
 Early Corsairs displayed
undesirable landing characteristics including the port wing dropping at landing speeds and
a tendency to bounce after landing. Ironically, these problems meant that the US Navy
initially considered the Corsair unsuitable for Carrier Operations. Early Corsairs were
therefore issued to the Marine Corps for land based use. Most of these operations took
place on the Solomon Islands. Guadalcanal was the first place for the birdcage canopied
Corsairs to see action. Early Corsairs displayed
undesirable landing characteristics including the port wing dropping at landing speeds and
a tendency to bounce after landing. Ironically, these problems meant that the US Navy
initially considered the Corsair unsuitable for Carrier Operations. Early Corsairs were
therefore issued to the Marine Corps for land based use. Most of these operations took
place on the Solomon Islands. Guadalcanal was the first place for the birdcage canopied
Corsairs to see action.
At this time the Marines operated off crushed
coral airstrips with the Corsair’s huge propeller blasting loose fragments across the
wings and fuselage. The sun also took its toll on the constantly exposed aircraft,
bleaching the paint to a well-faded finish. These effects combined to leave the aircraft
very weather beaten indeed! I wanted to reproduce this look on the model.
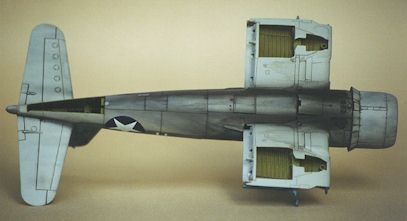
 Tamiya's 1/48 scale kit is superb - easily the best Corsair on the market and
not likely to be improved upon in the near future. The kit consists of approximately 124
parts in a medium grey colour and has well defined recessed panel lines and rivet detail.
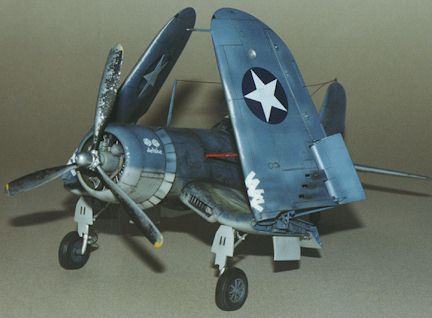
The wings can be displayed folded or in the normal flying position. There are optional
parts in the kit to make a standard F4U-1 or an F4U-2 Night Fighter (for more detail
see the history and construction
articles on the F4U-2 Night Fighter - ed.). Tamiya's 1/48 scale kit is superb - easily the best Corsair on the market and
not likely to be improved upon in the near future. The kit consists of approximately 124
parts in a medium grey colour and has well defined recessed panel lines and rivet detail.
The wings can be displayed folded or in the normal flying position. There are optional
parts in the kit to make a standard F4U-1 or an F4U-2 Night Fighter (for more detail
see the history and construction
articles on the F4U-2 Night Fighter - ed.).
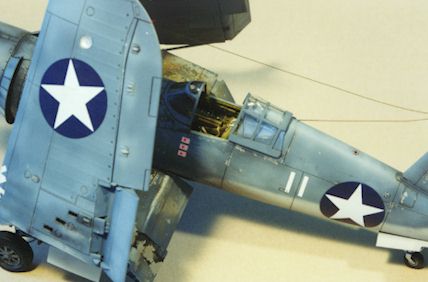
Cockpit detail is above average and too good to
bother replacing with a resin set (if that is your normal habit). The flaps can only be
displayed deployed (in the "down" position). Options include the choice of
birdcage canopies, centerline 500lb bomb or drop-tank, and different exhausts. Decal
options are supplied for three aircraft, two being Marine machines; VMF-213 is one and a
Night Fighter of VMF(N)-532 is the other. The third aircraft is an F4U-1 of VF-17.
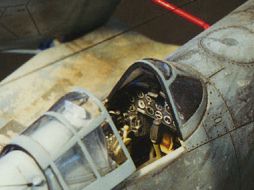
The first step is the cockpit. Everything fits
together very well and, as stated earlier, the replacement of the Tamiya cockpit with a
resin one would be a waste of your money. I did however make some minor alterations and
additions. The trim wheel was replaced with an appropriately shaped plasticard disk. The
throttle quadrant was scratch-built, as was a map pouch on the starboard side of the
cockpit. A seat brace was made from brass rod and shaped to fit behind the seat while
harnesses were made from lead foil strips and Reheat buckles.
 The kit instrument panel has
neatly recessed dial faces that I thought would be best detailed by punching-out the
individual dial decals from the main instrument panel decal with a punch and dye set.
These were individually soaked in water and placed in the relevant positions. It worked
perfectly and each instrument was finished-off with a "lens" using a drop of
Aeromaster gloss acrylic. The kit instrument panel has
neatly recessed dial faces that I thought would be best detailed by punching-out the
individual dial decals from the main instrument panel decal with a punch and dye set.
These were individually soaked in water and placed in the relevant positions. It worked
perfectly and each instrument was finished-off with a "lens" using a drop of
Aeromaster gloss acrylic.
The rest of the kit was assembled as
per the instructions. The fit of the fuselage and wing assemblies was excellent with only
a few minor areas to touch-up. The only additions to the basic kit were brake lines on the
main undercarriage legs and the aerials made from brass rod. I was not happy with the
final result of the aerials, however I could not think of another way to reproduce in
scale the ‘spring’ like device near the tail attachment.
| P
a i n t i n g , D e c a l s a n d W e a t h e r i n g |
The subject Corsair was attached to Marines
Squadron VMF-213 based at Guadalcanal in the Solomon Islands group during 1943. It was
piloted by 1st Lieutenant George C ‘Yogi’ Defabio who was credited with three
Zero kills, the first on the 30th of June and two more on the 11th and 17th of July 1943.
Painting and weathering are my favorite parts of modelling. The first step was to airbrush
the Corsair with Testors chrome enamel from a spray can but not sprayed directly from the
can. Instead I sprayed from the can into a cup, then poured into an airbrush paint cup and
thinned slightly with general-purpose thinners. Next day Aeromaster acrylic Intermediate
Blue F.S.35164 and Light Grey F.S.36440 were sprayed in their relevant places. I lighten
my paint with 10% white as directed by Aeromaster and I feel this adds to the scale look
of the model.
To replicate the sun-bleached look of the Pacific land based Corsairs I lighted the
Intermediate Blue a further 10% and sprayed in various places where the sun would have
affected the paint the most. The blue was lightened yet again by about 15% and lightly
misted over the upper surfaces of the aircraft. Further panels were sprayed various tones
of the blue to represent panels that may have been replaced or touched-up.
24 hours later I chipped the paint in relevant places using masking tape to pull the
acrylic paint off. This process worked in 80% of the places used, however I did manage to
pull-off all the paint in some places because the enamel silver hadn’t bonded to the
plastic as much as I’d hoped it would. ( This problem has since been fixed by using
"Floquil Railroad Colours" Bright Silver which has a stronger solvent in it
which definitely does bond the paint to the plastic. Thanks to John Kerr for putting me
onto this paint. ) In areas where too much paint came off I re- airbrushed the relevant
colour over those areas.
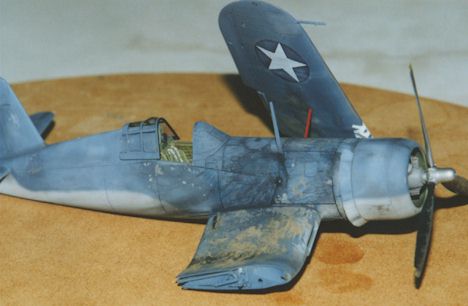 These Corsairs were hard at work every day until they broke. To reproduce the
heavily oil streaked look typical of the cowling area I used Atelier impasto artist
acrylic black thinned with water on the end of a paint brush. While still wet, the thinned
paint was either air blasted air with an airbrush along the fuselage from the cowling area
back or by dipping the paint loaded brush unto the fuselage, then blasting air at the
paint, streaking it in the direction of the air flow. These Corsairs were hard at work every day until they broke. To reproduce the
heavily oil streaked look typical of the cowling area I used Atelier impasto artist
acrylic black thinned with water on the end of a paint brush. While still wet, the thinned
paint was either air blasted air with an airbrush along the fuselage from the cowling area
back or by dipping the paint loaded brush unto the fuselage, then blasting air at the
paint, streaking it in the direction of the air flow.
Not all Corsairs had this oil streaked effect on
them, I guess it would depend on the amount of non-essential maintenance time available in
the war zone. As usual, check your references.
 Next the exhaust streaking. This was first done with the airbrush using matt
black, then added to using black and brown pastels. The streaking on the underside was
done by laying down some artist’s acrylic slightly thinned then streaking it back in
the direction of the airflow with a cotton rag. Next the exhaust streaking. This was first done with the airbrush using matt
black, then added to using black and brown pastels. The streaking on the underside was
done by laying down some artist’s acrylic slightly thinned then streaking it back in
the direction of the airflow with a cotton rag.
Aeromaster gloss varnish was next airbrushed
overall and allowed to dry for 48 hours. This was followed by the decals. Markings came
from Aeromaster decal sheet No.48-256. Defabio’s machine is not shown with kill
markings. I have no reference photo’s showing them on, so I used "artistic
license" and applied them anyway using spares on the decal sheet.
An excellent flat finish was achieved using Aeromaster acrylic. Sand and mud was applied
to the upper wing area where ground crew would have been walking about using pastels, then
sealed with a light coat of matt varnish.
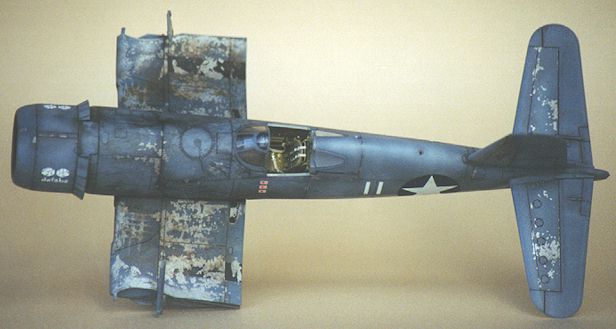
The indicator lights on the
undersurface of the starboard wing were painted-in using Tamiya clear red, yellow and
green. Don’t forget the two formation lights on the upper outer wing, which should be
painted clear blue.
All panel lines were washed with a
thinned mix of burnt umber artists' acrylic. This gives the same effect as using an oil
wash in panel lines but without the smell ! You also have more control and can wash out
any mistakes with water.
The model was a pleasure to build with no great
problems. Be careful fitting the folded wings though, I broke part A9 twice, not something
I usually do. And NEVER be afraid to experiment with weathering effects, if I hadn’t
I would have never achieved the finish I did. Experimenting, sharing and exchanging ideas.
Gaining experience through building is what modelling is all about, don’t you think ?
Happy Modelling
Richard Chafer
-
Osprey Aircraft Of The Aces No.8 - Corsair Aces Of W.W.2. (Defabio’s
machine, page 18)
-
Aerodata International - U.S.Navy carrier fighters of W.W.2.
-
Squadron / Signal Fighting Colours. F4U- Corsair in colour
-
Squadron / Signal F4U Corsair in Action No.145
Model, Text and Photographs Copyright 1998 by Richard Chafer.
Page Created on 22 March, 1998.
Last updated 26 July, 2007.
Back to HyperScale Main Page
Back to Features Page
|
 Home
| What's New |
Features |
Gallery |
Reviews |
Reference |
Forum |
Search
Home
| What's New |
Features |
Gallery |
Reviews |
Reference |
Forum |
Search